
Invoices – Create a sales invoice
Manage billing by setting orders ready, creating, adjusting, and sending invoices, and posting them to accounting with manual or automated steps.
Table of contents
Configuration option (SuperAdmin only)
Autofill booking date on invoice
Improve large-volume invoice processing by automatically setting the booking date on invoices. This reduces manual adjustments and speeds up billing workflows. The configurable default mirrors the Default invoice date, with additional options for full automation.
-
Configuration-based automation (SuperAdmin only) to automatically populate the booking date on invoices during bulk processing.
-
Configuration options include:
- Current date
- First order start date
- Last order end date
- Same as invoice date
-
Bulk invoice creation
- The Booking date field in the creation modal is prefilled according to the configured default.
-
Per-invoice control
- Despite automation, the booking date of each line item remains editable before saving.
-
Credit memos
- The booking date is prefilled based on the configured default, ensuring consistency across related documents.
-
Enable automatic setting of the booking date for large-volume invoice processing, removing the need to adjust each invoice manually.
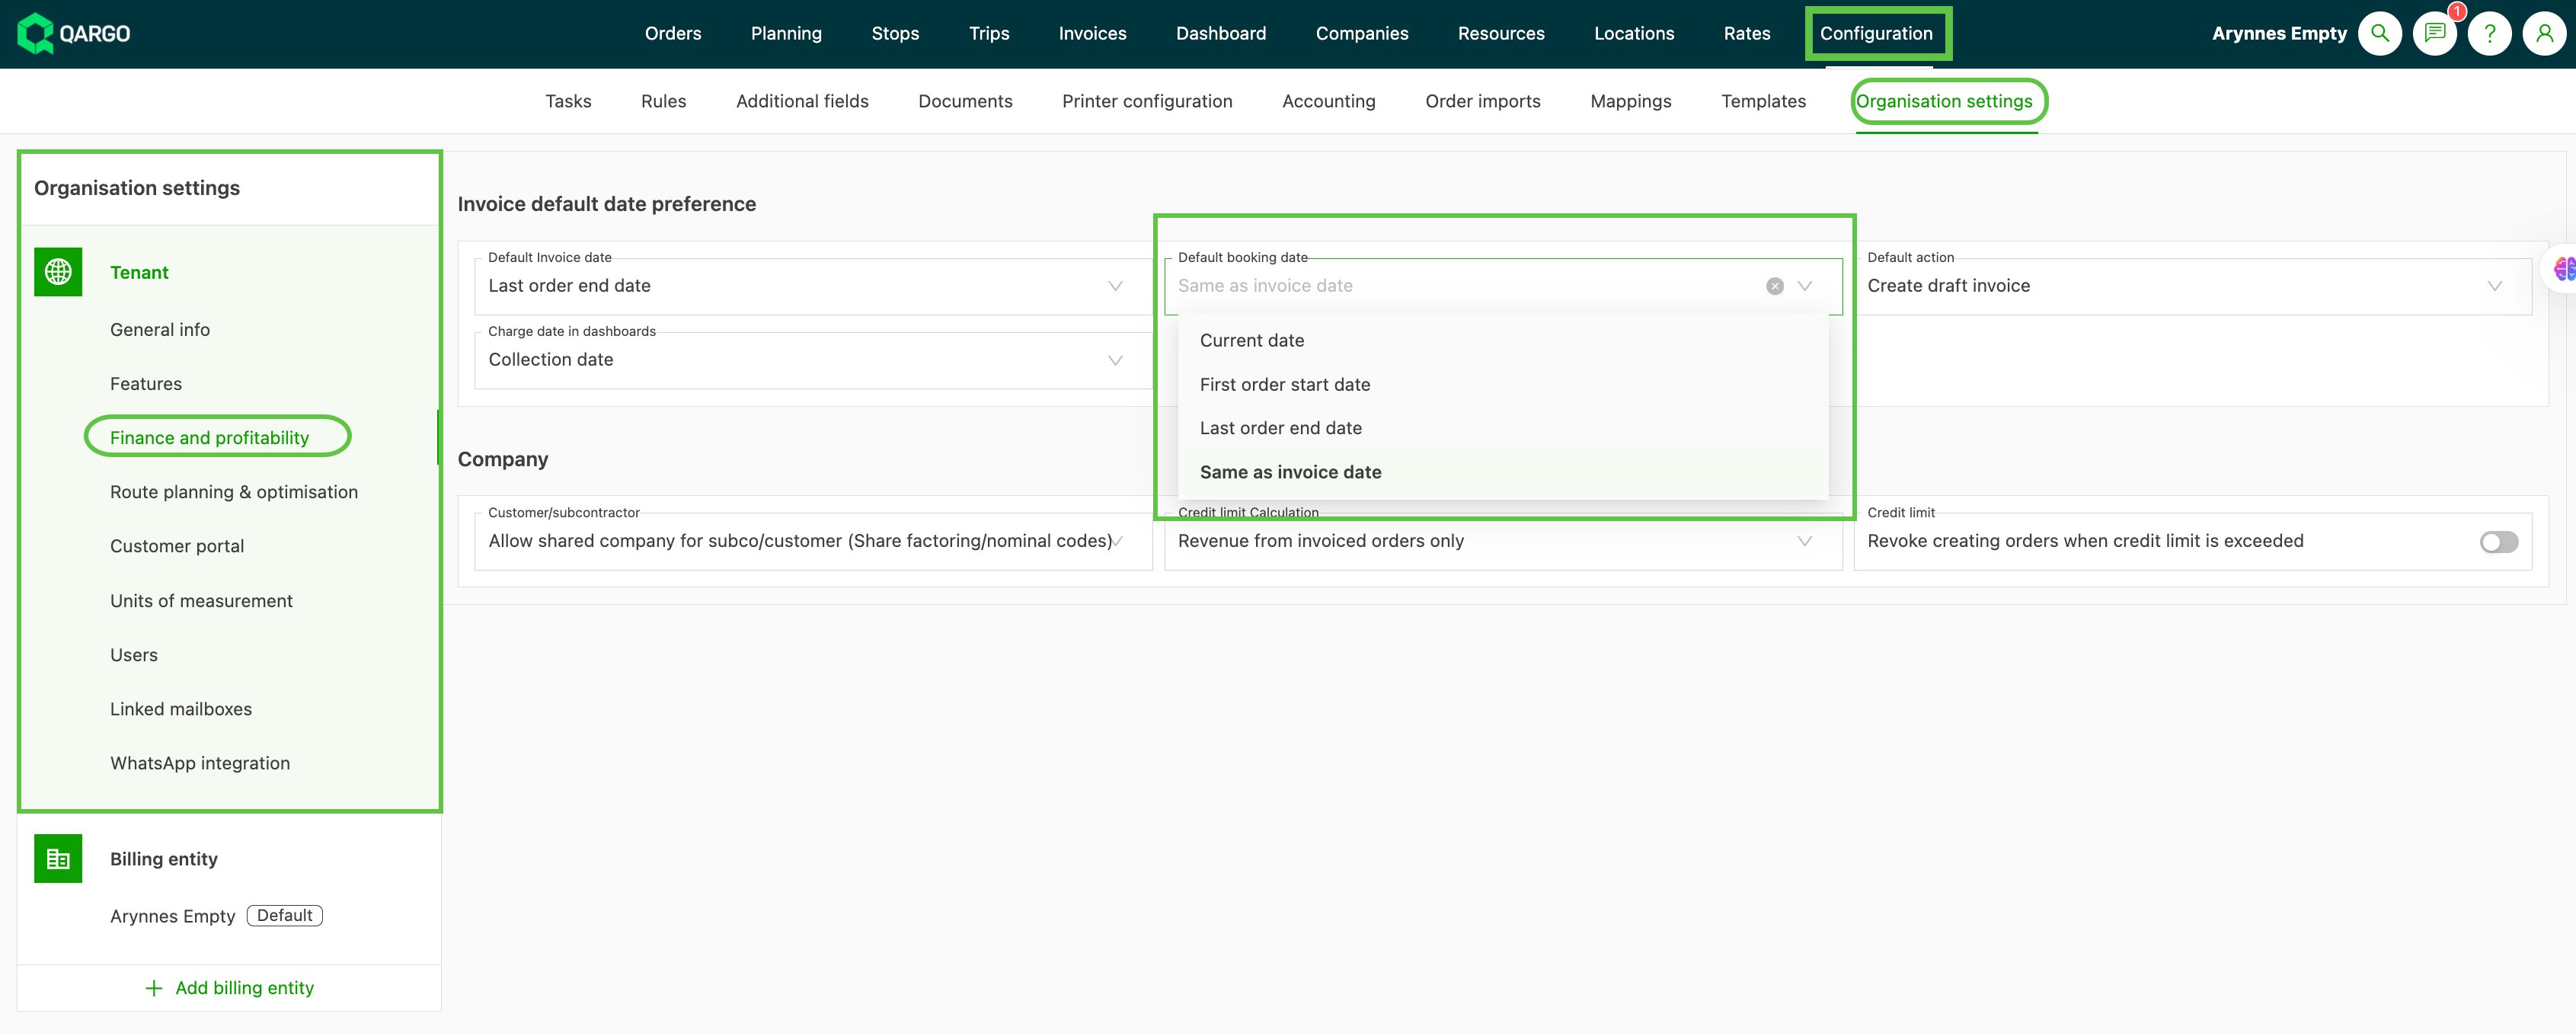
- Navigate to Configuration > Organization settings > Finance and profitability
- The options mirror the default invoice date, plus an additional “Same as invoice date” option.
- Bulk invoice creation: the Booking date field in the modal is prefilled according to the configured default.
- Per invoice: the booking date of each line can still be edited before saving.
- Credit memos: the booking date is prefilled based on the configured default.
Setting orders to Ready to invoice
Identifying orders to invoice
-
Orders can be set to ‘Ready to invoice’ at any point, based on individual business needs. The most typical workflow is to set this status once an order has the status Delivered.
-
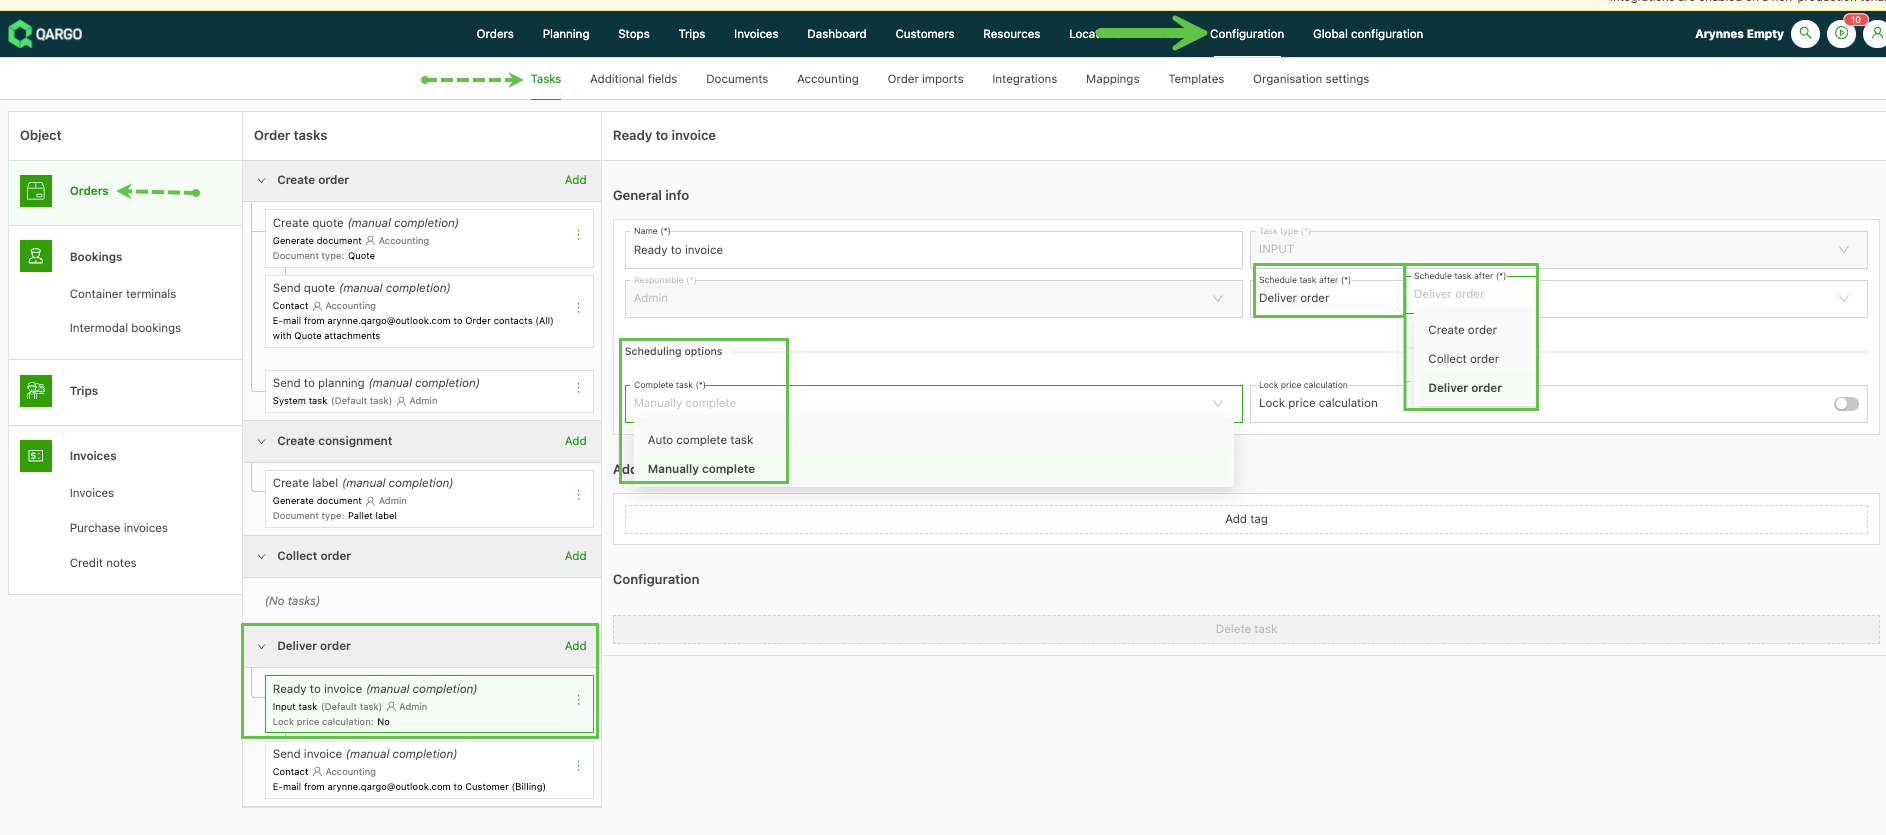
With tasks, this status can be configured as manual or automatic. When it is set to automatic, the ‘Schedule after’ event determines when the status is updated automatically. The status can still be set manually before the event selected in the configuration.
-
If the status is configured to update automatically after ‘Deliver order’, the order status automatically moves from ‘Delivered’ to ‘Ready to invoice’. The order then becomes available in the Invoices module for further auditing.
-
If the update is set to manual, a user must update the task manually once the order has the status ‘Delivered’ to set the status to ‘Ready to invoice’.
-
Tasks configured as automatic or manual can affect current and future orders differently. Orders created before changes to the task settings keep their original configuration, which may lead to differences in behavior.
When the status is updated manually, start by determining which orders need to be updated. From the Orders menu:
-
Use the default tab views, for example ‘Delivered’, or ‘All’ if the status does not have to be Delivered.
-
Use ‘Edit columns’ to show or hide data columns.
-
Create a custom ‘+View’ and use column filtering to select what to show in the view.

Column filtering options
- Consolidate orders on a single screen, making them easy to audit for billing.
- Customize the view based on specific criteria such as customer names, dates or any other relevant parameters to invoice the related orders.
The example below shows a custom view for ‘Invoice audit’. The column headers are filtered on customer, order operations status (delivered), order status not set to ‘Invoiced’, and the task ‘Ready to invoice’.
This shows all outstanding orders for the specific customer that need to be audited and set ready to invoice on a single screen.
Marking orders ready to invoice
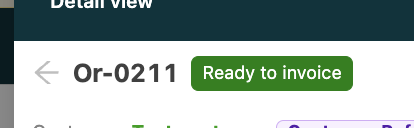
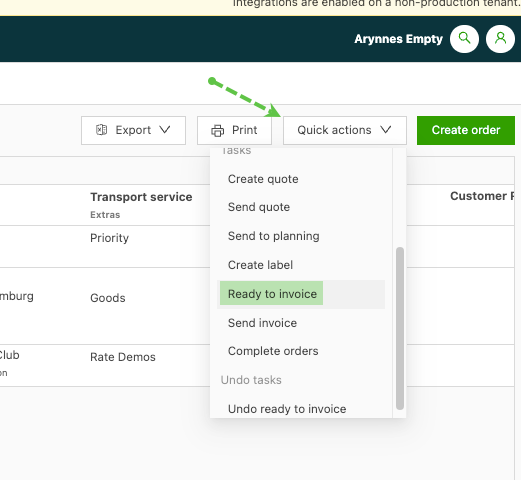
- For orders to move into the Invoices module, the status must be ‘Ready to invoice’. Orders can be updated individually or in bulk with the ‘Quick actions’ function.
- Mark individual orders as ‘Ready to invoice’ in the order list view or on the order details page.
-
To select multiple orders, click Quick actions and select ‘Ready to invoice’.
-
Confirm the selection by checking the box for the chosen orders.
-
Click the green ‘Complete’ button at the bottom of the screen.
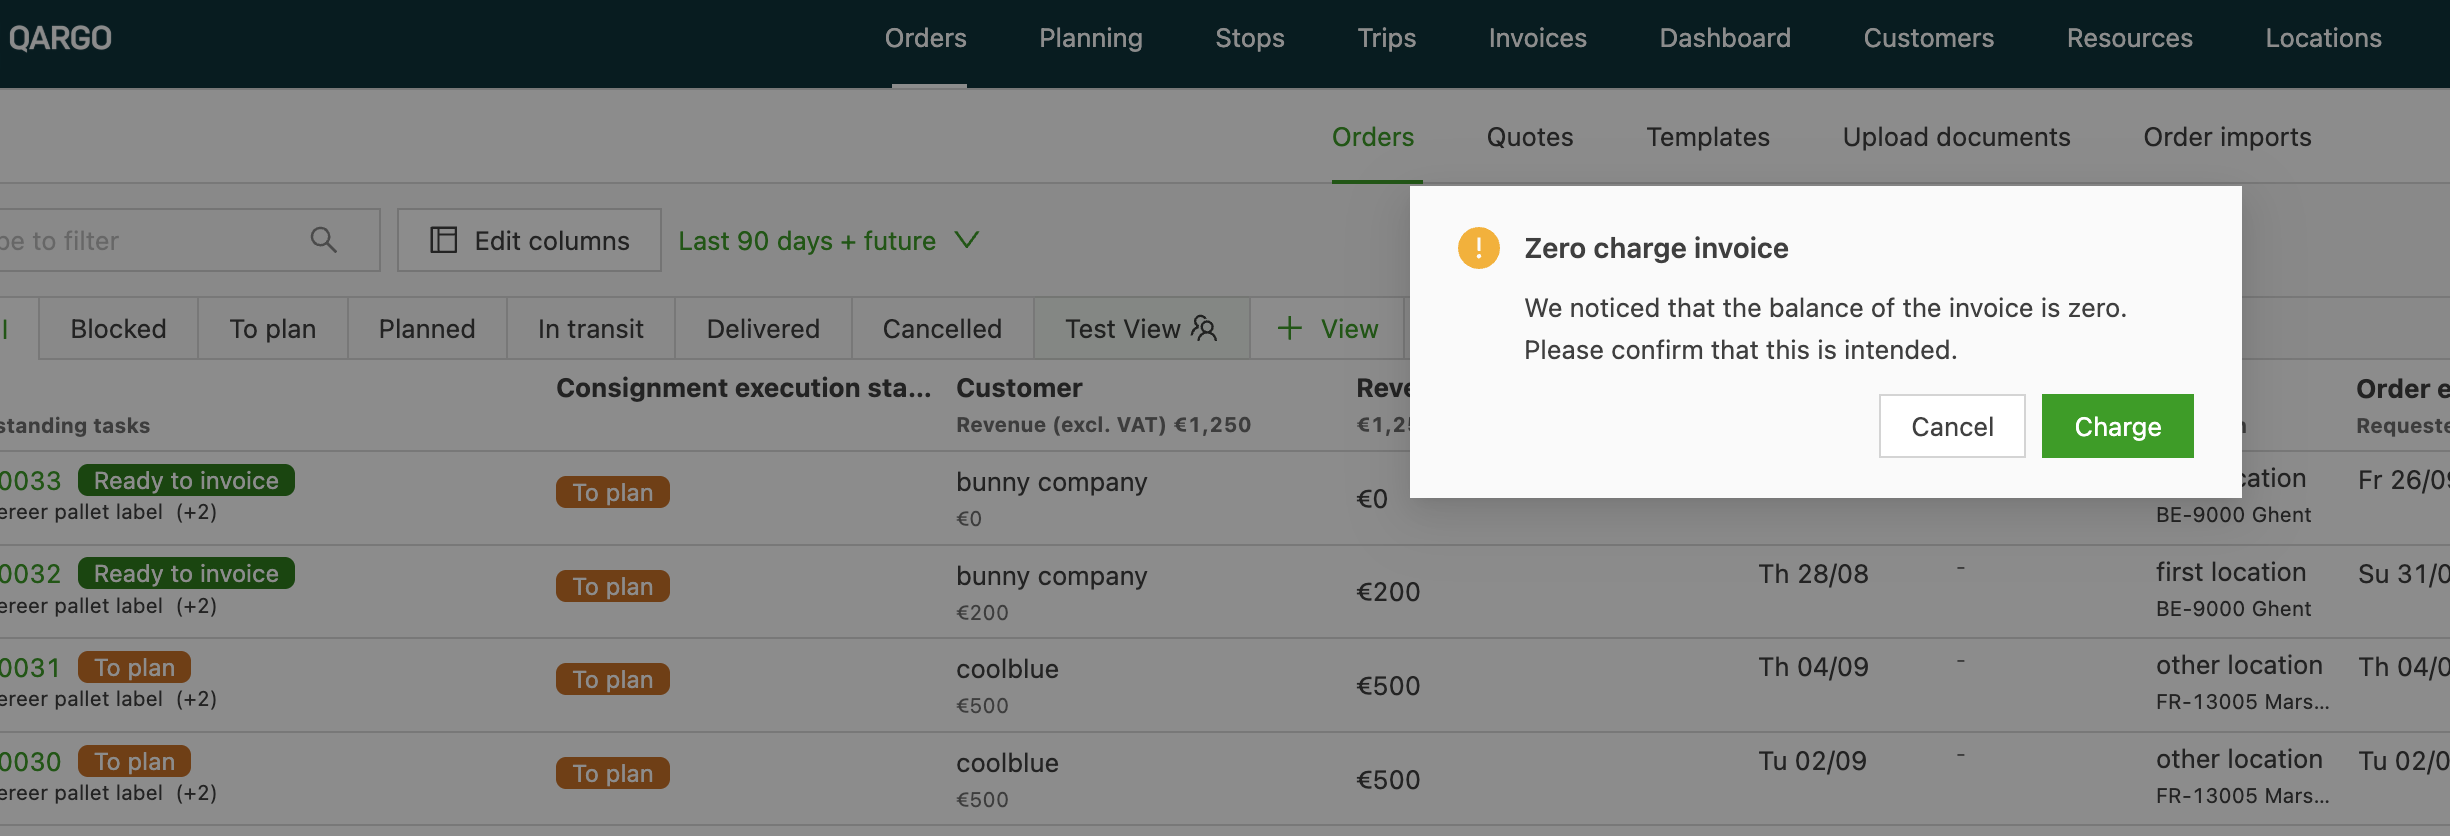
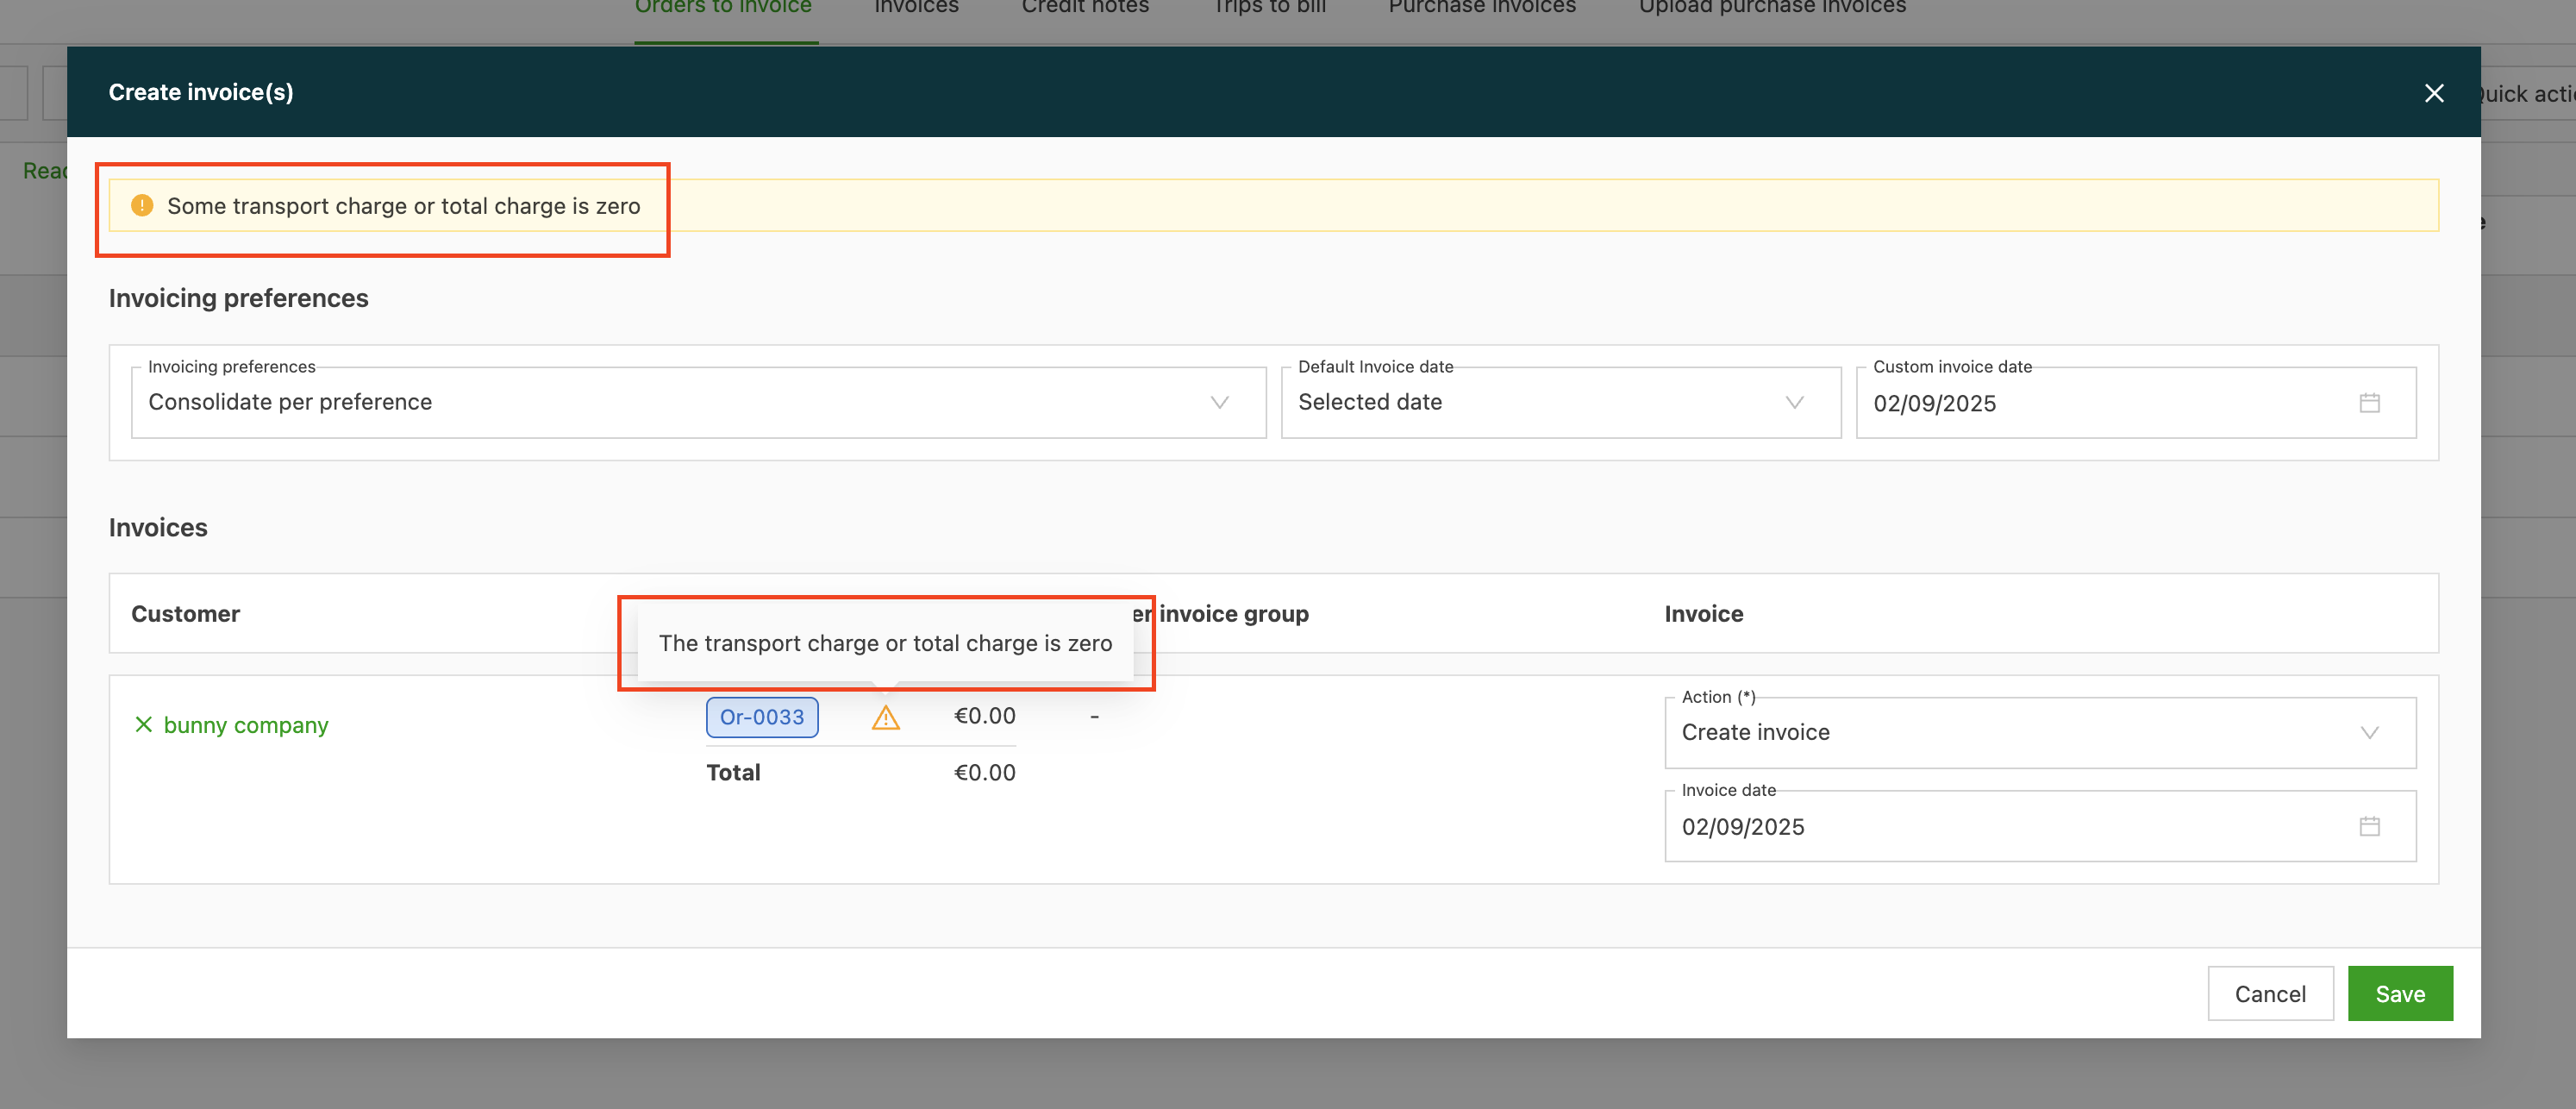
To prevent invoicing errors, Qargo now displays a warning if the transport charge of an order is zero. This new safeguard appears when an order is set to Ready to invoice or when invoices are created in bulk.
Create invoice
Use a default invoice action to set the action once and apply it to all invoices in the batch. Super Admin users can configure a preferred default (such as Create draft invoice), which is prefilled automatically. This reduces repetitive manual changes and streamlines invoice creation for finance and back-office users.
Once orders have been audited and all the necessary benchmarks for billing have been met (order status, received documents, etc.), and the status has been updated to ‘Ready to invoice’, the order moves into the Invoices module. Invoices are created and processed there.
-
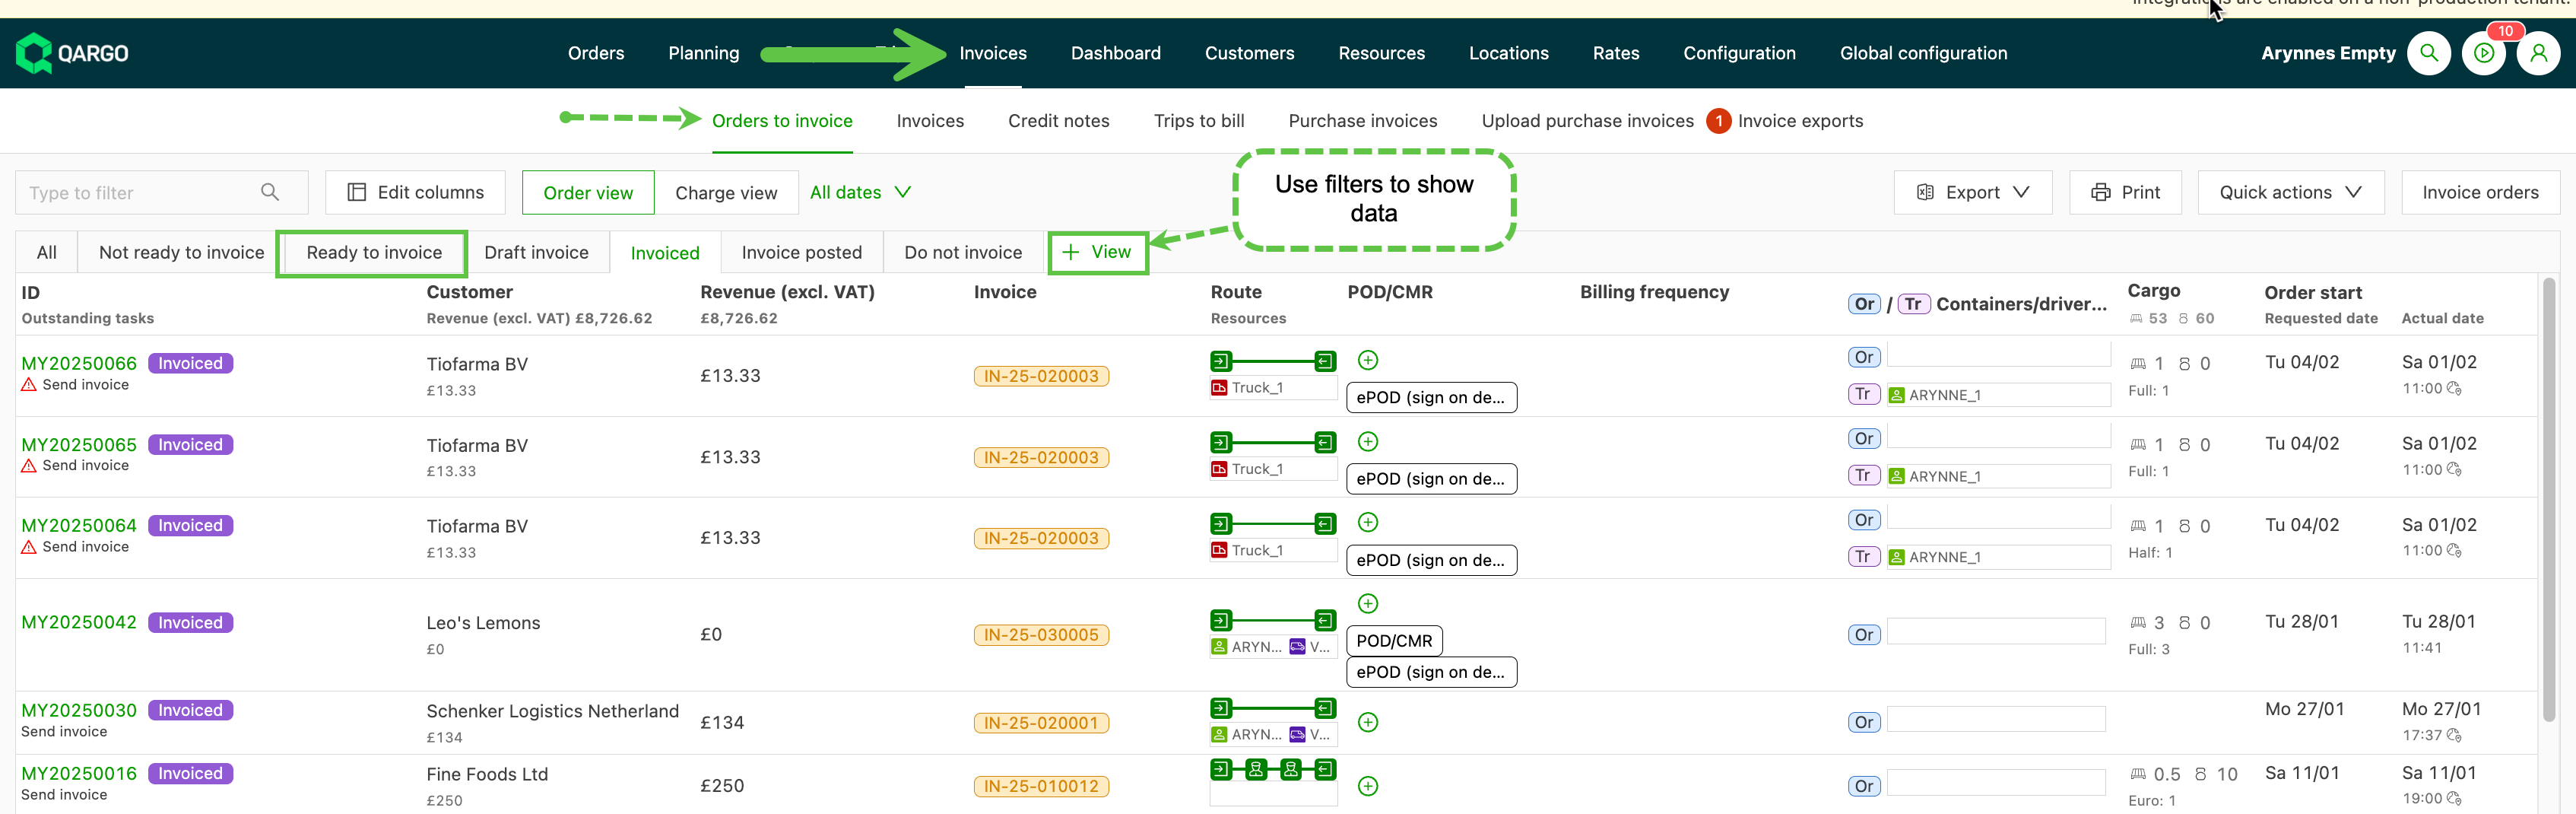
Navigate to Invoices and select ‘Orders to invoice’. All orders are available here and fall into one of the default tabs (Not ready to invoice / Ready to invoice / Draft invoice, etc.). Click the link below to learn how to get the most out of the available views to best suit business processes.
-
Select orders with the status ‘Ready to invoice’. They can be selected from the default tab or from a custom view, based on user preference.
Creating an invoice
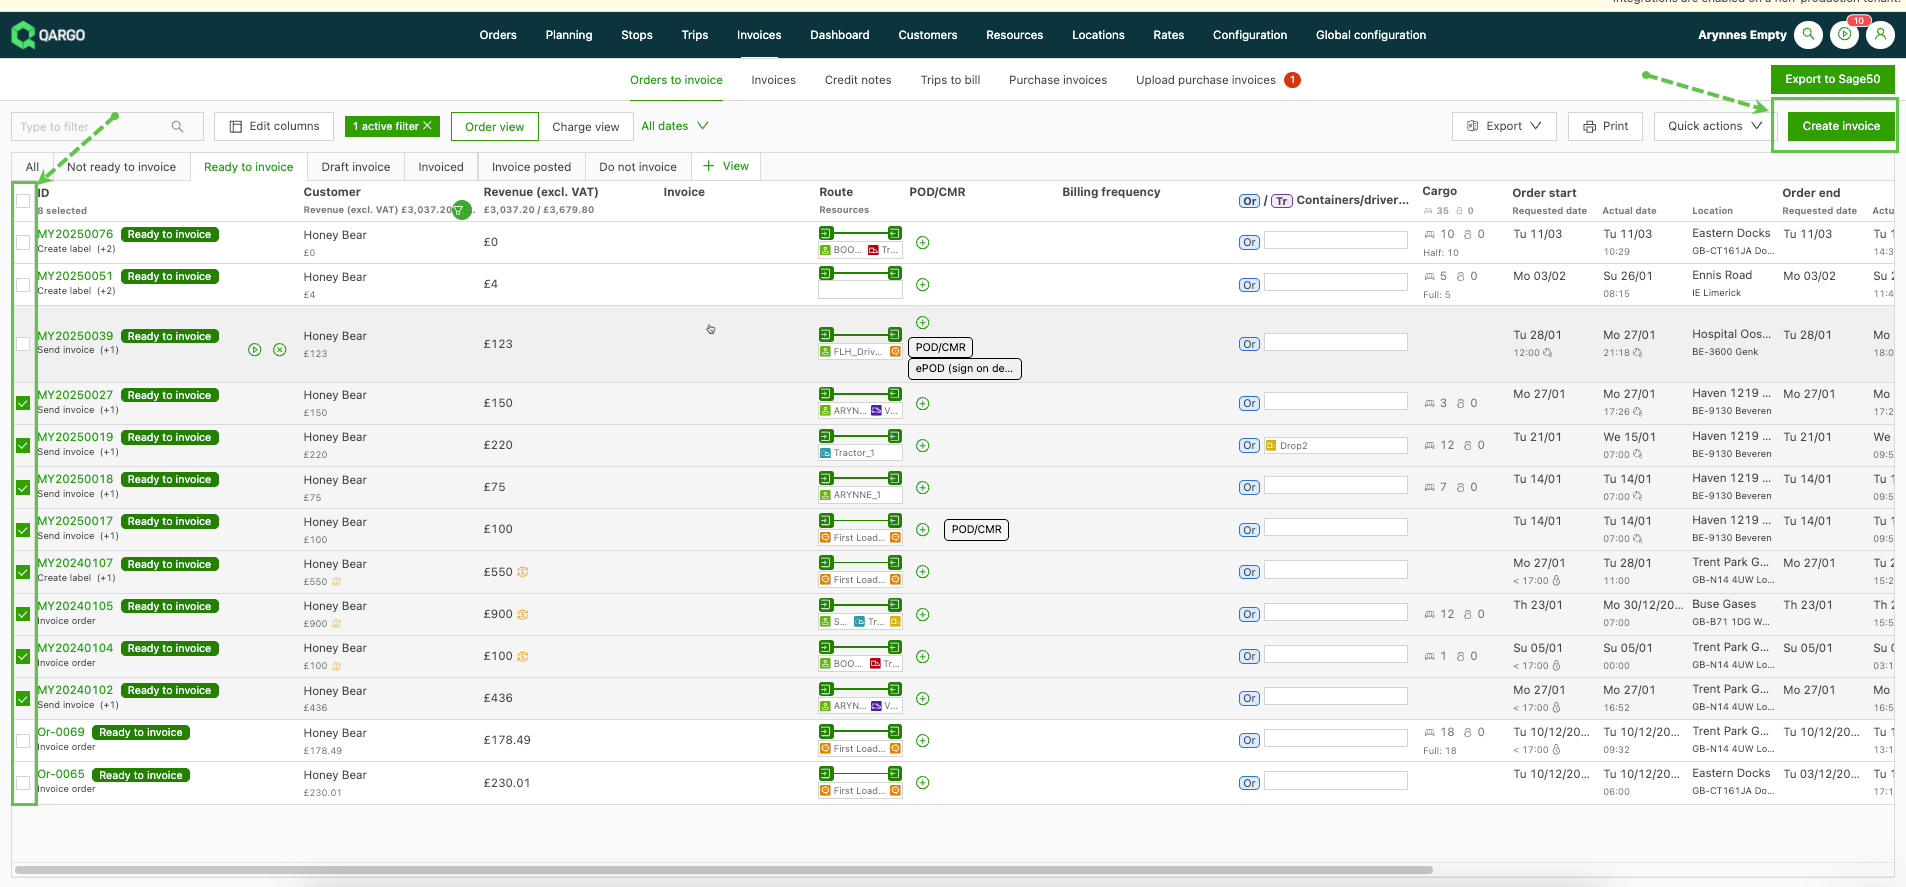
- Choose one or more orders and click ‘Create invoice’.
- Set the preferences by selecting consolidation options or creating separate invoices for each order.
-
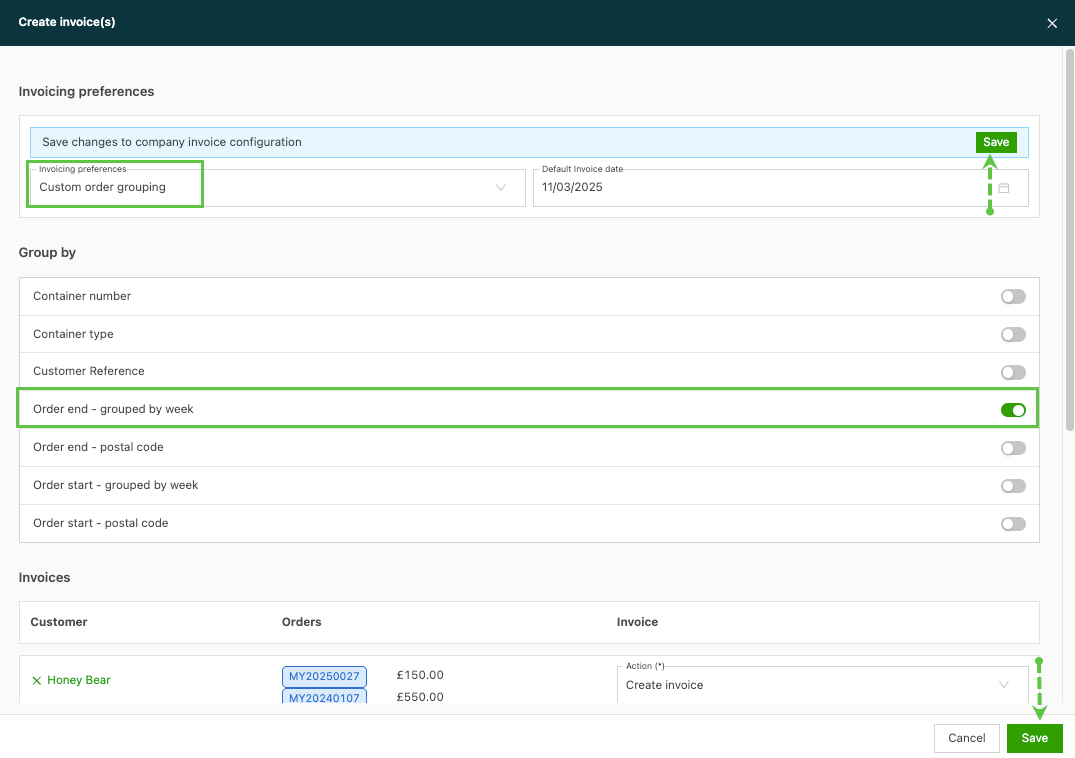
To consolidate orders on one invoice based on a set of criteria, use the ‘Custom order grouping’ preference and turn the preferred option on or off.
-
Click Save to confirm the option and generate the invoice.
-
Other invoice preferences include adjusting the number of orders that can be included in the invoice and creating separate invoices per order.
-
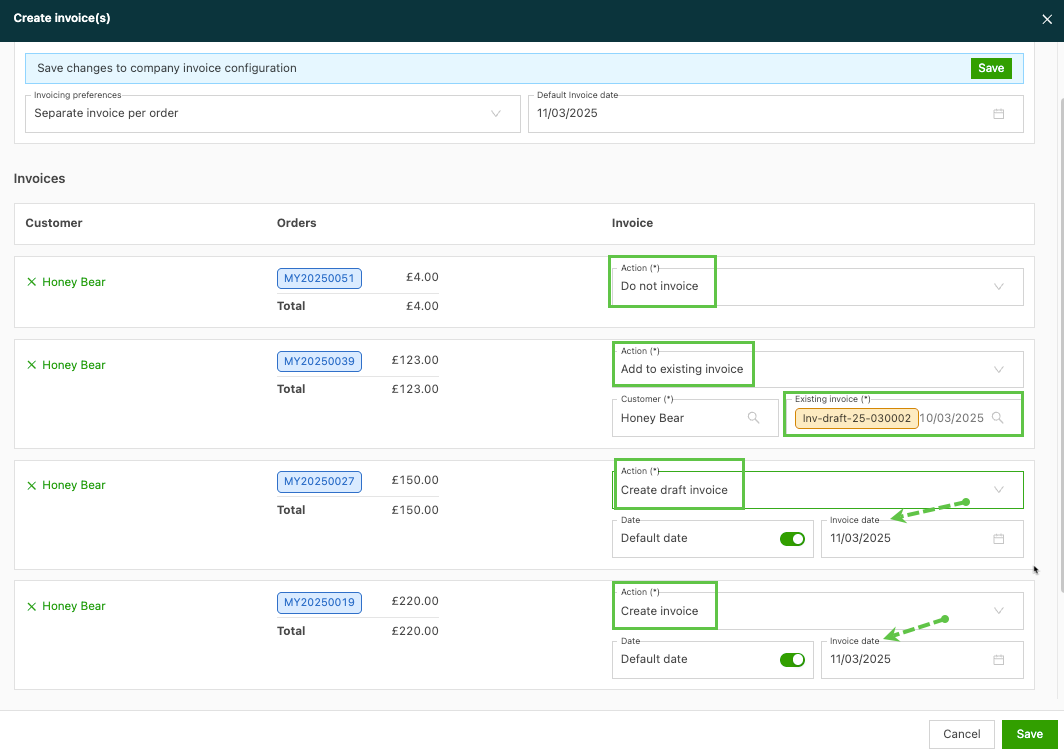
Select the action for each line, depending on what needs to happen with these orders.
-
Do not invoice: Sets the revenue value to 0 and updates the status to Do not invoice. The order then shows in the ‘Do not invoice’ tab.
-
Add to existing invoice: Invoices that match the bill-to customer are shown in the ‘Existing invoice’ field. If there are multiple invoices, including draft invoices, all of them are shown. It is not possible to add to an invoice that is already posted.
-
Create draft invoice: Creates a draft invoice with a unique draft invoice number. The invoice can be sent to the customer for approval if necessary. Changes and additions can be made to the invoice.
Click here to learn more about draft invoices. -
Create invoice: Creates the standard invoice with a unique invoice number that can be sent to the customer. This is the invoice the customer pays, and the one that is transferred or imported to the accounting software.
-
To prevent invoicing errors, Qargo now displays a warning when an invoice that contains a transport charge of zero is about to be created.
Select the date of the invoice
-
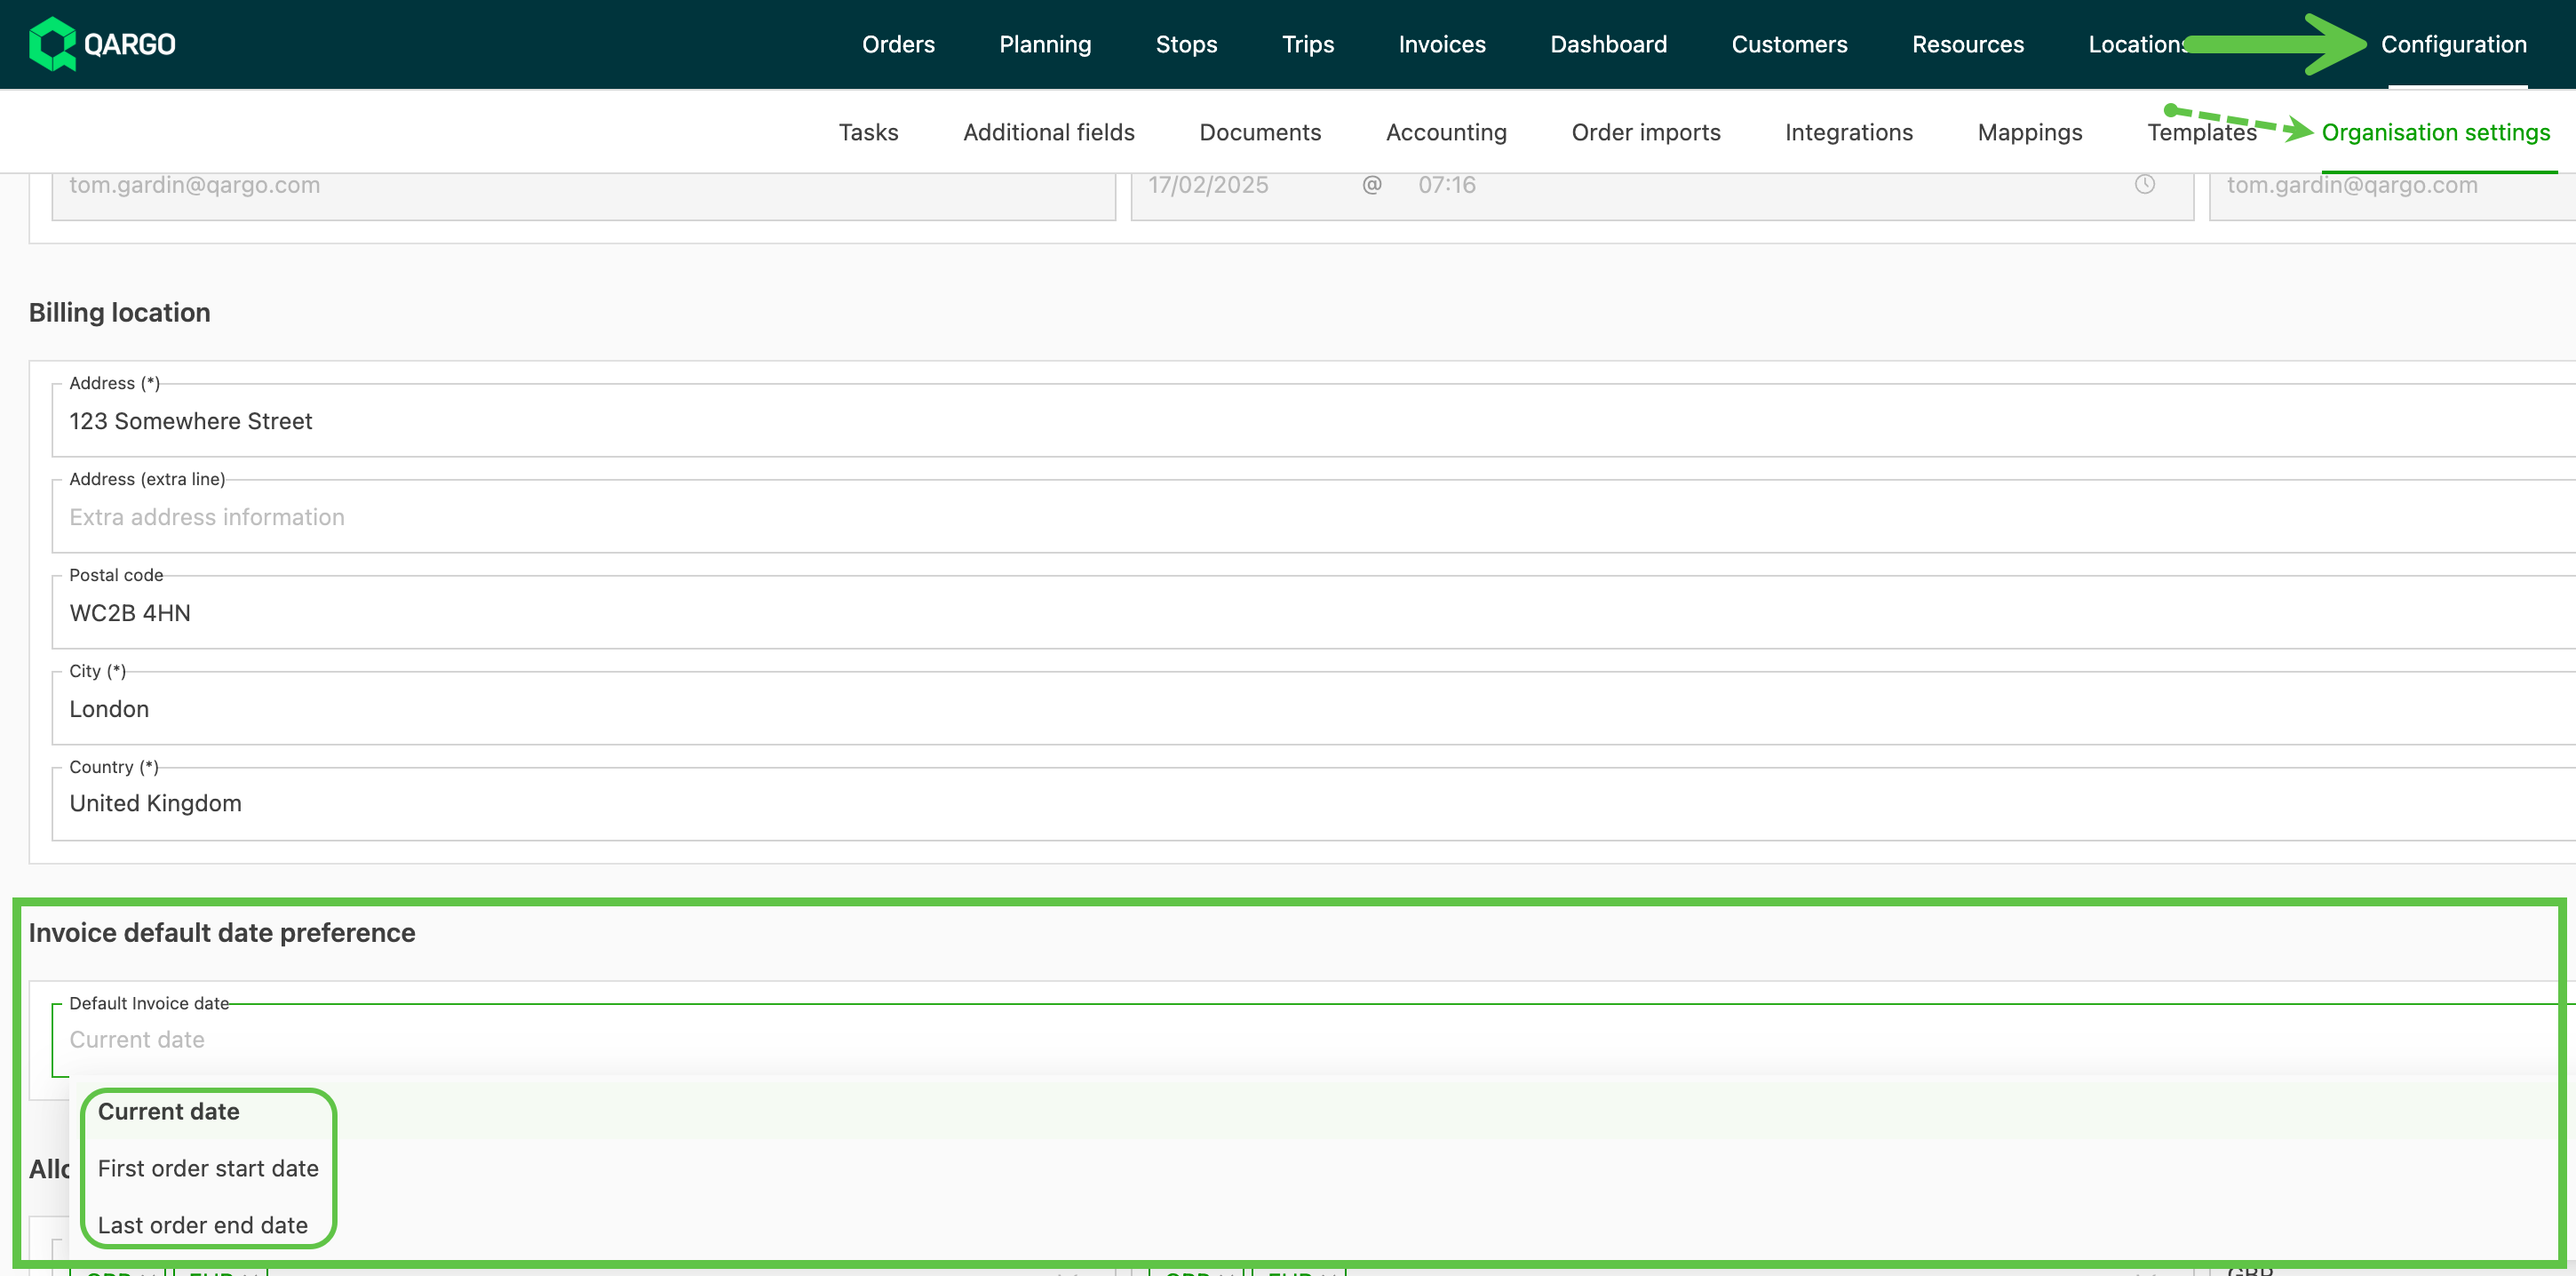
Choose from three different options for setting the default invoice date, to match different ways of working:
- Current date: As before, uses today’s date as the invoice date.
- First pickup date: Automatically uses the first requested start date of all orders on the invoice.
- Last delivery date: Automatically uses the last requested end date of all orders on the invoice.
How it works
- Set the preferred default invoice date at tenant level under organization settings.
-
Once configured, this preference applies automatically when:
- Creating single-order invoices (for example using the requested start date of the order).
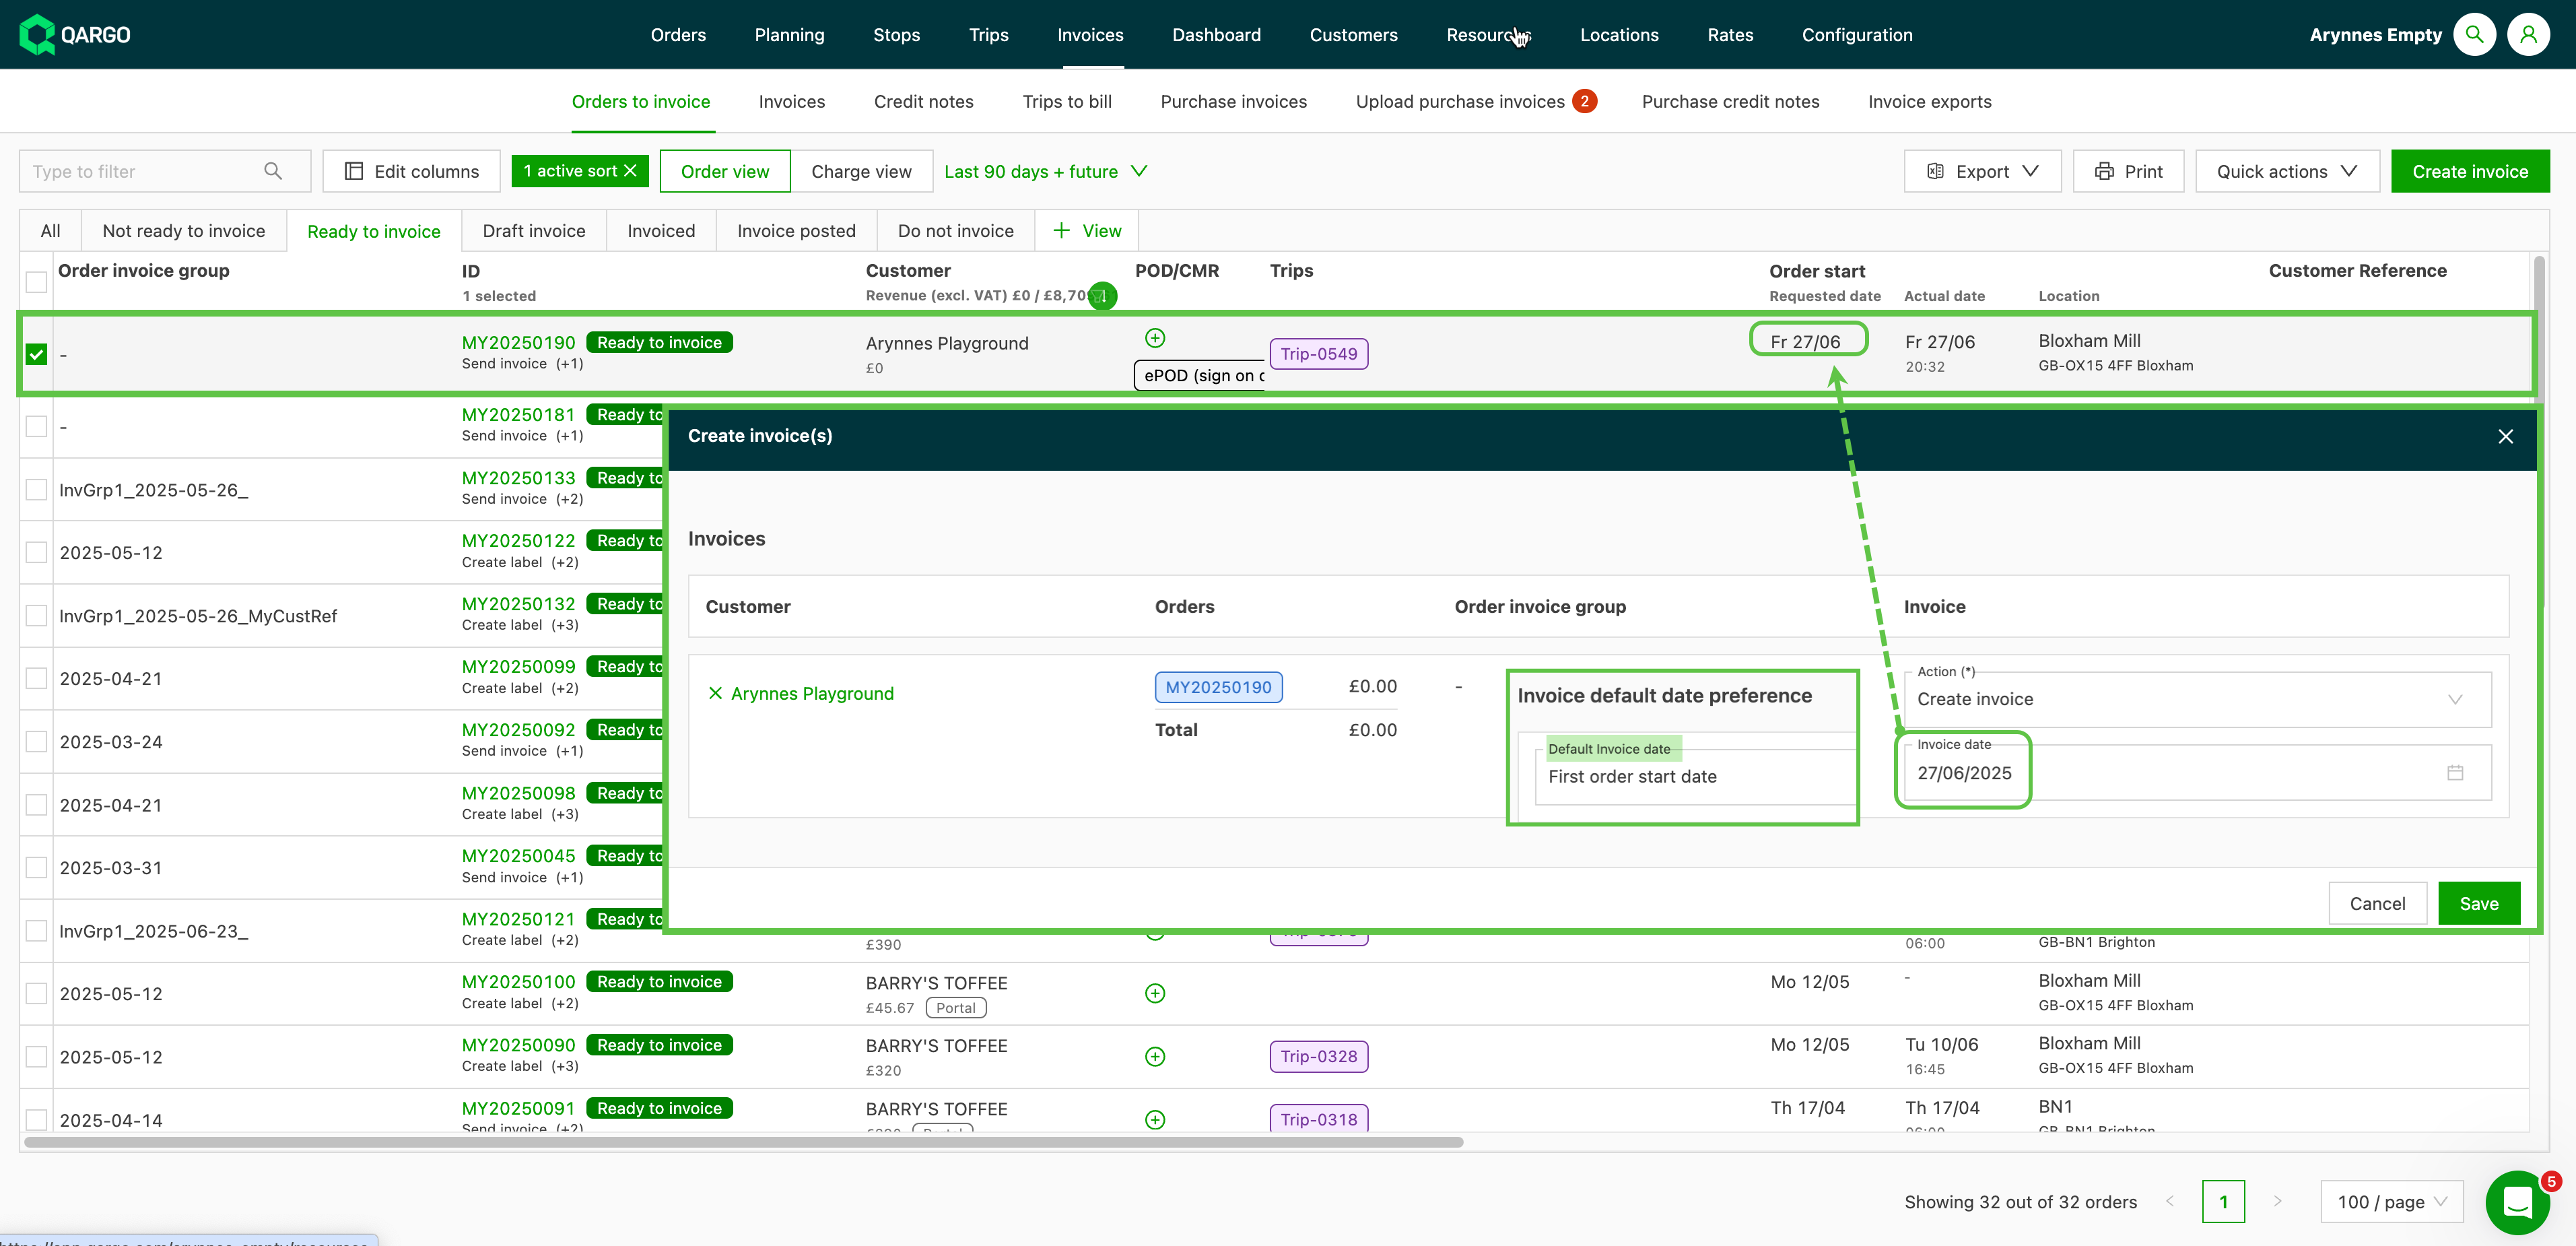
-
Creating bulk invoices, where the system uses the configured default but also allows a manual override.
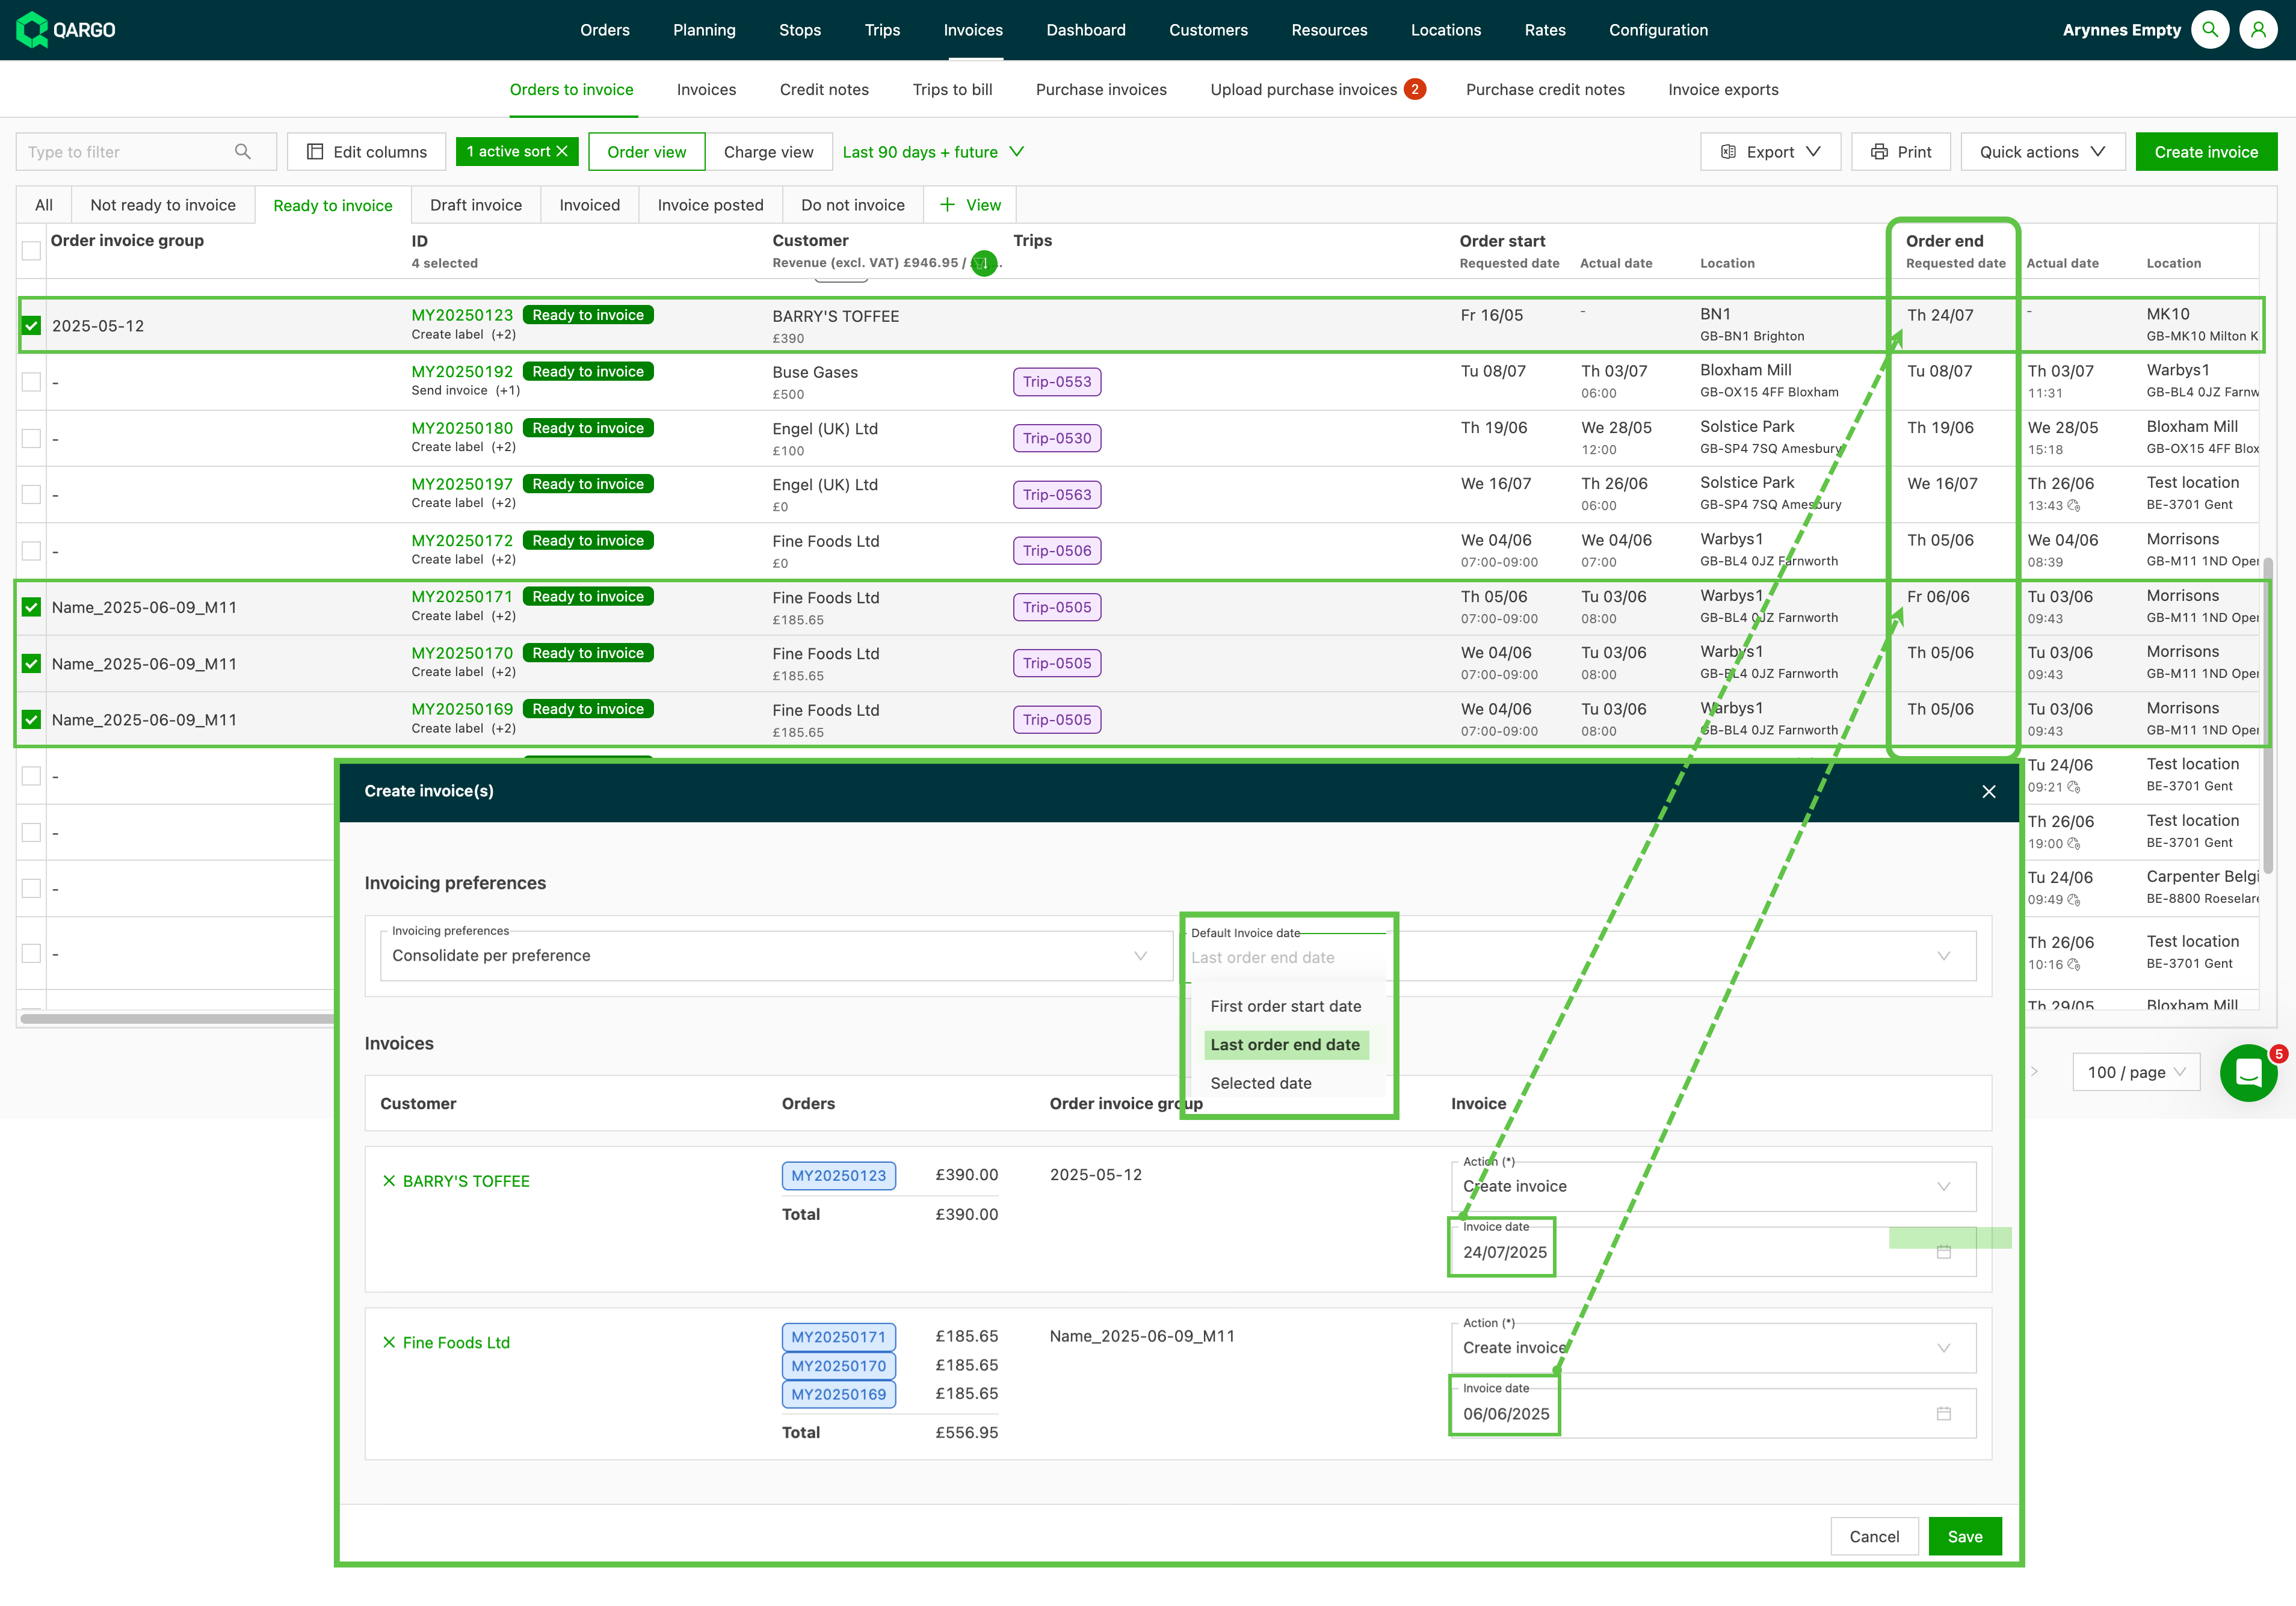
- This date determines the due date, based on the customer’s payment terms (i.e., 15 days, 60 days, etc.).
Adjusting invoices
Once an invoice or draft invoice has been created, it can be found under Invoices.
-
There are default tab views based on the invoice status (draft invoice, invoiced, invoice posted, canceled), as well as an All tab.
-
Column filters can also help to create a detailed view of the data.
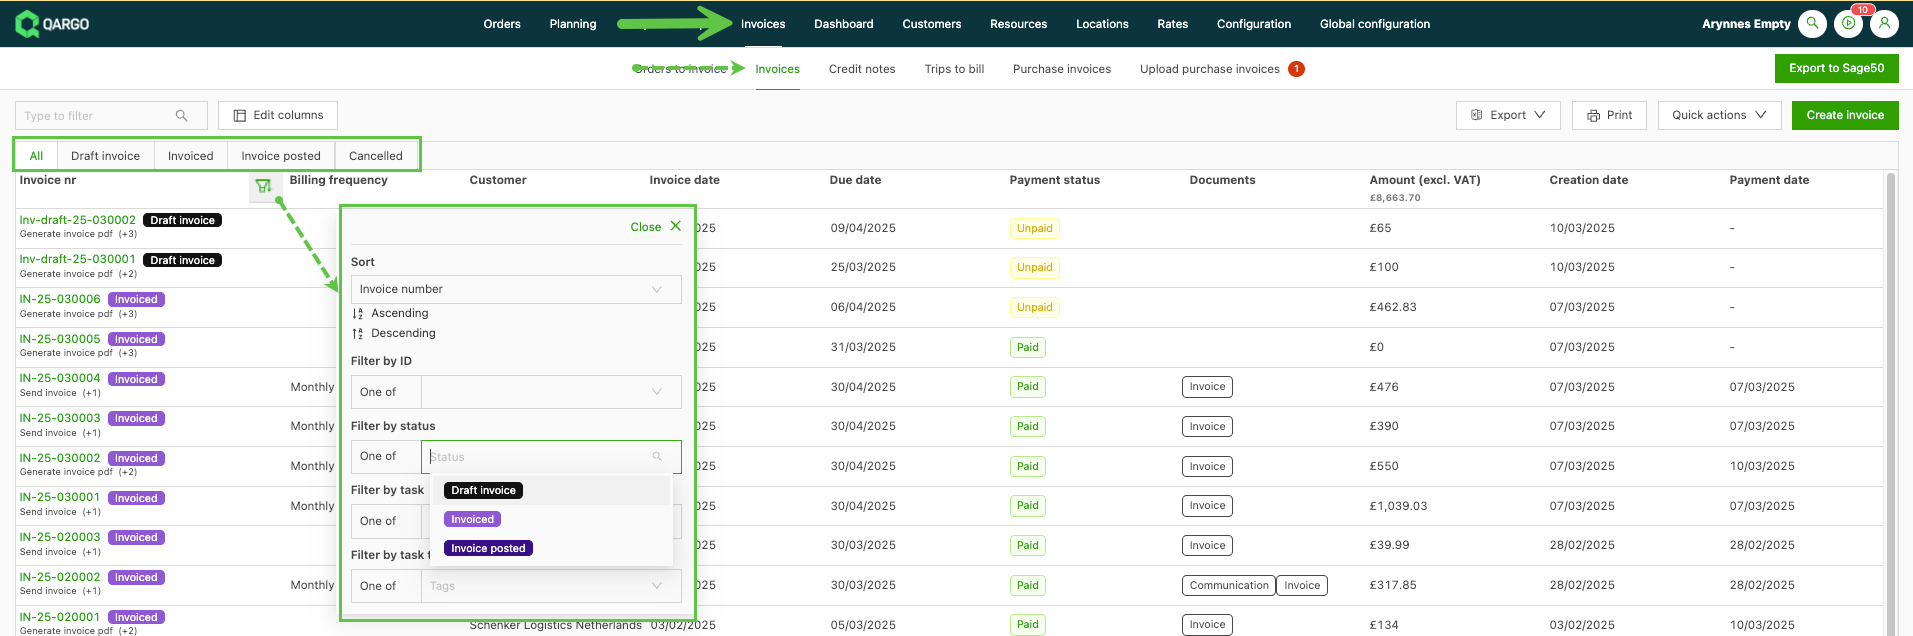
Click the invoice ID to open the invoice page and make adjustments.
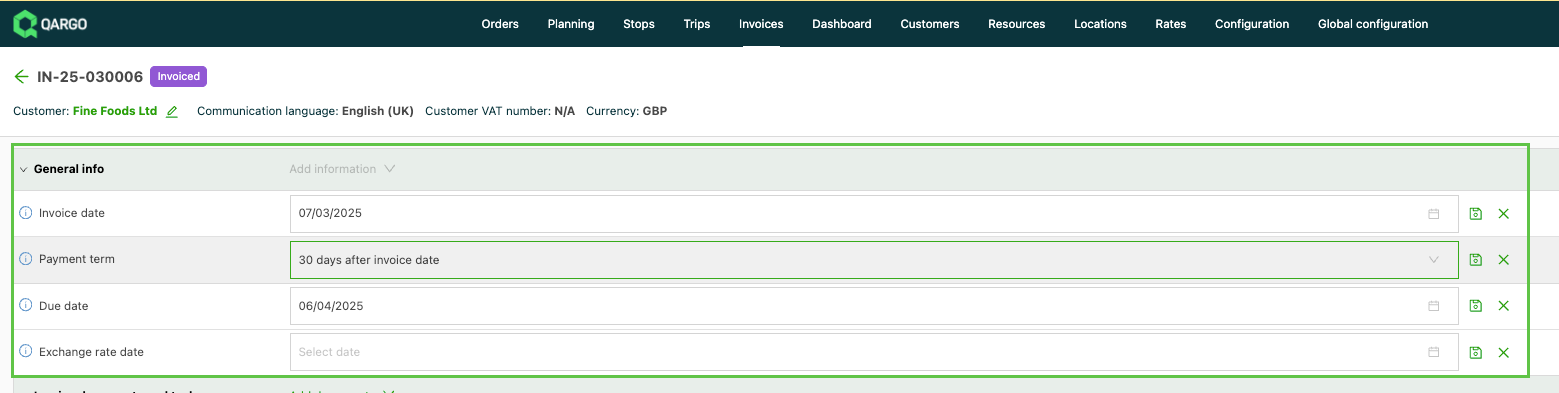
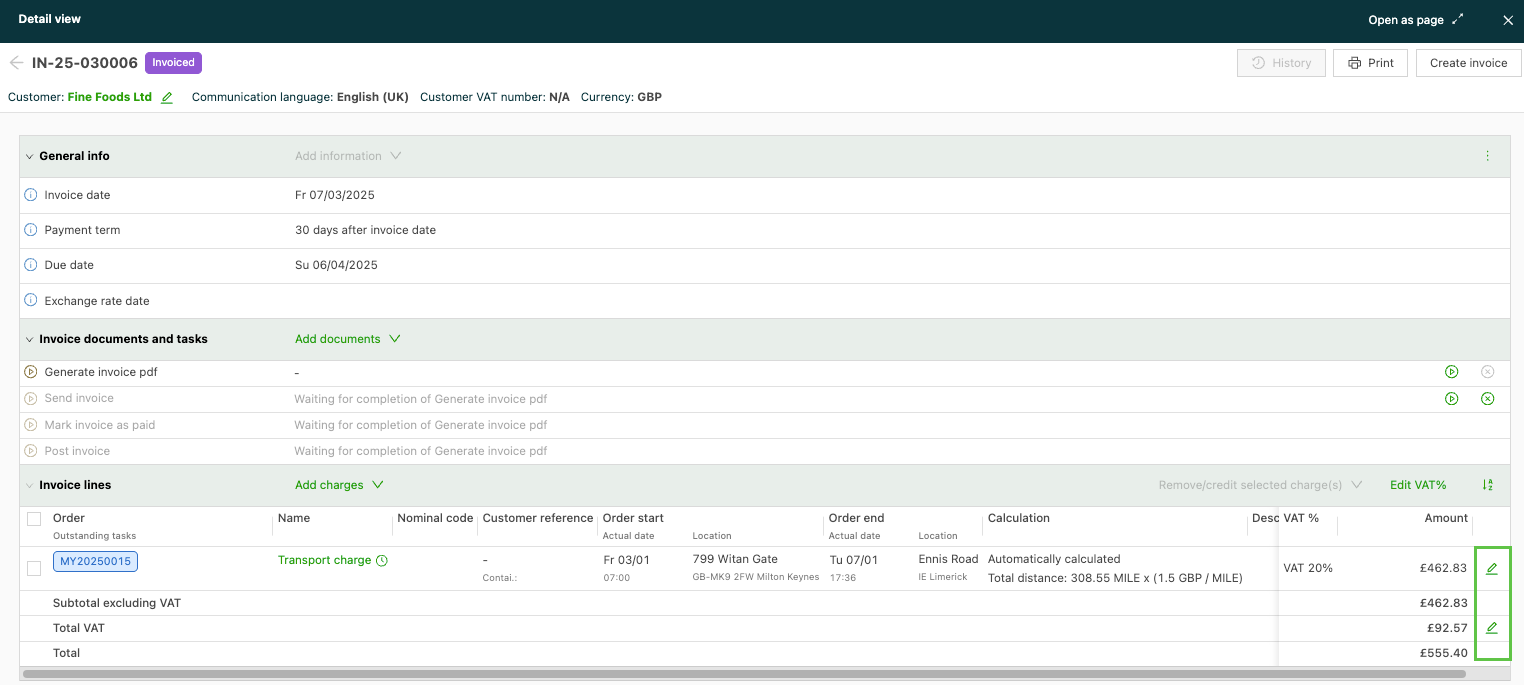
- General info: Dates can be updated directly by clicking in the row. Payment terms shows a drop-down menu of available options. Click the Save icon to update.
- Invoice documents and tasks: Add any additional documents that might be required for billing purposes. The tasks for processing the invoice (generate / send / post) are listed here.

-
Invoice lines:
-
Click ‘Add charges’ to add any charges that might be missing from the invoice.
- Add charge from order shows charges based on other orders for the same customer.
- Standalone charge uses the standard charge types available in the various price lists.
-
Use ‘Remove/credit selected charges’ to update a specific charge (or all charges): check the box next to the line item, then select the required action.
- Remove from invoice sets the charge status back to ‘To invoice’ or ‘Do not invoice’.
- Move to existing invoice shows a list of available invoices for the same customer that the charge can be moved to.
- Move charges to new invoice removes the charge and creates a new invoice that shows this charge.
- Create credit memo creates a credit memo (CM) with a unique number that shows the charge as a negative value. The existing invoice shows the CM number as a label next to the negative amount. This is typically used when the invoice is posted and adjustments are required.
-
Select ‘Edit tax %’ to change the tax rate on the invoice. A drop-down menu shows the available options.
-

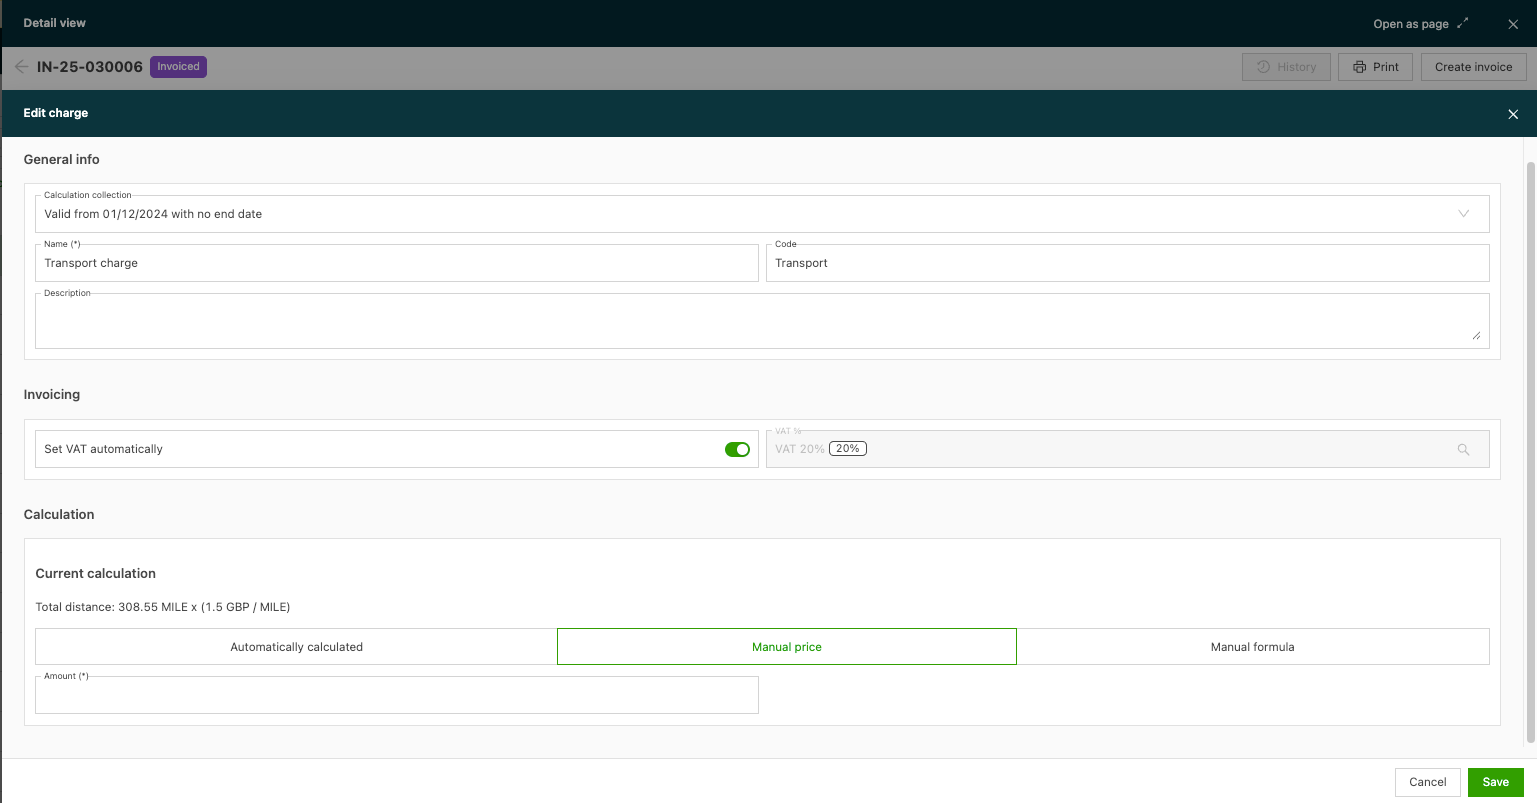
- Edit the charge data or add descriptions with the “pen” icon.
Generating invoice PDFs
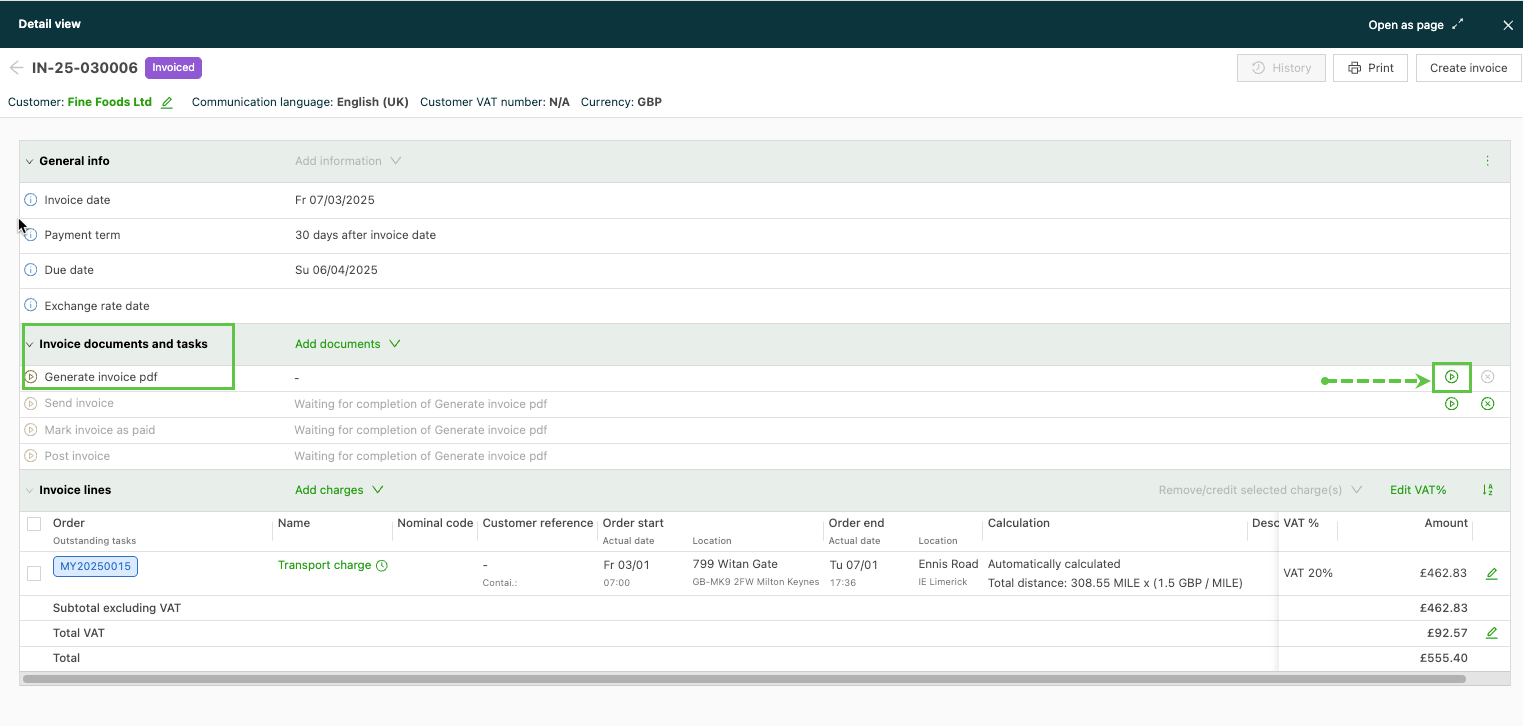
Verify that the invoice details are correctly registered on the invoice page.
Click the play button on the right side of the task line:
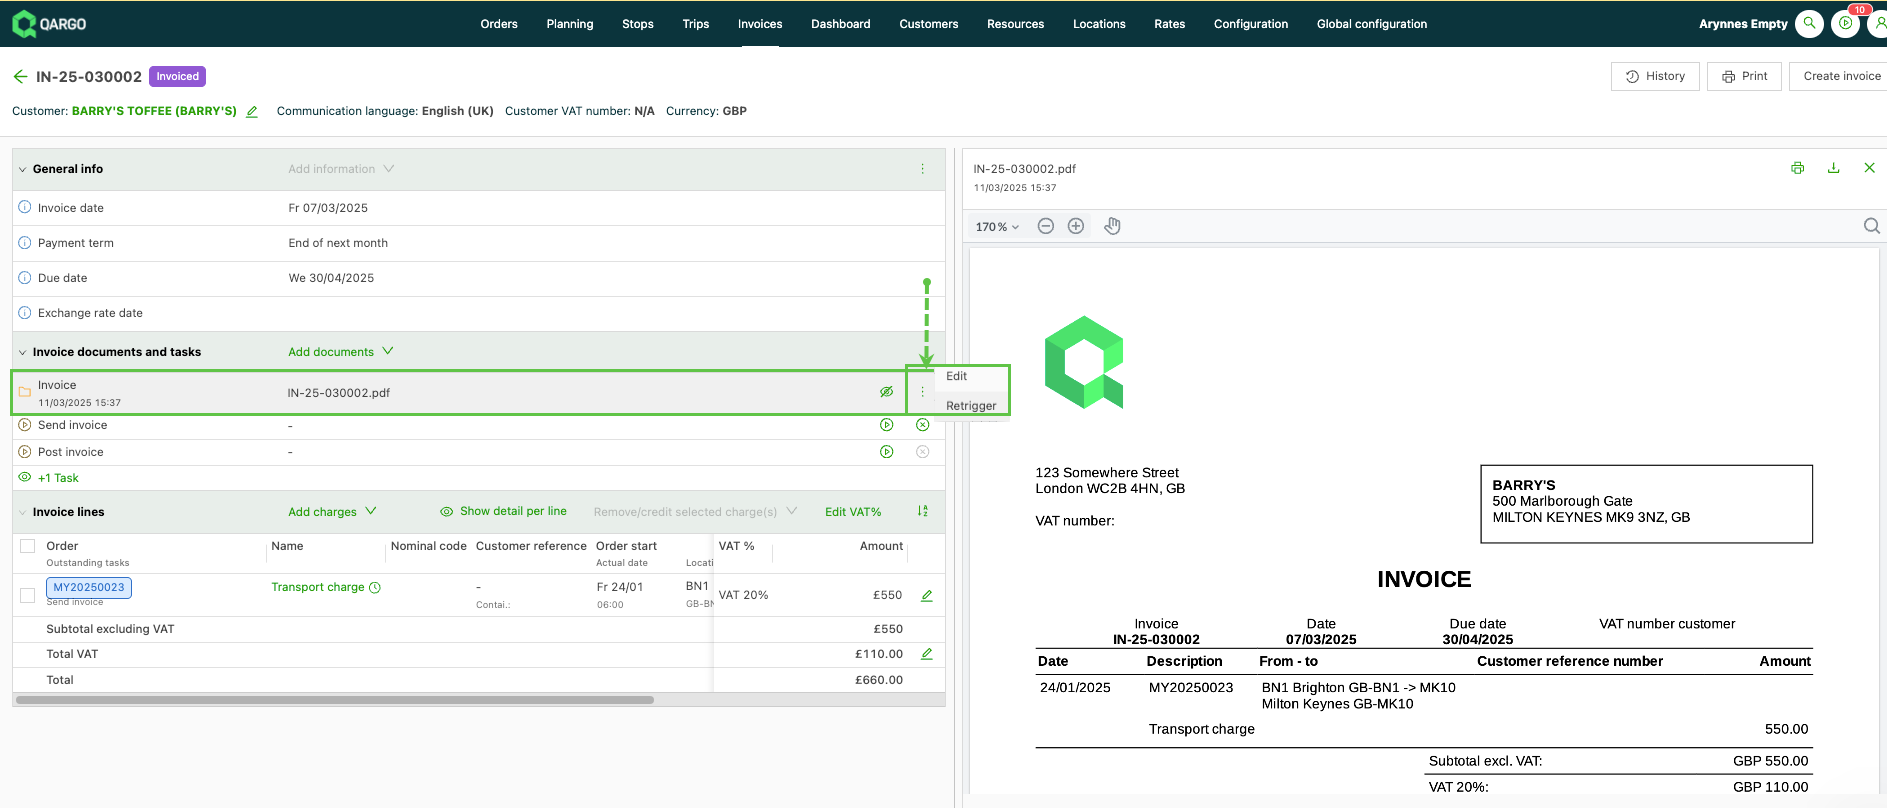
Once the invoice has been generated, the PDF preview is also visible for any final checks on the invoice.
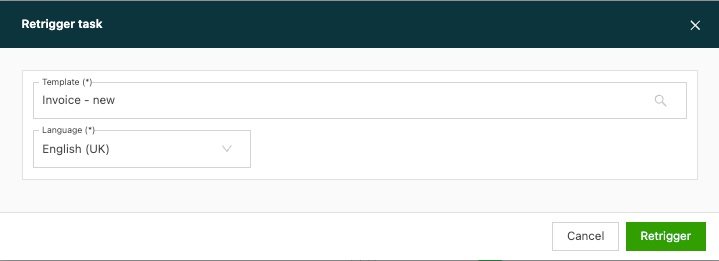
- If any changes are made to the invoice (e.g., adjusting the date or removing/adding an order), the PDF must be regenerated to show the changes.
- Click the three dots next to the task and click ‘Retrigger’.
Print documents from invoice detail
Documents can be printed directly from the invoice detail page. If the Print option is selected before the invoice has been generated, the print preview displays any associated documents selected for printing. Once the invoice has been generated, it also shows in the print preview.
Sending invoices to customers
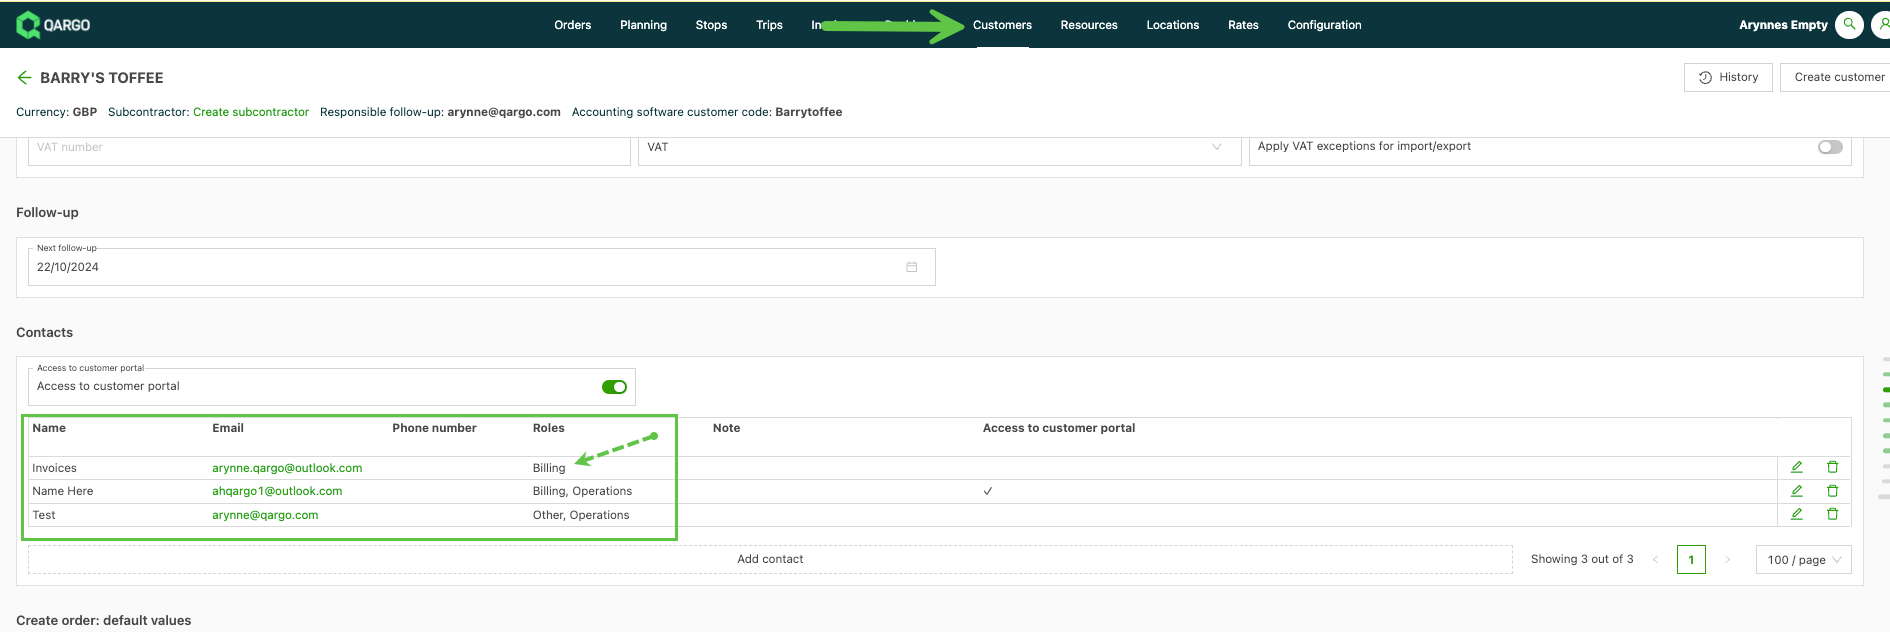
Once the invoice has been generated (Generate PDF), the ‘Send invoice’ option becomes available. To send the invoice, the customer profile must have a contact with the Billing role.
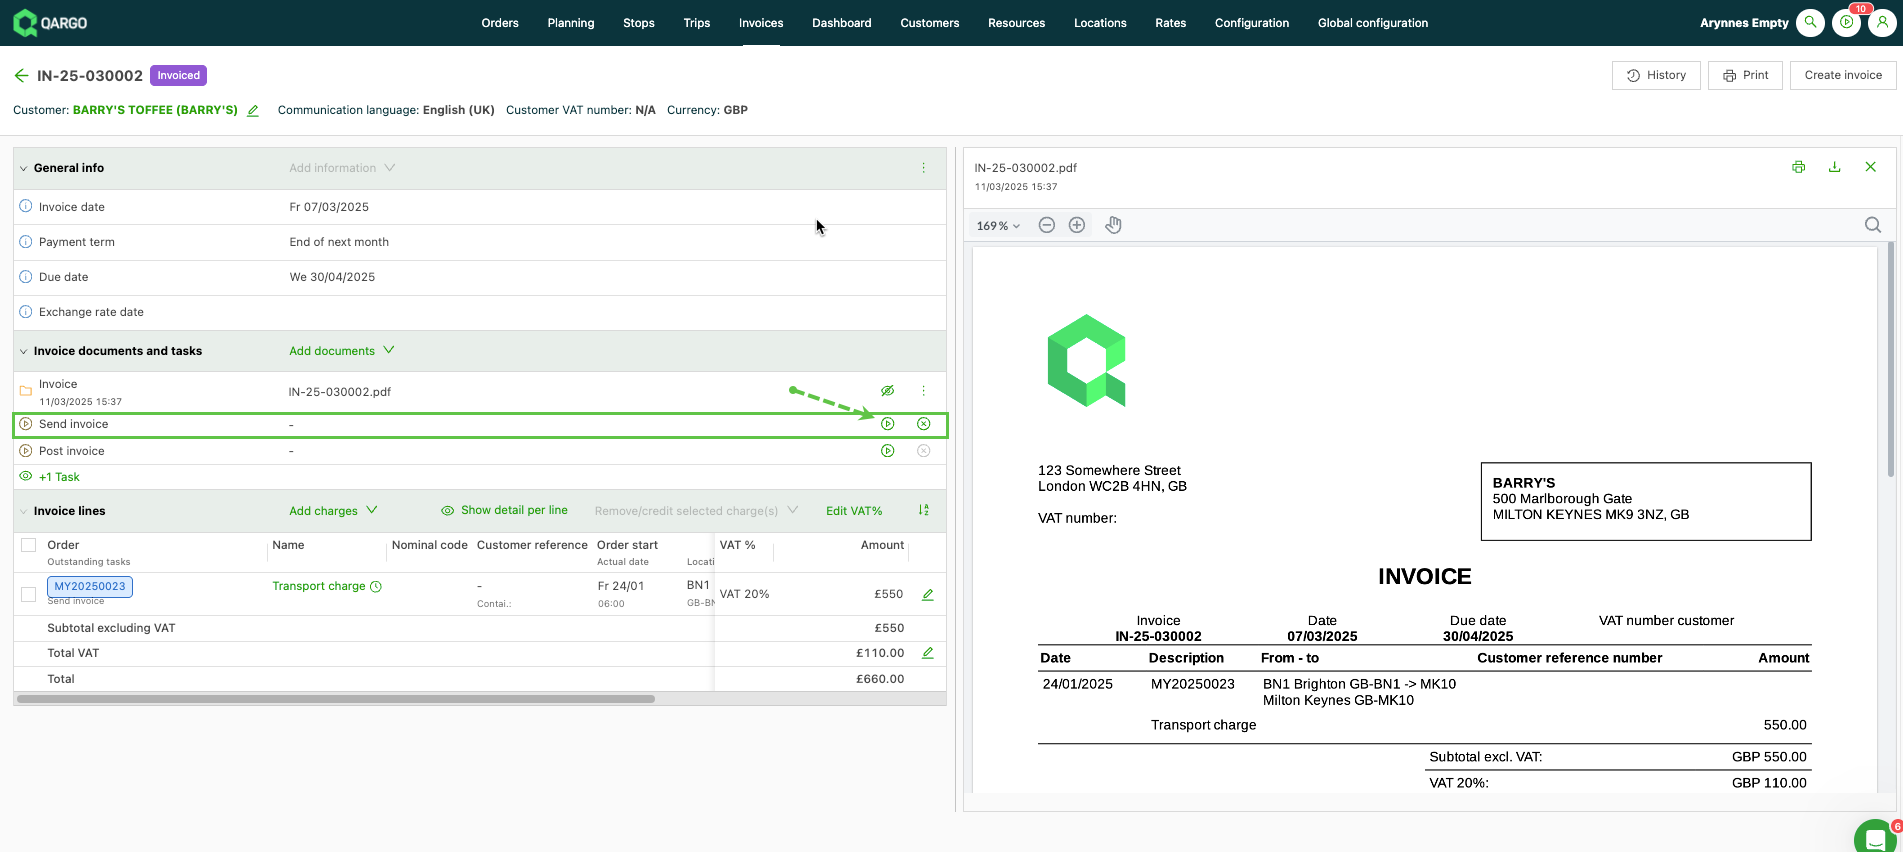
- Click ‘Send invoice’, carefully reviewing the details before starting the sending process.
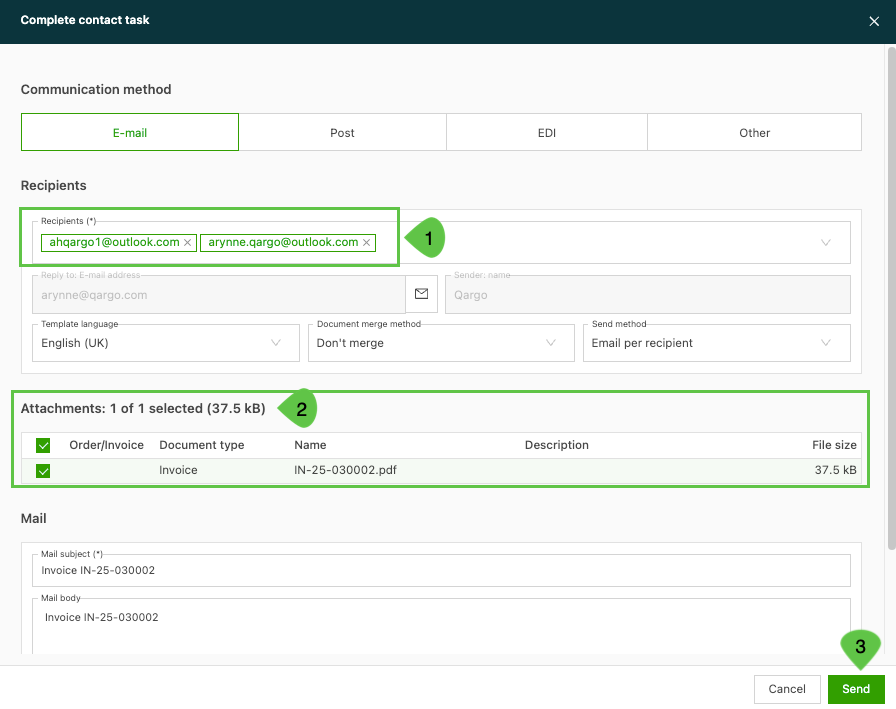
Once the Send invoice task is selected, a new window opens where the task can be completed.
-
Verify that the recipient email address is correct.
- A single email address can be added in Bcc on the invoice email. Enter the address in the Bcc field in the Send invoice window.
-
Confirm that the required attachments are selected. Any additional documents that are required and available can also be selected, i.e., POD/CMR, etc.
-
Click Send.
If there are any issues with the Send invoice task, an alert is generated.

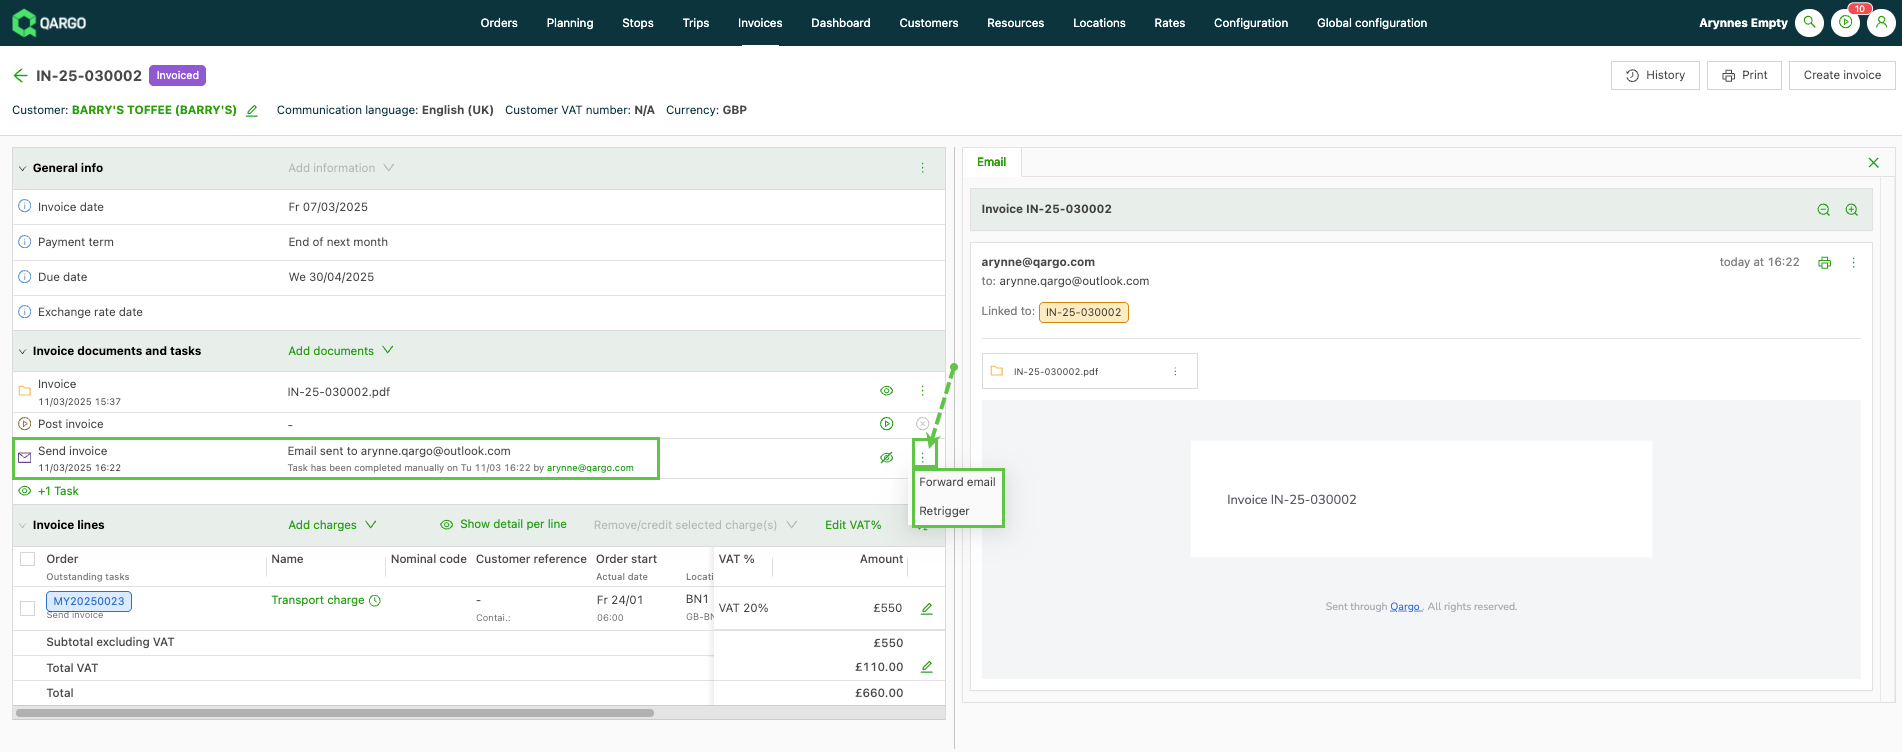
Once the invoice has been sent successfully, a note is added to the invoice with the details of the completed task (user / date and time stamp).
- Click the eye icon to preview the email that was sent, along with the invoice and any other attachments.
- If the recipient does not receive the email, it can be retriggered, which reopens the ‘Send invoice’ screen.
- Use the ‘Forward’ option if the email needs to be forwarded to another email address.
Depending on individual business requirements, additional tasks may be configured as part of the invoice process.
Posting the invoice
The final default task is to set the invoice to the status Posted.

When third-party accounting software is used with an integration, the option may be to send directly to accounting, which transmits the data directly. Alternatively, a manual export of the data to a format that can be uploaded may be required.
- Navigate to Invoices > Invoices and select the ‘Invoiced’ tab.
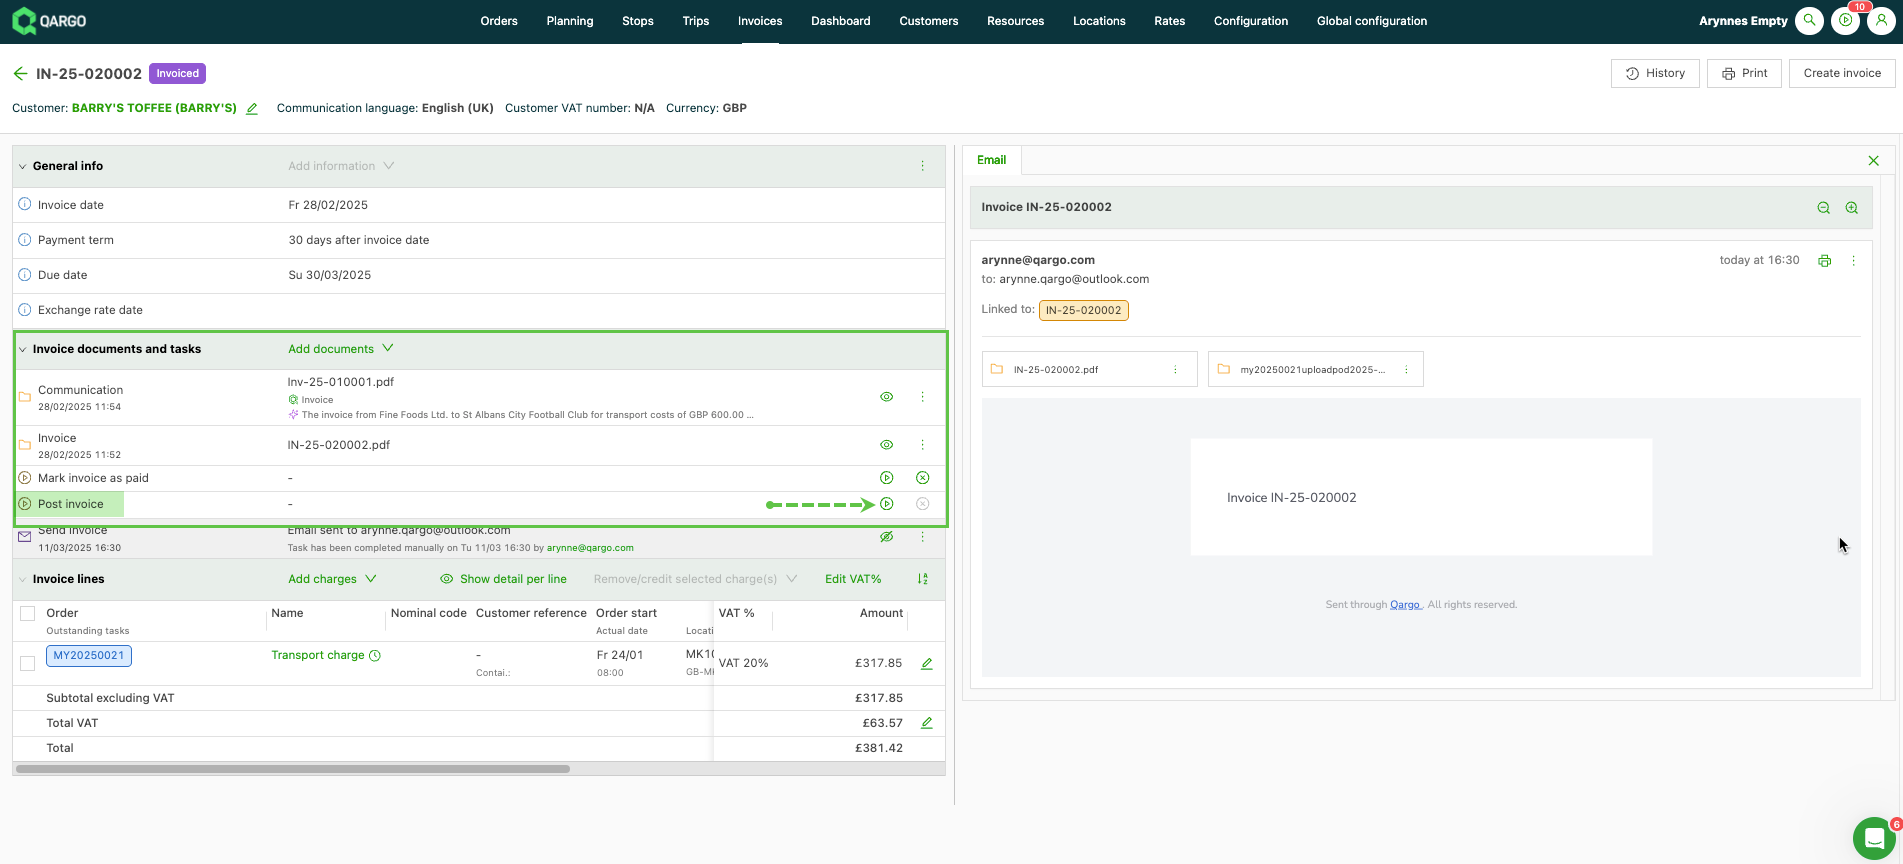
- Invoices can be updated individually by clicking the invoice number. Under ‘Invoice documents and tasks’, the option to post the invoice (send to accounting, etc.) shows as a task.
- Click the ‘Play’ button to complete the task. The status updates to Invoice posted.
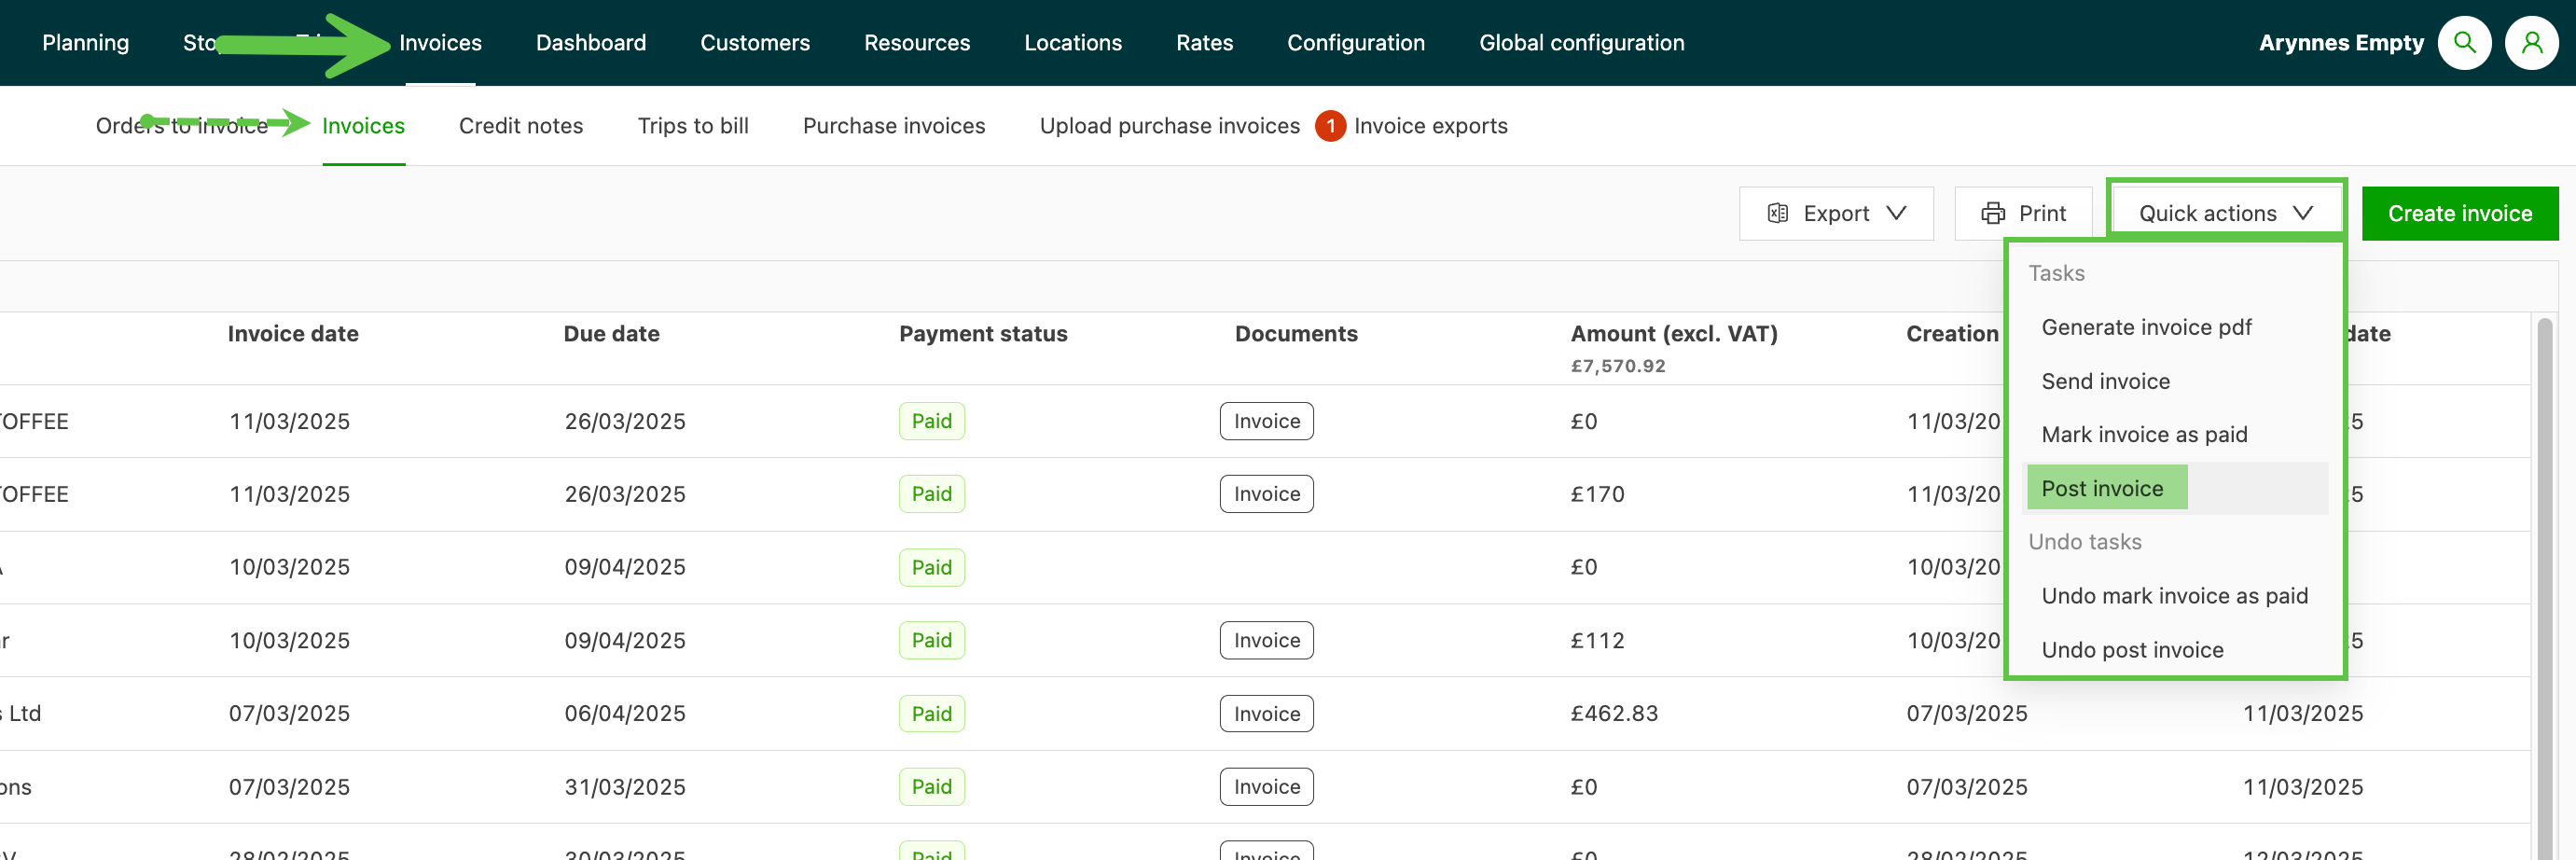
Once the invoice is posted, it is ready to be exported manually so that the data can be used in the accounting software.