
Configuration - Use rules to auto-assign fields.
Automate field values and extras on orders, stops, shipments and freight with auto-assign rules. Rules can add stop and freight extras and can overwrite existing field values.
Table of contents
Introduction
The Auto-assign feature automatically fills in field values across orders, shipments and stops based on configurable rules.
This helps to:
- Standardize data
- Speed up planning
- Reduce manual data entry.
The feature is flexible and can be used for various applications, such as routing decisions, customer references, region codes and planning guides. Rules are defined once, and the system applies them consistently to new or updated items.
Terminology
| Term | Definition |
|---|---|
| Rule | A set of conditions and resulting field values. Rules determine which fields are automatically populated and when. |
| Configuration > Rules | The central area where users create, manage and organize auto-assign rules. |
| Field | Any data item on an order, shipment, stop or freight line that can be populated (e.g., customer reference, region code, vehicle category, extras). |
| Default field | A standard field provided by the system that can be auto-filled. |
| Custom field | A user-defined field that can also be auto-filled with rules. |
| Trigger | An event that causes rule evaluation, such as creating a new order, shipment or stop. |
| Planning group | A grouping used to organize planning resources and rules for easier management. |
| Resource | People or assets (e.g., drivers, vehicles, departments) that can be assigned or referenced in rules. |
| Asynchronous | Operations that run in the background after the initial creation. The main workflow continues without waiting for the rule evaluation. |
| Synchronous | Operations that run immediately in the same process. They can delay the initial action until rule evaluation completes. |
| Extra | An additional service or item added to a stop or freight line, such as liftgate, cleaning or ADR handling. Extras can trigger charges on the rate card. |
| Stop extra | An extra that belongs to a stop. Configured under Rates > Order input, with a setting for which stop types it applies to (Pickup, Delivery, Other stops). |
| Freight extra | An extra that belongs to a freight line (goods) on an order. Configured under Rates > Order input. |
| Freight fields | The auto-assign category used to create rules that add freight extras. |
| Do not dispatch | A stop setting. Qargo keeps the stop on the load but does not send it to the driver mobile app or fleet system. |
Create a rule
-
Navigate to Configuration > Rules.
-
From the Auto-assign side menu:
-
Select the field to create the rule on
-
Options include:
-
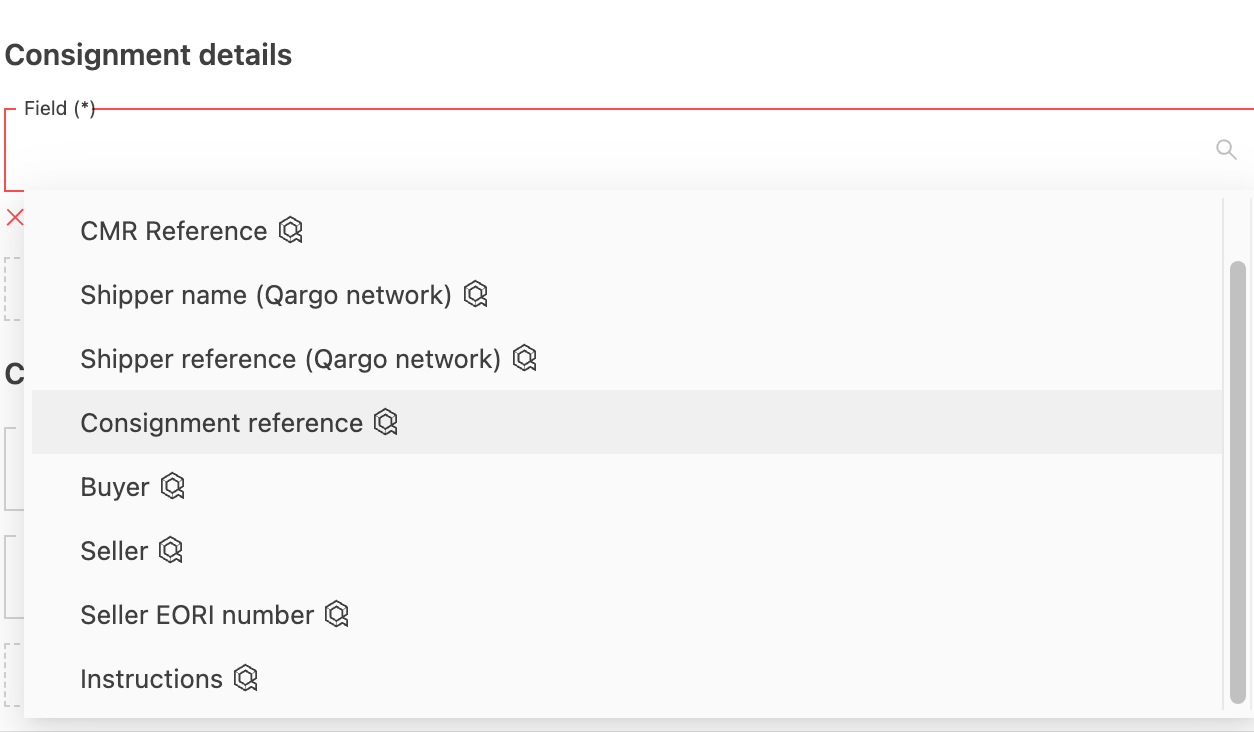
Shipment fields: default & custom fields associated with the shipment
-
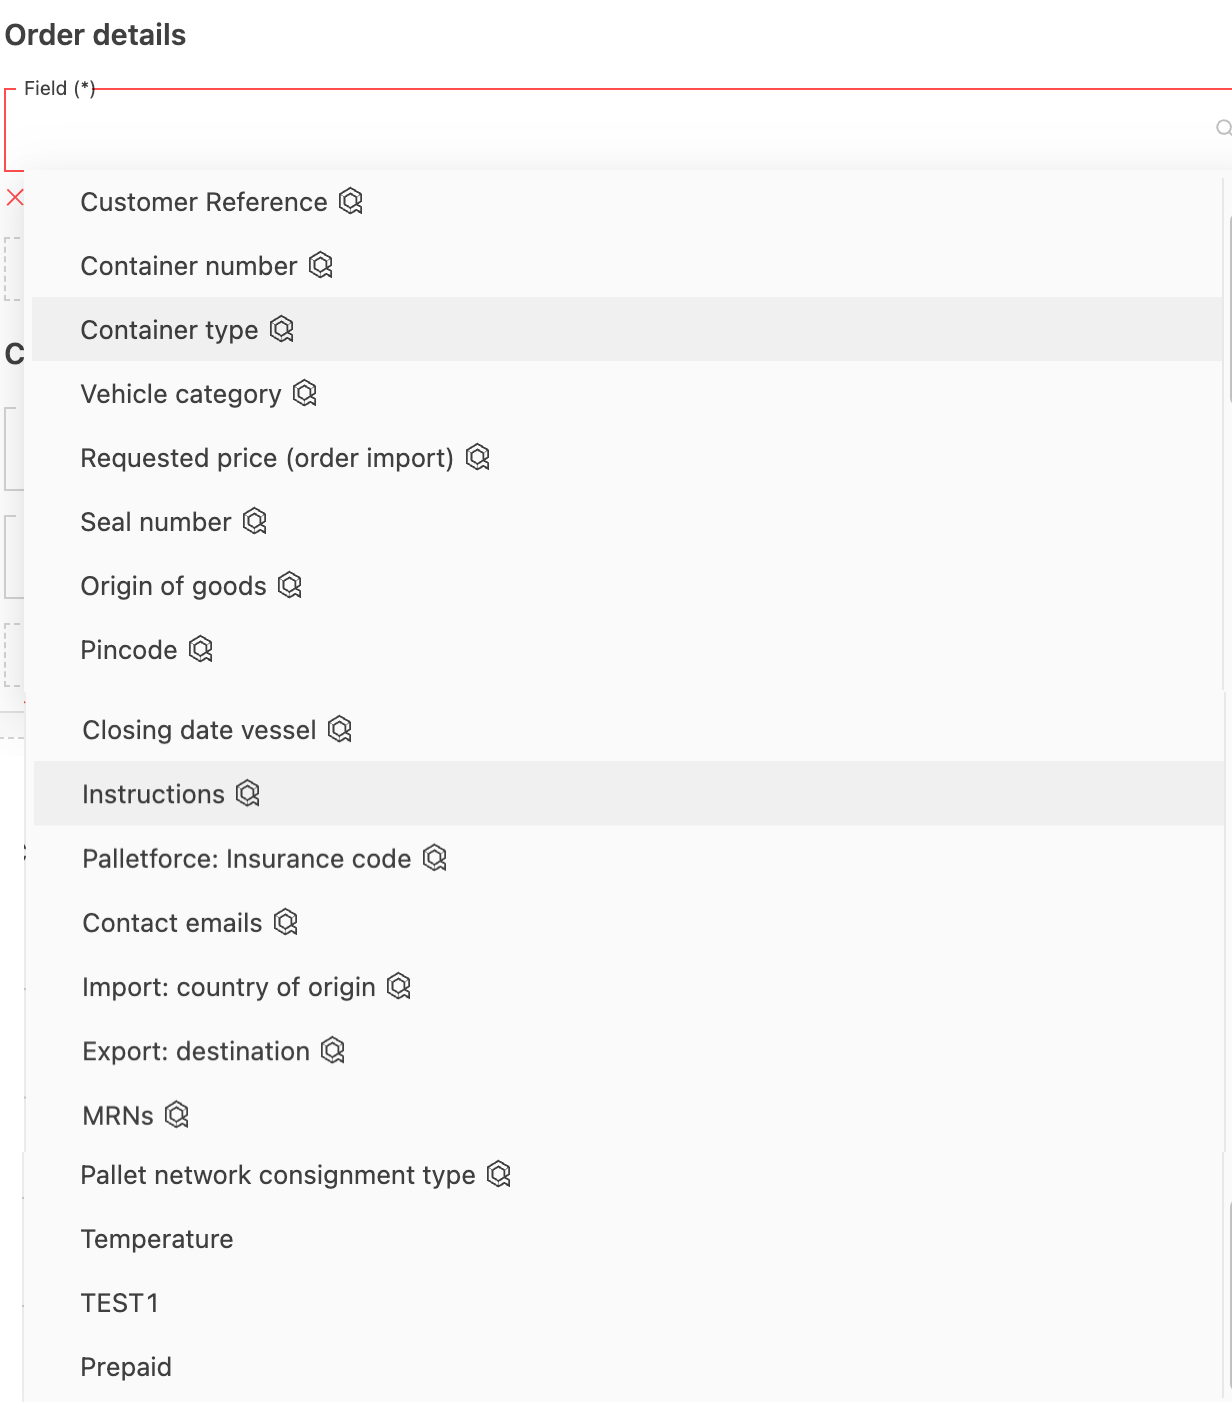
Order fields: default & custom fields associated with the order
-
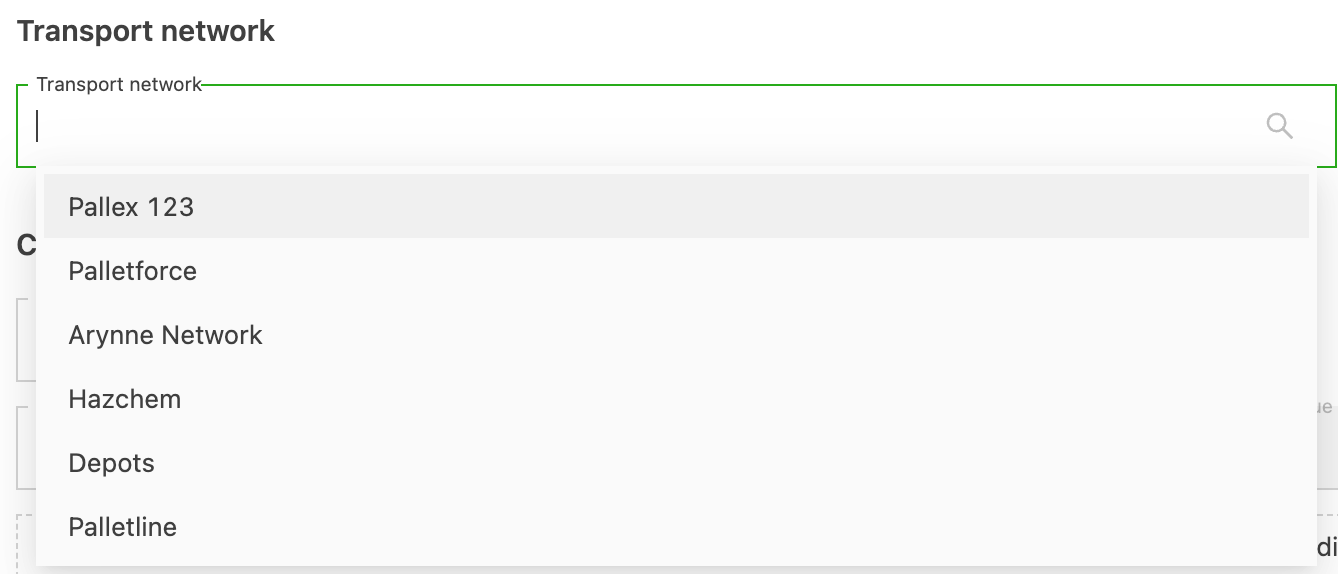
Order transport network: shows the networks active on the tenant
-
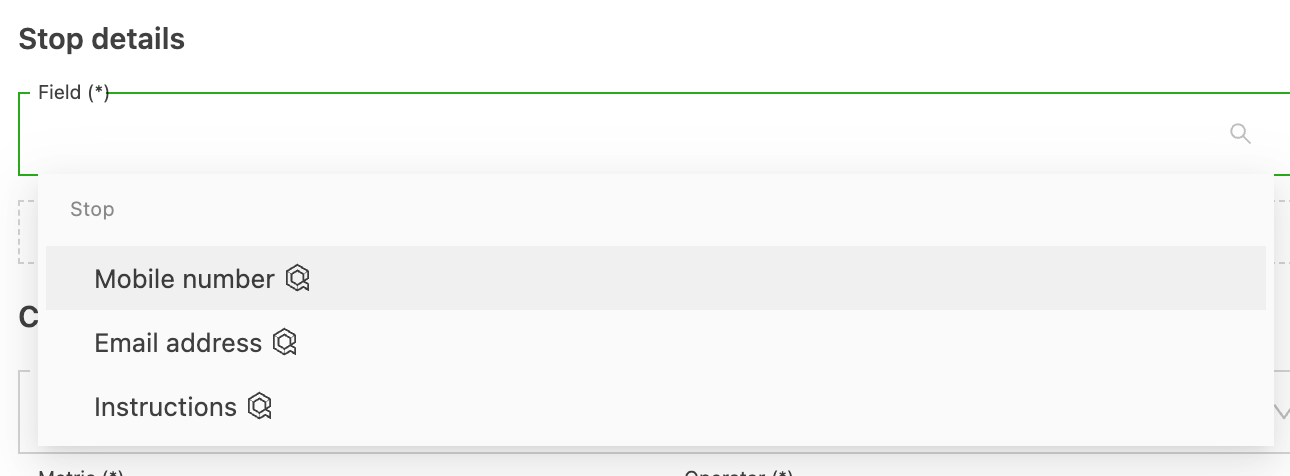
Stop fields: default and custom fields associated with the stop
-
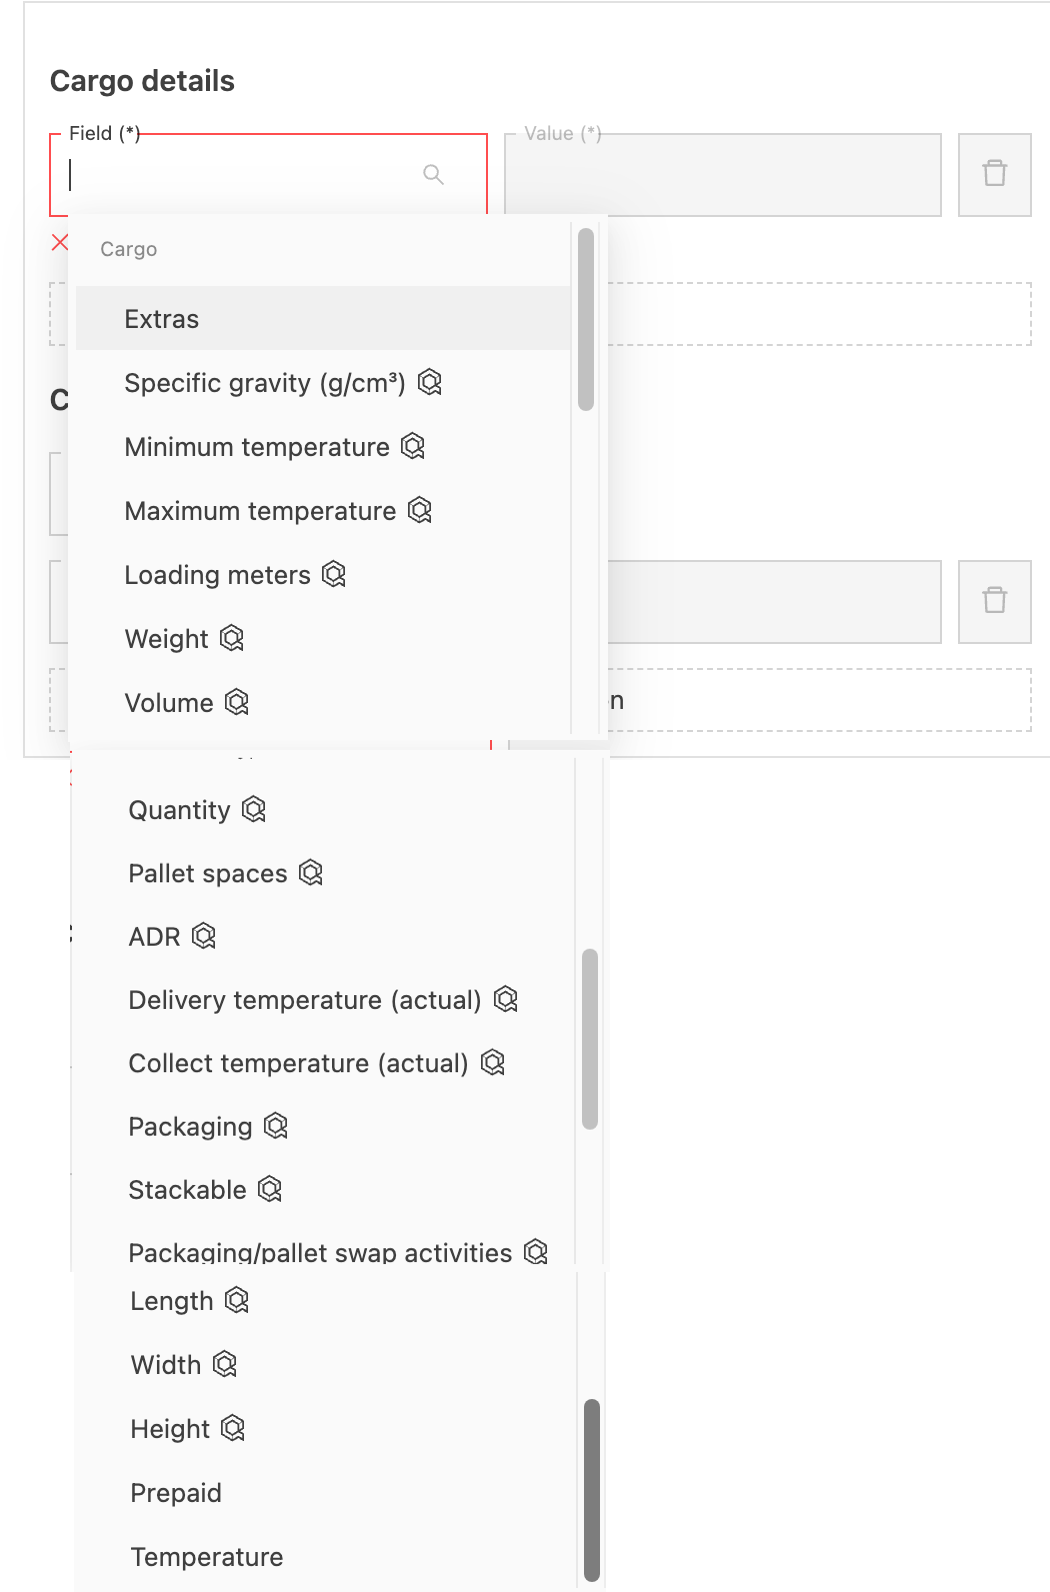
Stop fields also offer Extras in the Field dropdown. See Auto-assign stop and freight extras below.
-
-
Freight fields: extras associated with the freight (goods) on an order. This category only shows when freight extras are configured on the account.
-
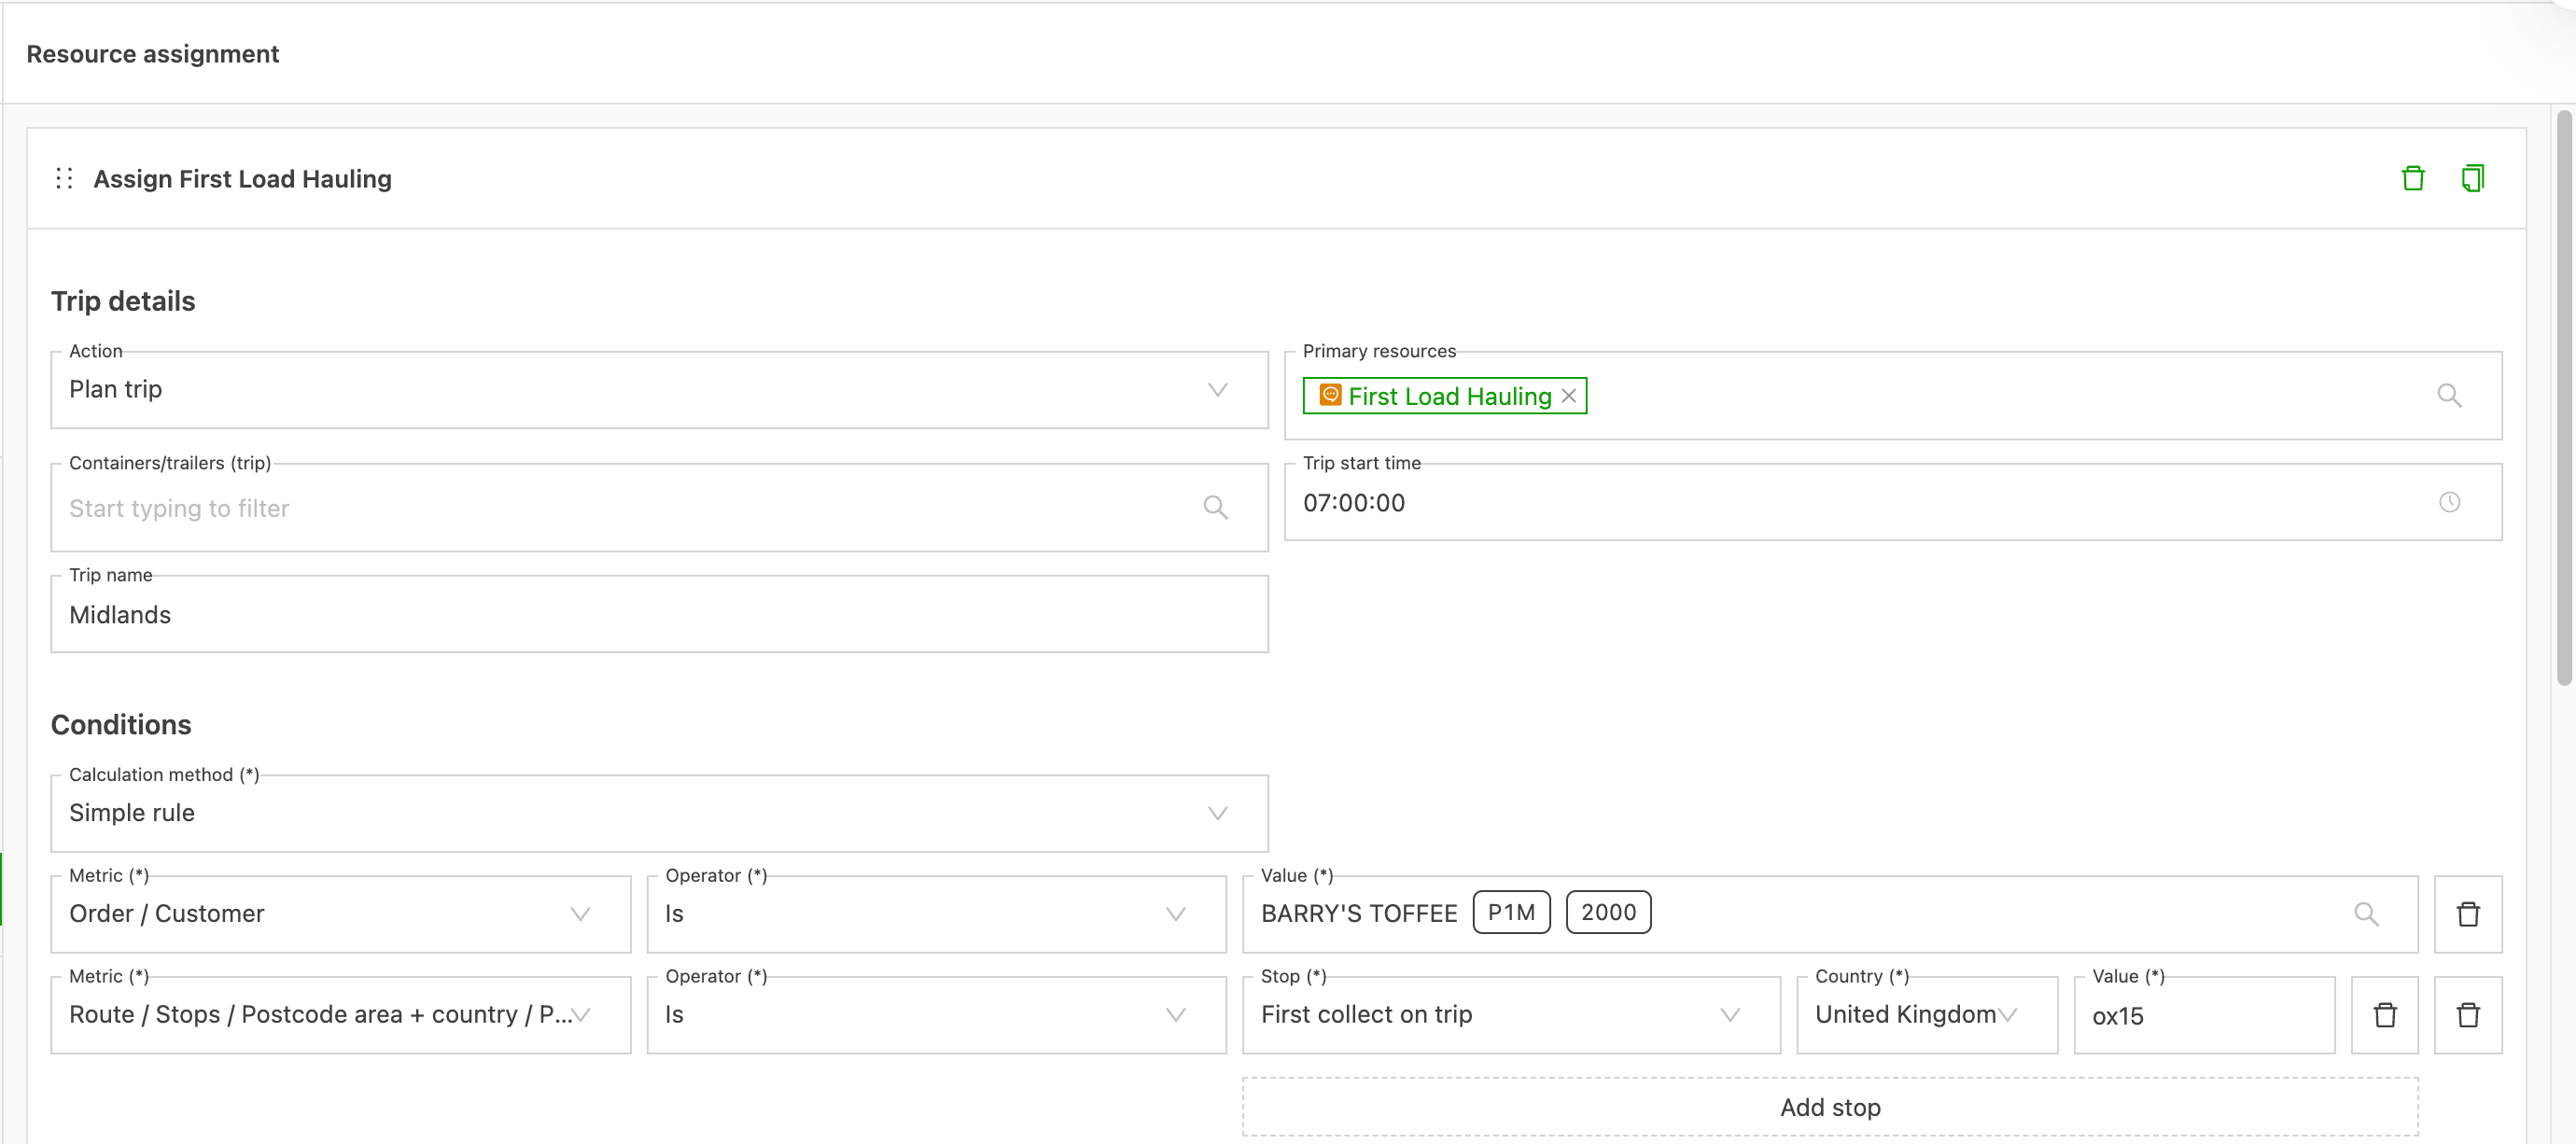
Load resource assignment: assign internal & external resources
-
-
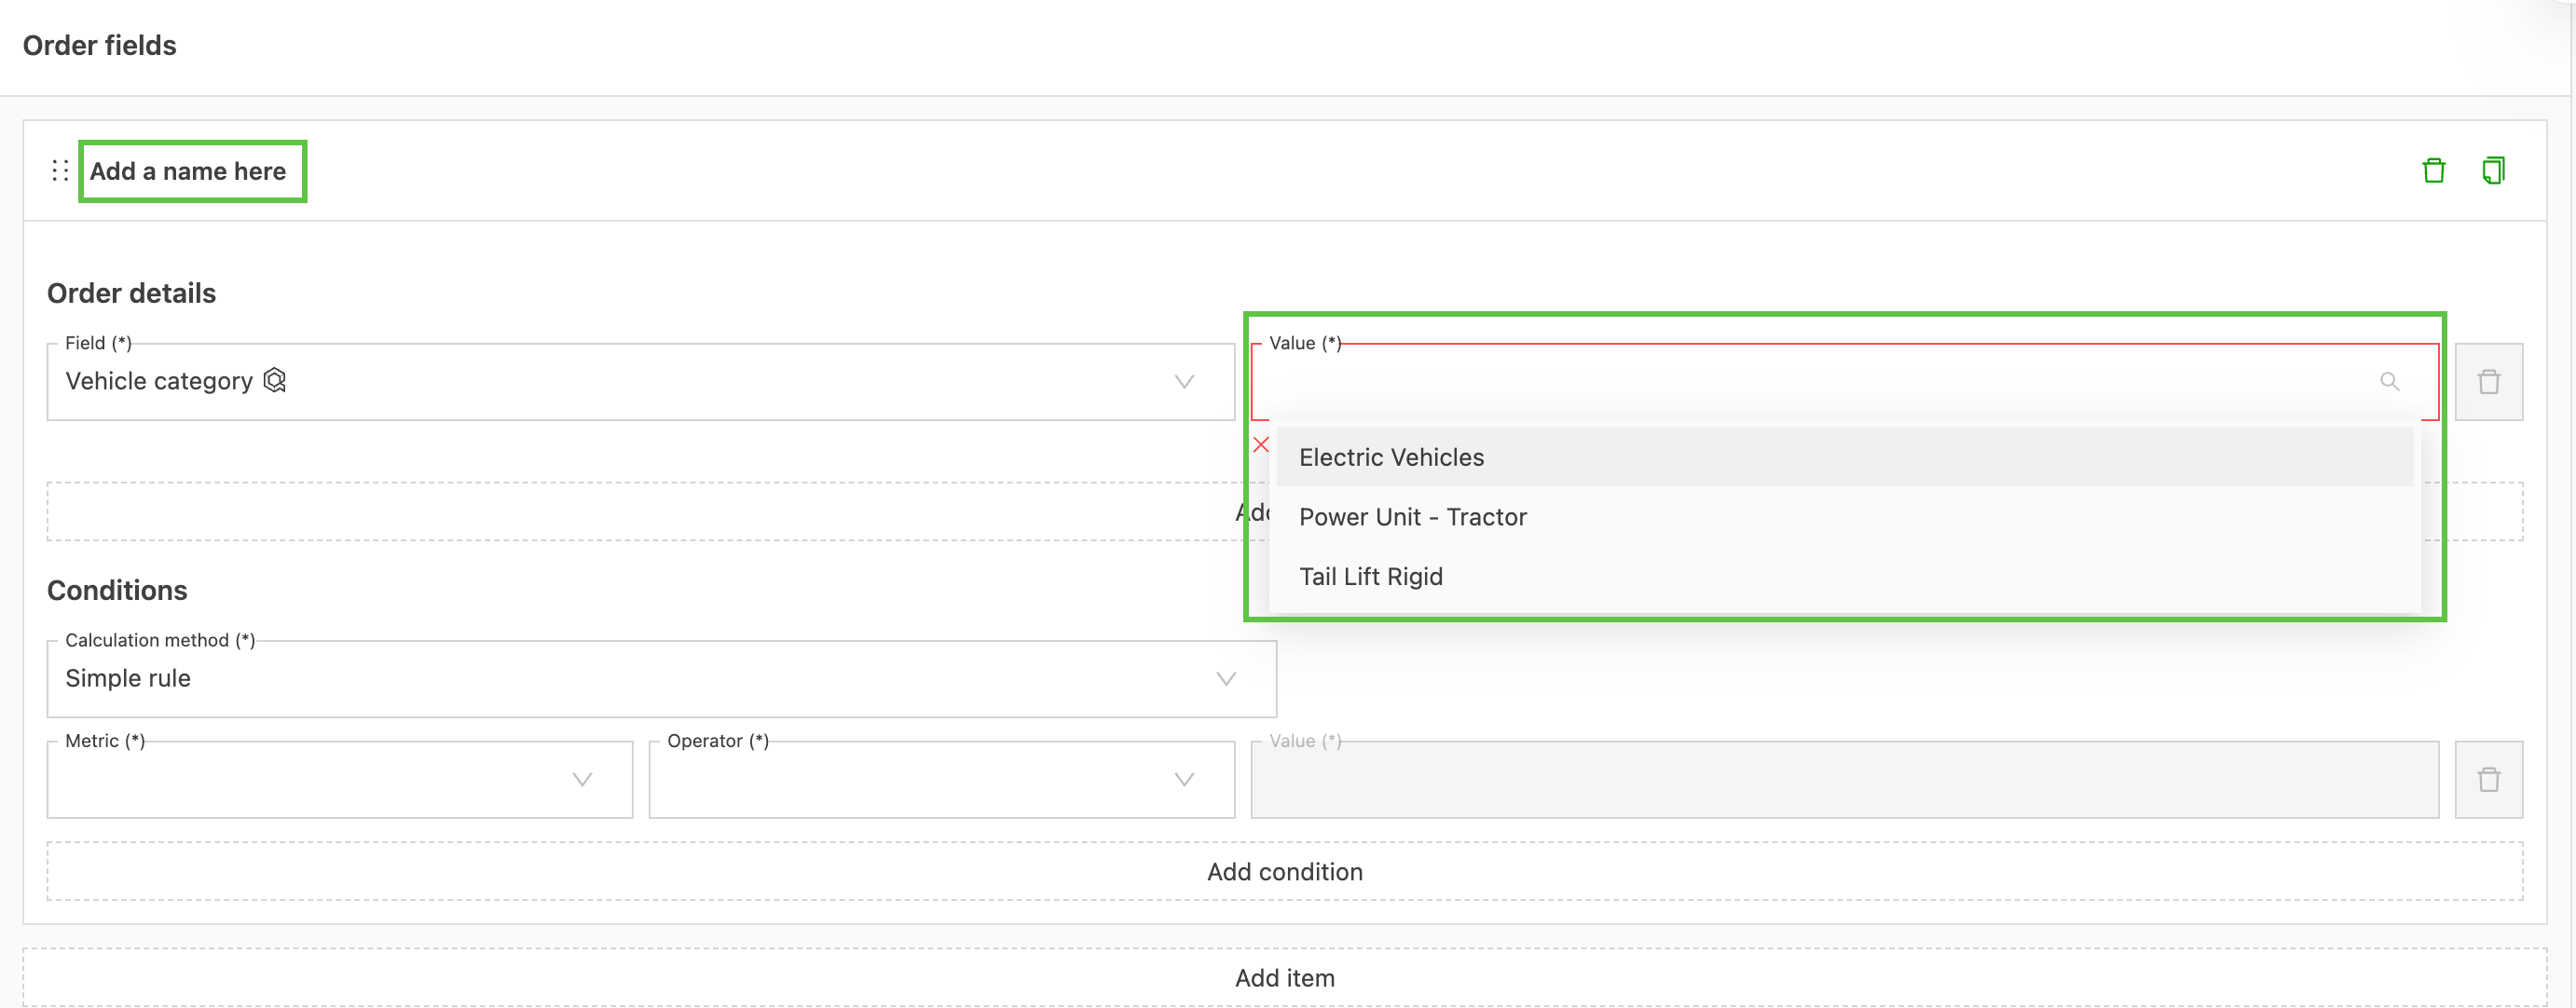
Click ‘Add item’ to start building a rule
- If adding multiple rules, name each rule for easy identification: click ‘Rule 1’ and enter the name.
-
Complete the displayed fields:
-
Field: From the dropdown, select which field to populate automatically (e.g., customer reference, region code, ZIP code zone, vehicle category)
- The options displayed here relate directly to the active default and custom fields on the property
-
Value: Define the value to populate for the selected field. The options displayed depend on the field selected
-
-
Conditions: Define when the rule should run (for example, on creation, or when a specific field is set).
- Calculation method: Run multiple simple rules in sequence, or use complex rules (Excel table) to build a specific set of criteria for the conditions to apply to.
- Metrics / Operator / Value: Select the condition parameters that apply in order to auto-assign the field.
-
Save the rule.
Using rules
- When a new order, shipment, stop or freight line is created, the system checks the rules that apply to it.
- Stop fields rules now also run for stops added to an existing order or shipment, not only for stops created together with a new shipment.
- If a field requires information that is not yet available, the rule can wait for a subsequent input or run asynchronously, depending on the rule’s configuration.
Use case: Orders - Tag an order for zone visibility
Auto-assign order transport network
This can be used when users are members of a transport network, or have their own network setup. Auto-assign rules can configure the conditions under which the transport network is assigned automatically.
-
Set up in the same way as the order, stop and shipment data fields.
-
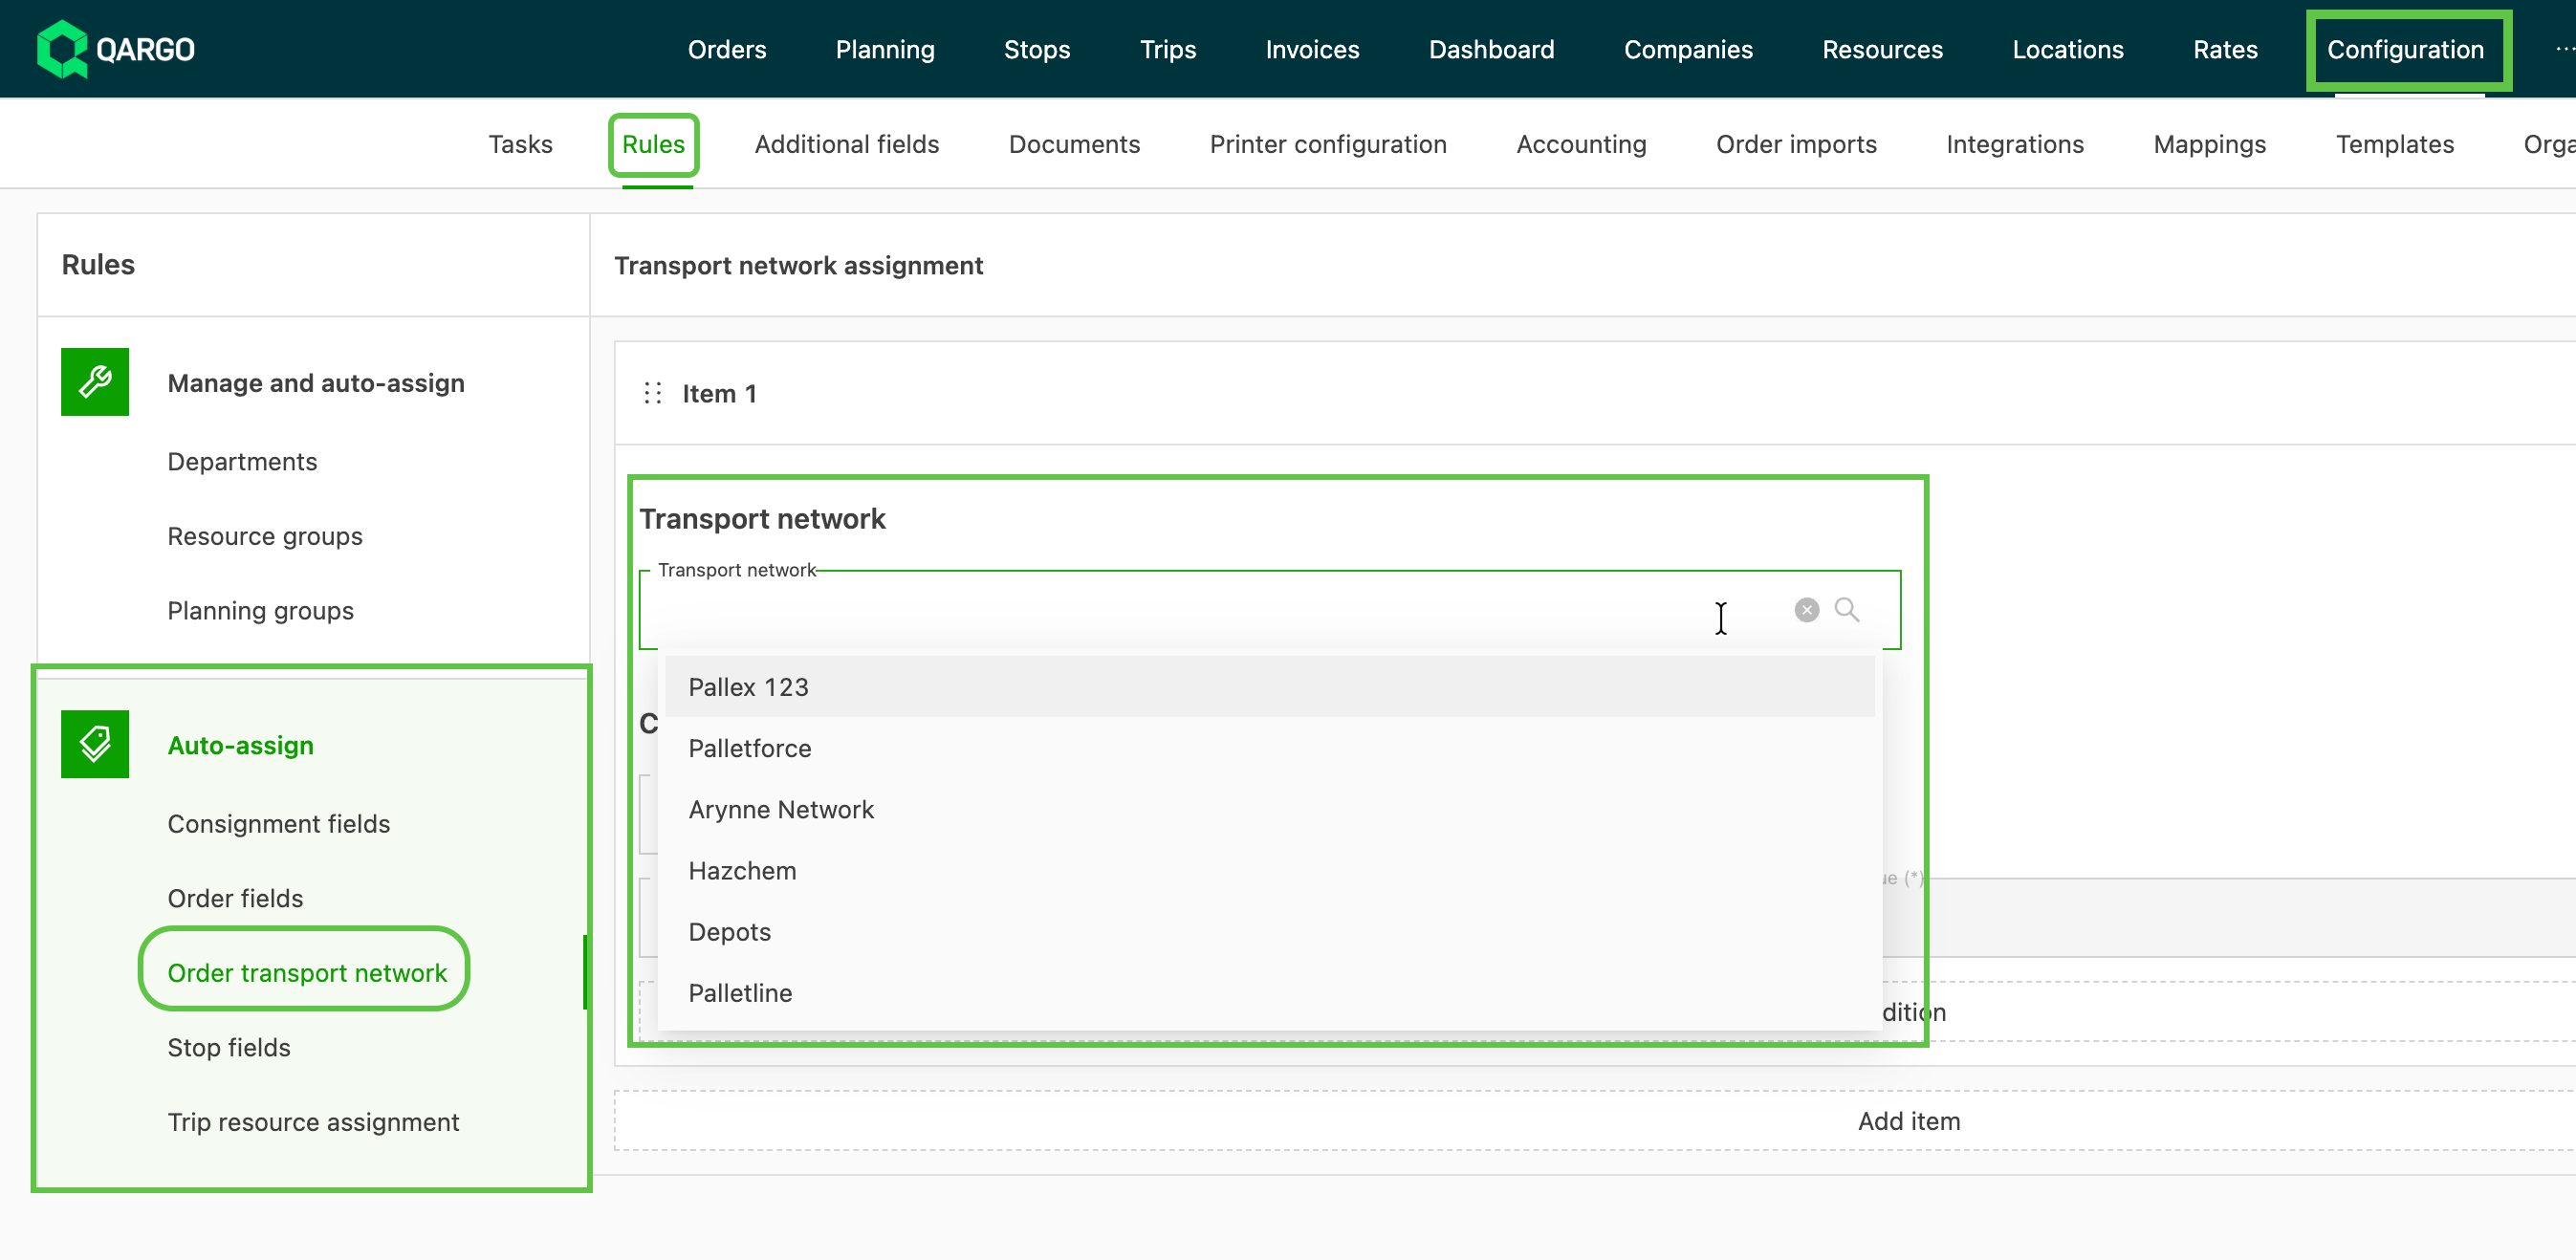
Navigate to Configuration > Rules
-
From the Auto-assign side menu, select Order transport network
-
Select the transport network from the dropdown
-
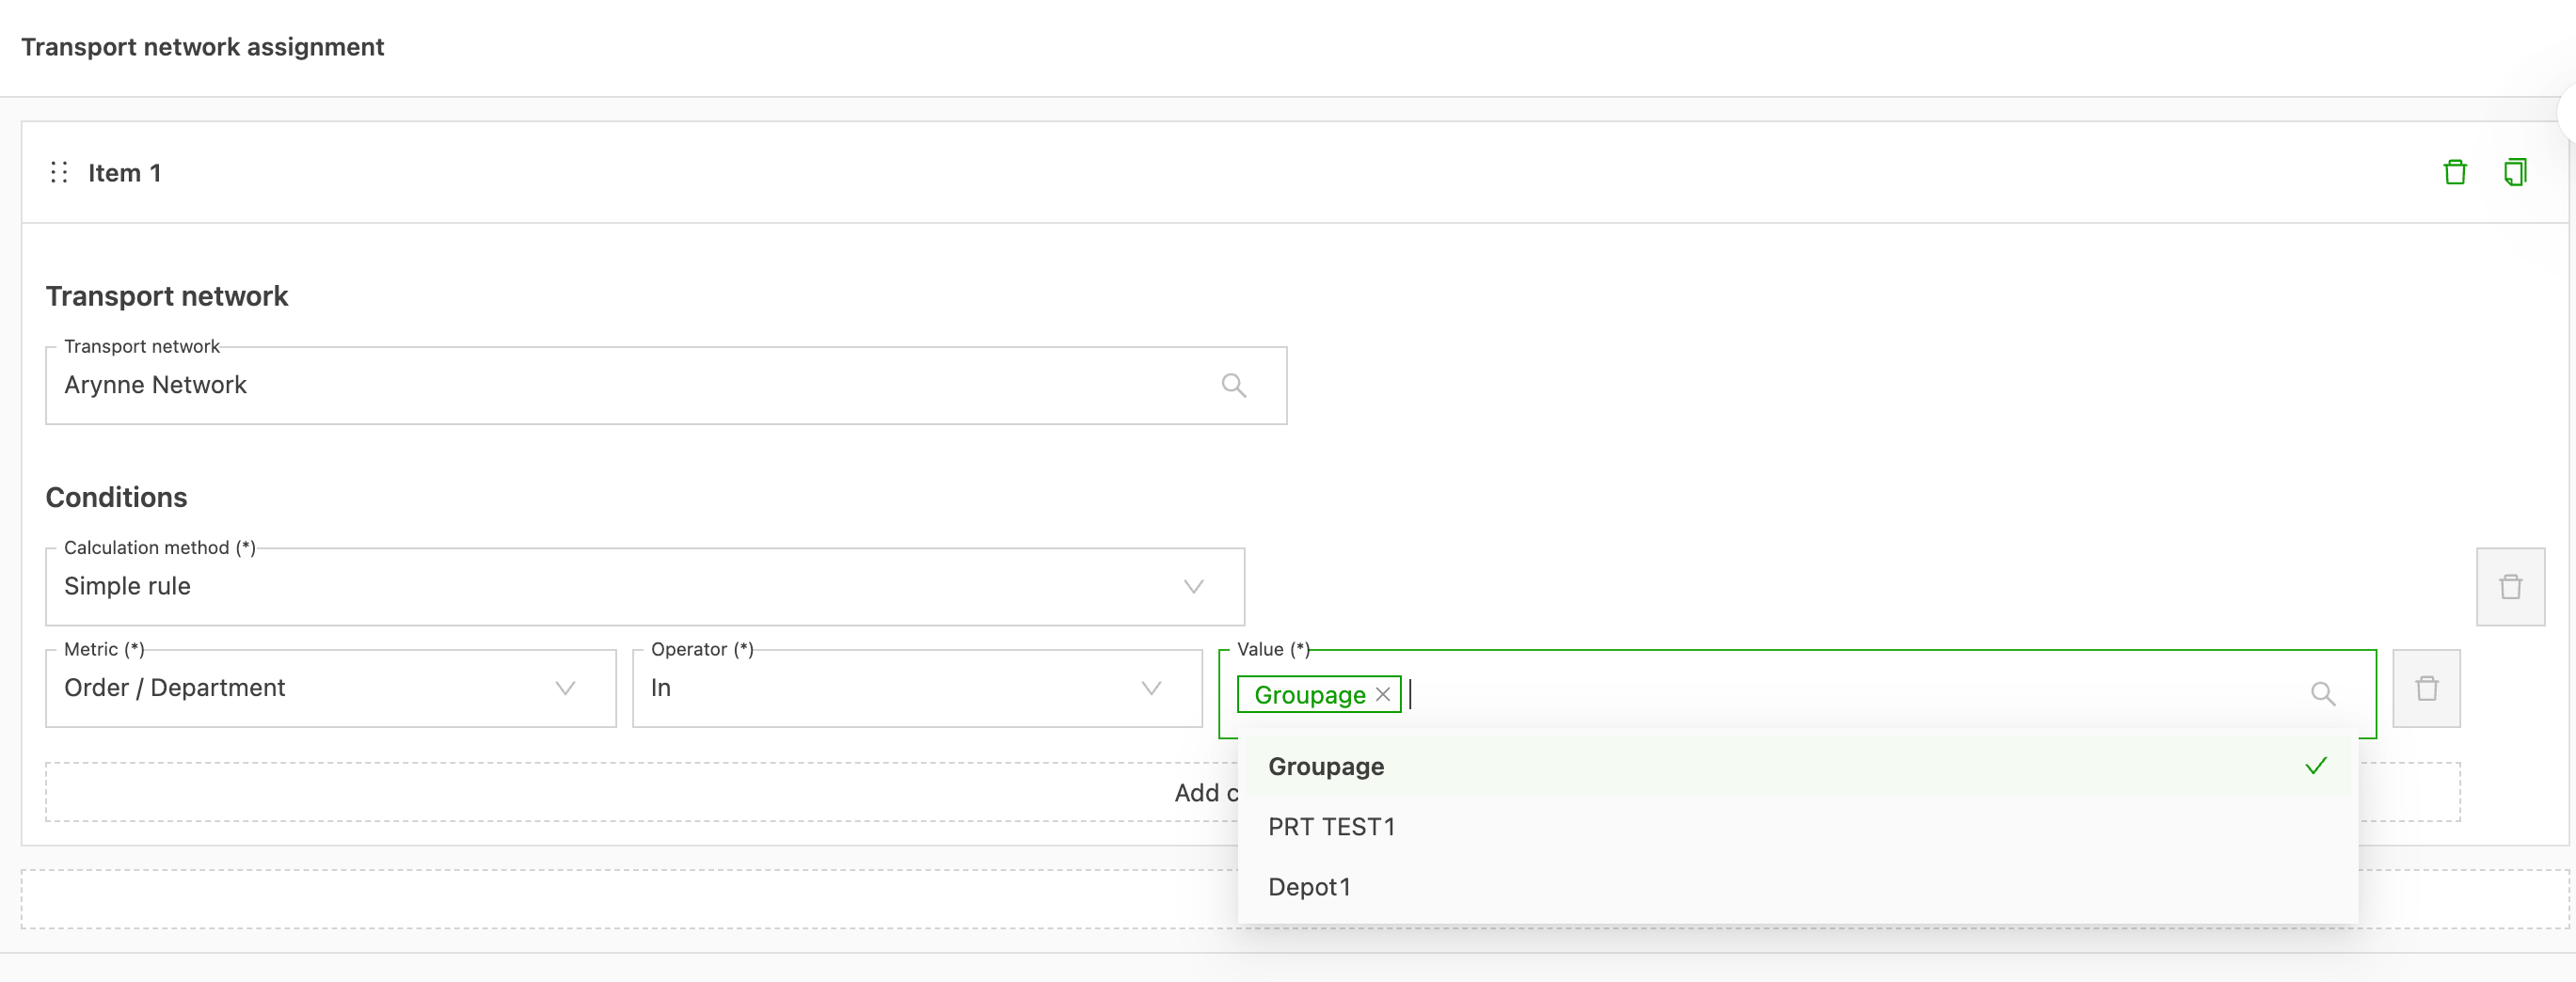
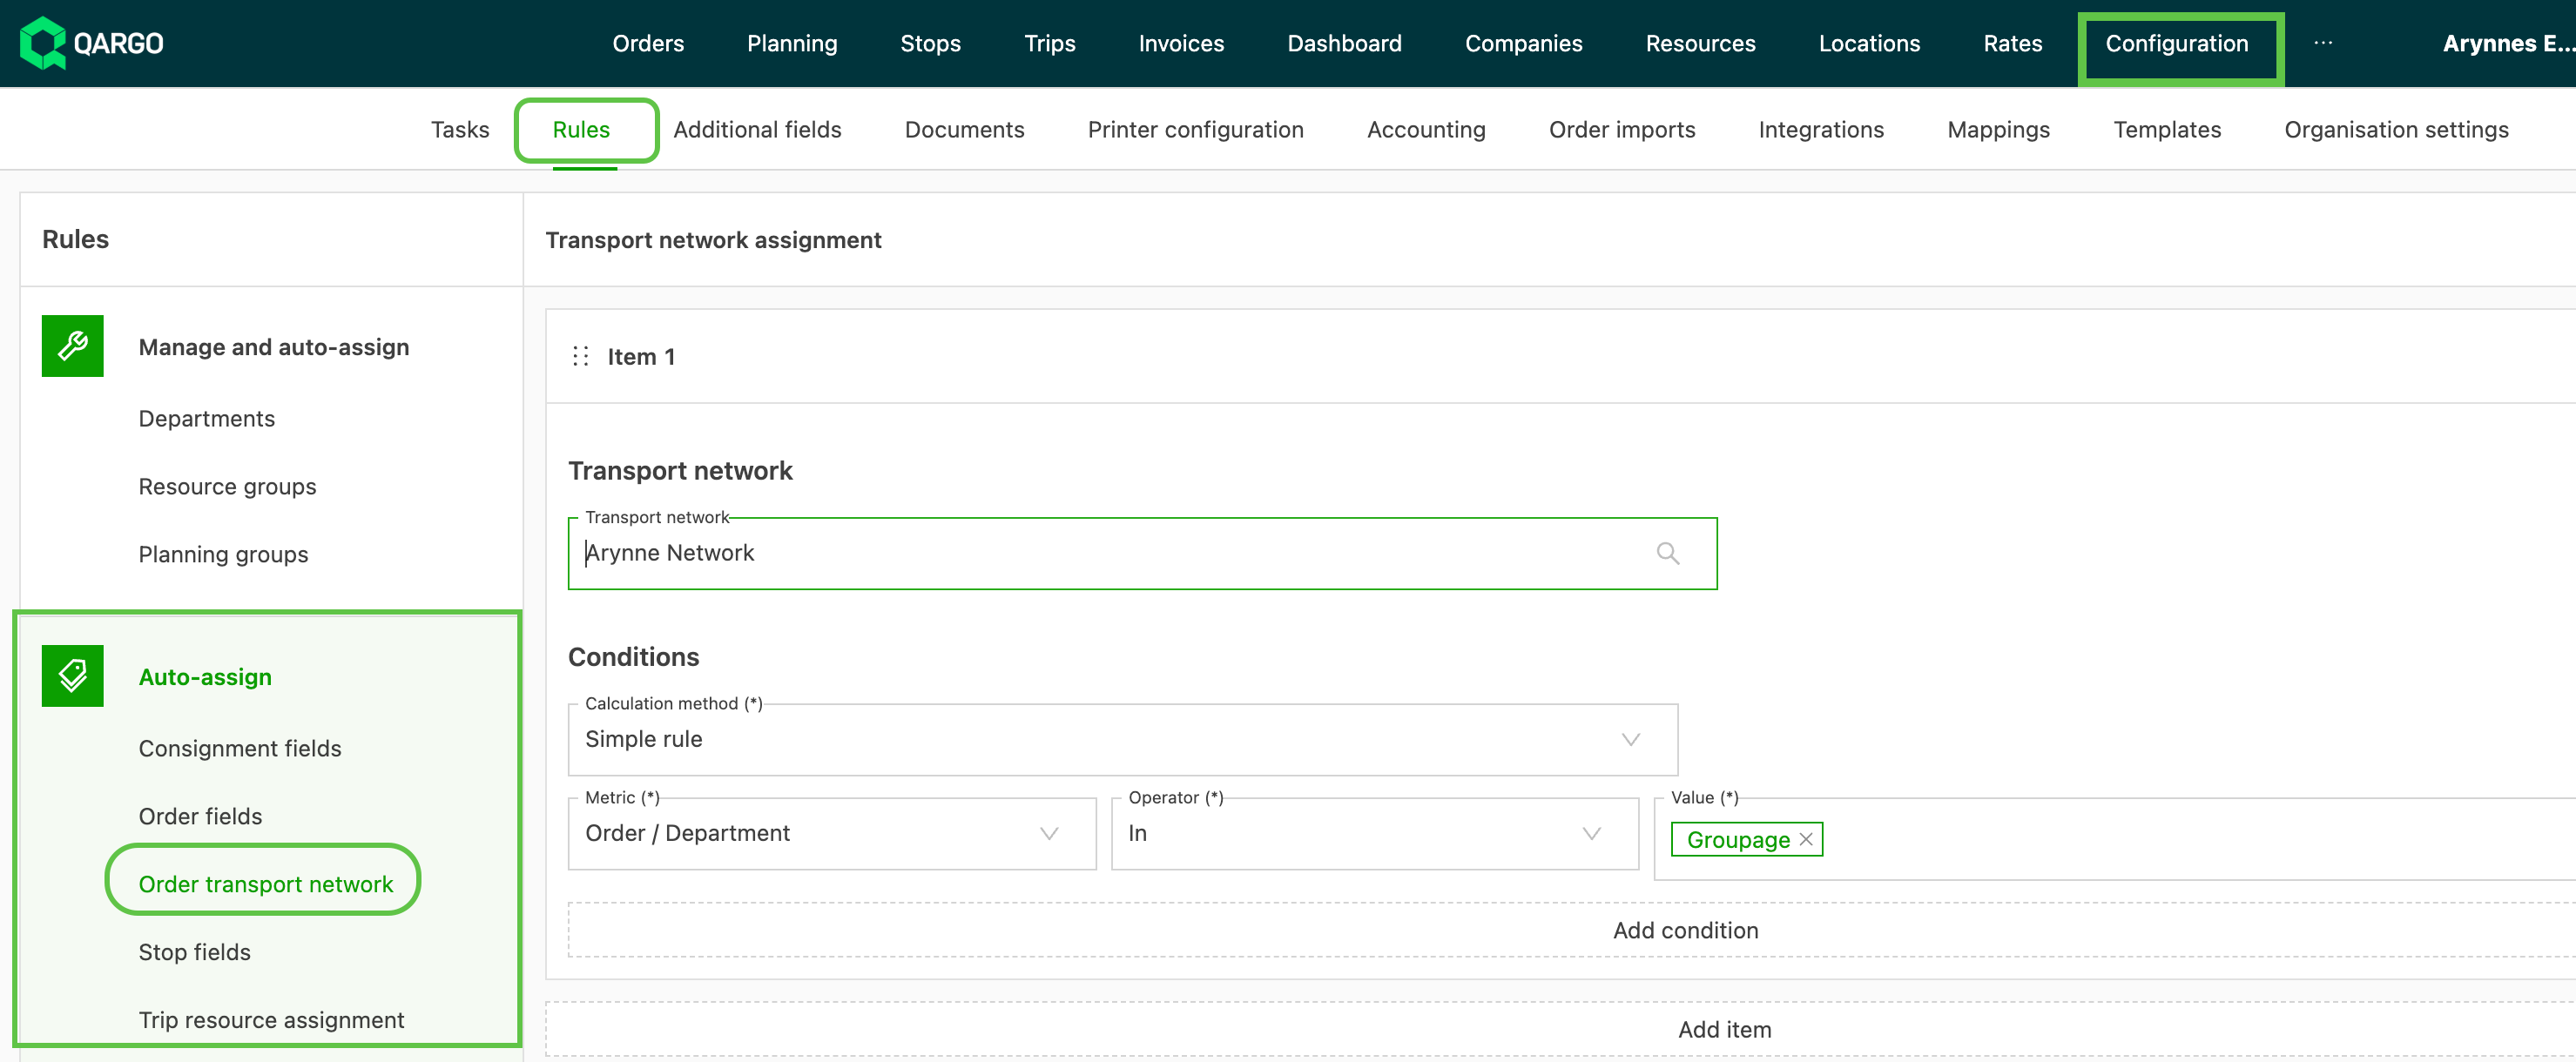
Set the conditions that apply for the transport network to be auto-assigned.
- The options available depend on the metrics selected
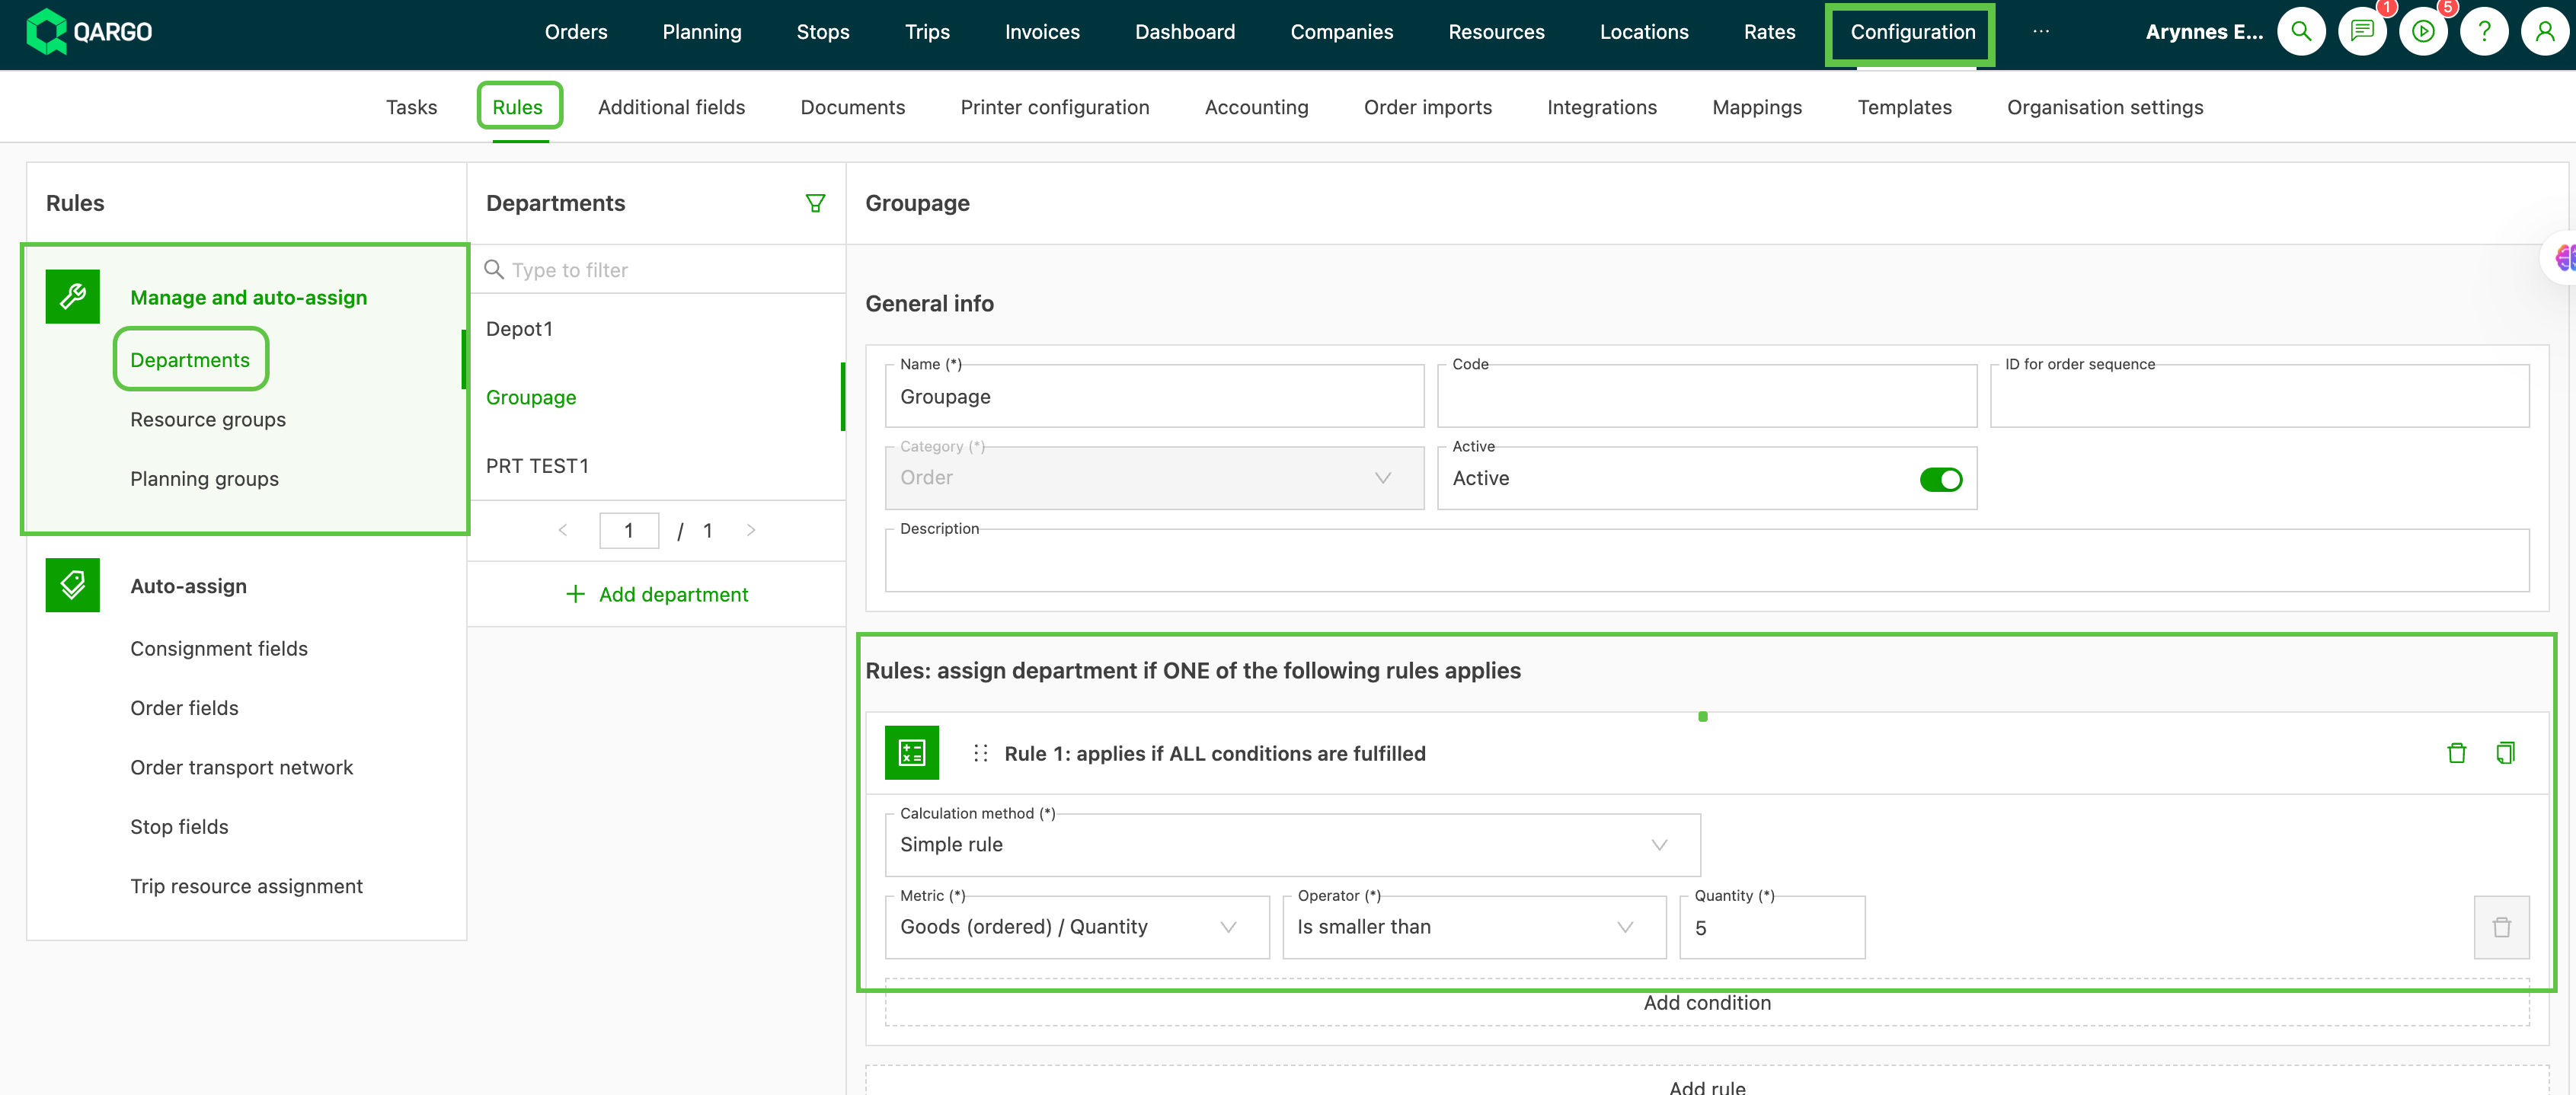
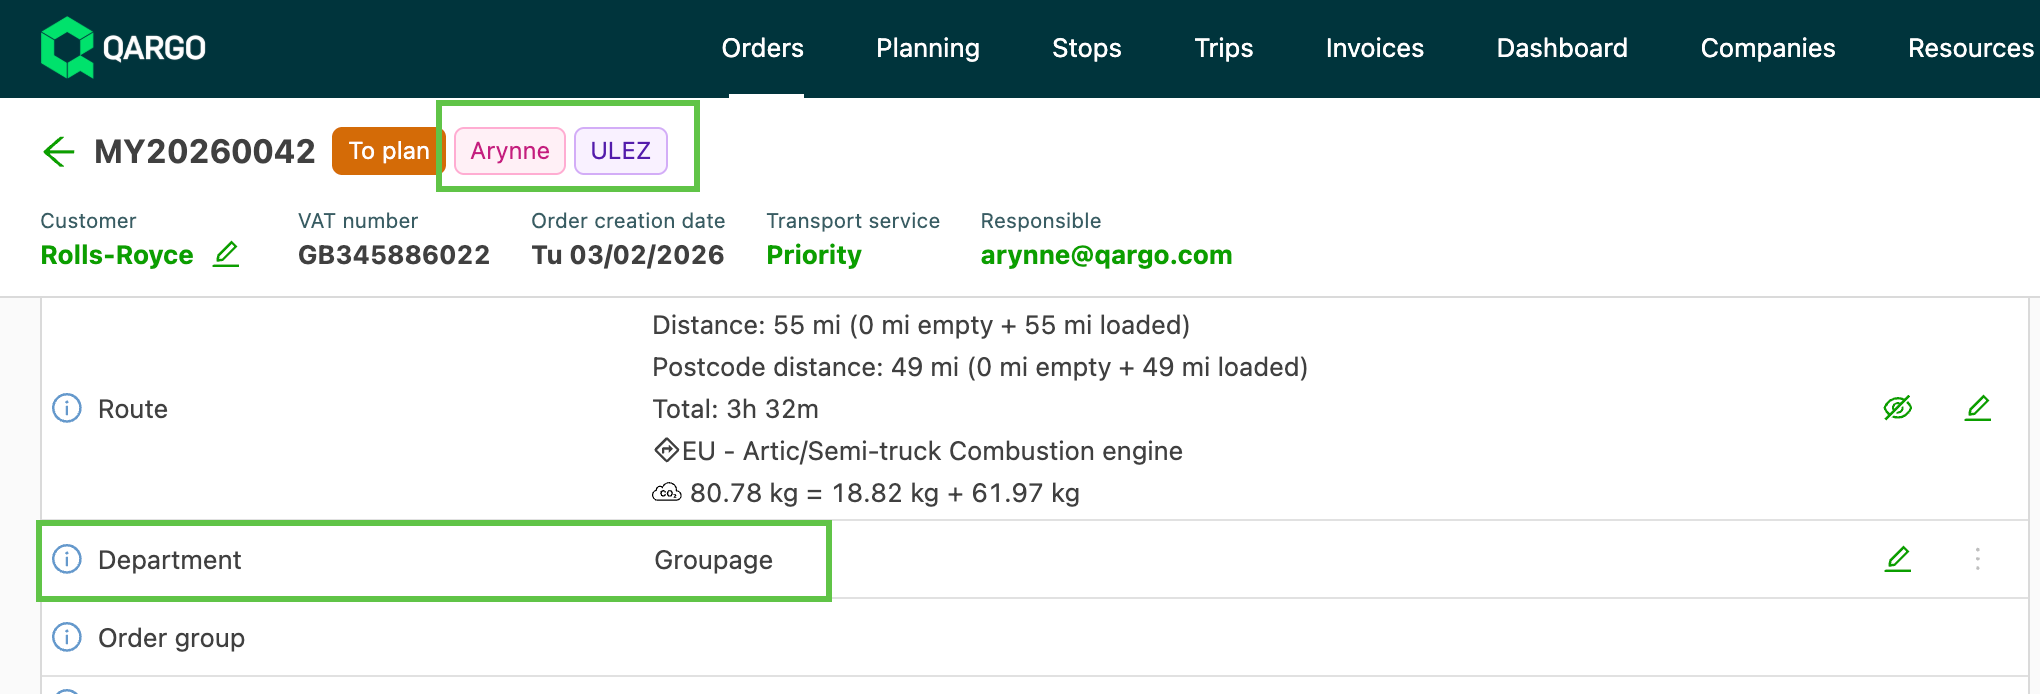
In the example below, the configured transport network is prefilled if the order is created and assigned to the Groupage department. That department is also set to be auto-assigned when the order quantity is less than 5 units.
Other auto-assign options
-
Department rules can be created to automatically allocate an order to a department based on set conditions.
- To learn more about departments 👉 Click here
-
Add resource groups to organize planning boards: filter easily, customize, and improve planning and pre-planning visibility.
- To learn more about resource groups 👉 Click here
Use planning groups rules to simplify allocating orders to specific planning groups.
- To learn more about planning groups 👉 Click here
Enable overwrite on a rule
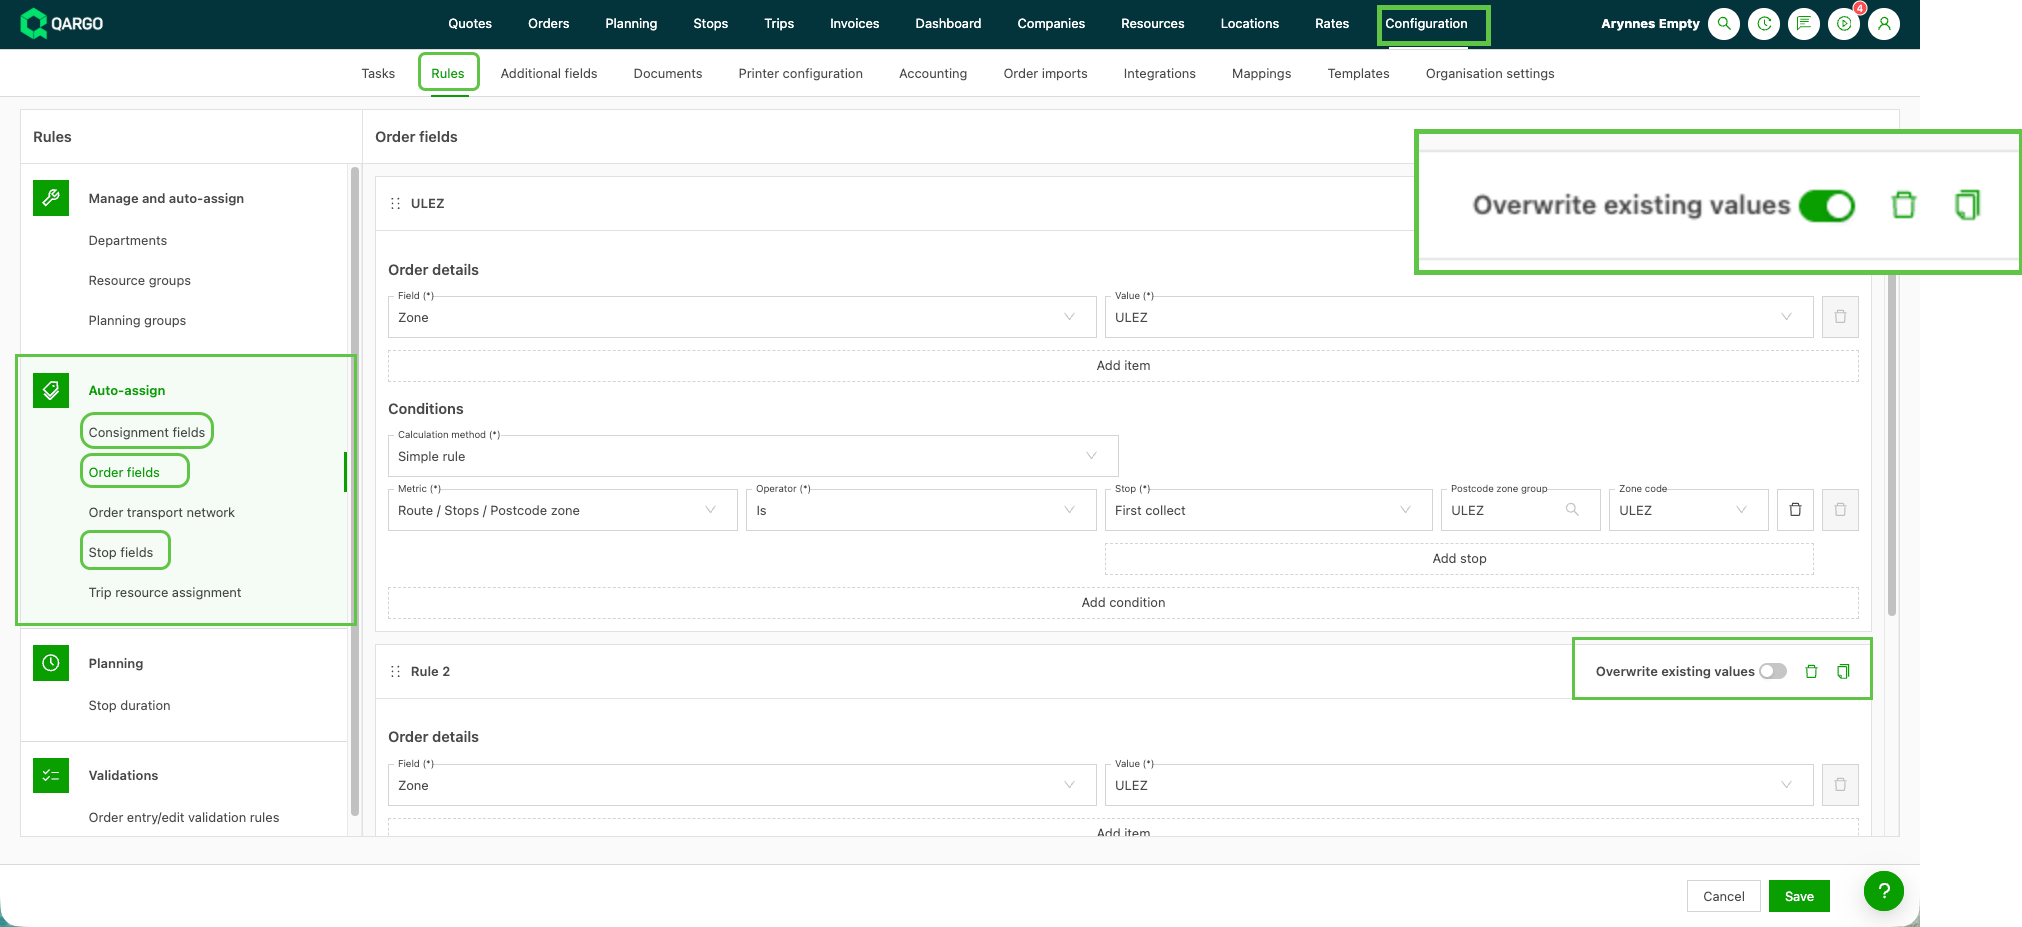
-
Navigate to Configuration > Rules.
-
Select the field type from the Auto-assign side menu (shipment fields, order fields and stop fields).
-
Open an existing rule, or click Add item to create a new rule.
-
Locate the Overwrite existing values toggle in the rule configuration panel.
-
Toggle the switch:
- Toggle off (default) - the rule skips any field that already contains a value. Existing data is preserved.
- Toggle on - the rule replaces the existing field value when the configured condition is met on a create or update event.
-
Save the rule.
Limitations
- The toggle is configured per rule. There is no global switch to enable overwriting across all rules at once, and no bulk action to toggle multiple existing rules in one step.
- Overwriting is on-trigger only - the rule replaces the field value at the moment the configured condition is met (during a create or update event). Previously existing records are not updated retroactively; the affected record must be edited or re-triggered for the new behavior to apply.
Auto-assign stop and freight extras
Auto-assign rules can now add extras, not just field values. Extras such as liftgate, cleaning, customs handling or ADR handling no longer need to be checked by hand on every stop or freight line. When a stop or freight line matches the rule conditions, the chosen extras are added automatically. This saves time and helps make sure the rate card always picks up the charge.
- Stop extras are set up in the Stop fields category.
- Freight extras are set up in the new Freight fields category.
- Order fields and Shipment fields do not offer extras.
Use cases
- Product-based stop extra: a liquid bulk transport company with a large product catalog needs a fixed stop extra (for example Baffled) every time a specific product is transported. A stop extras rule with a condition on the freight product removes the need to add it by hand on each order.
- Surcharge by area: a pallet network member needs a surcharge stop extra on deliveries to certain ZIP codes. A stop extras rule with a ZIP code condition adds the surcharge automatically.
- Customer-specific extras: a delivery to a specific customer always needs a liftgate. A stop extras rule with a customer condition and a Delivery stop type adds Liftgate to every matching delivery.
- Existing auto-assign users: companies that already rely on auto-assign rules for fields can now manage their recurring extras in the same place.
Create a stop extras rule
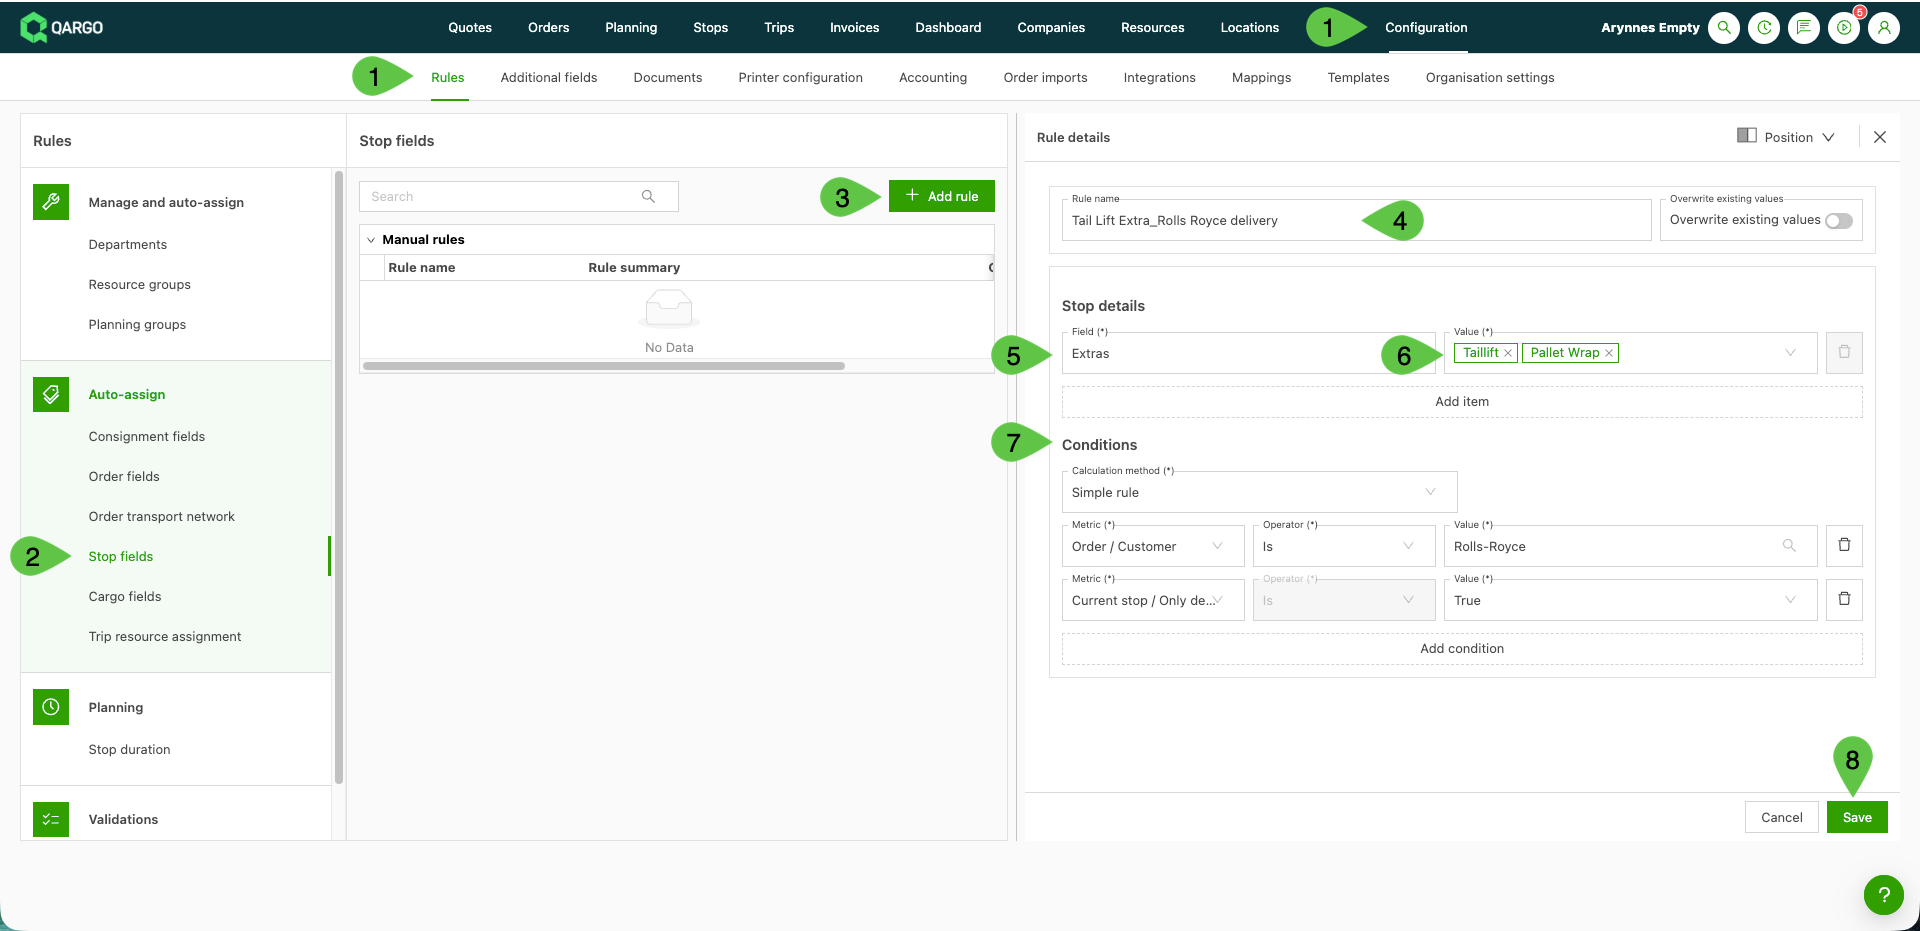
- Navigate to Configuration > Rules.
- Select Stop fields from the Auto-assign side menu.
- Click Add rule to create a new rule, or open an existing rule.
- Name the rule for easy identification (for example “Liftgate - Customer X deliveries”).
- Select Extras from the Field dropdown.
- Select one or more stop extras from the Value multi-select list.
- Set the Conditions in the same way as for any other rule (for example a customer, a product on the freight, or the stop type).
- Save the rule.
Create a freight extras rule
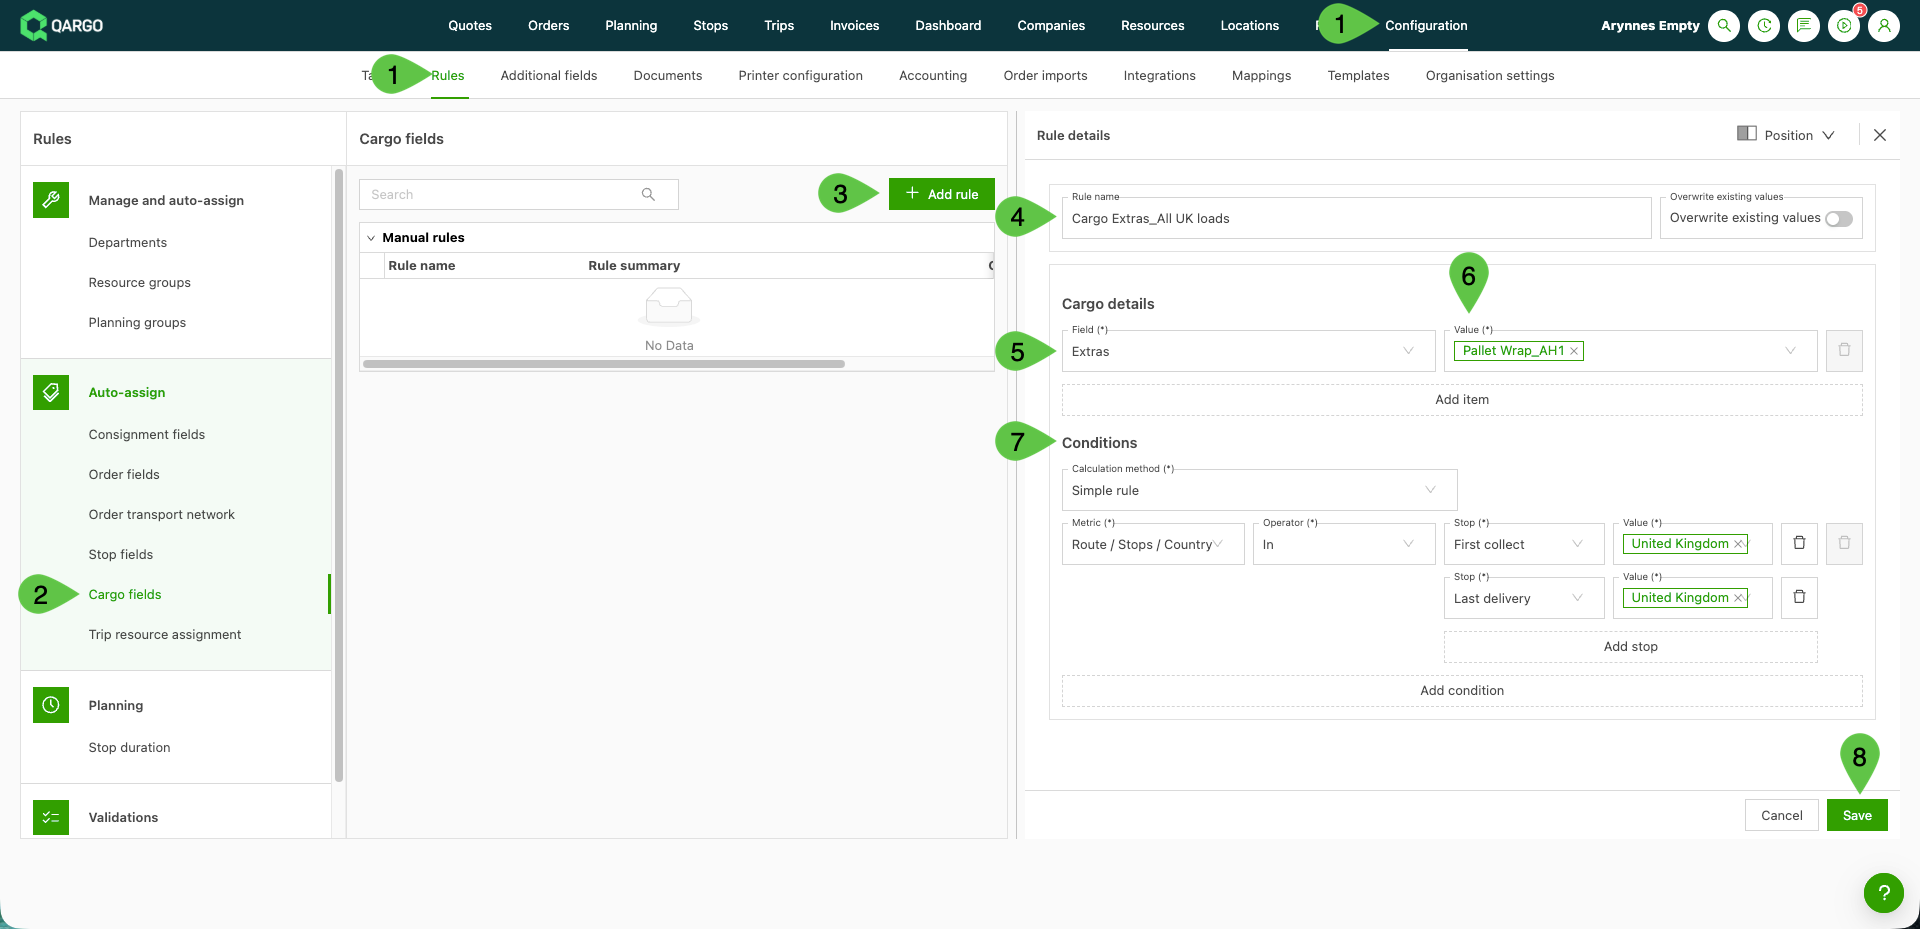
- Navigate to Configuration > Rules.
- Select Freight fields from the Auto-assign side menu.
- Click Add item to create a new rule, or open an existing rule.
- Name the rule for easy identification.
- Select Extras from the Field dropdown.
- Select one or more freight extras from the Value multi-select list.
- Set the Conditions for the rule.
- Save the rule.
When extras rules run
- Stop extras rules run when a stop is created. This includes stops added to an existing order or shipment, not only stops created with a new order.
- Freight extras rules run when a freight line (goods) is created. The extra is added to that freight line only. Other freight lines on the same order are not changed.
- The Conditions, Calculation method and Metrics work the same way as for regular field rules.
What happens on the order
- Extras added by a rule behave exactly like extras added by hand. They show on the stop or freight line, feed into rate cards and billing, and count toward resource compatibility.
- Extras are never duplicated. If the extra is already on the stop or freight line, the rule skips it.
- When several rules match the same stop or freight line, all of their extras are added together. This is different from regular fields, where only one rule’s value is used.
Limitations - extras
- Rules only add extras. The Overwrite existing values toggle does not apply to extras. A rule never removes or replaces an extra that is already on the stop or freight line.
- Adding freight later does not re-run stop rules. If freight is added to an existing shipment, the stop extras rules for that shipment are not checked again. A rule such as “heavy freight adds a forklift stop extra” only works when the freight is already on the order at the moment the stop is created.
- Internal stop type is not available as a condition. Adding an extra based on an internal stop type (for example a customs or cleaning stop) is not yet supported with these rules.
- Rules do not add stops. Extras rules add extras to stops that already exist. They do not create new stops.
- Existing records are not updated. Rules only run on new stops and freight lines. Stops and freight created before the rule was saved do not get the extra.
- Only stop and freight extras. Other items, such as incidents, cannot be added with auto-assign rules.
Do not dispatch: set it automatically with an AI-based stop rule
An AI-based rule under Stop fields can set Do not dispatch on a stop, based on the stop’s activity. Qargo keeps those stops on the load but does not send them to the driver mobile app or fleet system.
Prerequisites
Qargo Intelligence must be enabled; the AI-based rule type only shows when Qi is active.
Create a Do not dispatch rule
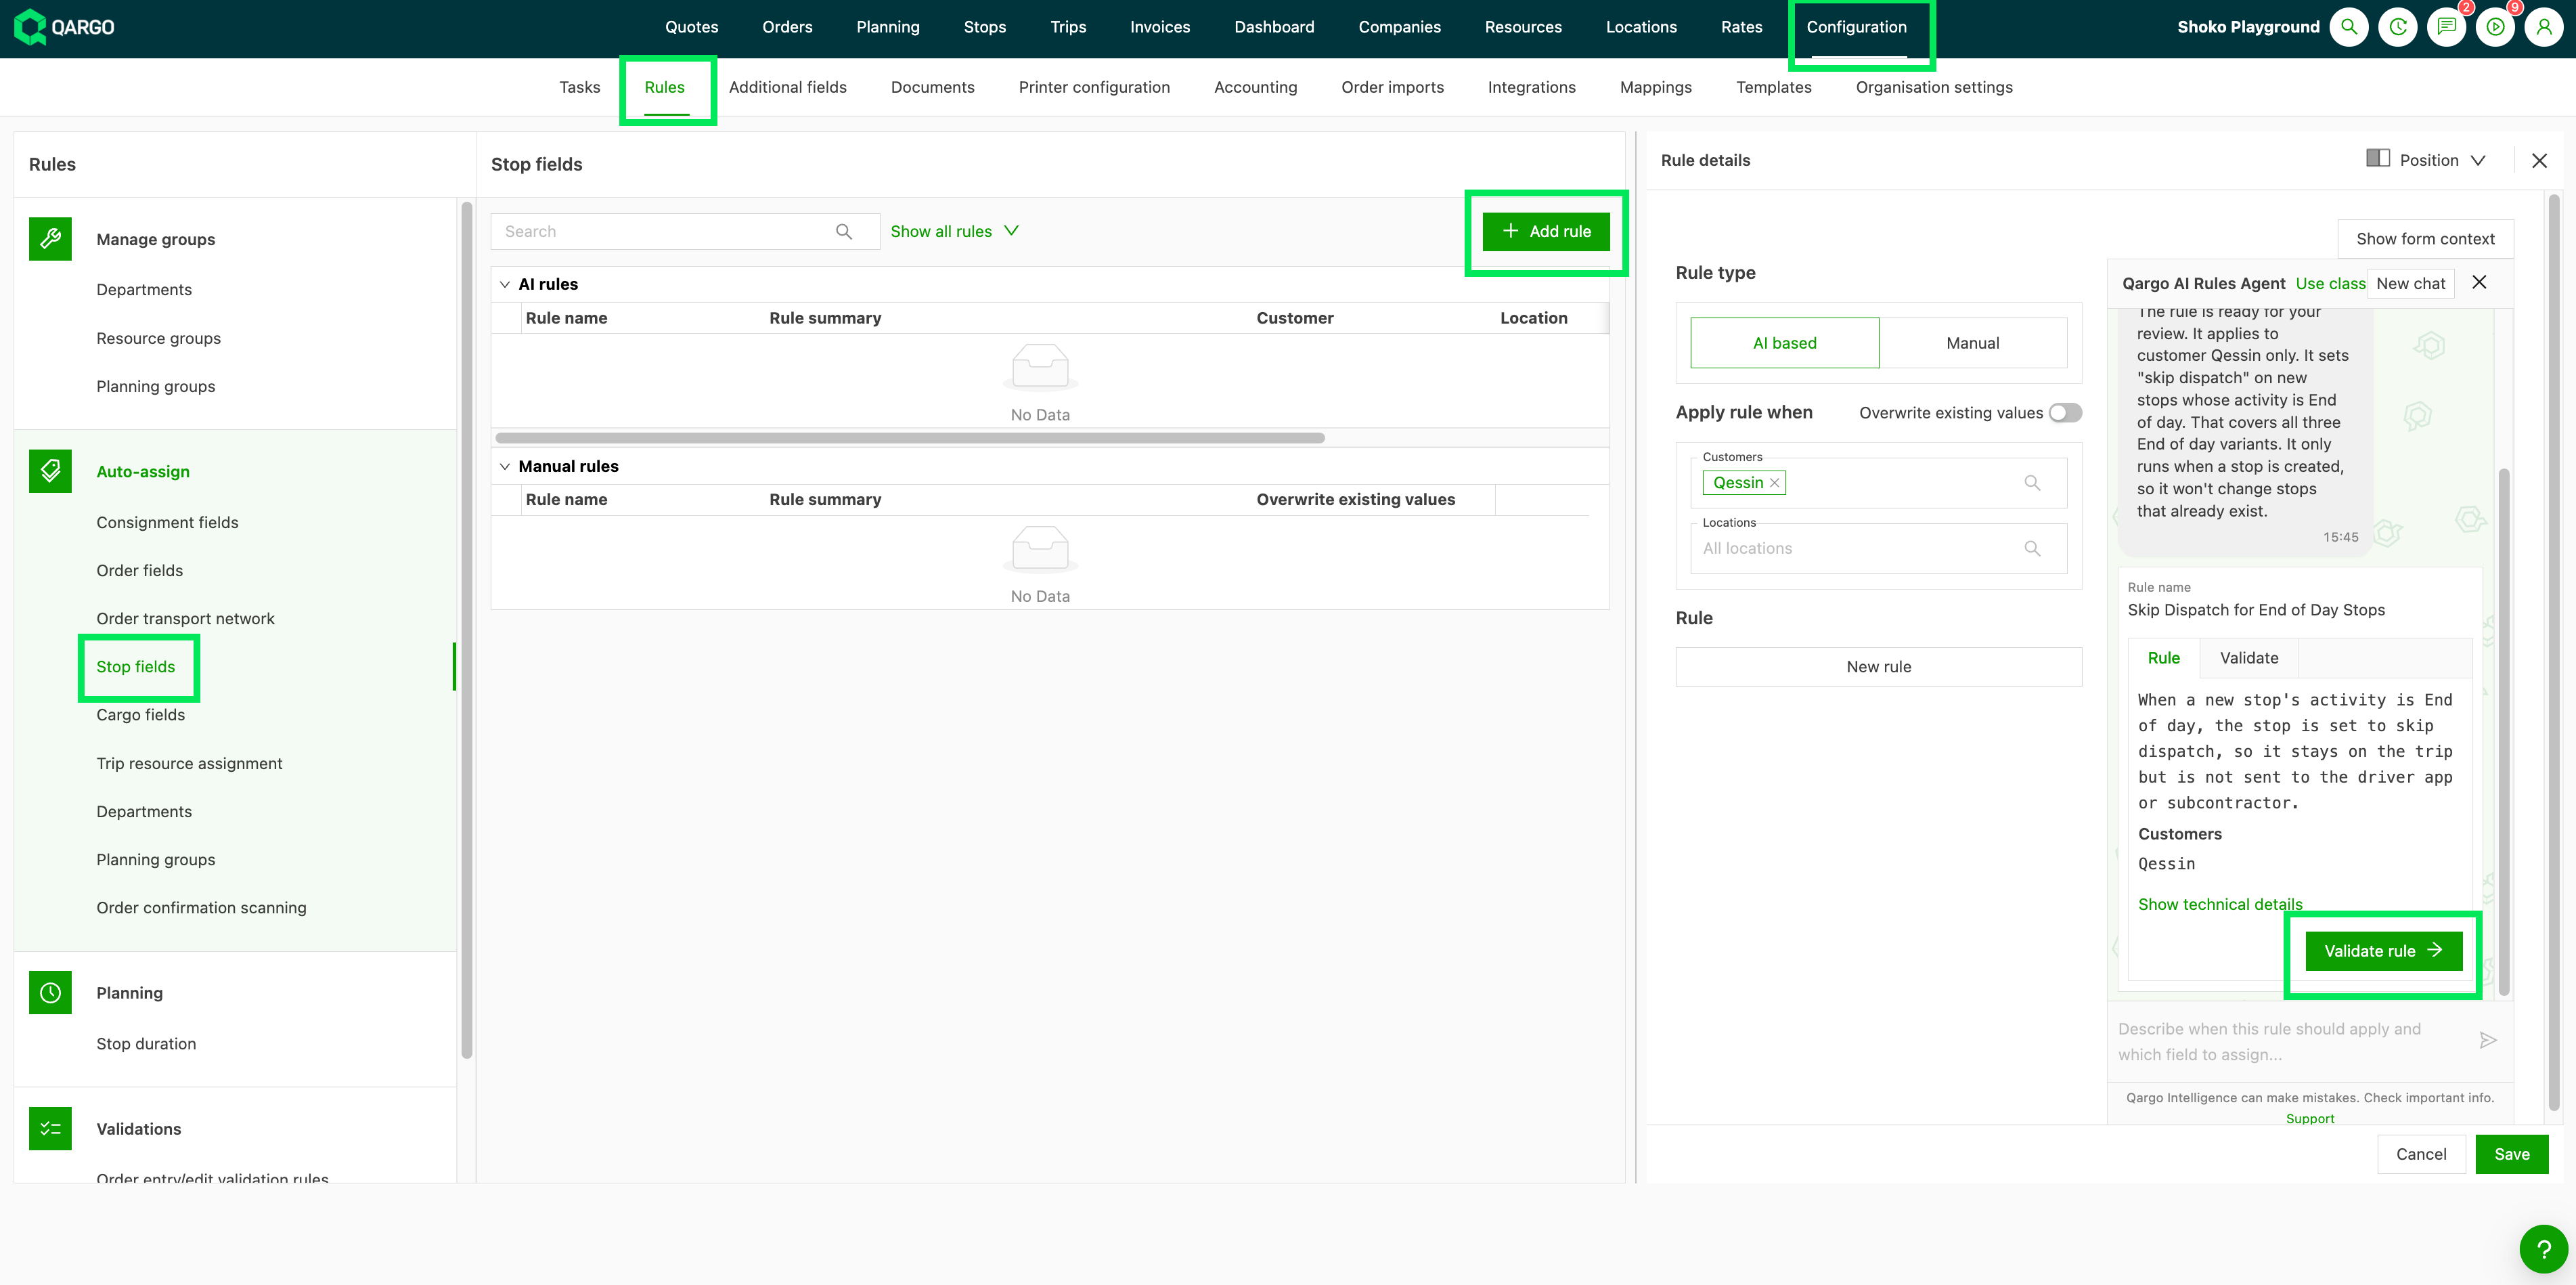
- Navigate to Configuration > Rules.
- Select Stop fields from the Auto-assign side menu.
- Click Add rule and choose AI-based.
- Enter the rule in plain words in the ‘Qargo AI Rules Agent’ chat, for example “When a new stop’s activity is End of day, do not dispatch it”.
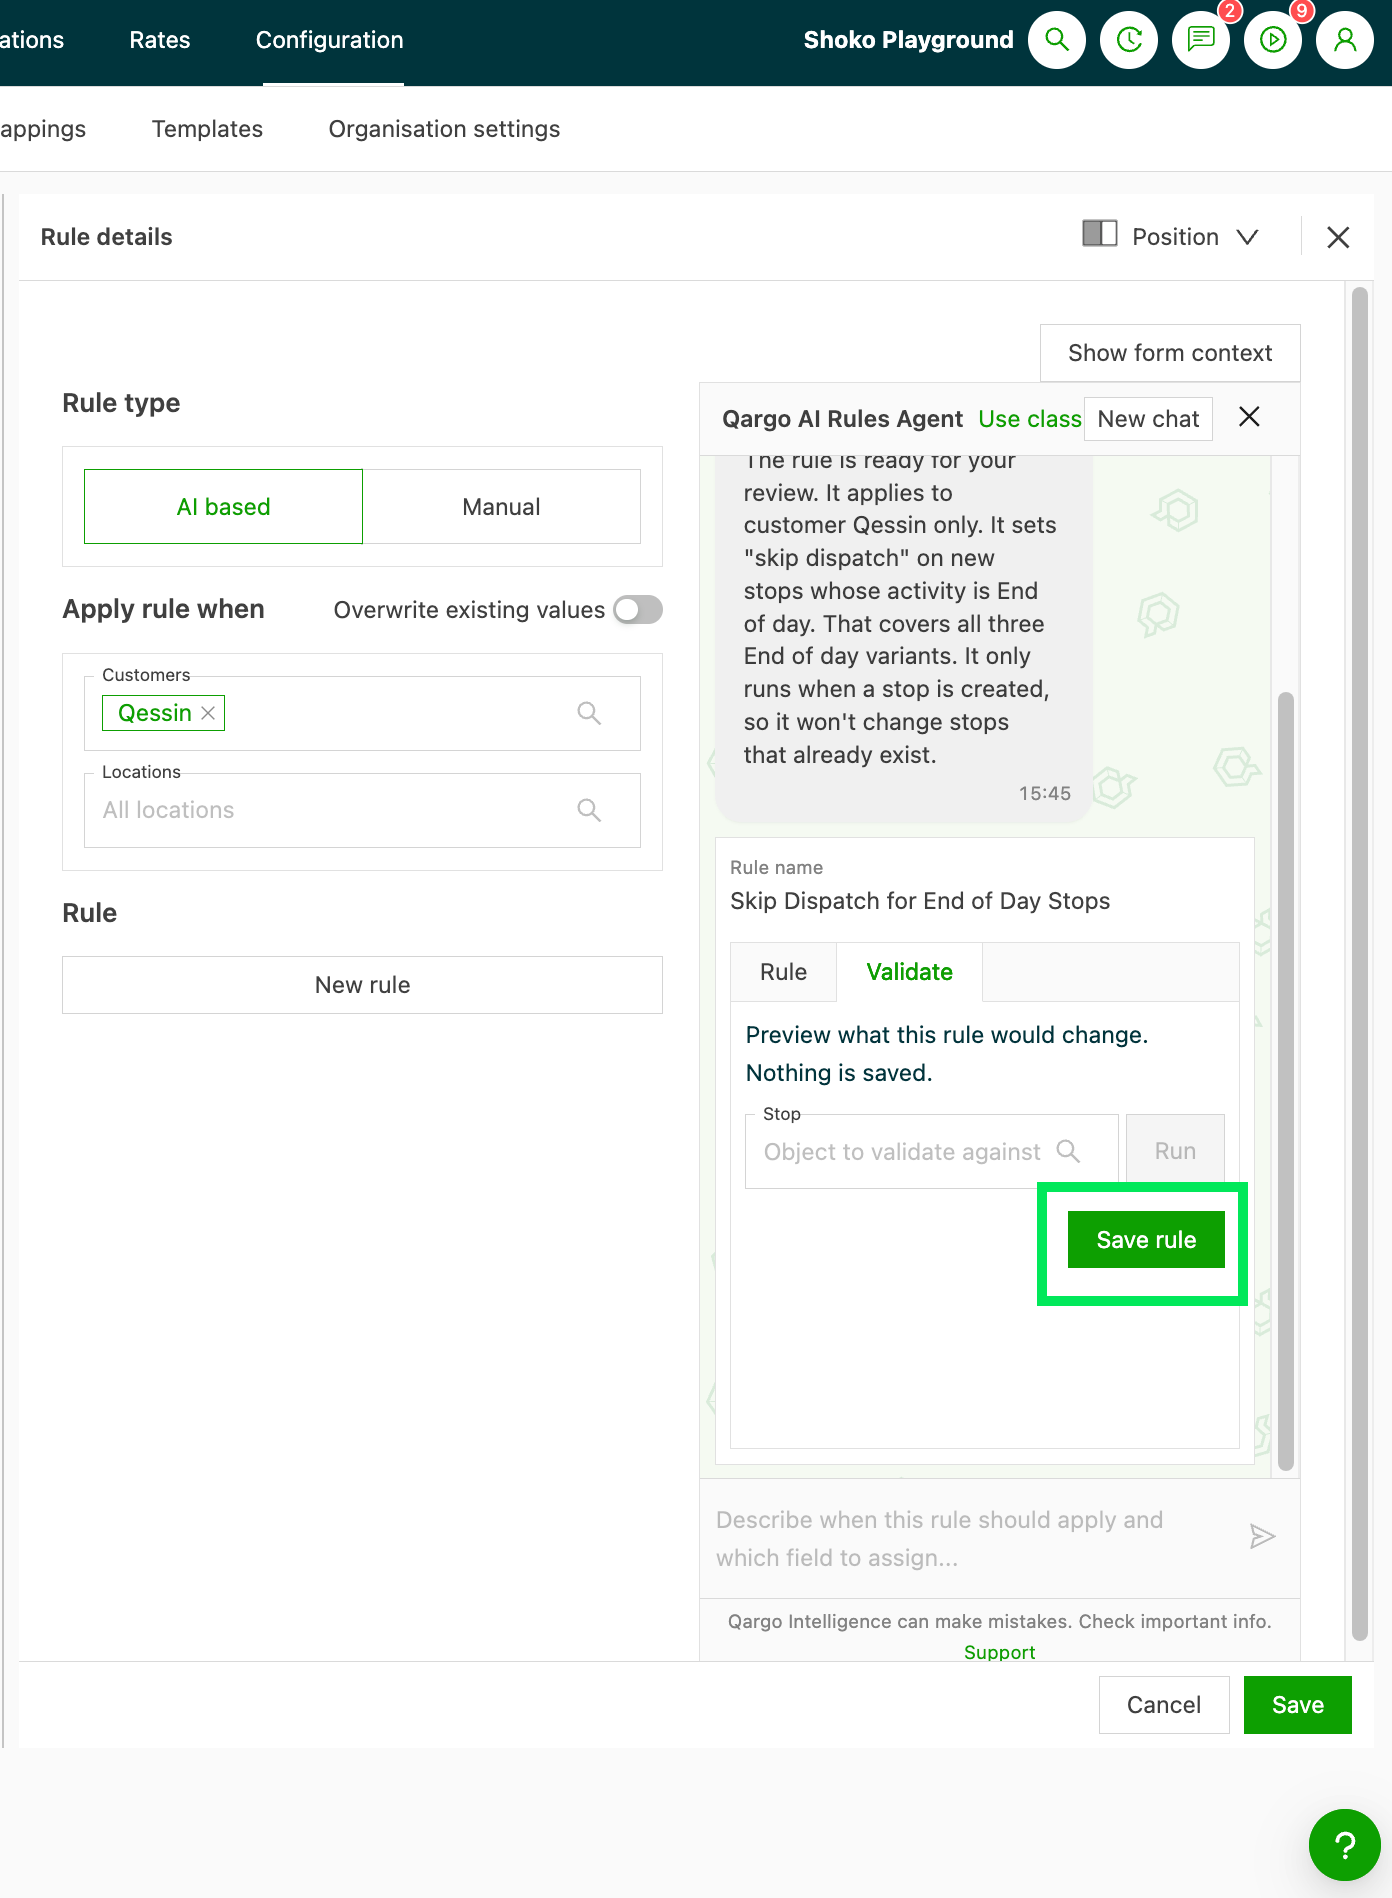
- Review the rule and click Validate rule, then Save rule.
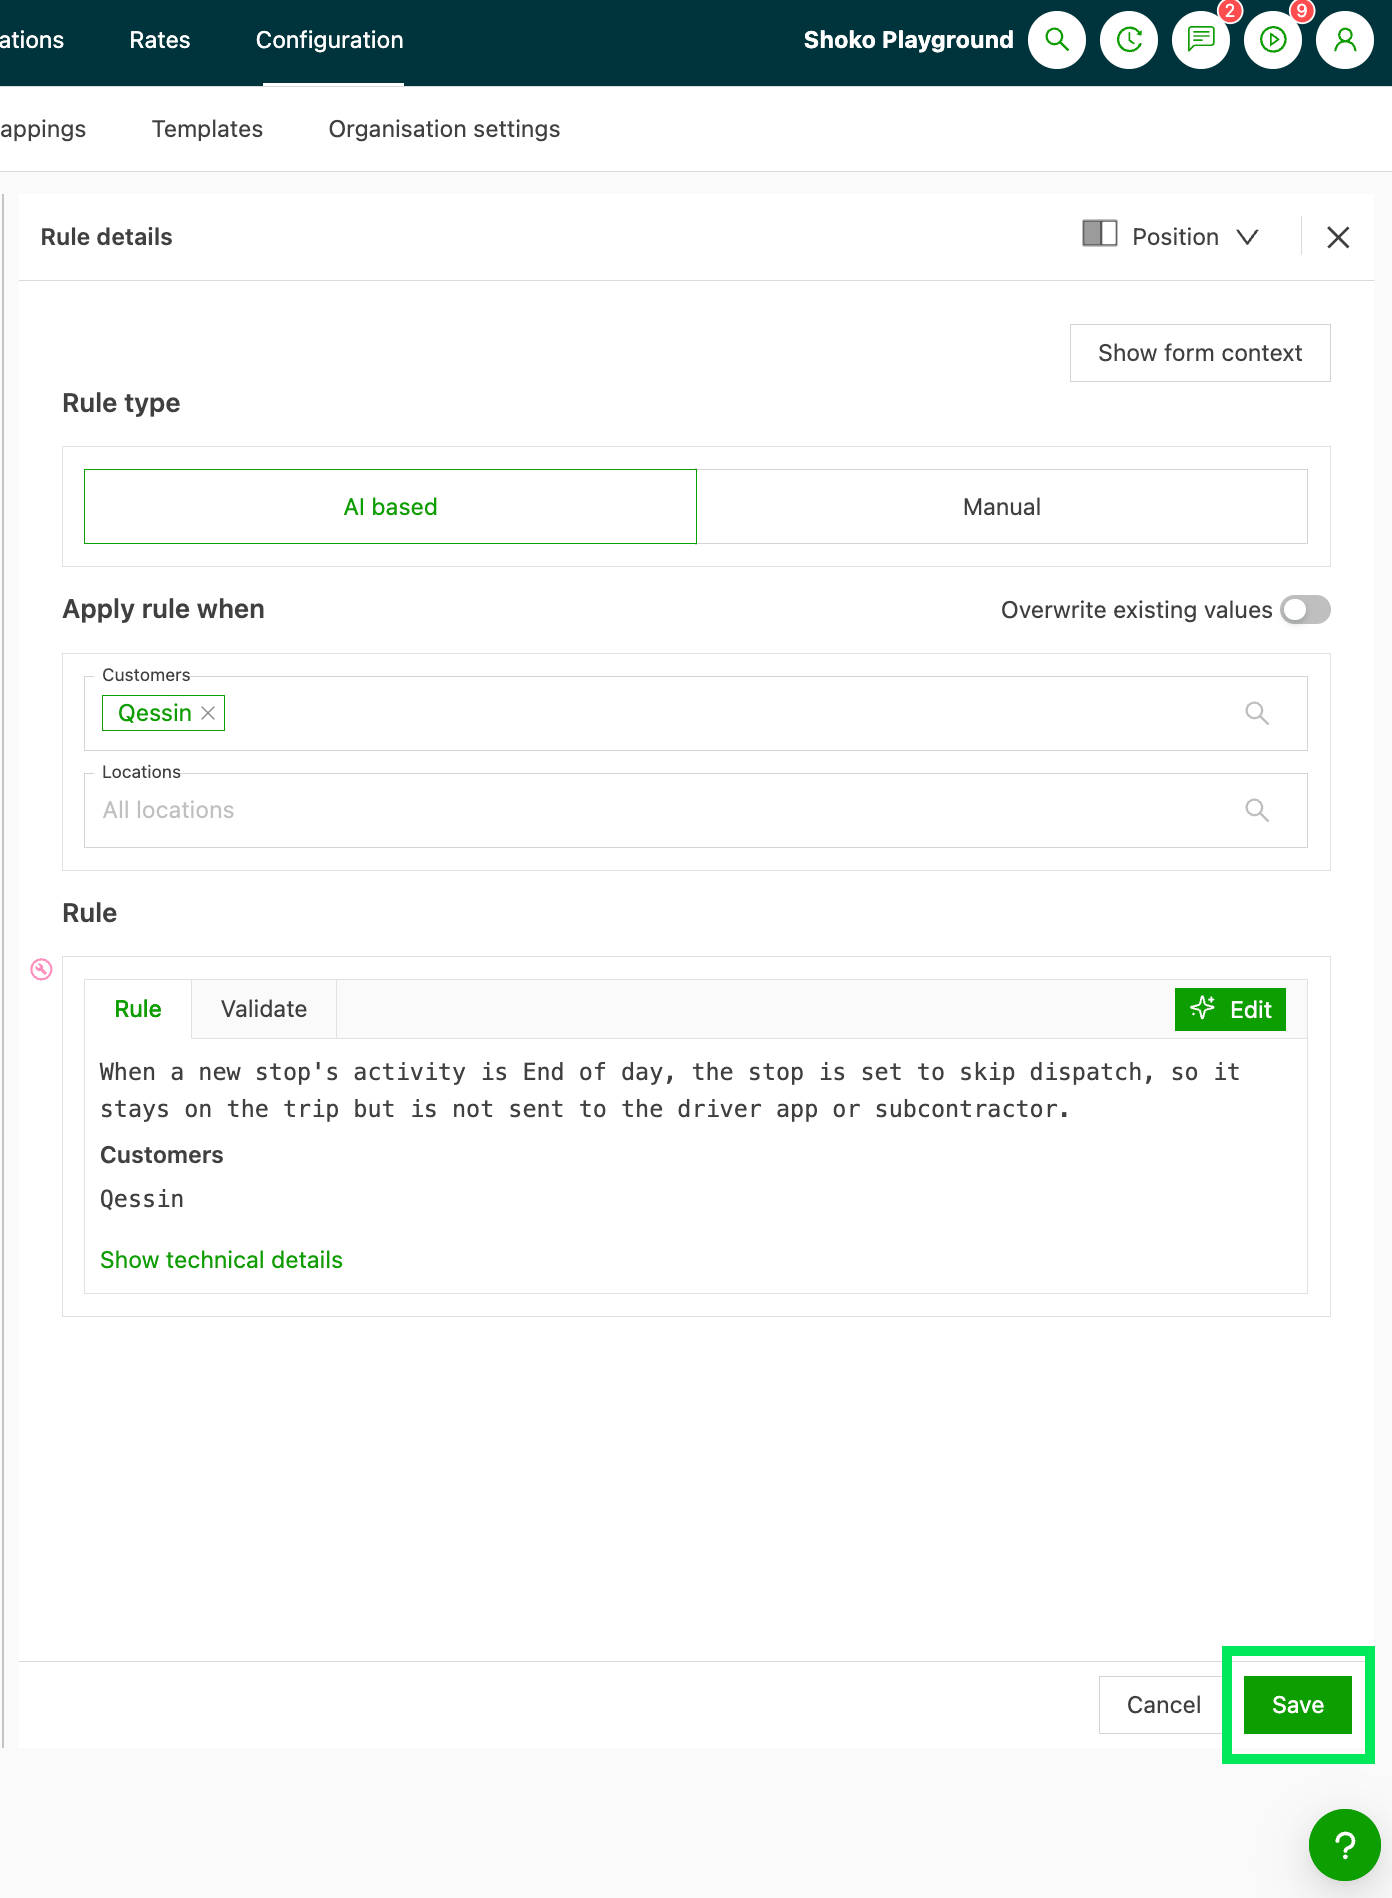
- Save the rule panel.
How it works
- When it runs: on every new stop. That covers Create order, order import, the API, and stops added with Edit order or Add stop.
- Existing stops: editing a stop does not run the rule again. A new or changed rule does not update stops that already exist.
- Manual rules: they cannot set Do not dispatch. Only AI-based rules can.
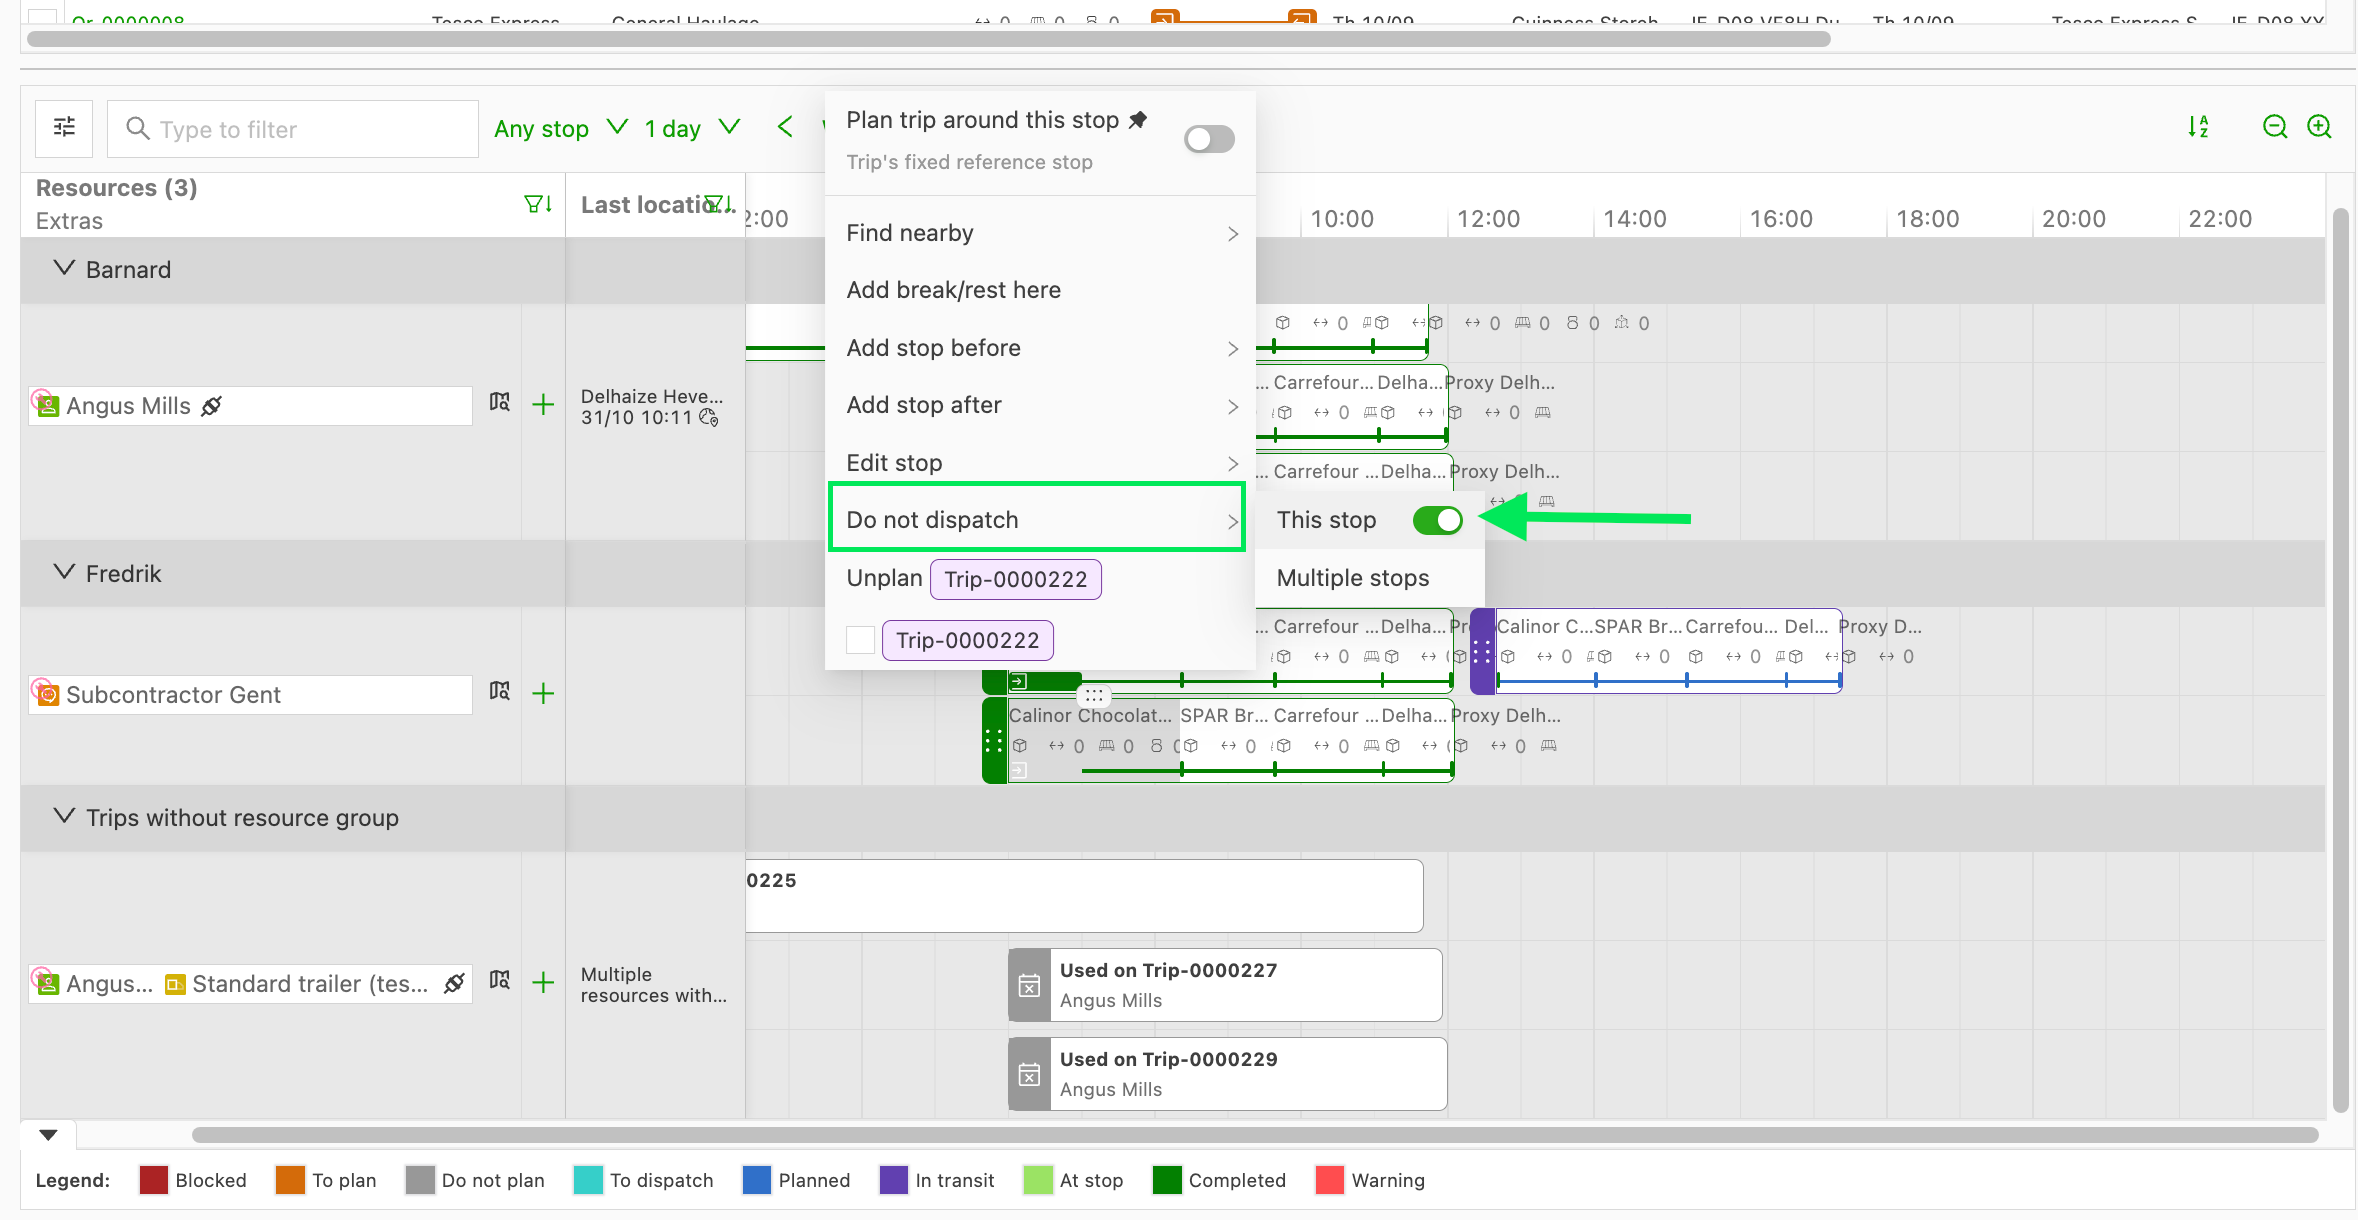
- Switch back: the planner can still dispatch an excluded stop from the planning board, with Do not dispatch > This stop.
Troubleshooting
| Issue | Resolution |
|---|---|
| Field not auto-populated | Check that the rule is configured for the correct scope (order, shipment, load, stop).\ |
| Verify that the rule’s trigger is set to run at the appropriate time (creation vs. update).\ | |
| Make sure there are no conflicting rules that overwrite the value after it is set. | |
| Incorrect values | Review the rule’s value definitions and any dependencies on other fields.\ |
| Confirm that the rule’s conditions match the actual data context. | |
| Rule not triggering | Confirm that the rule is enabled\ |
| Check whether the rule relies on data that isn’t available at creation time. | |
| Data inconsistency after updates | If a field is overwritten by a later rule, adjust the rule priorities or add conditions to prevent unintended overwrites. |
| Field value not overwritten despite toggle on | Confirm that the rule’s trigger condition is met on the record.\ |
| Verify that the rule scope matches the entity type (order, shipment or stop).\ | |
| Check whether a later rule resets the field to a previous value. | |
| Field remains empty after rule runs with toggle on | Rules run on create/update events — the rule may not have fired yet.\ |
| Re-save or re-trigger the affected record to evaluate the rule. | |
| Unexpected values on existing records | Rules with the toggle on do not retroactively update existing records.\ |
| Only records created or edited after the toggle was enabled reflect the overwrite behavior. | |
| Extras not shown in the Field dropdown | Extras are only offered in Stop fields and Freight fields, not in Order fields or Shipment fields. |
| Freight fields category not visible | The category only shows when freight extras are configured. Add freight extras under Rates > Order input first. |
| Stop fields category not visible | The category only shows when stop fields are available on the account. Contact the Qargo account manager for help. |
| Extra not listed in the Value picker | Check that the extra exists under Rates > Order input and is not archived. |
| Stop extra not added to a stop | Check that the extra’s Pickup, Delivery and Other stops setting allows that stop type. - Check that the rule conditions match the stop. - Check that the stop was created after the rule was saved. |
| Stop extra not added after freight was added to an order | Adding freight later does not re-run stop rules. The freight must be on the order when the stop is created. |
| Existing extra not replaced or removed by a rule | Expected behavior. Rules only add extras, and the Overwrite existing values toggle does not apply to extras. |
| More extras than expected on a stop or freight line | Several rules matched. Extras from all matching rules are added together. Review the conditions on overlapping rules. |
| Freight extra added to the wrong freight lines | Freight extras have no stop type setting, so the rule conditions alone decide. Make the conditions more specific. |
| Do not dispatch not offered in a manual rule | Only AI-based rules can set Do not dispatch. Create the rule with the AI-based rule type. |
| Existing stops not excluded after saving the rule | Rules only run on new stops. Exclude existing stops on the planning board with Do not dispatch. |
Additional tips
- Start with a small set of high-impact rules and expand gradually to avoid complex interdependencies.
- Document each rule with a short description of its purpose and the fields it affects.
- Use a standard naming convention for rules to make them easy to find (e.g., “Route_Zones_AutoFill” or “CustomerRefs_Defaults”).
- Regularly review and retire rules that are no longer needed or have been superseded by new configurations.
The Auto-assign feature simplifies data management by automatically populating key fields according to well-defined rules. It streamlines workflows, reduces manual data entry and improves consistency across loads, orders, shipments and stops.