
Cross dock: what it is and how to use it
Use cross docking to streamline logistics by consolidating shipments at hubs and reducing transport costs. See how Qargo handles it all.
Table of contents
A cross dock (XD) is a location where incoming goods from various suppliers are unloaded from inbound trucks / containers. The goods are sorted and then loaded onto an outbound truck / container to the final destination. The main purpose of a cross dock is to streamline logistics operations:
- cross docking allows shipments from multiple sources to be consolidated, enabling efficient distribution of goods that have a similar or nearby delivery location.
- by consolidating shipments at a cross docking facility, transport companies can optimize load capacity, reduce the number of delivery vehicles needed, and minimize transportation costs.
- for long-distance transportation, repeated cross docking at strategically located facilities along the route helps overcome the logistical challenges of covering vast distances.
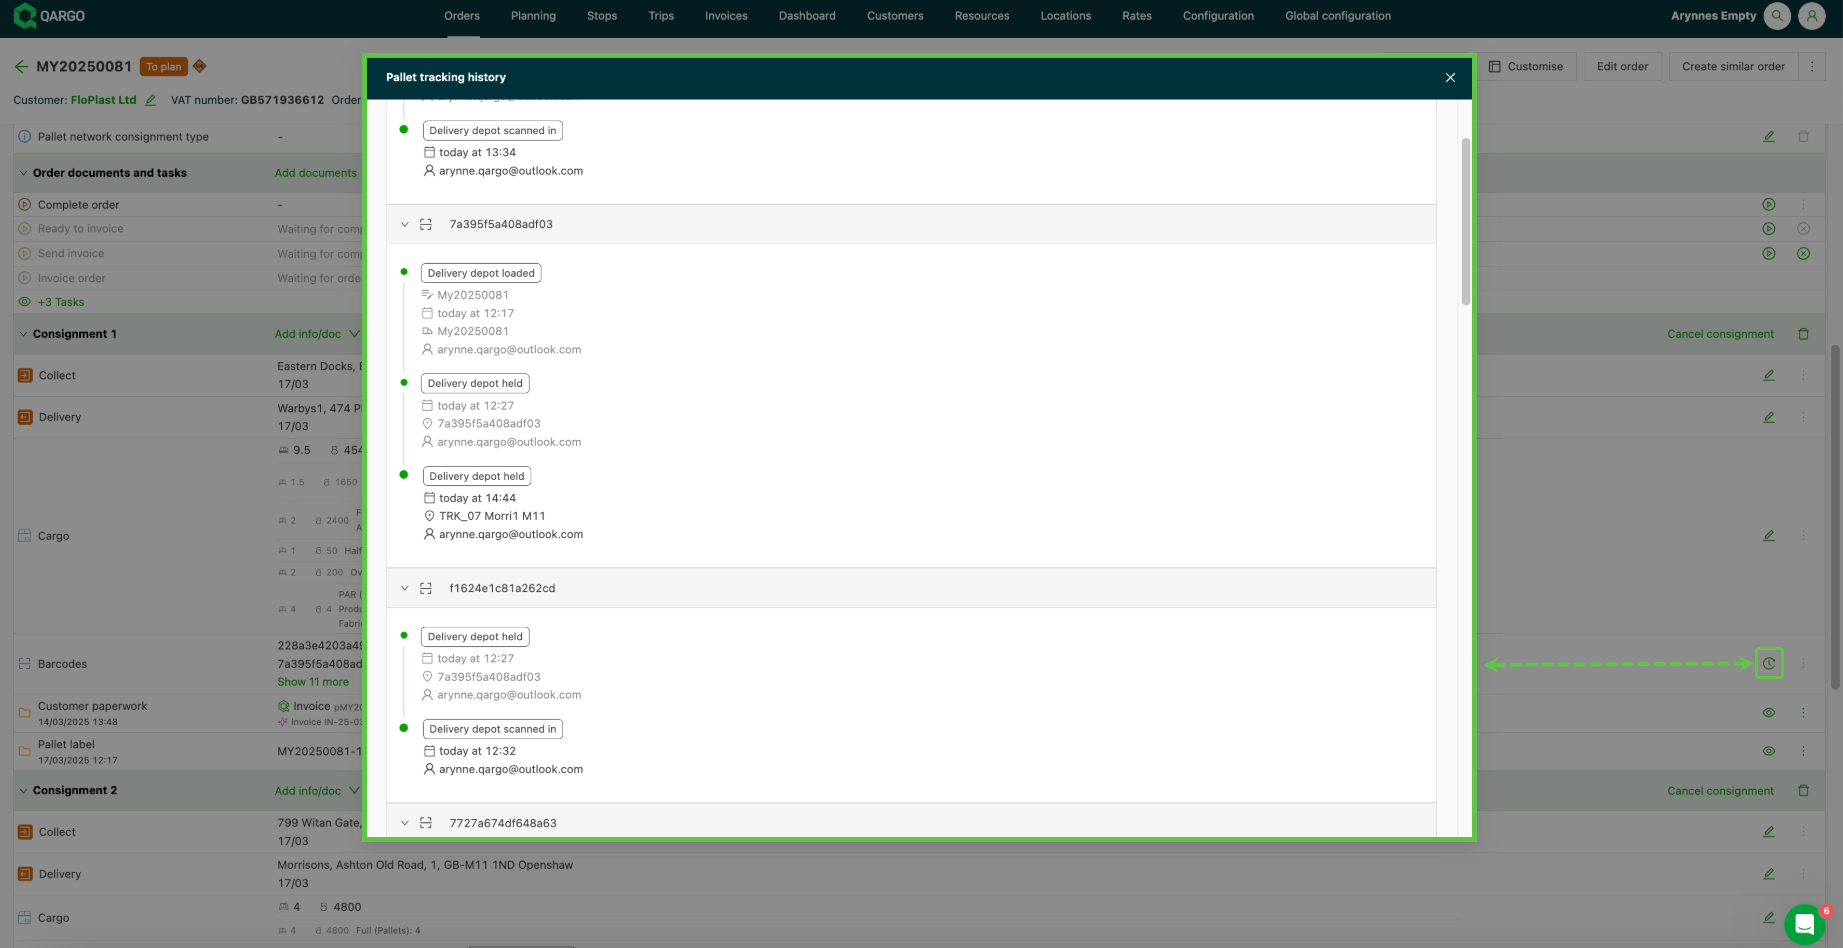
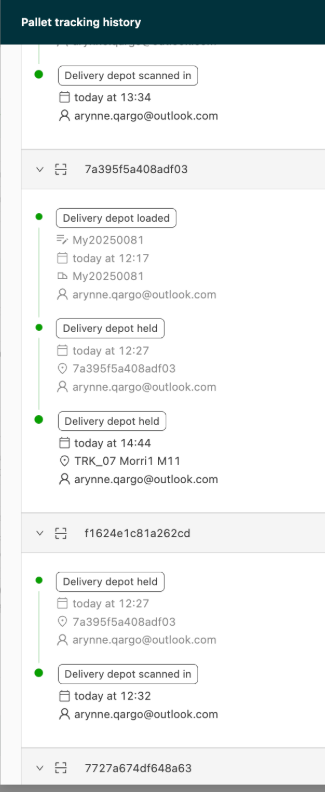
Qargo has extensive cross dock functionality built into the platform, including integrations with some of the leading pallet networks and the Cross dock scanning function available in the Qargo mobile app. Pallet tracking history is available directly from the shipment, showing the current location as well as previously scanned locations and status updates.
Terminology
| Term | Definition |
|---|---|
| Inbound vehicle | Vehicle arriving at a location with picked-up freight on board. |
| Outbound vehicle | Vehicle at a hub/terminal location loaded with freight for delivery. |
| Requesting terminal | Terminal that requests the service and reports to the customer, but does not actually complete the pickup or delivery; often used in pallet networks. |
| Pickup terminal | Terminal location associated with the pickup leg of a shipment |
| Delivery terminal | Terminal location associated with the delivery leg of a shipment |
| Transfer terminal | Terminal location between the pickup and delivery legs; this stage is often referred to as shuttle or trunk (Owned / partner network) |
| Hub | Transfer terminal associated with pallet networks, referred to as hubs. |
| Terminal | Terminal location often associated with carrier satellite locations; see also ‘Hub’ and ‘Terminal’ |
| Scanned in | Scan status associated with arrival and unload events at hub/terminal locations; uses a fixed format structure made up of location and event. |
| Scanned out | Scan status associated with load and departure events at hub/terminal locations; uses a fixed format structure made up of location and event. |
| Free scan | Used to scan either inbound or outbound freight. |
| Stored | Scan status indicating offloaded freight that is not immediately sent out for delivery |
| Trunk | Transfer of goods between a pickup and delivery terminal; goods are offloaded at the new terminal or can remain on a dropped trailer for allocation (Shuttle) |
Transport network: 3 types of networks are identified
- Owned network: the transport company uses 1 or more terminals of its own
- Partner network: the transport company works with partners to execute local pickups and deliveries from their own terminals
- Pallet network: the transport company works with a central authority that decides how local pickups / deliveries are distributed and executed via central hubs.
Configuration
Location setup
To cross dock, at least one location must be set up and marked as an internal terminal. When combined with the cross dock scanning function of the Qargo mobile app, locations marked as terminals are shown as available in the app.
Step 1: Create the terminal as a transport network
-
Navigate to Locations > Transport networks
-
From the left menu, click ‘+Add transport network’
-
Under network type, select one of the 3 available options:
- Own network: used to create a network of owned terminals, even if there is only a single location
- Partner network: used to create a network of partner-owned terminals
- Central network (pallet networks, see below): used to create a network for an existing pallet network partner
-
-
Complete the General info section by providing a name / description.
- The code field is required when implementing integrations with networks.
Step 2: Add the terminal location to the network
-
Click the new network. Hubs & terminals are shown in the right panel.
-
Click the green ‘New terminal’ button.
-
Complete the new terminal details.
- If the location is not showing in the dropdown, use ’+ Create new location’ to add it to the location database.
-
Complete Terminal lead times for pickup and delivery terminals
- The default is set to ‘same day’, with options for +1 and +2 days.
-
Complete *Exceptions: terminals without a direct connection (*see details below)
-
Click Save
*Exceptions: terminals without a direct connection
-
This section lists terminals in a network that cannot be reached on a direct leg
- An intermediate terminal or hub is required on the route
-
The system automatically creates a route via the specified intermediate hub
- Orders are structured with stages that mirror real-world transfer points
- This prevents errors from planning operationally impossible loads, while ensuring accurate order splitting across all legs
Cross dock modes (app configuration)
The cross dock app in Qargo offers two main modes to control how goods are handled during cross docking:
-
Location scanning mode: operators are prompted to scan the physical location (such as a specific bay or outbound vehicle) where pallets are placed. This ensures that every move is precisely registered, helping track not only when but also where a pallet was placed within the terminal.
-
Keep pallets on truck while unloading mode: in terminals with limited space, operators may leave pallets on the inbound trailer and only fetch them when it’s time to load them onto the outbound vehicle. When this mode is enabled, the app does not automatically assume that unloading results in a loading or storage action, so pallets can stay on the trailer until needed.
Barcode setup (Qargo admin only)
- From Order input, select Packaging types under Freight options.
- Scroll to the ‘Configuration’ panel and make sure the ‘Generate barcodes’ toggle is on.
- This must be on for barcodes to be generated on orders.
Document types activation
-
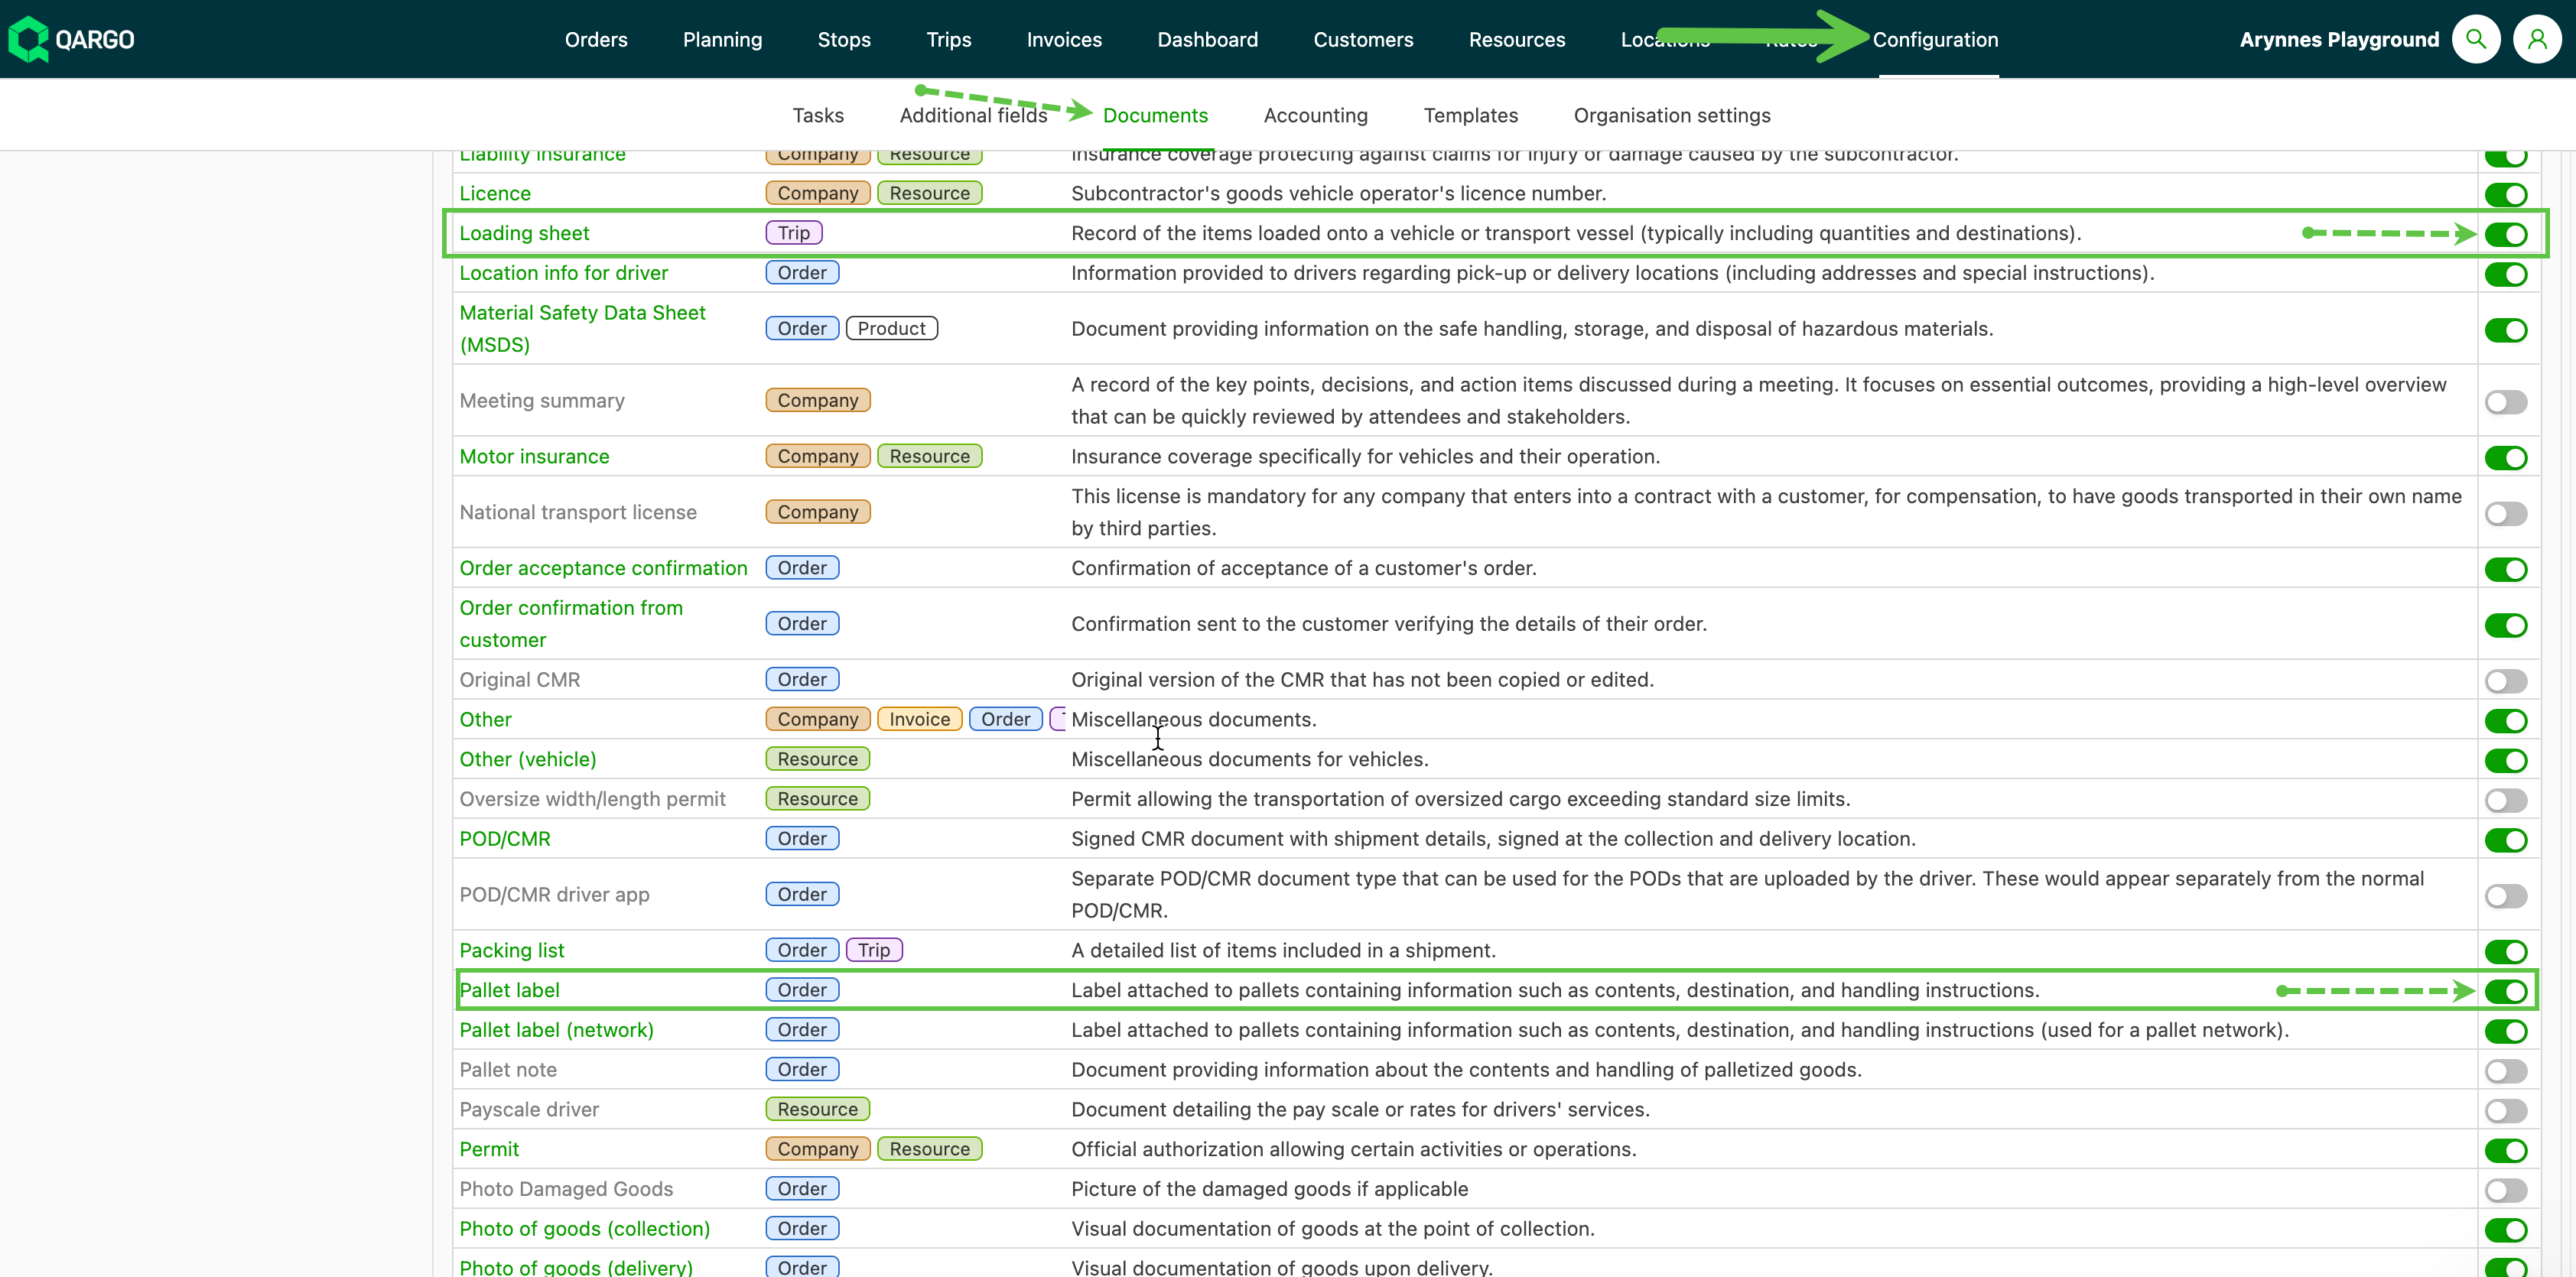
Navigate to Configuration > Documents.
-
Use the All tab to see the whole list
-
Toggle these templates on:
- Pallet labels (orders)
- Load sheet / Loading sheet (loads)
-
This enables these document templates so they can be used as part of the workflow task: document generation.
Document generation: labels with barcode
Documents can be generated as part of the task workflow in the system. A template for the document must be created.
- From Configuration > Templates, click the green ‘Add template’ button.
- Select the ‘Pallet label’ option from the list of available templates
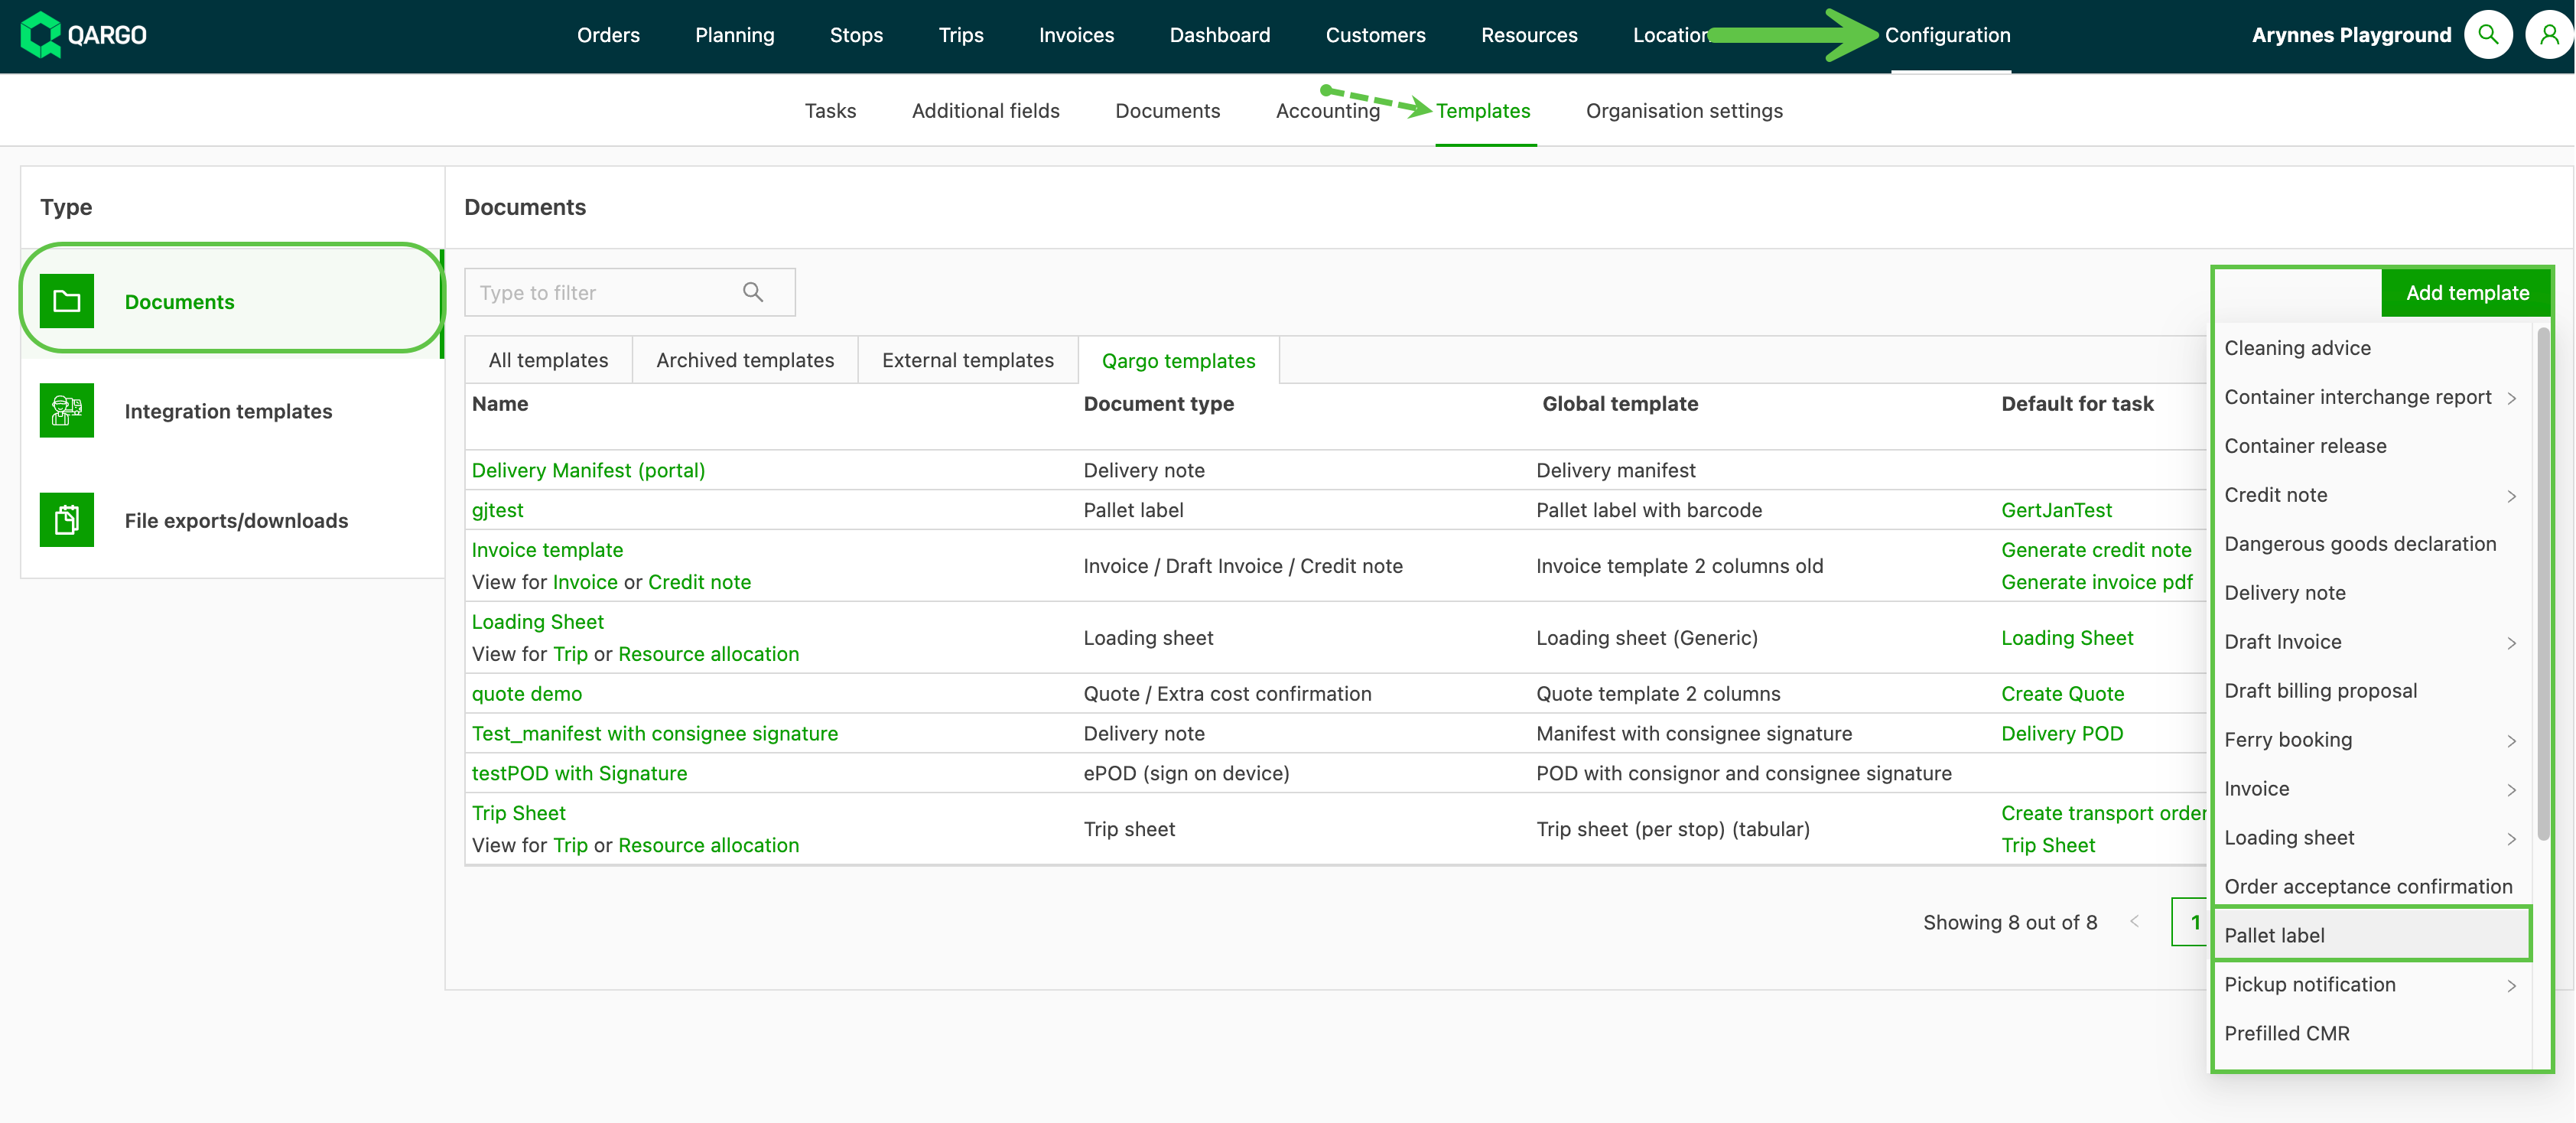
- Select the base template ‘Pallet label with barcode’
- Give the template a name.
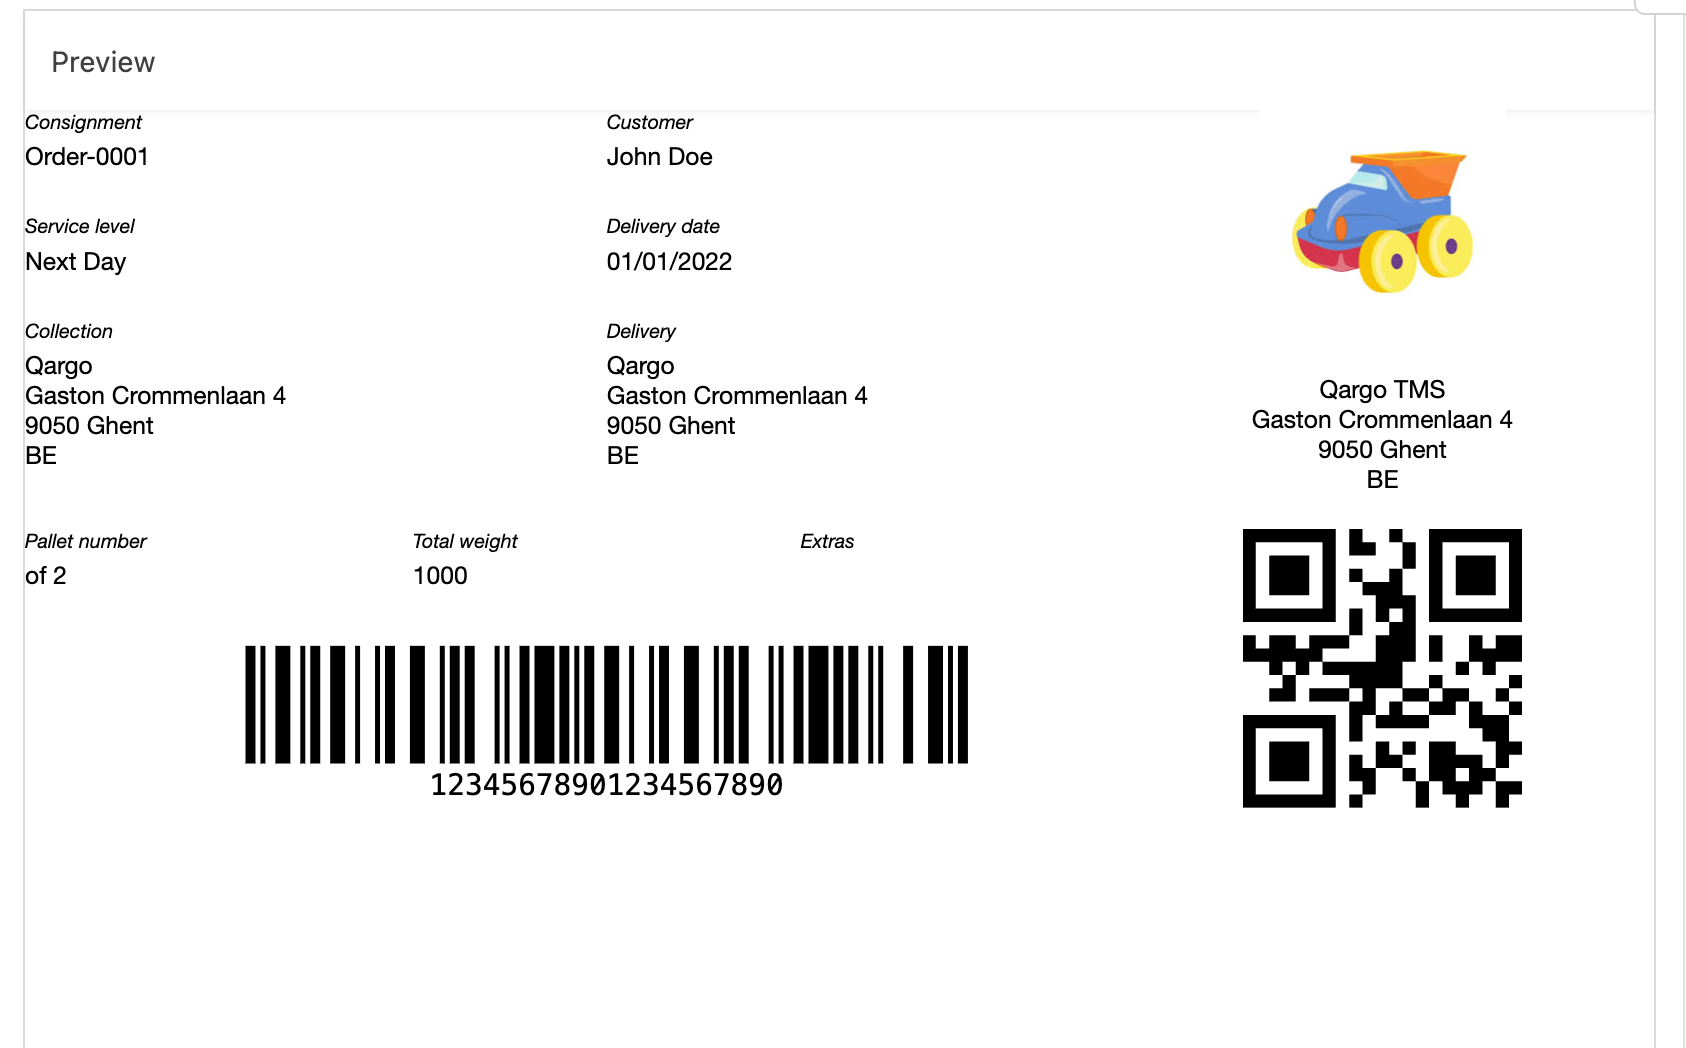
- A preview of the label is displayed in the right panel.
- The label can be modified by updating the relevant row details
- Click Save
Document generation: loading sheet > load
- From Configuration > Templates, click the green ‘Add template’ button.
- Select the ‘Loading sheet > Load’ option from the list of available templates
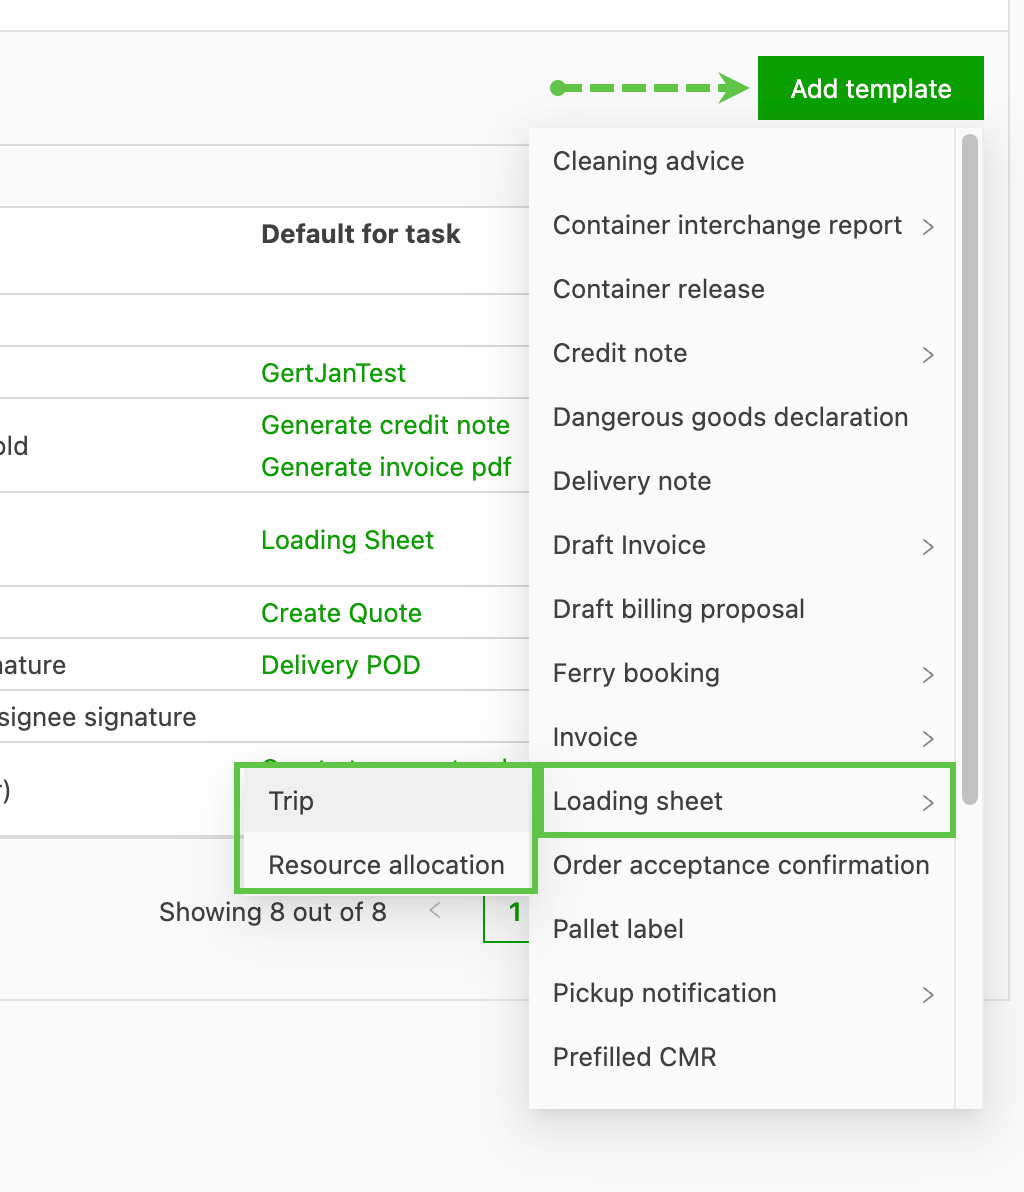
- Select the base template from the dropdown and give the template a name.
- A preview of the sheet is displayed in the right panel.
- The sheet can be modified by updating the relevant row details.
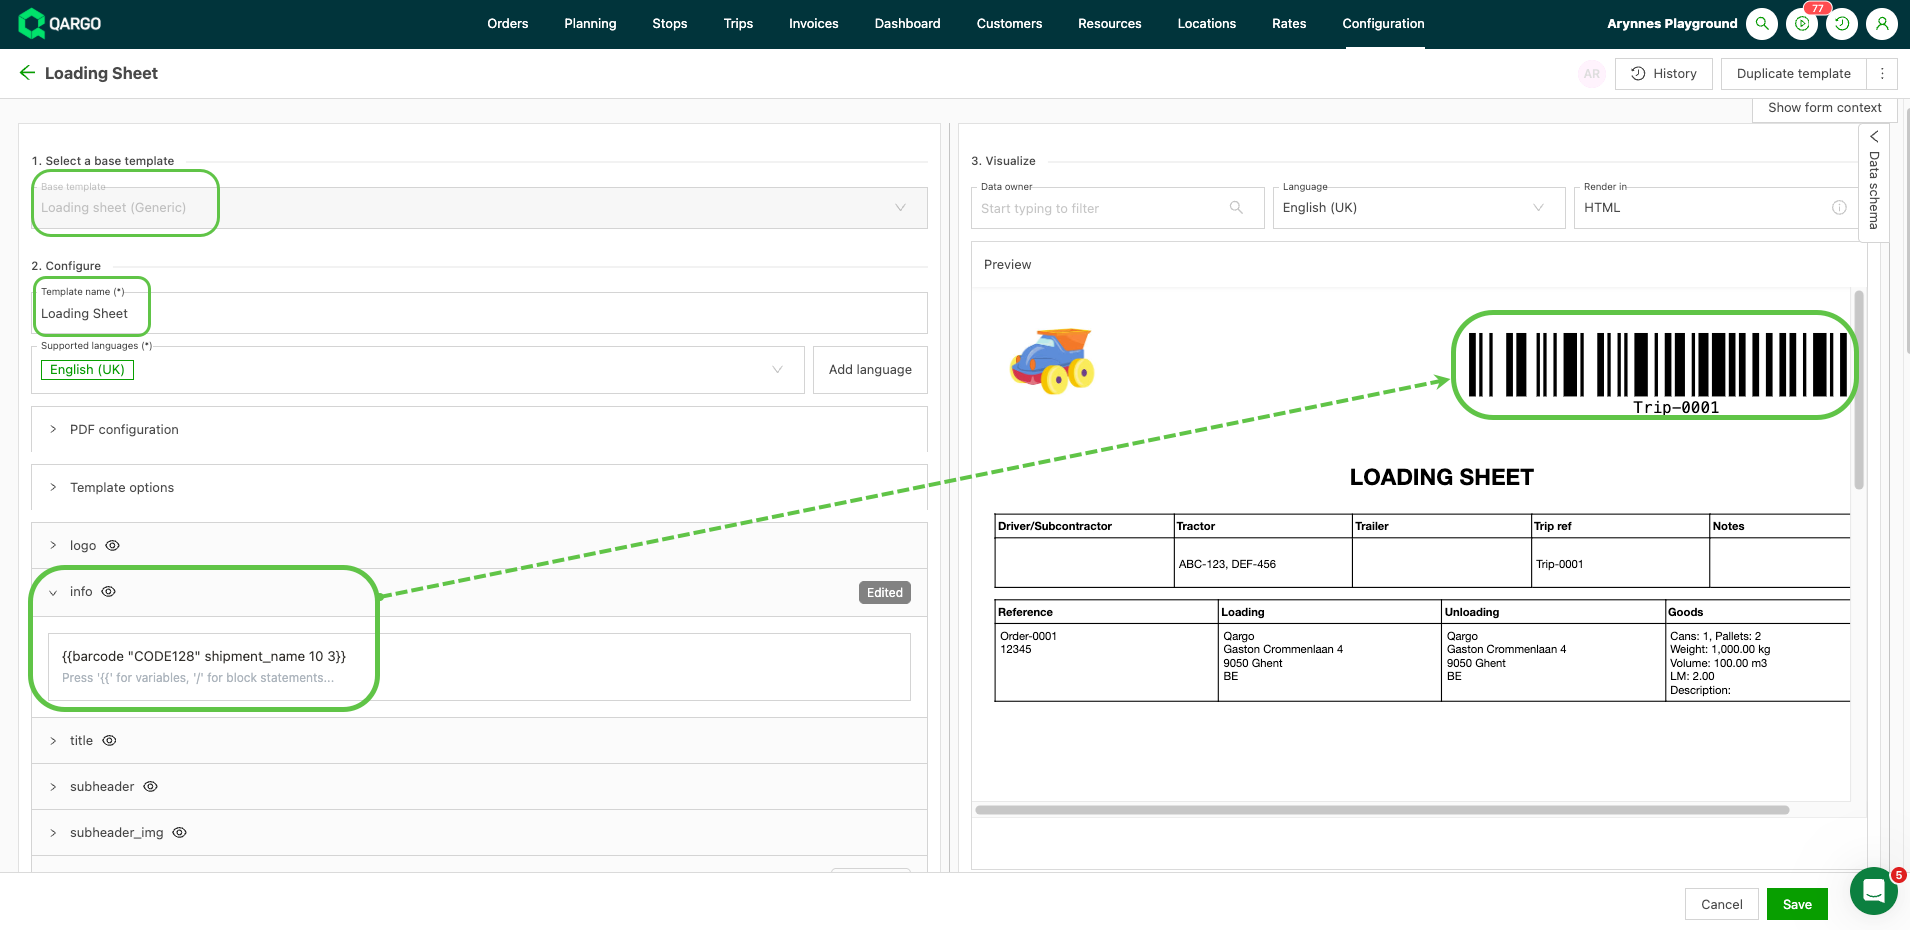
- Click Save
See the Qargo mobile app - Cross dock scanning article to learn more about cross dock scanning workflows.
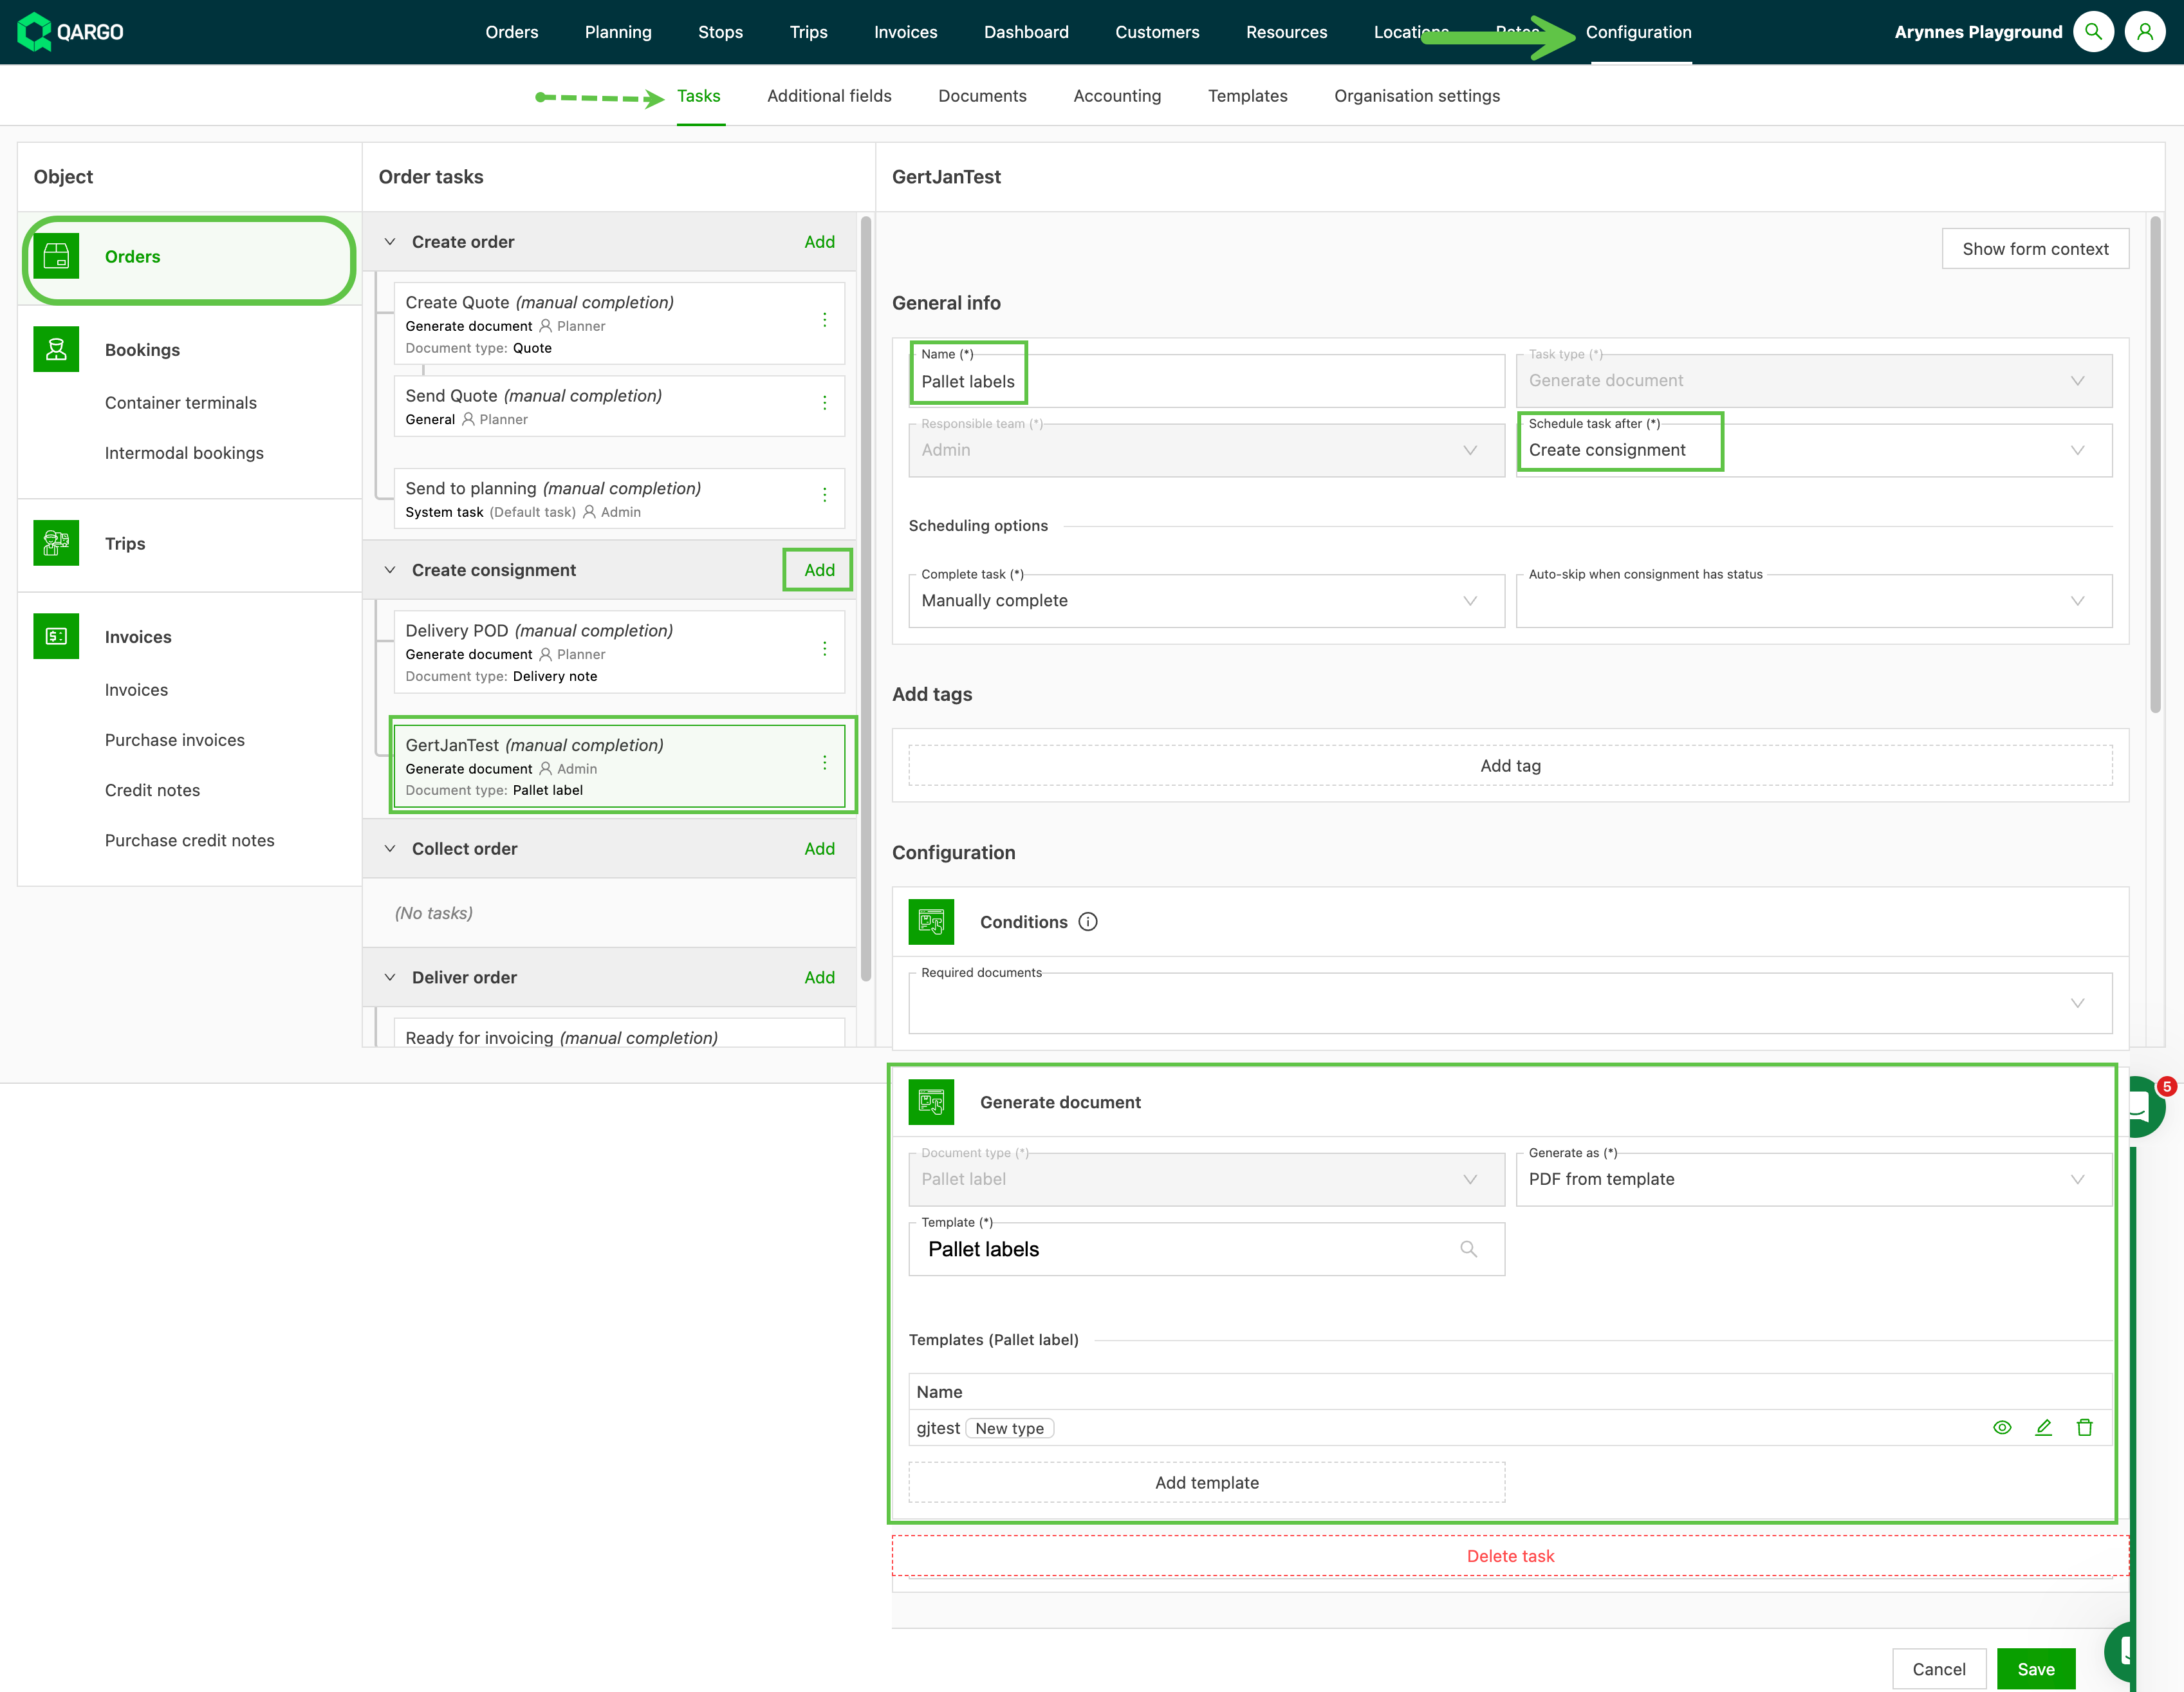
Add a workflow task
With the document templates added, tasks that use these documents can be set up
- Go to Configuration > Tasks
- Add a task under Orders, for instance below ‘Create shipment’, to generate a pallet label
Enable users (app configuration)
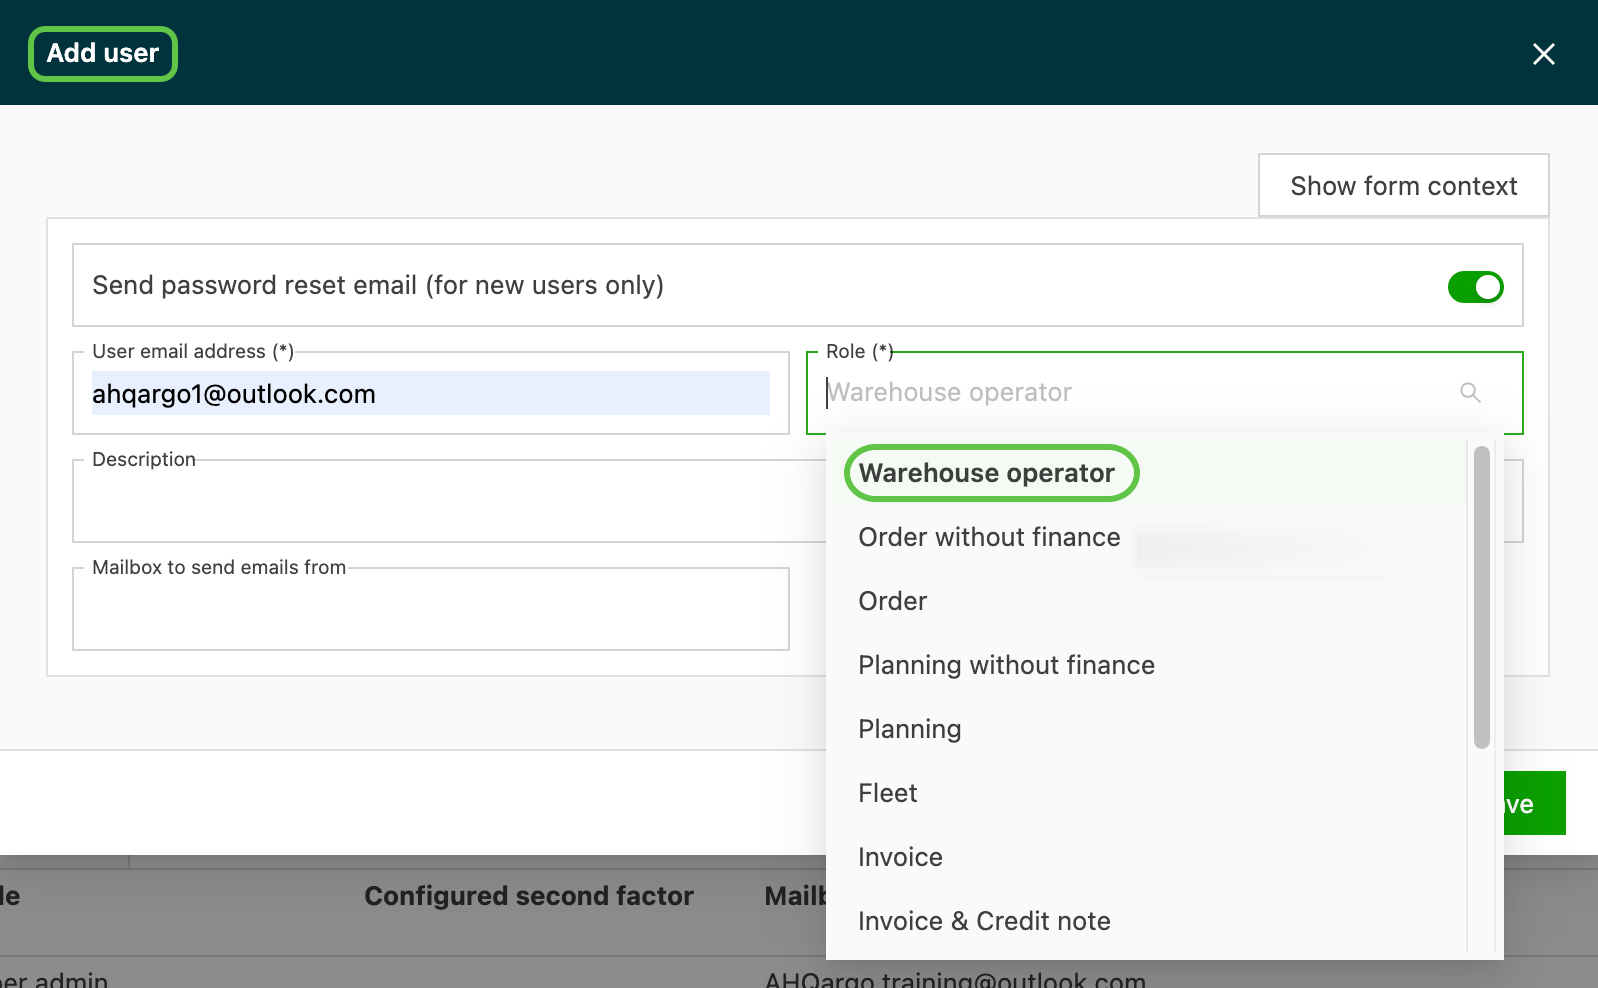
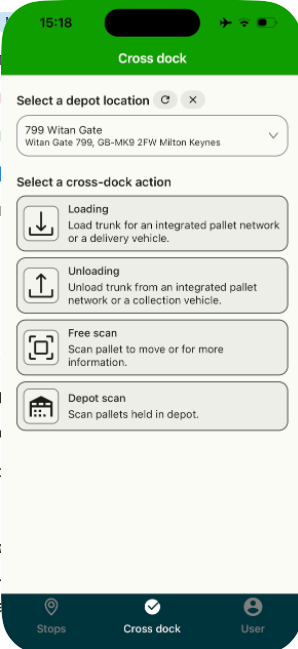
- Add new users and set their role to ‘Warehouse operator’
- This gives access to the app with a separate ‘Cross dock’ tab
Features
Barcodes
- Barcodes can be either generated by Qargo or generated externally, i.e., provided by the network or the customer
- Barcode generation can be configured as part of the task workflow (Qargo admin only)
- Barcodes are enabled per packaging type when it is created in ‘Order input’ (Qargo admin only)
- Provides full traceability for every scan event (loading / unloading, etc.)
- Each scan contributes to a chronological history of the pallet
- Externally generated barcodes can be imported via integration or API, creating the link to the goods in Qargo
- The Qargo cross dock app works with both Qargo and externally generated barcodes.
- All barcode scans are stored as part of the pallet’s audit trail, regardless of whether the scan comes from the Qargo app or another source.
- Full track and trace visibility per pallet within the application.
Limitations:
- If an external barcode is not registered via integration, it may not be recognized, and the warehouse may need to relabel the pallet with a Qargo barcode
- Multiple pallets cannot be identified by a single barcode; each pallet requires its own label with a barcode for scanning.
Pallet labels
-
Labels include key operational information:
- routing instructions
- delivery address
- service level (i.e., next day)
- number of pallets (i.e., 1 of 3)
-
The warehouse can print Qargo labels on demand for unlabeled goods
-
Label templates are adjustable, including sizes and layouts.
-
Labels with barcodes can also be used within warehouse locations or trucks, connecting pallet movements with specific locations for visibility.
Scanners & scanning app
- Qargo supports Zebra and Honeywell barcode scanners for use with the cross dock mobile app.
- Scanners must run Android 8 (released 2017) or higher for compatibility with the Qargo app.
- The Qargo cross dock module is built for warehouse operations and is tested specifically on these brands for accurate and reliable scanning.
- Other Android-compatible barcode scanners may also work if they meet the OS requirement.
Click the link below to learn more about how scanning works in the Qargo app.
Cross dock scanning in the Qargo app
Track & trace
Qargo’s cross dock track & trace logs every pallet scan with time, place and action. It maintains a complete, real-time history from arrival to final loading and shares this visibility across internal and external systems.
- Each time a pallet is scanned (inbound, moved internally or loaded outbound), a ‘scan event’ is recorded.
- The full chronological history of every barcode scan is linked to the pallet and visible within the order.
- Each handling step (when/where the pallet was unloaded, moved, loaded or stored) is visible in the system, providing total traceability for audit, KPI and incident resolution purposes.
- Scan events can be generated in Qargo’s own cross dock app or received from integrated external systems and pallet networks.
- Scans are not limited to preset operational flows. Pallets can be scanned in any sequence (e.g., unloading, internal moves or loading), and every movement is part of the pallet’s audit trail.
- Statuses from external networks/pallet systems (such as Palletline or Hazchem) can also sync with Qargo, providing a single, consolidated view of all pallet movements throughout the network.
Driver scan: pickup / delivery
In some cases, the driver may be required to scan pallets at the pickup and / or delivery locations. Drivers can scan multiple barcodes, improving visibility of which pallets were picked up / delivered.
To enable this functionality:
-
Create a new task on loads to prompt the driver to scan codes.
-
Once the barcode has been added in the mobile app and the user clicks Save, the barcode can no longer be edited or removed. Before clicking Save, it can still be edited or removed.
Pallet networks
Configuration:
Each pallet network has its own onboarding / setup steps. Below is a general summary:
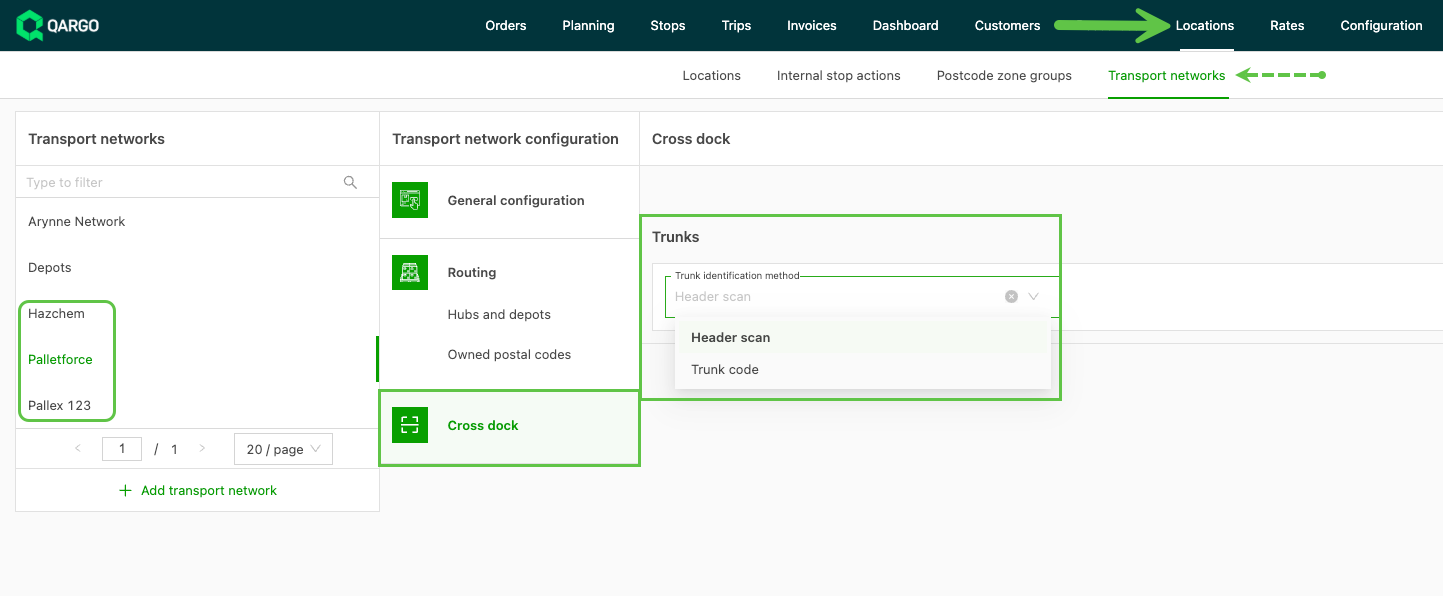
- Configure the pallet network in Qargo (Locations > Transport networks).
- Add terminal location(s) and mark them as internal as required.
- Define / update packaging types to match the network’s pallet types, and enable ‘Generate barcodes’ for proper scanning functionality.
- Modes of operation: select the mode for trunks (barcode vs. static code)
- Enable integrations and export mappings so that status updates, documents and labels sync to supported networks.
When setting up a pallet network, a new cross dock option is shown in the ‘transport network configuration’ panel. When selected, it shows ‘Trunks’, with the options Header scan or Trunk code.
-
This relates to selecting the trunk when loading / unloading
-
Depending on the network partner, the options require either:
- Scanning a trunk ‘header’ barcode
- Selecting the trunk by a predefined code
Loading / unloading functions
-
Dedicated flows for loading / unloading trunks, specific to each network.
-
The trunk is selected either by scanning a barcode (header scan) or from predefined codes (as set in the network configuration above).
-
Inbound cross dock events include:
- Unloading a trunk at the pickup terminal
- Loading for delivery at a delivery terminal
- Scan the trunk or select it from the list.
- Scan the pallet label to register the movement (unload, store or load for delivery).
- Pallet movements (‘free scanning’) can also be recorded in the shipment’s pallet history.
- Scans are logged and sent as status updates to the respective network.
- Trunk loads are not explicitly planned in Qargo; pallets are scanned and associated with the selected trunks.
To learn more about the loading / unloading workflow in the app, click the link(s) below.
Sending scan status
-
Scan statuses from the Qargo app are pushed to pallet network systems and updated there.
-
Scan statuses generated by network terminals or network scanners can be imported and synced into Qargo.
-
Scan updates are sent in near real time, as soon as the scan is processed.
-
Trunk loading / unloading is supported: all scanned pallets are associated with the trunk, and scan events are exported to the network
-
Pallet tracking history is visible in the shipment in Qargo and in the network
-
Scan info includes:
- time
- event type (i.e., arrived, loaded, held in terminal)
- barcode / identifier at pallet level
-
Incoming scan statuses from other terminals or from the network’s own hardware are synced back to Qargo and visible in the history.
Scan status definitions
The main pallet scan statuses reflect the movement of pallets through the network. Not every status is tied to a physical scan; some are generated automatically for operational visibility. Some of the main pallet scan statuses are defined below.
-
Stored / Held in terminal: pallet stored in a terminal at either the pickup or delivery end
- Variants: CD Held (pickup terminal held) / HUB Held / TD held (transshipment terminal held) / DD held (delivery terminal held)
-
Scanned in/out: pallet scanned into / out of a location, i.e., a terminal or trunk.
- Variants: Pickup terminal scanned in / Pickup terminal scanned out (trunk) / Delivery terminal scanned in / Delivery terminal scanned out (to delivery vehicle)
-
Loaded / Unloaded: pallet loaded onto / unloaded from a trunk or delivery vehicle
- Variants: CD load (pickup terminal load) / HUB load / TD load (transshipment terminal load) / DD load (delivery terminal load)
-
Delivered / Delivered sign: delivered to the receiver / signature taken
-
Departed: departure from a specific location (i.e., pickup terminal)
- Variants: COL Dep (pickup terminal departed) / CD Dep (pickup terminal departed) / HUB dep (HUB departed) / TD dep (transshipment terminal departed) / DD dep (delivery terminal departed)
-
Load/stop events: status linked to load movements (i.e., arrive / depart)
-
ARRI (Arrived at delivery location): the driver has arrived; the pallet may still be on the vehicle
-
EPOD: receiver signature captured, completing the delivery
Specific examples (Pallex/Fortec mapping to Qargo status):
- Arrived at Collection Point → COLLECTION_ARRIVED
- Loaded to C&D → COLLECTION_SCANNED_IN
- Depot Scan In/Out → COLLECTION_DEPOT_SCANNED_IN / COLLECTION_DEPOT_SCANNED_OUT
- Out for Delivery → DELIVERY_DEPOT_DEPARTED
- Arrived at Delivery Point → DELIVERY_ARRIVED
- Delivered (POD complete) → DELIVERY_DEPARTED
Add a cross dock
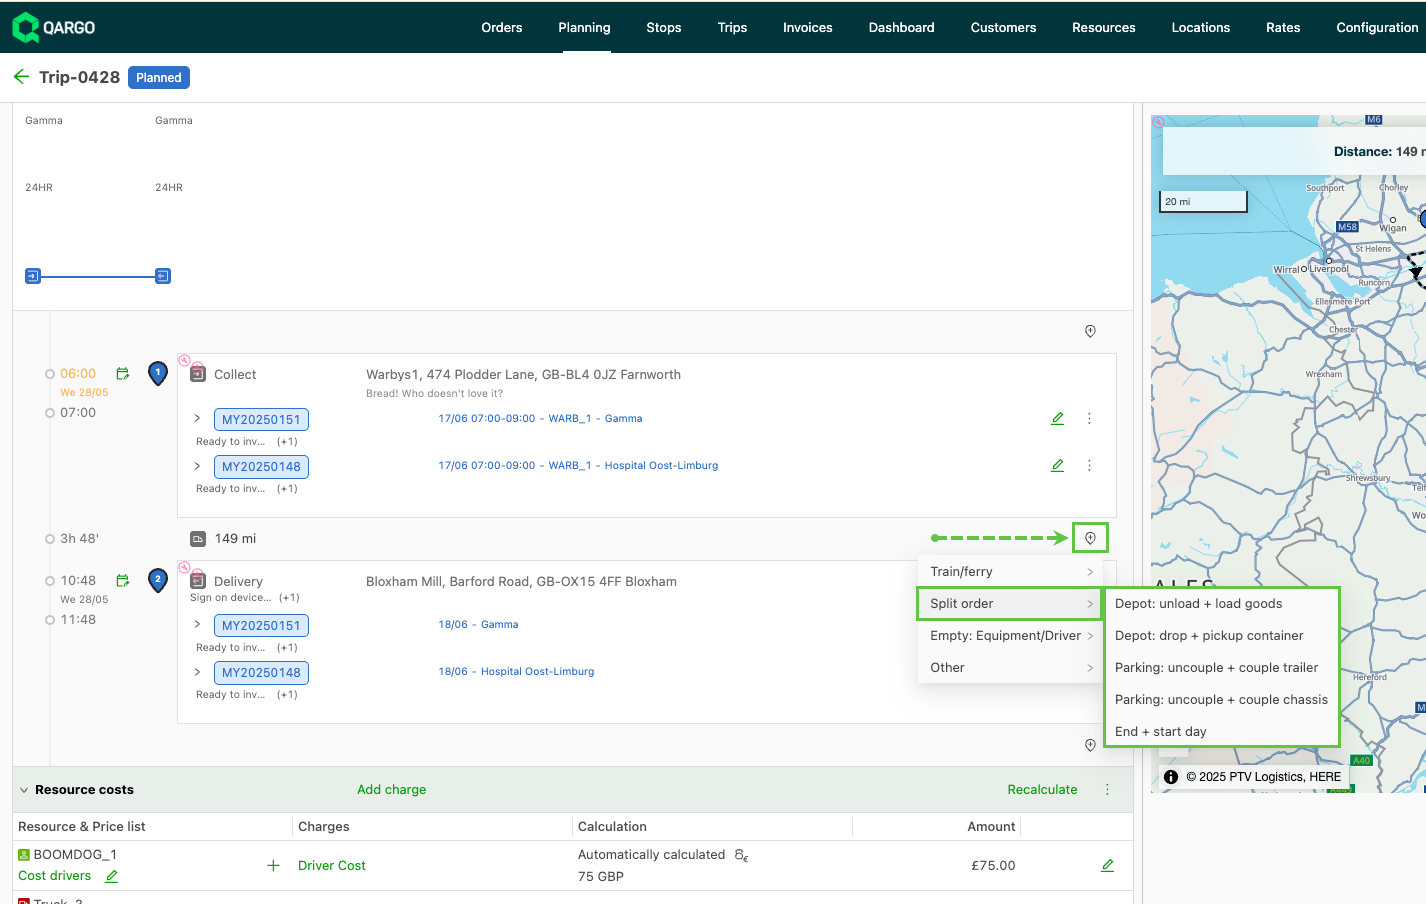
To add a cross dock (terminal stop) to an order in Qargo:
-
Open the order to update.
-
In the order’s route/stop section, add a new stop at the point in the journey where the cross dock should take place.
-
Select the correct terminal or cross dock facility as the stop location.
-
Drag and reorder stops to make sure the cross dock appears between the pickup and delivery legs.
-
To do this for multiple orders at once, use the “Bulk add activities” feature from the Quick actions menu on the order list to add terminal stops to several orders simultaneously.
When using a TMS-WMS integration (such as Clarus):
- Orders are often exported from Qargo to the WMS, where the cross dock (XD) is modeled as a stop (or order) in the warehouse management system.
- For dual-leg orders (pickup + delivery), the cross dock is placed between these legs.
- The correct linkage and visibility of cross dock stops may also depend on integrations (i.e., Clarus).
- After a cross dock stop is added in Qargo and confirmed/planned, the associated cross dock record/order is created in the WMS (if integrated).
For groupage/cross docking operations:
- Internal terminals must be correctly configured as cross dock locations in the transport network settings to be available as stops when added to an order.
Important notes:
- If the cross dock stop has already been confirmed/synced to the integrated WMS, it may need to be removed or adjusted on both sides (Qargo and WMS) for changes to apply.
- When importing orders in bulk or via API, the terminal stop can be included in the import/template so that cross docking is planned automatically for all relevant orders.