
Feature releases August 2024
Table of contents
Views option on the order charge view
**Sticker/label document for document recognition**
Edit stop date propagates to other stops
User-configurable exports on the templates page
Send emails from the company’s own domain/mailbox
Secondary resources
Time rounding and last location
Customer portal prefill and customer locations
Views option on the order charge view
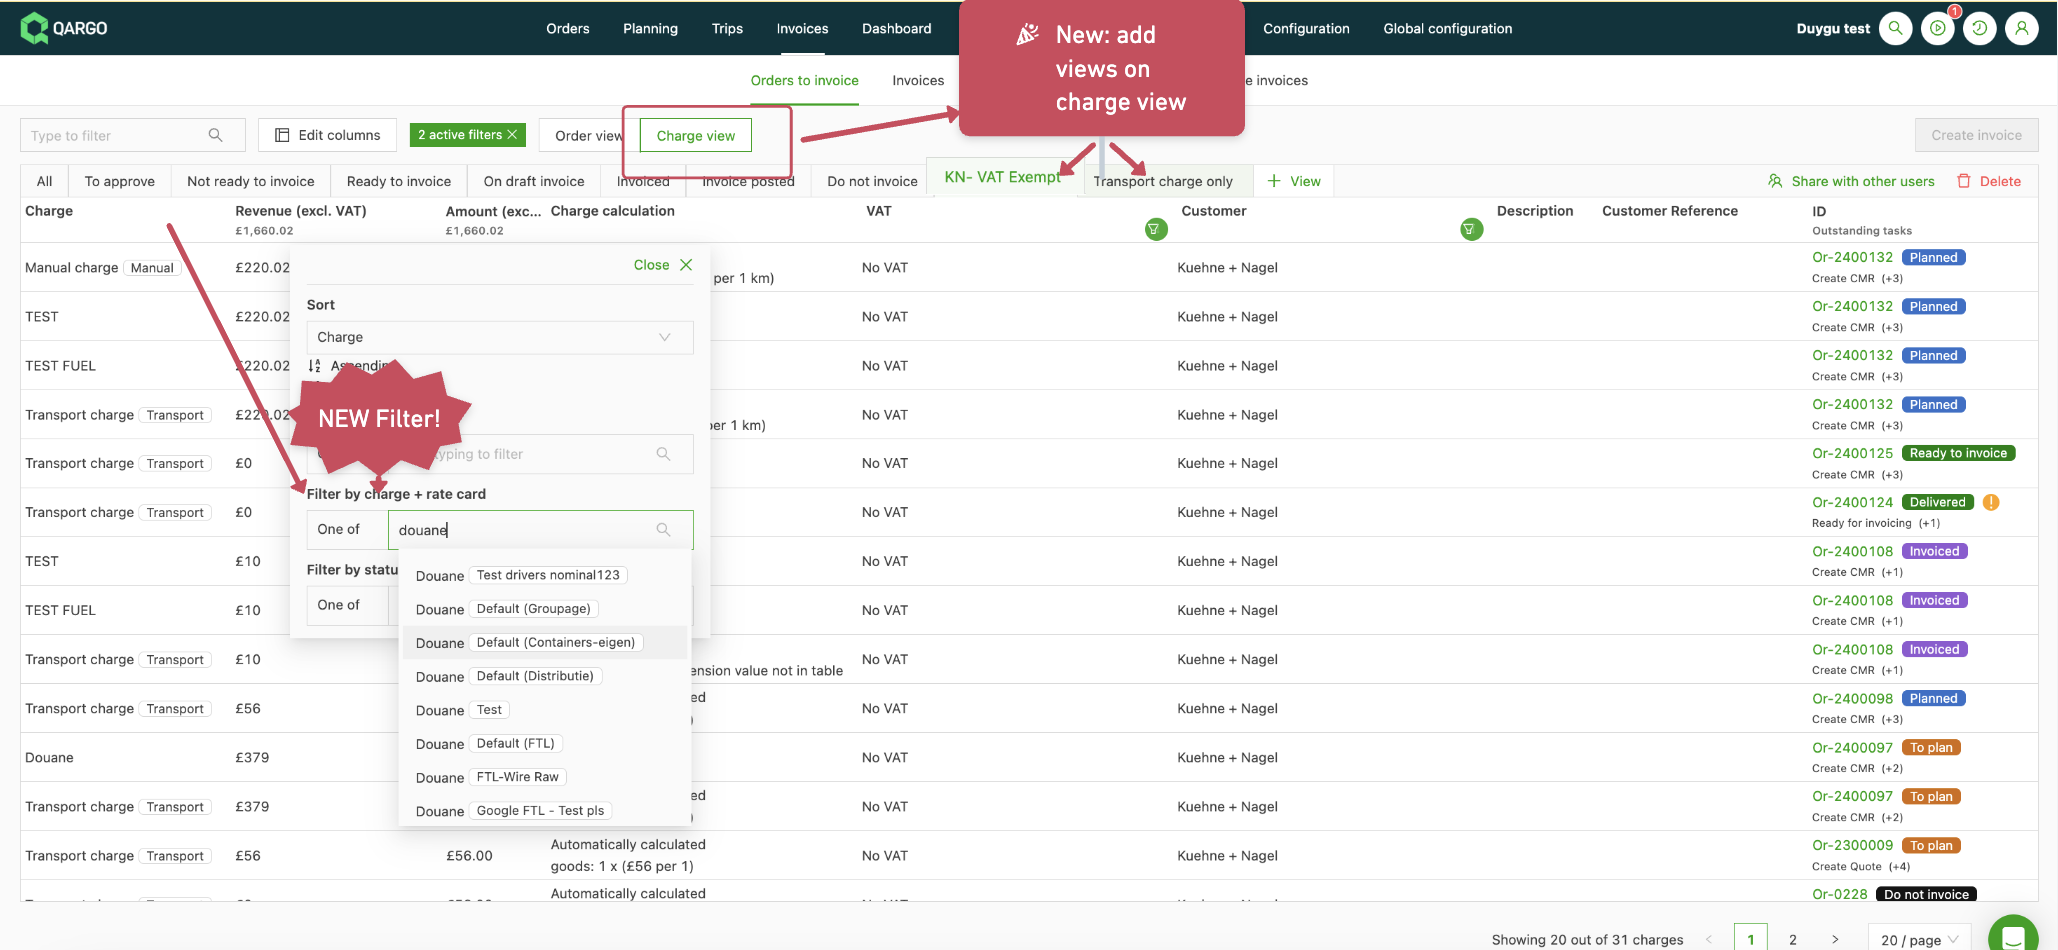
Views can now also be configured on the charge view of the orders to invoice page.
A new filter is also available here to filter on charges from specific price lists:
Sticker/label document for document recognition\
{#h_faa03f7065}
Written by Duygu Demir
Transportation companies often receive paperwork from customers that drivers need to sign.
After signing, this paperwork needs to be scanned and sent back to the customer.
However, since these documents might lack reference numbers, the Qargo document scanning system cannot automatically match the scans to the correct orders. This results in a lot of manual work.
🎉 To solve this issue, a simple solution is now available: a sticker document that can be printed and attached to the customer paperwork.
This helps link the scanned documents accurately to the correct orders.
Here’s how to set it up (a sticker printer is required for this functionality):
1. Navigate to Configuration > Documents > Available document types
2. Activate the Qargo ID sticker document type in the documents section:
3. Navigate to Templates and add the sticker template:
4. Navigate to Configuration > Tasks:
5. Create a “Generate document” task at the order level, under “Create order”, to generate the sticker document:
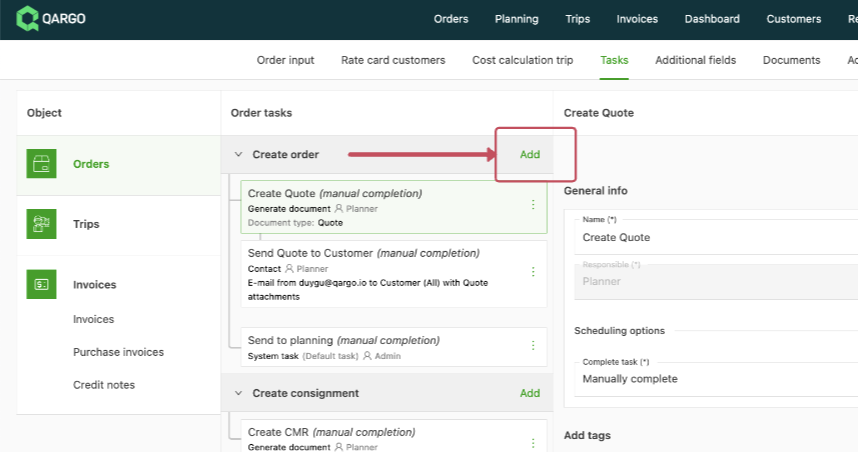
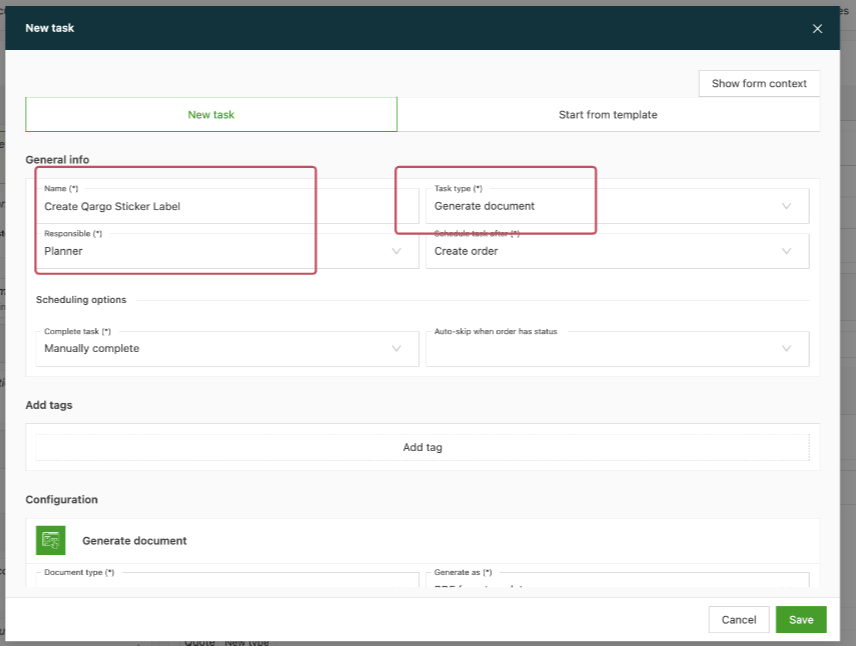
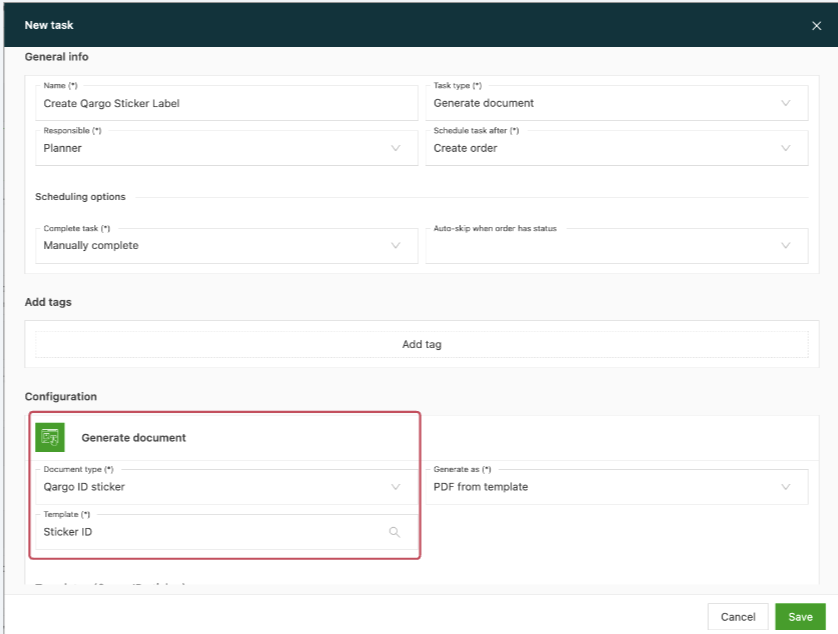
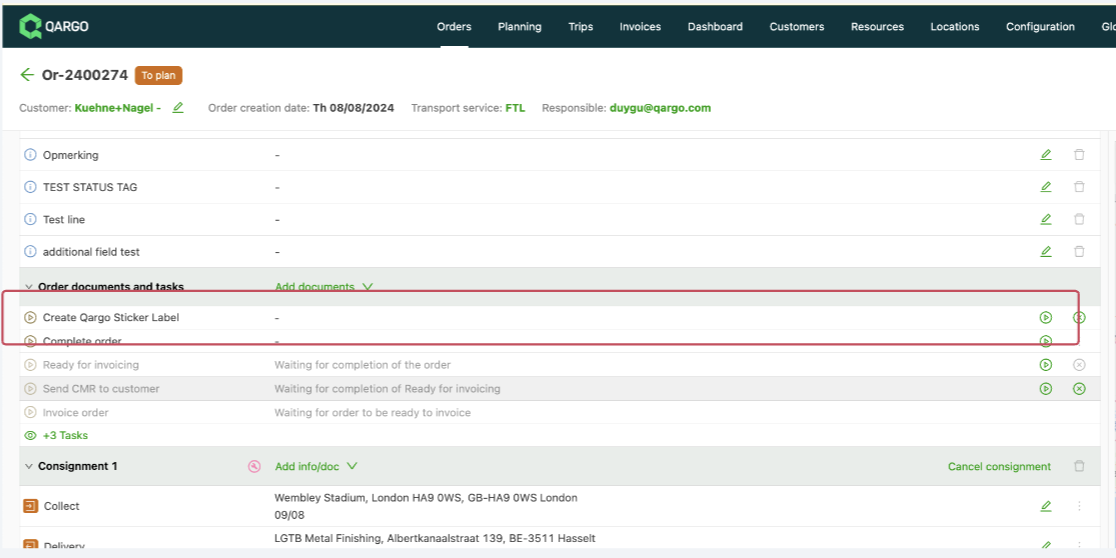
Locate the task on the order view (only valid for orders created after the task was created):
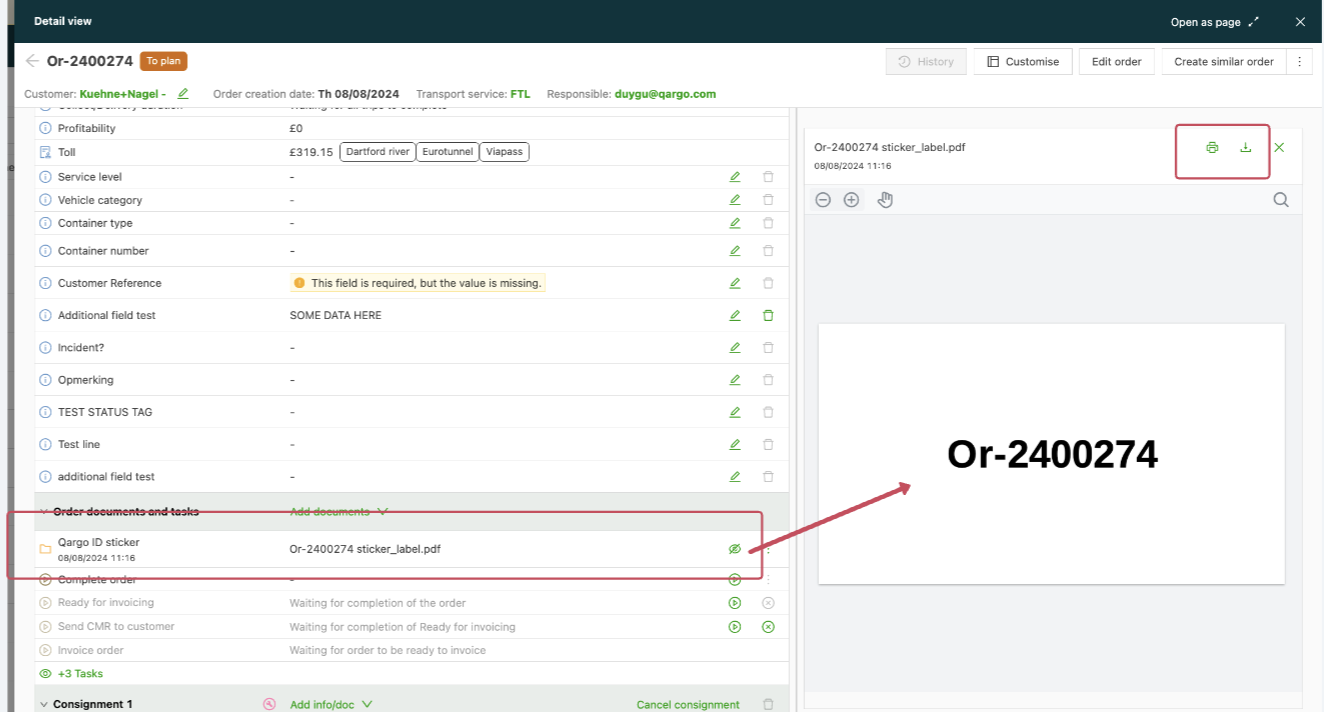
Use the download/print options after the document is generated:
**Note**: The sticker document can only include order information.
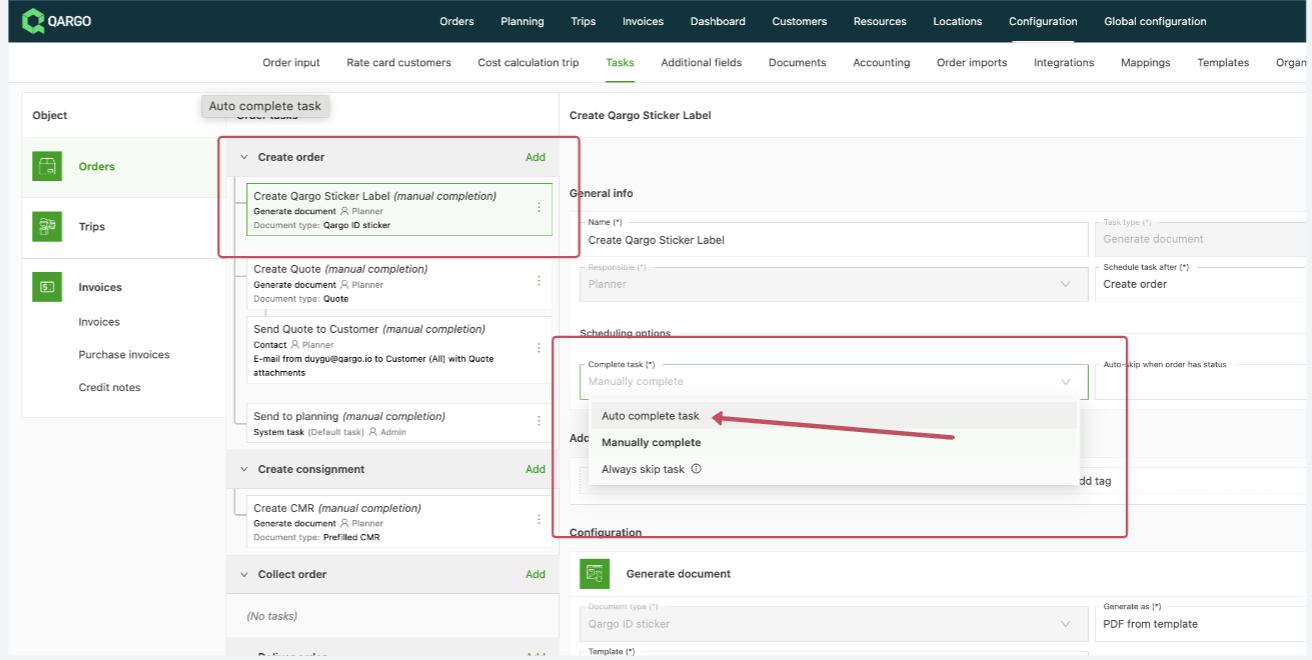
_To automate sticker generation for every order, set the task to auto-complete instead of manual completion:_
Edit stop date propagates to other stops
Hi,
Previously, adjusting the dates of an order or load by a few days was a hassle. Each stop had to be edited individually when, for example, the order contained storage (terminal) stops.
This is now easier!
🎉 Now, when the date of one stop changes, that shift can be applied automatically to all other stops in the same order or load!
After the first stop is adjusted, a second step appears in the modal, showing the proposed new dates for all stops.
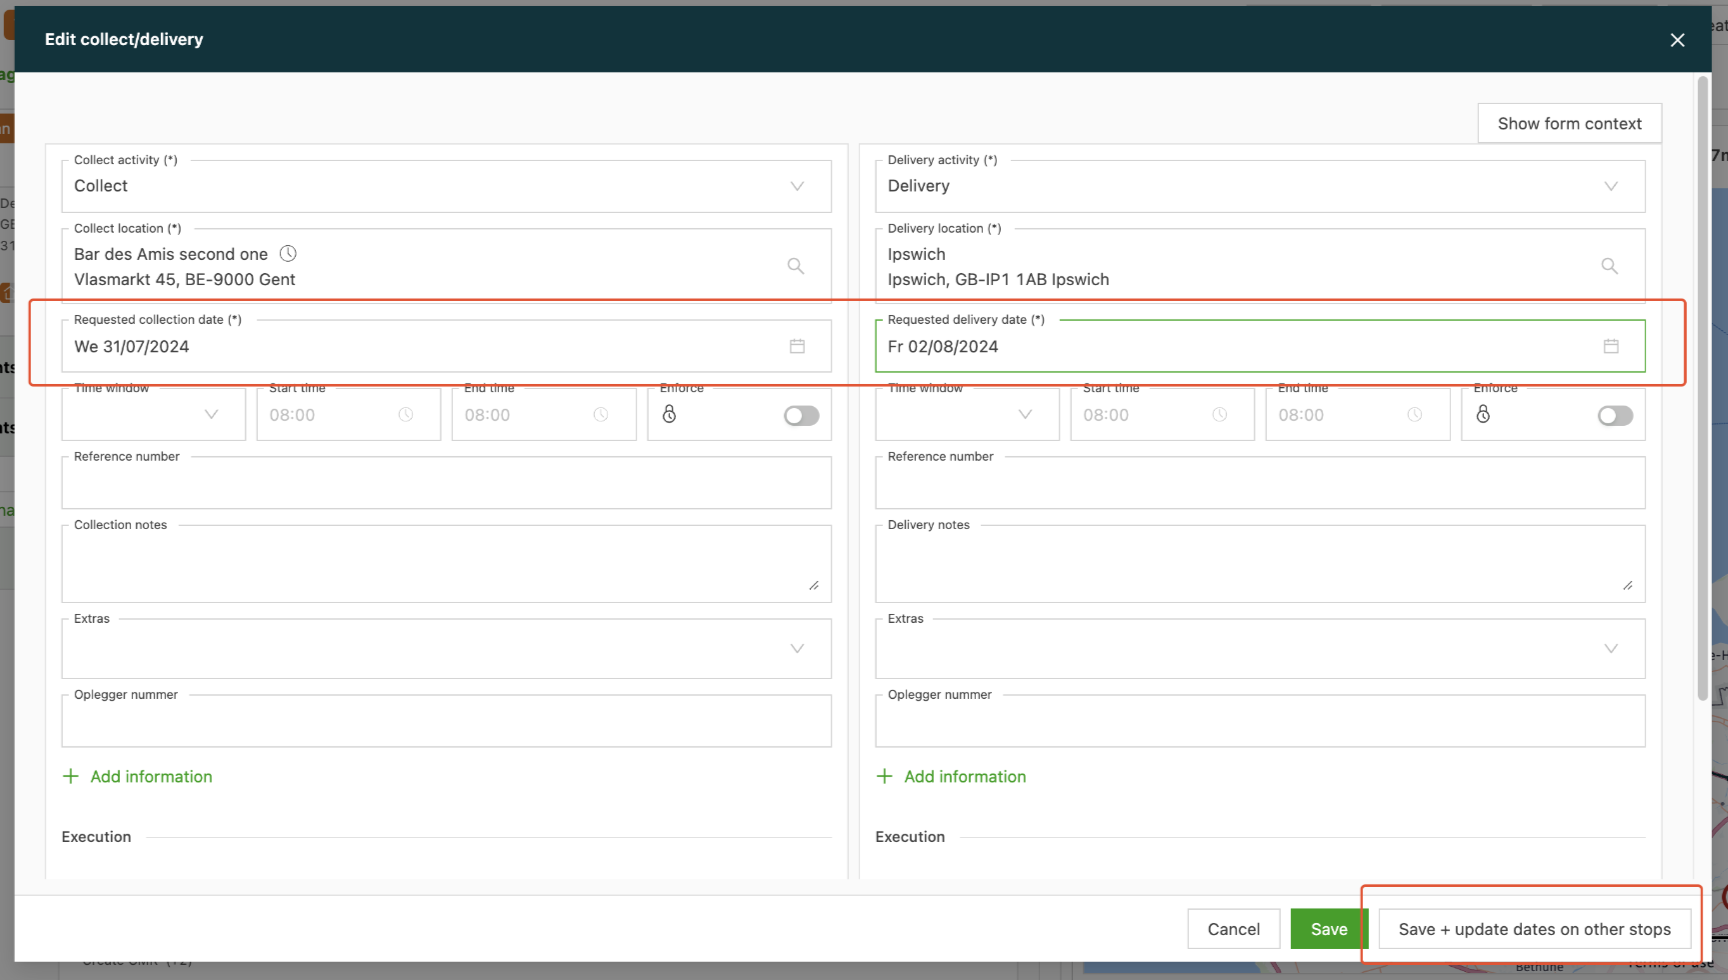
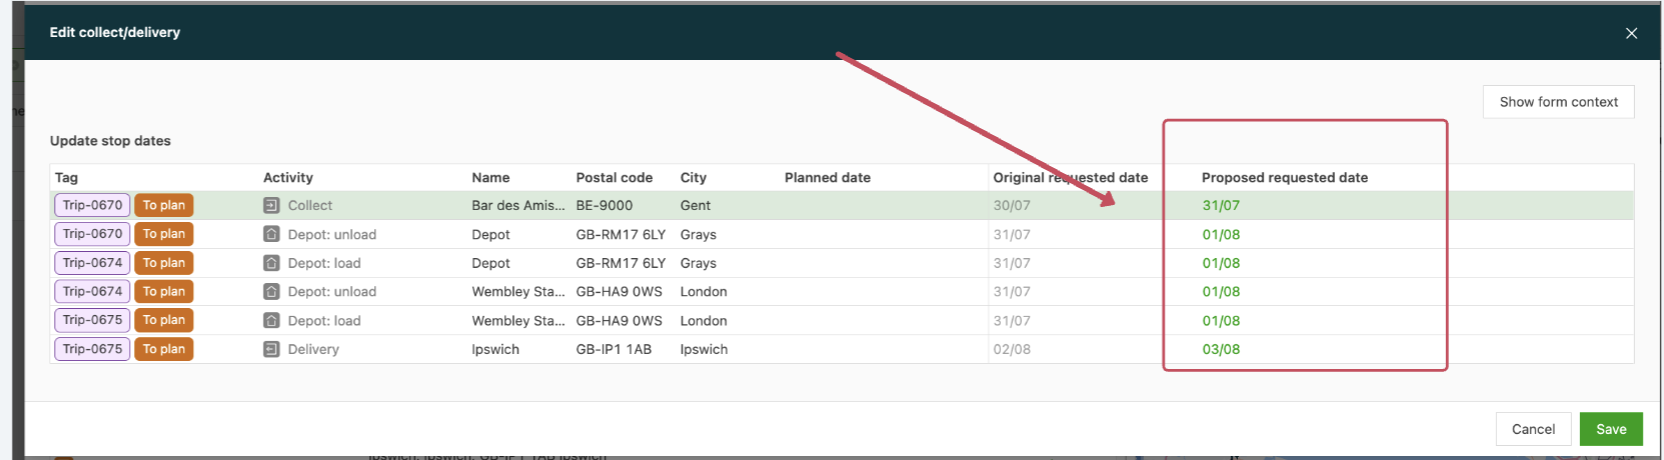
These dates can easily be edited if needed and then saved all at once.
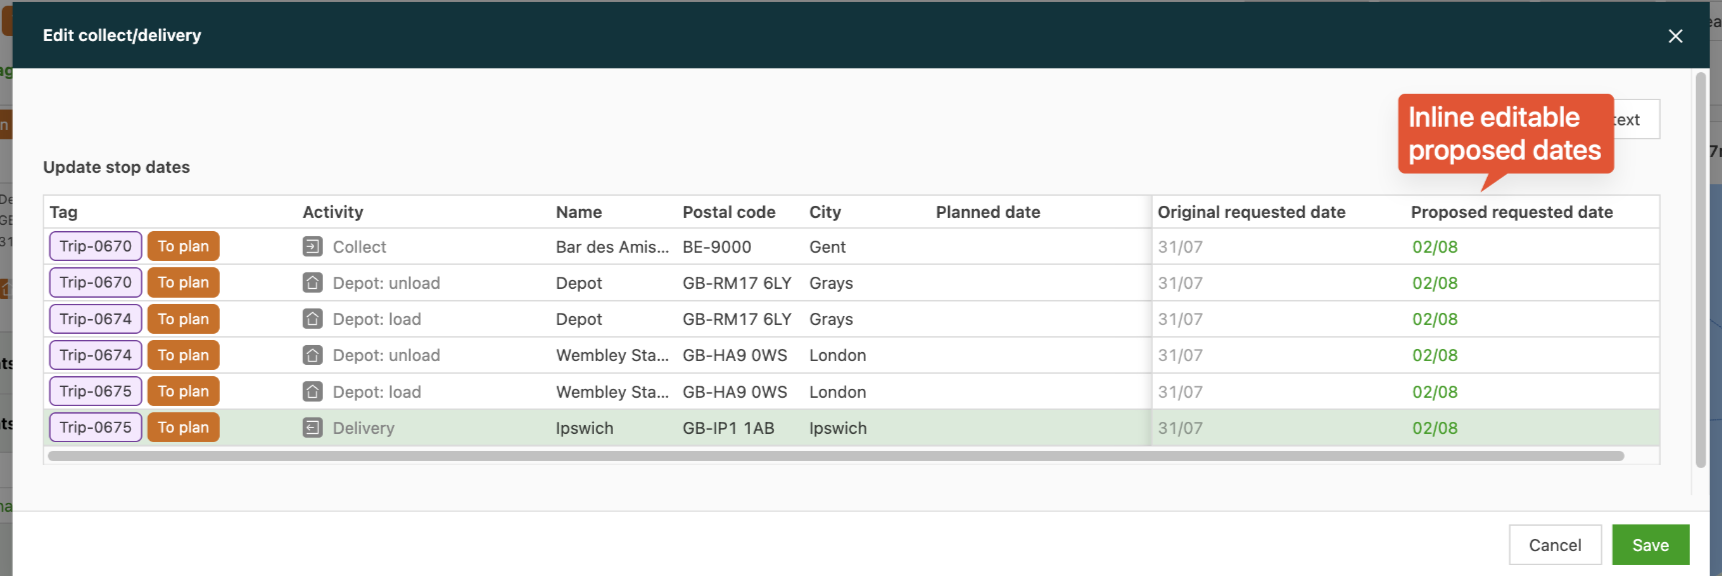
It is also possible to change the dates of orders via the order list view, as shown below:
Note: The system propagates date shifts for unplanned stops as long as the sequence of dates remains logical (e.g., they stay in chronological order).
Kind regards,
User-configurable exports on the templates page
Super admins can now configure custom data exports for the following:
-Container
-Credit memo
-Customer
-Driver
-Order
-Carrier invoice
-Sales invoice
-Contract carrier
-Load
-Vehicle
👤 This feature allows Super admins to create custom CSV and Excel documents based on data available in Qargo.
Here’s how to configure it:
1. Navigate to Configuration > Templates and click “File exports/downloads”
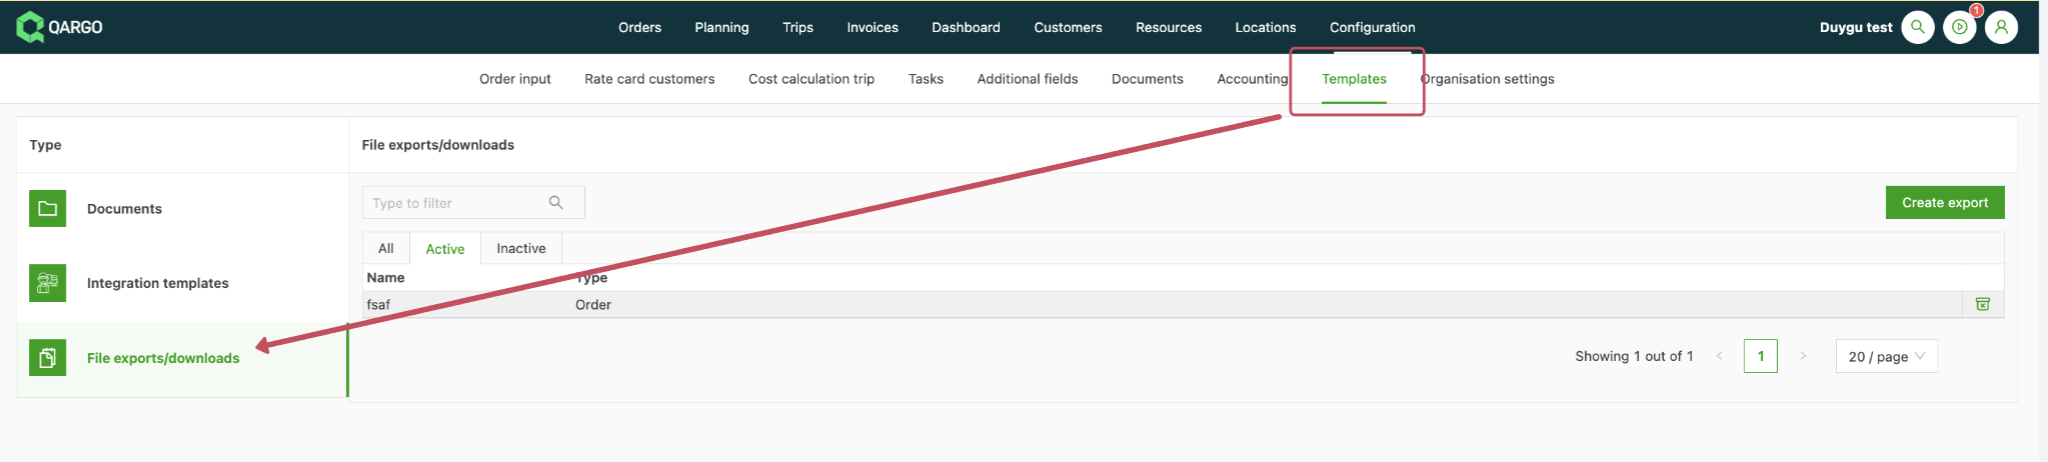
2. Click “Create export”, select the export document type and name the export type:
3. Click “Next” to select the columns for the export.
Select the information fields to show in the export file and name the header.
Below is a short video showing how to select these fields and how to rename the column headers:
4. If applicable, adjust the order of the fields so that the columns appear in the same order as the setup.
5. Click Next after the adjustments are done and select the type of export file to create from two options: CSV or Excel
After selecting the file type, click “Save”
The created export file is listed under Active templates:
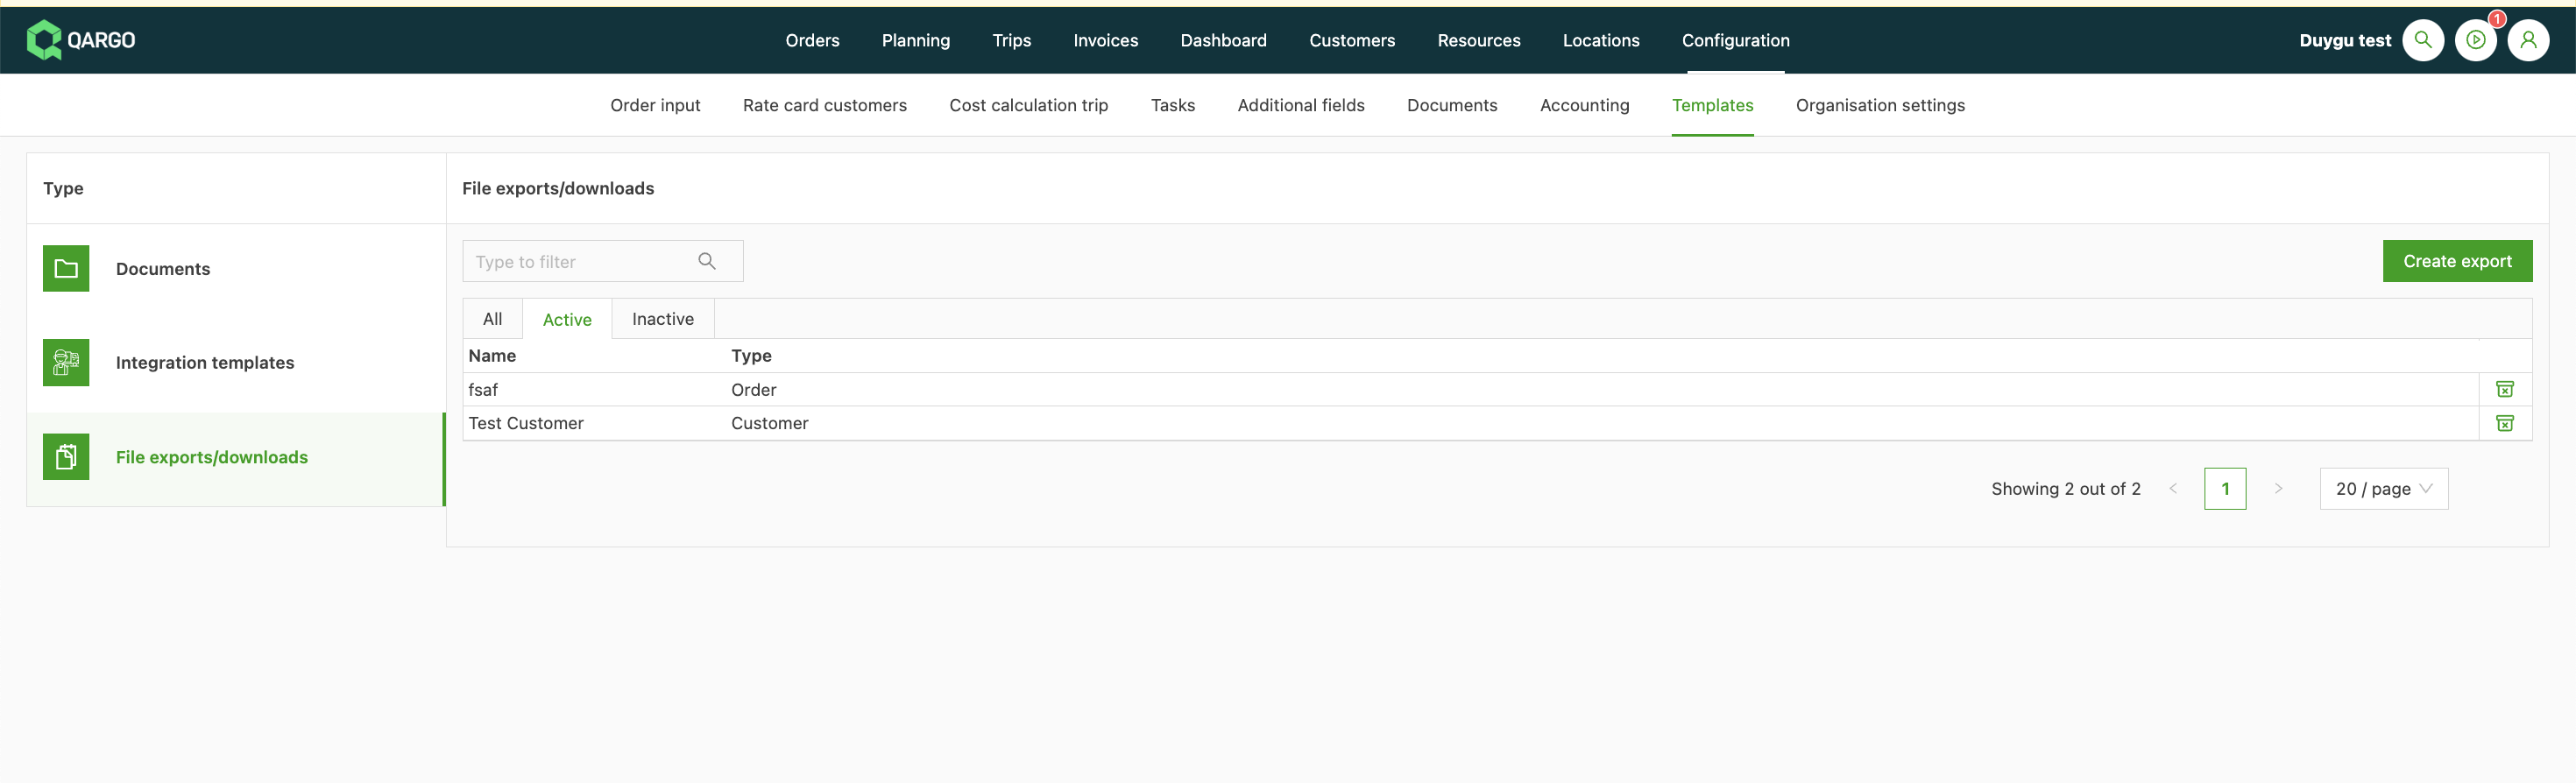
Next, navigate to the related page for which the export file was created (e.g., if the export file was created for customers -> navigate to the customers page).
Once a new export has been created, it shows up under the Export button at the top right of the page, as in the example below:
Filters can be applied before running the export, or a full export can be pulled without filters applied.
To deactivate the export option, navigate to Configuration > Templates > File exports/downloads and deactivate the export file with the trash icon on the right side of the line:
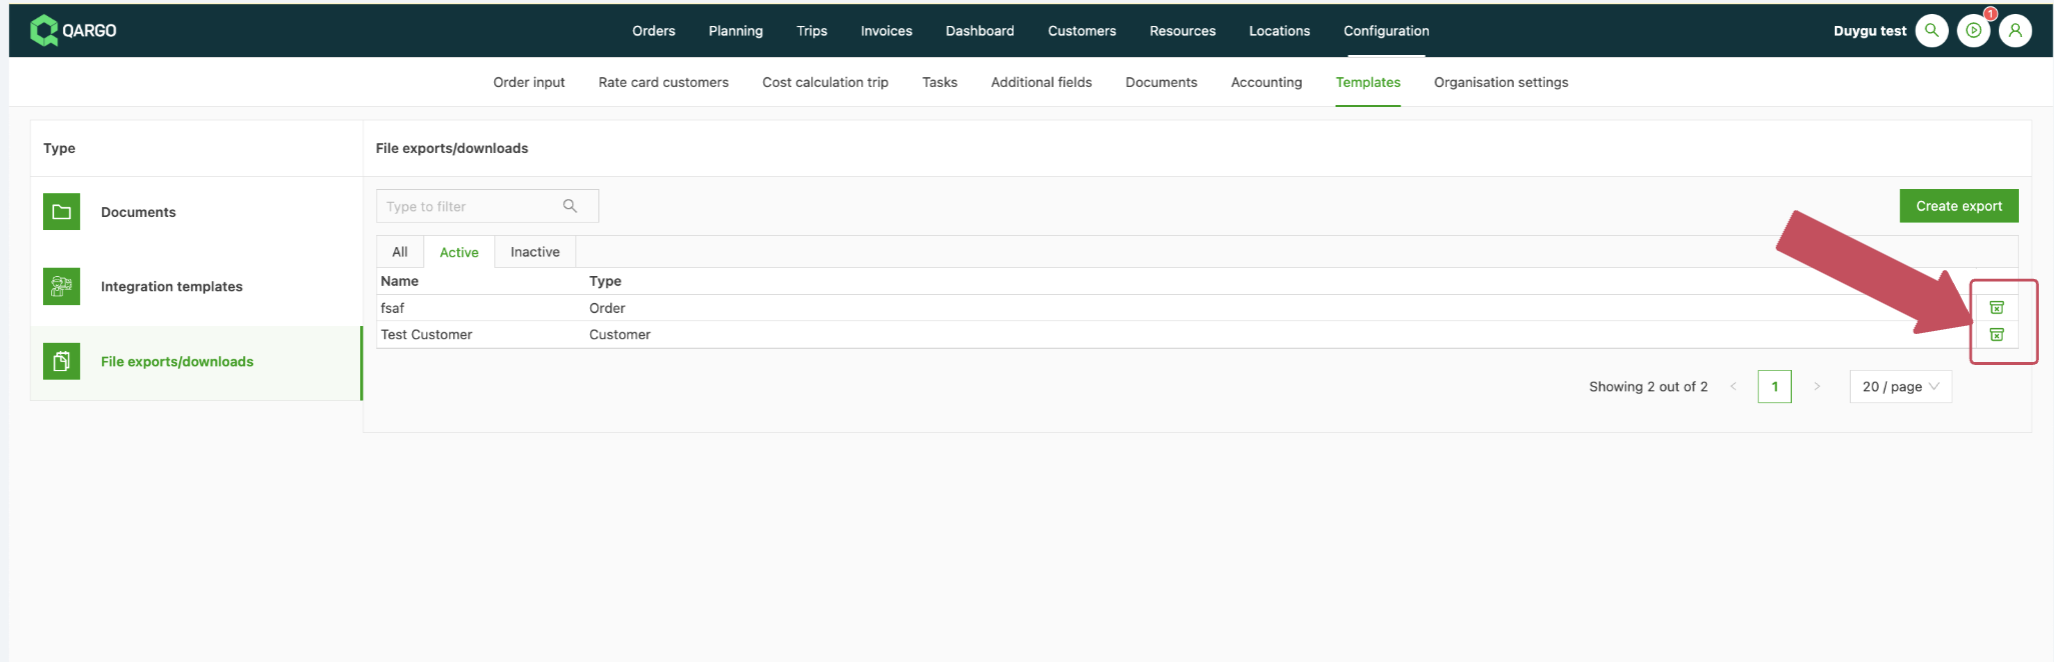
\
Send emails from the company’s own domain/mailbox {#h_c3457fff1c}
Hello,
Support has been added for linking user mailboxes within Qargo. This is the first step in what is currently called the Email Intelligence feature.
Once a mailbox is linked, the system automatically detects it when completing email tasks. It then sends the emails from the user’s own mailbox instead of the no-reply@qargo.com email address. When the email is sent from the user’s own email address, it is less likely to end up in the recipient’s spam folder. This avoids all kinds of headaches related to missed communication.
Mailboxes can be linked on the Organization settings page (only available for Super admins), where a new table is shown
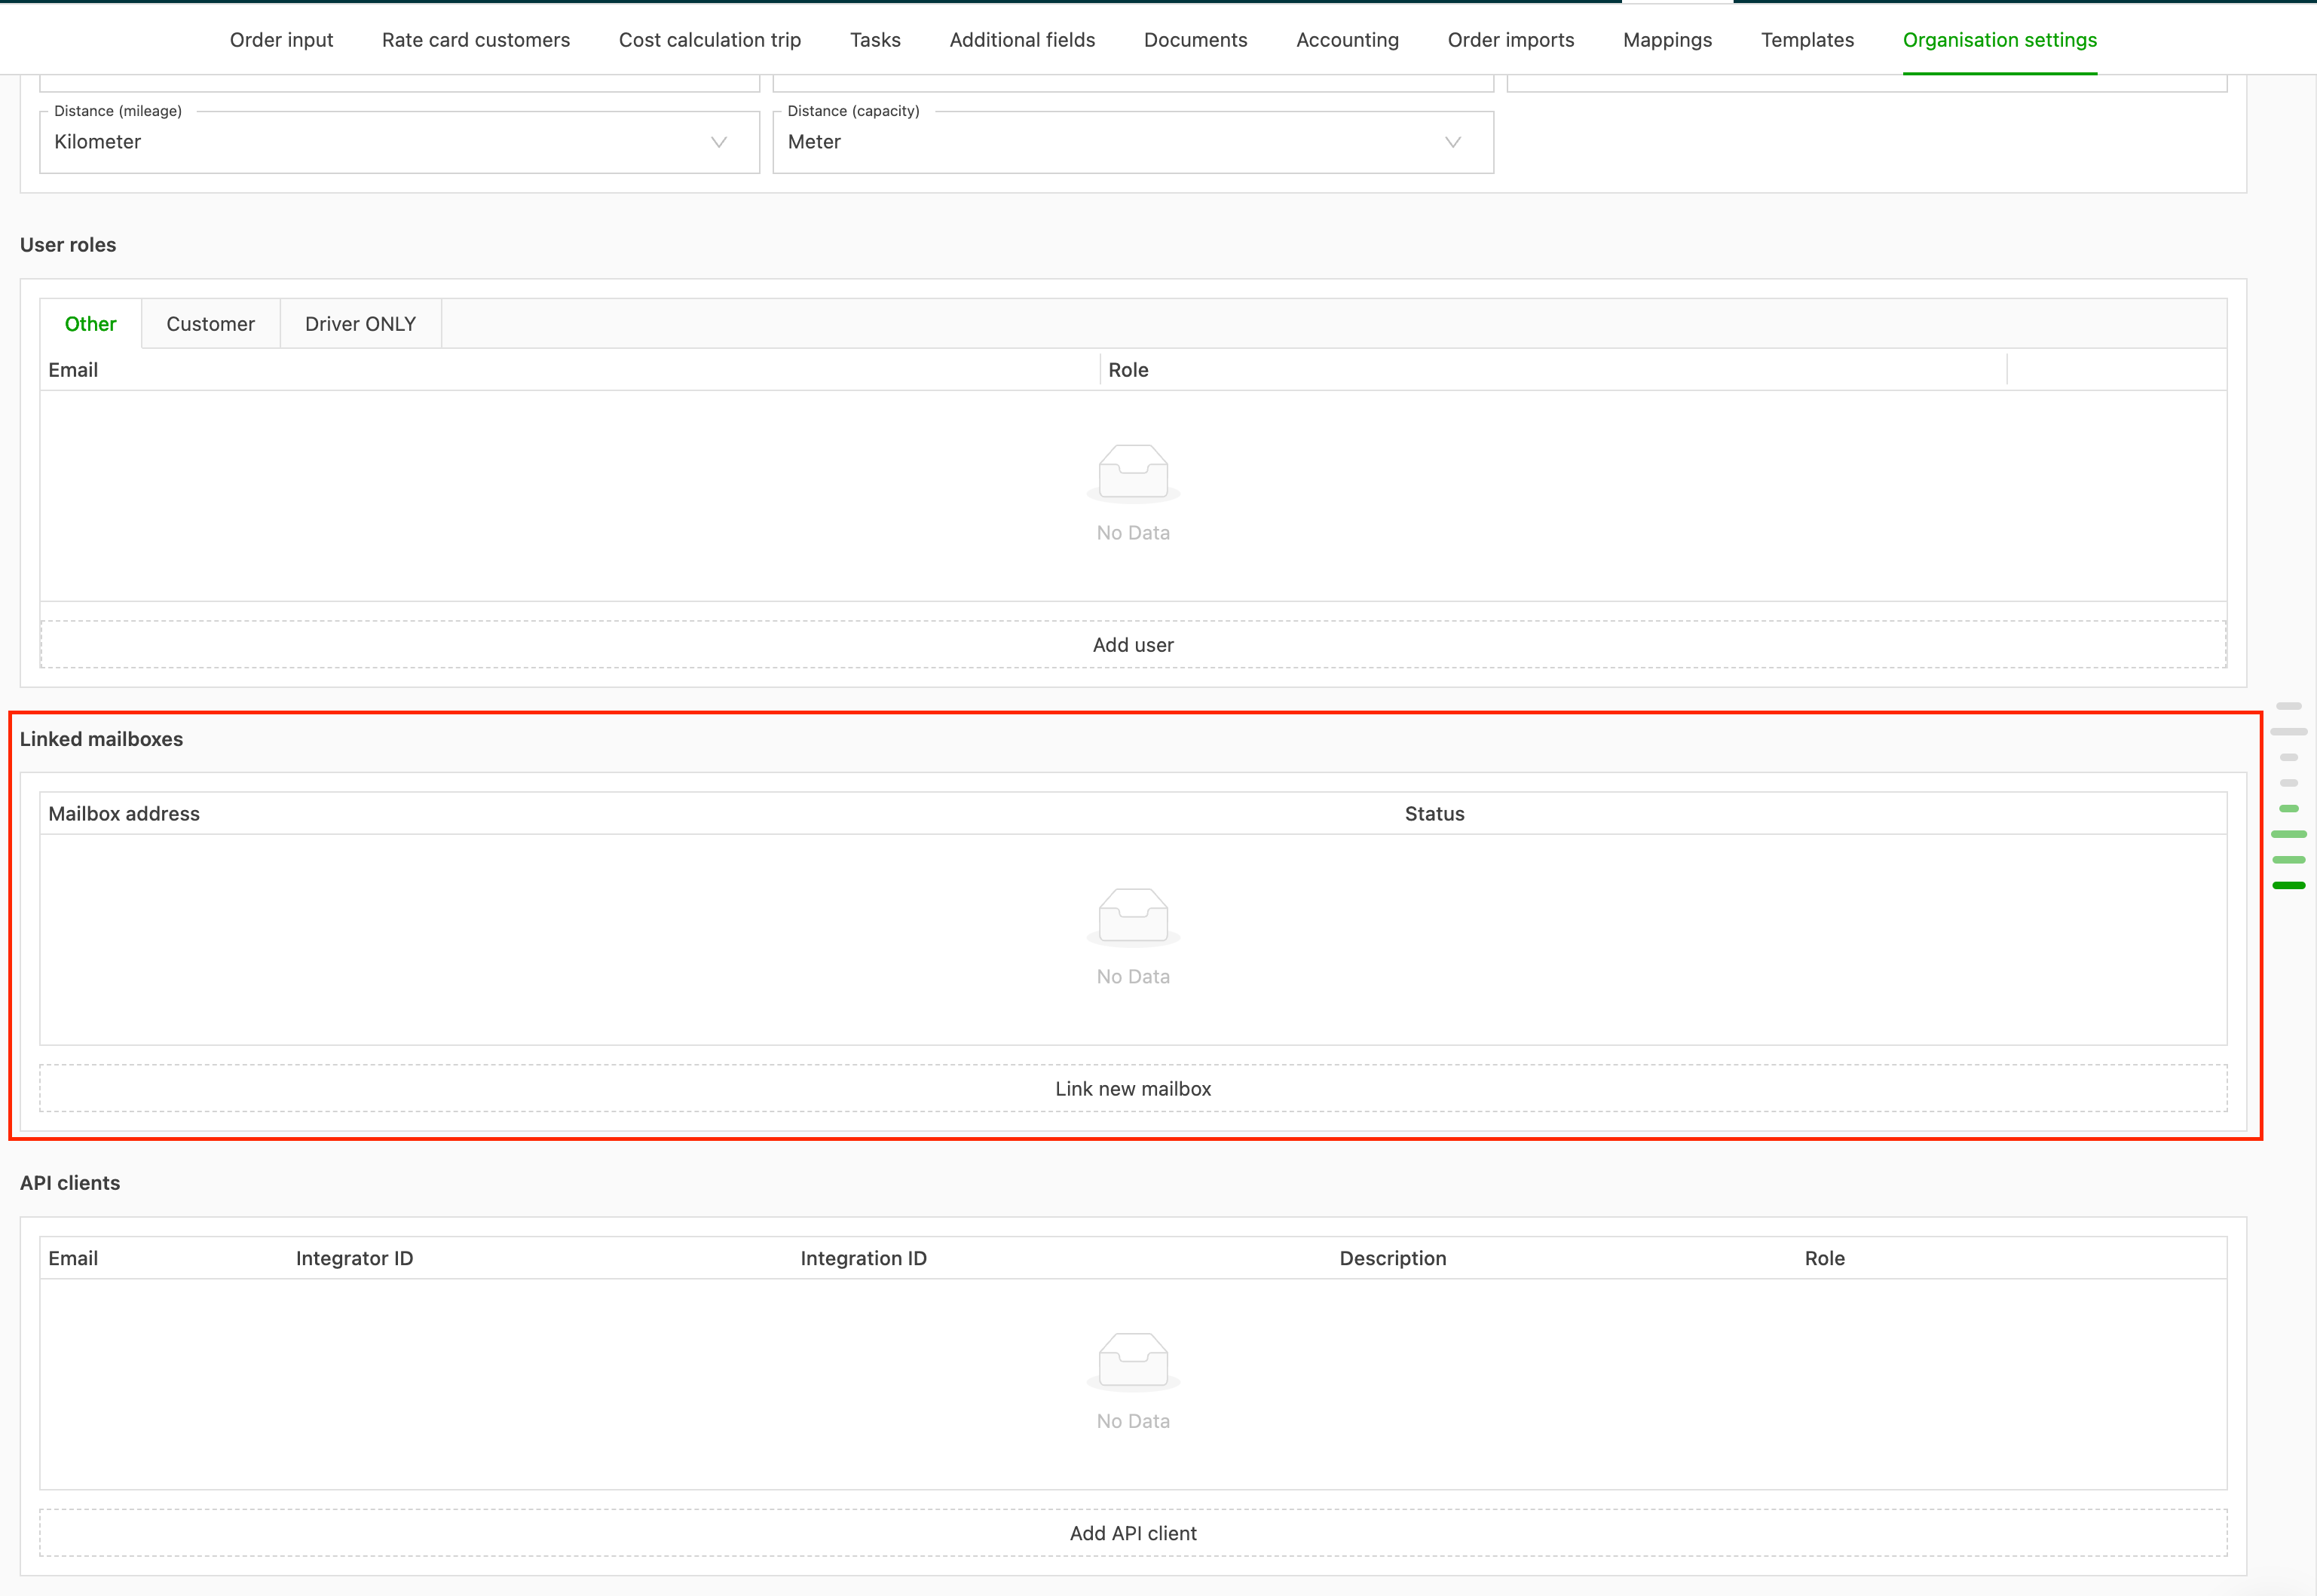
Clicking the Link new mailbox button redirects the user to a login screen to enter their credentials. Currently, only Outlook or IMAP-based mailboxes can be linked (no Gmail yet).
If everything goes right, the user is redirected to Qargo and the screen should look like this:

It is important that the status says Linked; the mailbox is then ready to use.
The contact task configuration also indicates when an email will be sent via the no-reply email address (the old way of sending emails).
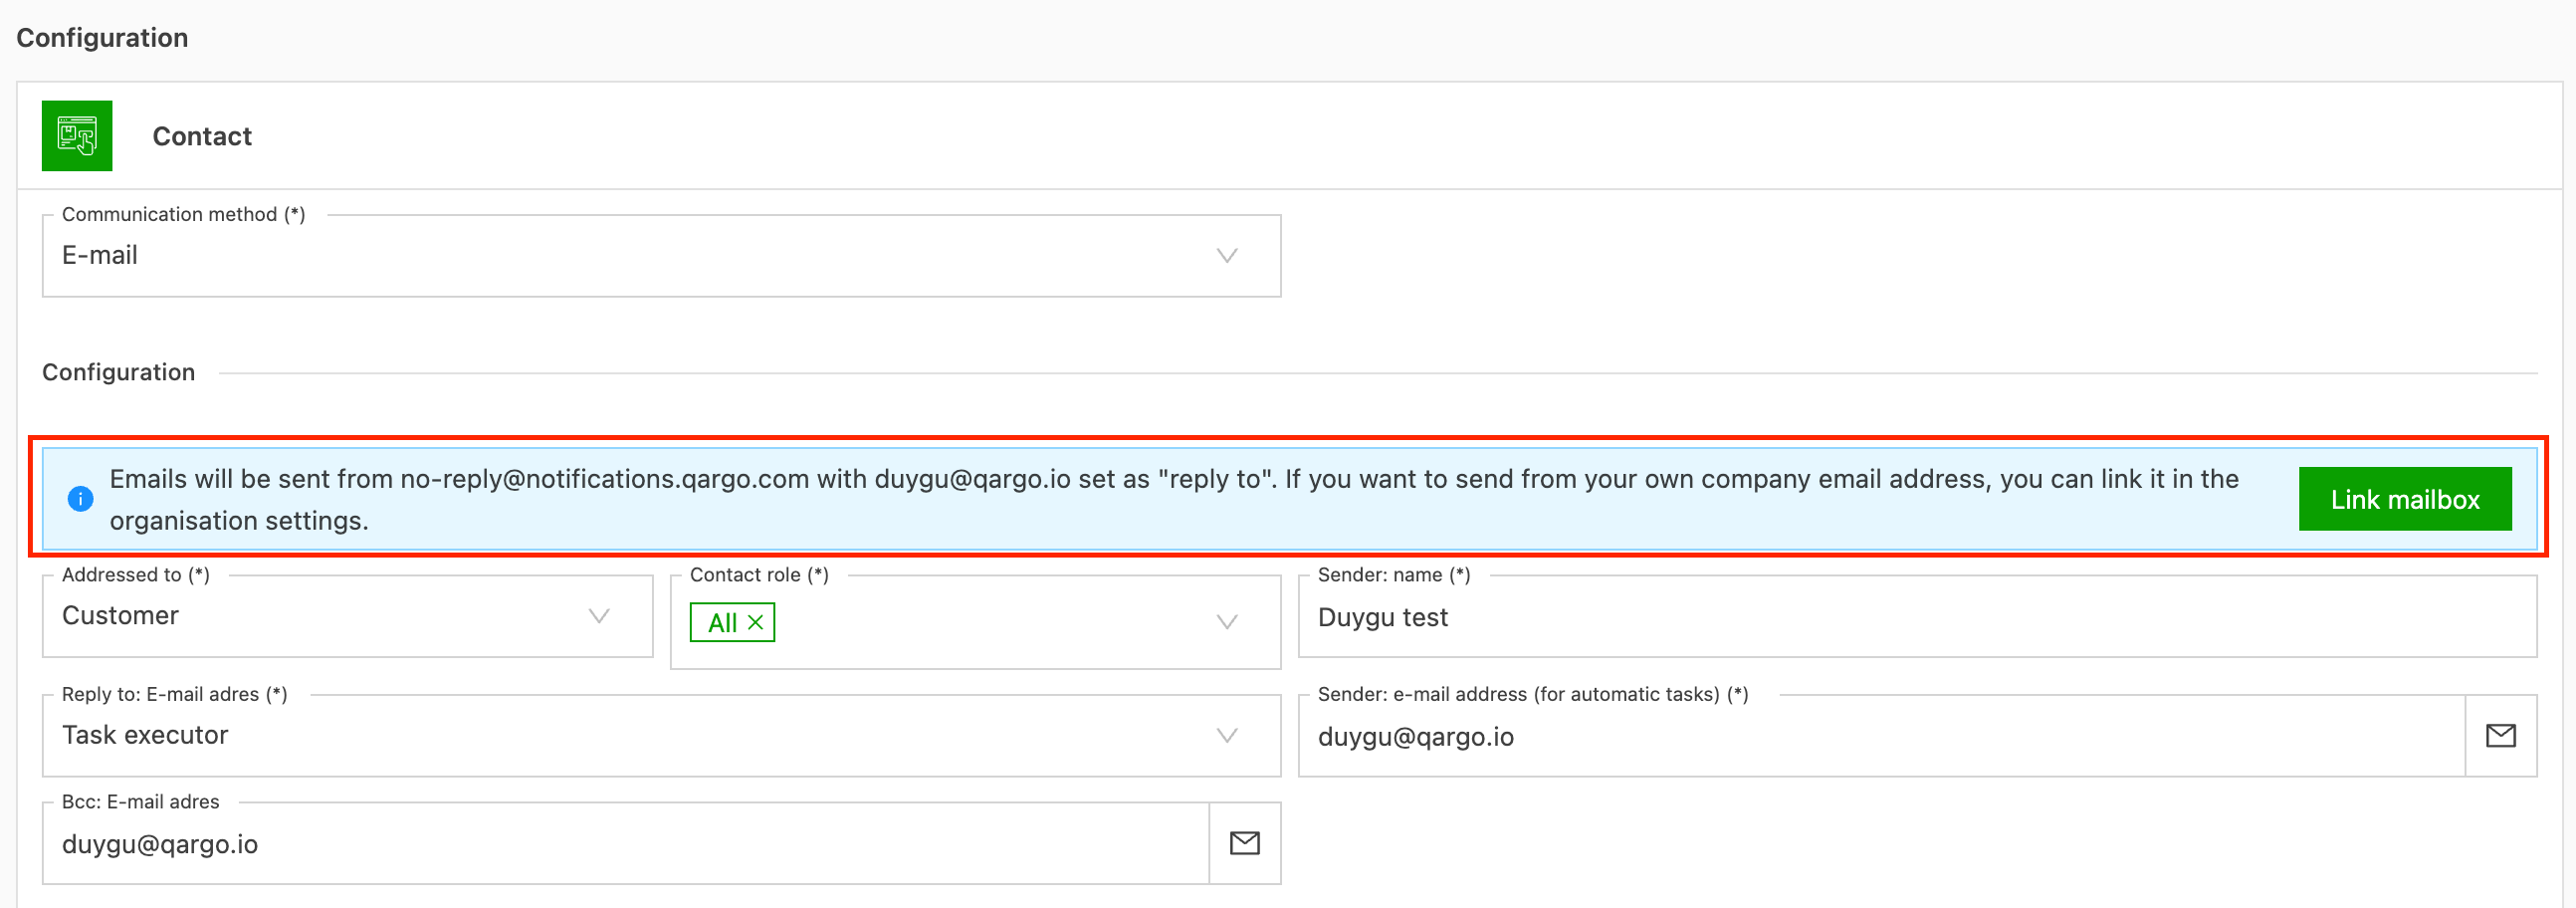
When a linked mailbox is detected in the Sender email address field of the contact task, the message disappears.
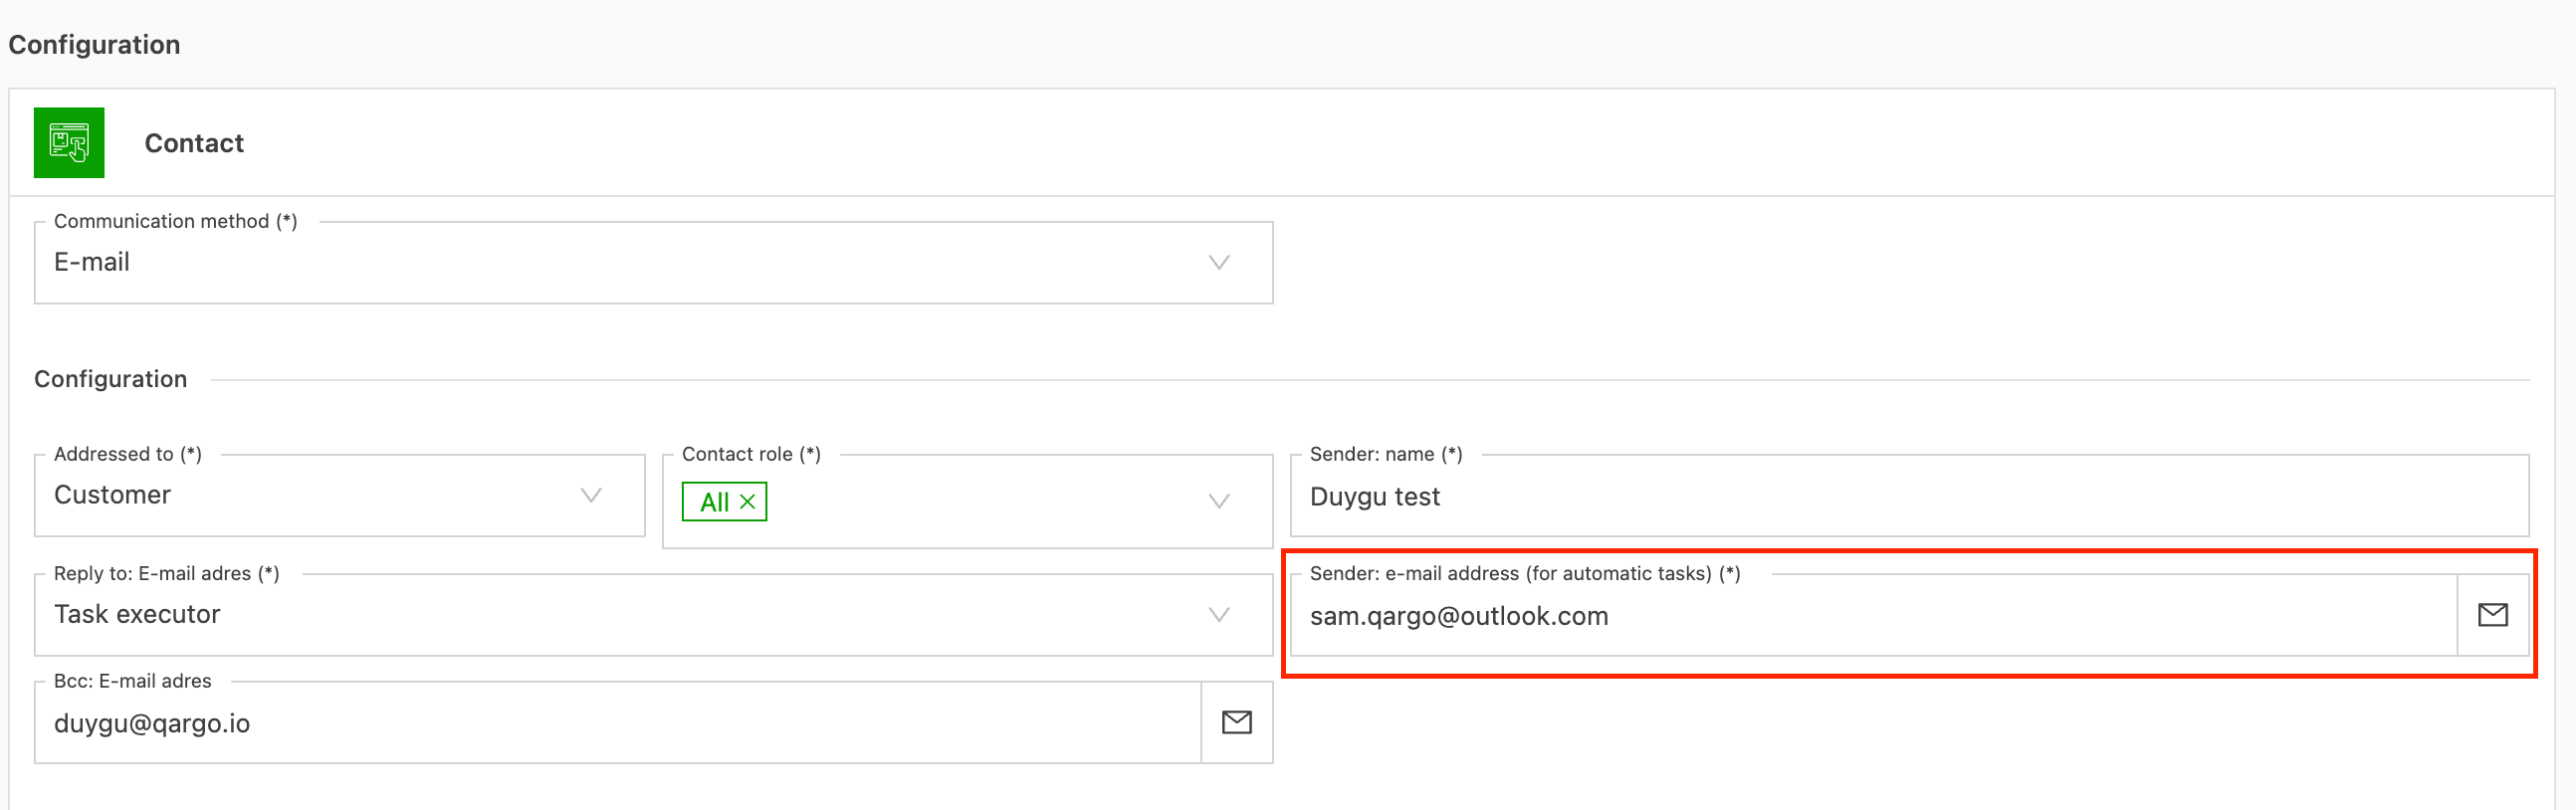
The configuration may differ depending on the type of mailbox: individual (normal) mailboxes, shared mailboxes or distribution lists.
This can be used in combination with the existing email functionality. Email addresses under linked mailboxes are sent via the linked mailbox, while other email addresses are sent via the qargo.com email address with the configured email in the reply-to.
See the setup instructions in this help article. For any questions, feel free to contact Qargo.
Secondary resources
Hi,
A new update enhances how secondary resources and their customization options are managed.
It is now possible to select which additional resource types can serve as secondary resources for an order or load. Any secondary resource type enabled for a load or order has the following functionalities:
- It can be added to planned loads for allocation.
- It can be dragged onto the planning board to create deadheads, similar to how trailers or containers were previously handled.
- It appears as an option for visualization on the planning board.
Example use case: Drivers who switch vehicles throughout the day no longer need to be created as a temporary combination for the day. Drivers now stay permanently on the planning board; for each load, simply drag a vehicle onto the planned load.
For questions about this new feature or for help activating secondary resources, feel free to contact Qargo.
Time rounding and last location
Hi,
Two new features have been released today.
Automatic time rounding to 15-minute blocks
When a load or resource is dropped on the planning board, the first stop’s time is now rounded down to the nearest 15-minute block. This change helps avoid confusion, such as drivers wondering why they need to arrive at 10:06 instead of 10:00, and reduces unnecessary communication. The only exception is when rounding would cause an overlap with a previously planned load; in that case, the exact time is used.
Enhanced last location information
The last location column on the planning board has been upgraded to display more detailed live information when viewing today’s schedule. It now shows driving ETA and wait times for the current stop in progress.
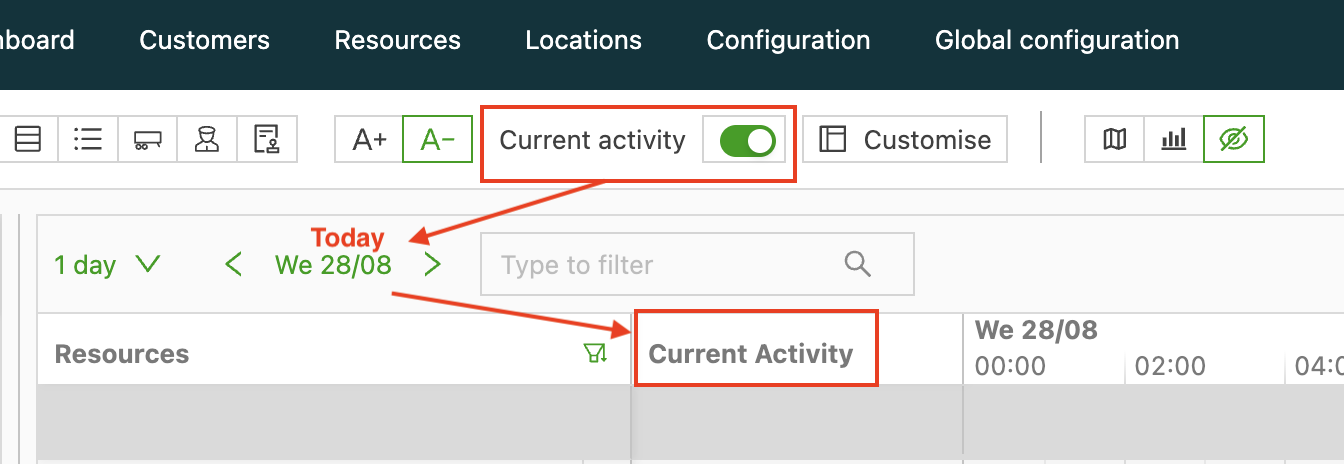
In non-compact mode, relevant stop tasks are also shown, making it possible to set up quick notifications for customer updates. This feature is activated by default, but it can be turned off using the toggle in the top bar on the planning page.
Customer portal prefill and customer locations
Hi,
Two updates were released on the customer portal this morning.
Order prefill configuration: Two months ago, order prefill was introduced for customers and transportation services. Many users requested that these prefills also be available on the customer portal. Both the order prefill (for customers and transportation services) and the stop prefill are now accessible on the customer portal!
On the order prefill configuration screen, some fields are marked with an orange border and an eye icon by default. These indicate prefills that are not applied to the customer portal.
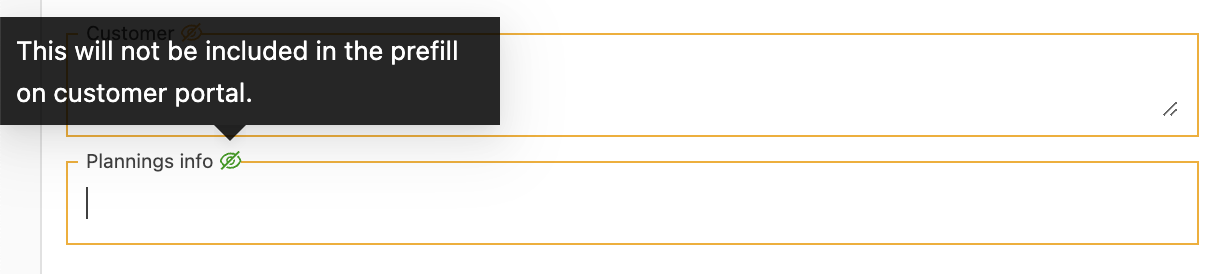
Additionally, the custom and extra fields for customer-specific locations have been disabled in the stop prefill, as this function is now managed by the customer-specific address book.
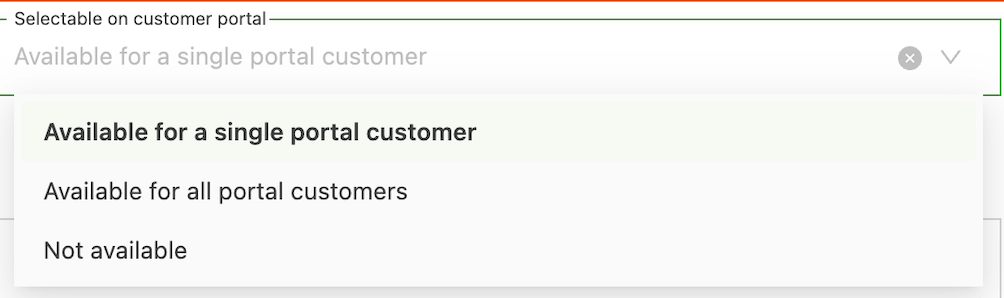
Customer-specific address book: A new field has been added to the location detail page. It determines the location’s availability on the customer portal and the applicable customer. The options include:
- NONE/Not available: These locations are not available on the customer portal unless already used in an order. They do not appear in the customer portal’s location list.
- ALL/Available for all customers: These locations are available to all customers but are not shown in the location list on the customer portal.
- CUSTOMER_SPECIFIC: Available only to a single customer and appears in that customer’s portal location list.
Every location used by only a single customer has been migrated to a customer-specific location. With this update, customers have access to their own set of locations and can only use those (or locations available to all customers) to place orders. All locations that were used by multiple customers (where any of them has customer portal access) have been made available to all customers.
For more details on this functionality, see the help article: “Customer portal locations”