
Tasks: add workflow tasks
Set up and automate tasks in Qargo to streamline workflows from orders to billing, including POD and CMR email automation.
Table of contents
Click the video below for a full walkthrough on how to add a workflow task
Tasks are used to establish a consistent workflow from order creation to billing. Tasks can be configured based on internal preferences and automation needs.
Terminology
| Term | Definition |
|---|---|
| Task | A unit of work or automated process used across orders, loads, and invoices. |
| POD (Proof of Delivery) | A document confirming that goods were delivered successfully. |
| CMR | A transport document for international road freight (Convention relative au contrat de transport international de marchandises par route). |
| Load contacts | Recipients linked to a load who can receive automated emails or updates. |
| Auto-generate | Enables tasks to trigger automatically when specific conditions (e.g., order creation) are met. |
| Manual task | A task that requires user intervention to complete. |
| Recipient roles | Contact groups such as Operations or Customer used for automated notifications. |
Use case
- A customer configures a task to automatically email the signed POD and CMR to the customer immediately after the driver uploads the documents at the delivery stop.
- Every time an automated email is successfully sent to a customer, a completed task is logged on the order page, creating a simple, auditable timeline of customer communication.
Setting up tasks
-
Go to Configuration
-
Select Tasks
-
Choose a category
-
Tasks can be configured for:
- Orders
- Bookings
- Loads
- Invoices
-
-
Select the category on the left-hand side to edit or add tasks.
Task configuration details
When creating or editing a task, complete the following fields:
-
Responsible person: Assign the person or role managing the task.
-
Schedule: Define when the task should be triggered.
-
Recipient roles: Choose roles such as Operations or Customer contacts for email notifications.
- Roles are defined under Customer/Contract carrier > Contacts page.
-
Completion method: Select whether the task should be completed manually or automatically.
-
Automation:
- To enable automatic triggering (e.g., when an order is created), set the task to Auto-generate.
- Make sure linked mailboxes and recipient contact details are configured correctly.
- Reply-to email settings: When setting up a task, the reply-to email address is shared across all emails associated with that task. Individual emails under one task cannot have different reply-to addresses, which ensures consistency in communication.
Configuring contact-based automation for loads
Contacts can be added directly to a load to make sure the correct people receive load-related communications (e.g., POD/CMR emails).
Steps:
1. Enable contact emails
- Go to Configuration > Additional fields.
- Under Loads, activate the field Contact emails.
- This makes contact email addresses visible in load details.
2. Configure contact task
- Go to Configuration > Tasks.
- From Load tasks, select or add an email task.
- In the Addressed to field, select Load contacts.
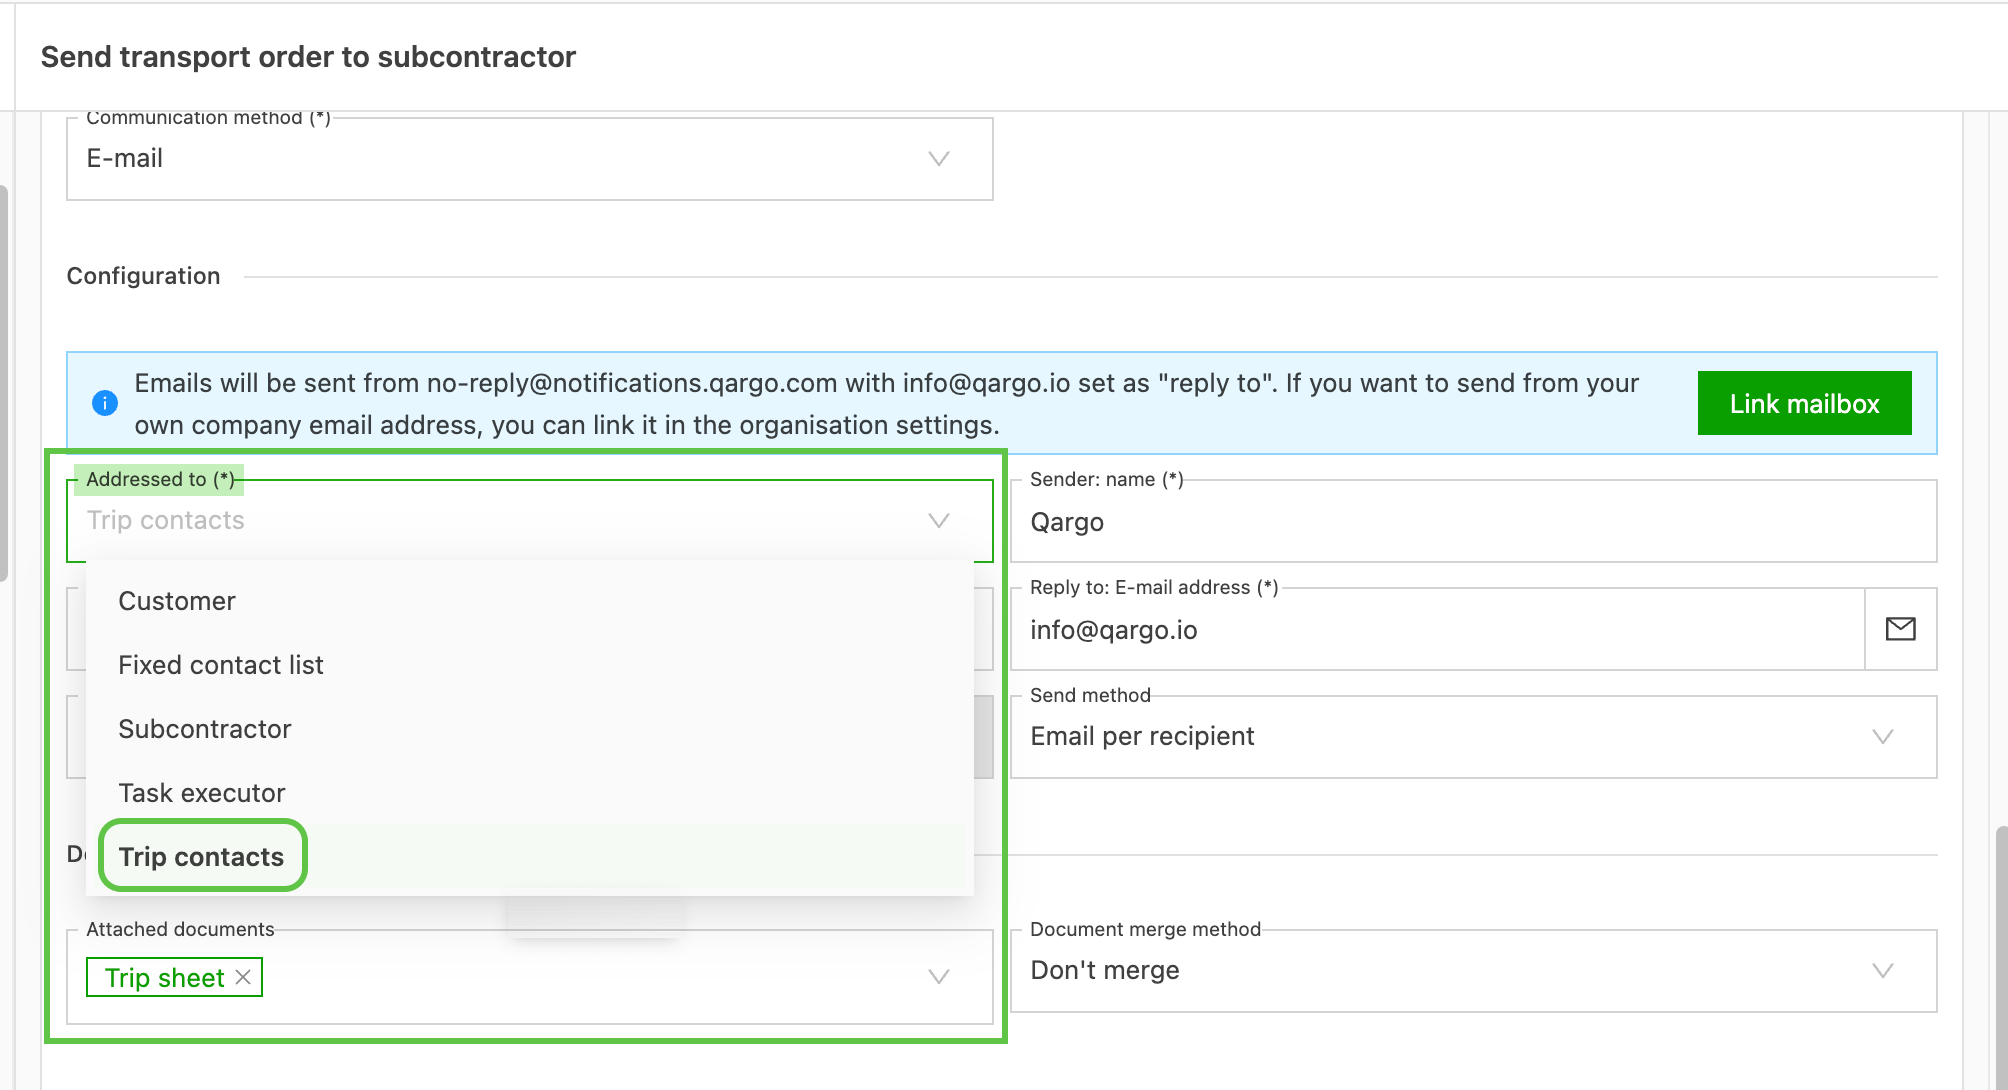
To automate POD/CMR email sending:
- Create a Contact task that triggers only once the required documents (POD/CMR) are available.
- Automation applies only to new orders created after configuration.
- All emails within the same task share the same reply-to email address. This cannot be customized for individual emails under the same task.
Configuration example
| Setting | Default (manual) | Automated configuration |
|---|---|---|
| Task name | Send POD email | Auto-send POD email |
| Trigger | User manually marks delivery as complete | Automatically triggers when POD is uploaded |
| Recipient | Customer service | Load contacts |
| Completion | Manual | Auto-complete |
| Linked mailbox | Not configured | “Operations@company.com” configured |
| Document type | Not set | POD/CMR required before sending |
Autocompleting a task on a status change
Workflow tasks can automate actions such as:
- Generating documents
- Sending emails
- Unblocking billing
The Schedule task after mechanism now includes 20 additional status-based triggers. A task can autocomplete the moment its parent entity (order, shipment, or load) reaches a specific status, instead of at creation.
Configuring a status-based autocomplete trigger
- Open the task template in Configuration > Tasks.
- Locate the Schedule task after (autocomplete) setting on the task.
- Select the status that should trigger autocompletion, for example when the order reaches a planned, executed, or delivered status.
- Save the task template.
Once configured, the task completes automatically when its parent entity reaches the selected status. This keeps the workflow aligned with the operational stage rather than the moment of creation.
This example shows the ‘Send tracking link’ task, set to Autocomplete once the shipment is in a Planned status. This automatically generates and sends the tracking link to the order contacts once the order is planned on the load.
Monitoring and using tasks
-
Once created, tasks are visible across the app:
- Order pages
- Load pages
- Invoice views
-
New tasks appear only for newly created orders or loads after configuration.
-
If automated notifications (like POD emails) are not sent, check:
- Whether the task was set to manual instead of automated.
- Whether the email configuration or contact details are correct.
Manually triggering tasks
For older orders created before automation was set up:
- Go to the Order list page.
- Hover over the order name.
- Trigger one of the tasks shown manually.
This makes it possible to send delayed or missed automated emails (like POD emails) for historical orders.