
INTEGRATIONS - Connect an AI assistant to Qargo over MCP - Walkthrough
Connect Claude, ChatGPT or another AI assistant to a Qargo tenant. With Qargo Intelligence, the setup is self-service: a Super admin sets MCP access, then the user adds the connector.
Table of contents
What an assistant can do
An assistant reaches the same data as the Qargo external API, on behalf of one named user, with that user’s own permissions. The Qargo API available options FAQ describes the full scope: orders, loads, tasks, companies, resources, documents and accounting.
Not available through MCP:
- Tenant configuration. Feature flags, integration setup and organization settings stay out of reach.
An assistant never sees more than the user it acts for. A user without access to financial data in Qargo cannot retrieve it through an assistant either.
Before starting
- Qargo Intelligence on the tenant. MCP is part of the Qargo Intelligence add-on. Without it, MCP access is not available. Contact the Qargo Account Manager to add it.
- A Super admin in the organization. Only Super admins can set MCP access for a user.
Connector address
Use https://mcp.qargo.com/mcp in every assistant.
Step 1: Set MCP access for the user
MCP access is a separate setting per user. It defaults to Disabled for everyone, and a Super admin sets it.
- Navigate to Configuration > Organization settings > Users.
- Click the pencil icon next to the user.
- Select a level under MCP access.
- Click Save.
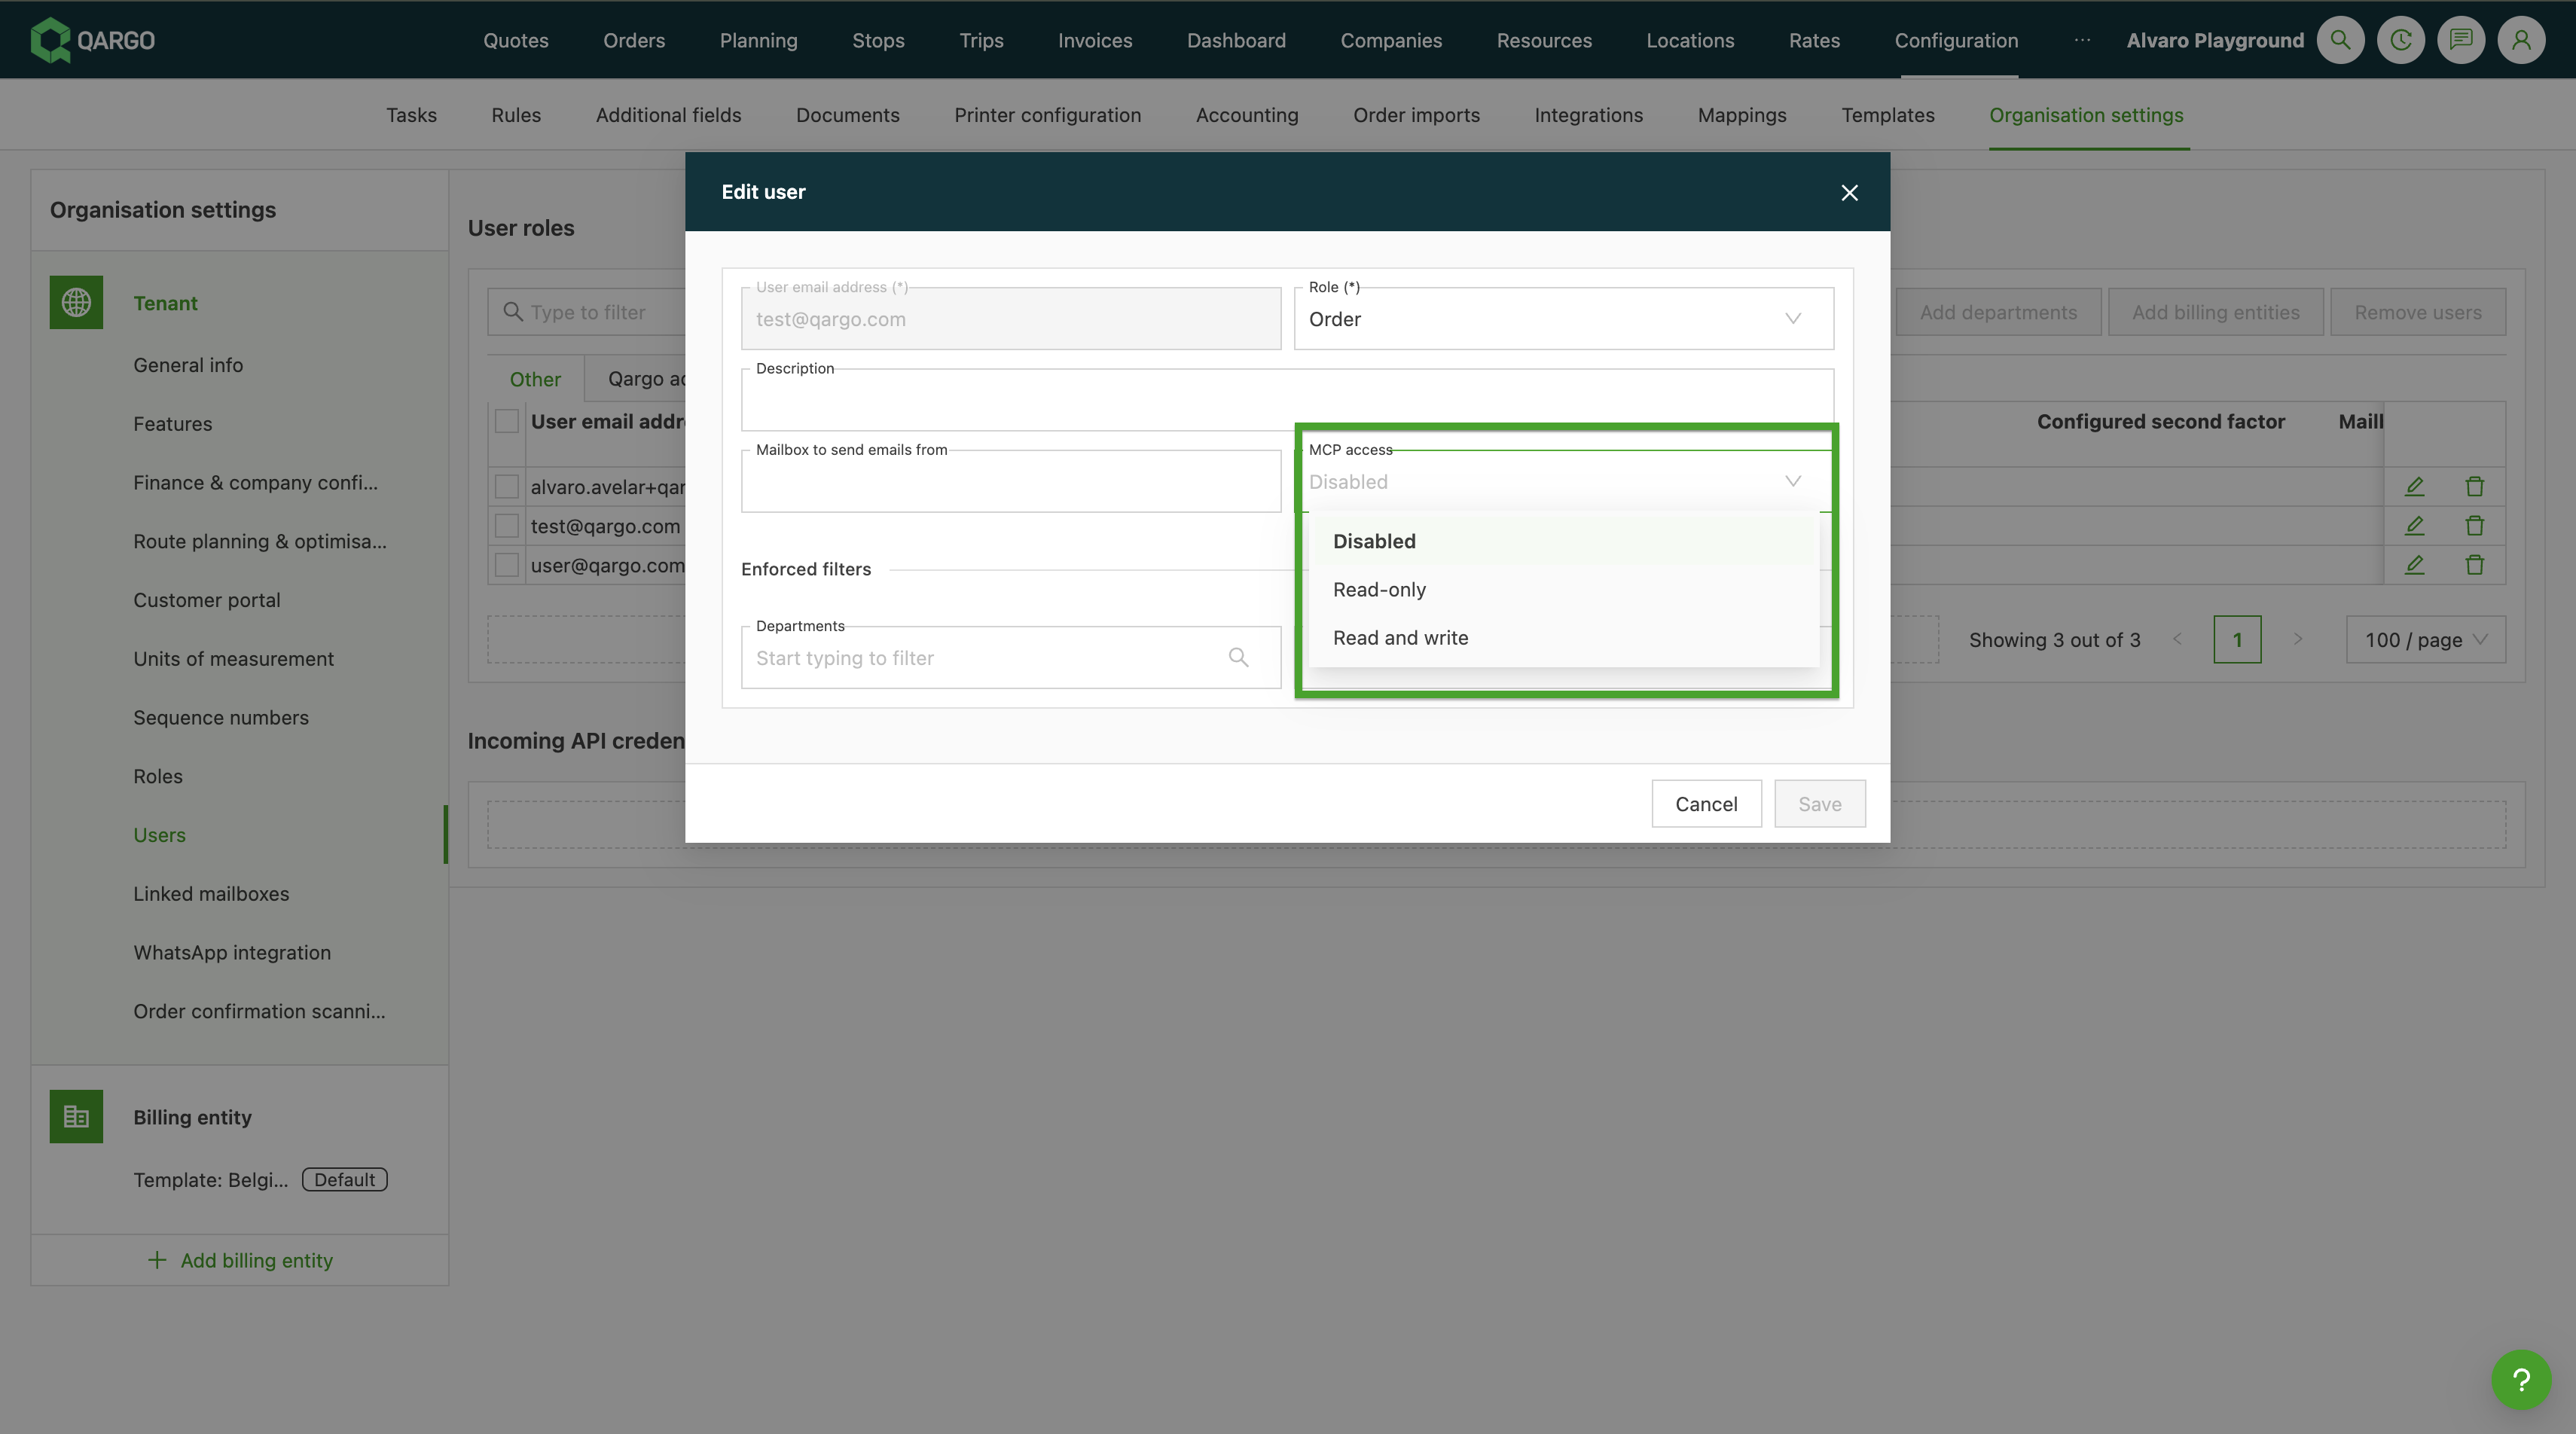
| Level | What the assistant can do |
|---|---|
| Disabled | Nothing. No MCP tools at all. This is the default. |
| Read-only | Every read operation. Anything that creates, updates or deletes is refused. |
| Read and write | Reads, plus create, update and delete. |
Step 2: Add the connector in the assistant
Any AI assistant that supports MCP can be connected. Quick steps for Claude and ChatGPT are below.
Claude: quick steps
Free, Pro or Max, in Claude Desktop or the web app
- Navigate to Customize > Connectors.
- Click Add at the top right of the Connectors panel, then Add custom connector.
- Enter Qargo as the name and https://mcp.qargo.com/mcp as the remote MCP server URL, then click Continue.
- Leave Authentication and OAuth client as Claude fills them in. The detected settings are the correct ones for Qargo.
- Click Add, then Connect, and sign in with Qargo credentials.
Team or Enterprise, in Claude Desktop or the web app
- As an Owner, add the connector once under Organization settings > Connectors > Add > Custom, using the name and URL above.
- As a member, connect a personal account under Customize > Connectors, then sign in with Qargo credentials.
Claude Code
- Check first with claude mcp list. A connector already added on claude.ai loads automatically for the same account.
- Run claude mcp add —transport http qargo https://mcp.qargo.com/mcp in the project that needs access, if Qargo is not already there.
- Type /mcp, select qargo, choose Authenticate, and sign in when the browser opens.
Full steps and troubleshooting: INTEGRATIONS - Claude: connect to Qargo over MCP.
ChatGPT: quick steps
Business, Enterprise or Education
- As an admin, publish the app once: turn on developer mode under Settings > Apps > Advanced settings, then go to Workspace settings > Apps > Create, enter the name and endpoint above, select OAuth, click Scan Tools, then Create. Test the draft, publish it from Drafts, and set user access.
- As a member, connect a personal account: open the Qargo app, sign in with Qargo credentials, then select the app for the message.
Plus or Pro
- Open the ChatGPT settings, then Apps > Advanced settings, and turn on developer mode.
- Create a custom connector named Qargo, with https://mcp.qargo.com/mcp as the endpoint.
- Select OAuth as the authentication method. Leave client ID and secret empty.
- Scan the tools, sign in with Qargo credentials, and approve the access request.
- Select the connector for the message.
Reading works on Plus and Pro; changing data does not. Full MCP support, which is what allows a change, is currently limited to Business, Enterprise and Education. Free plans cannot add custom connectors at all.
Full steps and troubleshooting: INTEGRATIONS - ChatGPT: connect to Qargo over MCP.
The article for each assistant covers the full setup, the plan requirements and its own troubleshooting.
| Assistant | Who sets it up | Article |
|---|---|---|
| Claude Desktop, claude.ai and Claude Code | An Owner on Team and Enterprise, each user on Free, Pro, Max and Claude Code | INTEGRATIONS - Claude: connect to Qargo over MCP |
| ChatGPT | An admin on Business, Enterprise and Education. Each user on Plus and Pro, with read-only access | INTEGRATIONS - ChatGPT: connect to Qargo over MCP |
Approve a change to production data
Read requests run immediately. The first time an assistant tries to change data in a production tenant, Qargo stops it and returns an approval link.
- Open the approval link in a browser that is already signed in to Qargo.
- Review the tenant named on the approval page and check that it is the right one.
- Approve the session.
- Return to the assistant and ask it to retry the change.
Approval covers that user, that tenant and that assistant session only. A new session needs a new approval.
Daily use
- Sessions expire. The connector might need to be re-authenticated periodically to stay signed in, in practice around once a day.
- Reporting is not supported. Send requests for totals, averages or dashboards to BigQuery or the external API instead.
- Rate limits are shared with the tenant’s other API traffic.
Troubleshooting
| Issue | Resolution |
|---|---|
| The MCP access setting is missing when editing a user | Either the user editing is not a Super admin, or the tenant does not have Qargo Intelligence. For Qargo Intelligence, contact the Qargo Account Manager. |
| The assistant reports that MCP access is not enabled for the user | That user is still set to Disabled. A Super admin sets the level in Configuration > Organization settings > Users. |
| A read works but a change is refused | The user is set to Read-only. A Super admin can change the level. On ChatGPT Plus and Pro, changes are not possible at all, whatever the Qargo level. |
| The assistant reports that access is denied and mentions Qargo Intelligence | The tenant does not have Qargo Intelligence enabled. Contact the Qargo Account Manager. |
| The assistant can list tenants but every other request fails | External API access is not enabled on the tenant. Contact the Qargo Account Manager. |
| The assistant asks for approval again in the same conversation | A new session started. Open the new approval link and approve again. |
| The assistant stops responding after many requests | The tenant rate limit is reached. Wait for the period stated in the response. |
| Setup problems specific to one assistant | See the troubleshooting section in that assistant’s setup article. |