
FAQ: Using temperature settings in Qargo
Qargo supports refrigerated transportation with temperature setpoints, multi-zone tracking and live monitoring through selected integration partners.
Table of contents
Q. Does Qargo have an option for refrigerated transportation that allows users to enter a temperature setpoint? Is integration with providers of temperature tracking services possible?
A. Yes! Temperature settings can be added to orders, freight and loads for monitoring and reporting. Qargo offers integrations with some of the leading temperature tracking providers.
Overview
-
Add custom fields for temperature setpoints at order level and on freight details
-
Load fields available for zone-specific setpoint values
- Compatible with dual-zone trailers or complex loads
-
Temperature data monitored live during transit, where integrations are active.
- Can be automatically logged and stored for compliance reporting, audits and customer service
- Time-stamped temperature records, fridge downloads and compliance paperwork can be uploaded and matched to jobs
-
Configure alerts when temperatures fall outside the permitted range
- The system flags discrepancies with color-coded (amber / red) warnings
-
View live temperature status on various screens (where integrations are active):
- Planning board
- Load detail
- Block view
-
Qargo can generate compliance and temperature reports in real time or retrospectively
- Historical data available for audits
- Document types added for these reports, supporting KPI measurements like “temperature reports uploaded within 1 hour of delivery”
- Event triggers (like sending a temperature breach) can be sent by email or webhook (where integrations are active).
-
For customers, temperature reporting can be made available through the portal.
Terminology
- Requested temperature = what the customer asks for
- Requested setpoint = the setpoint the driver is asked to configure (the driver can deactivate this if it is not needed)
- Actual setpoint = what the driver has configured
- Actual temperature = temperature in the vehicle.
Configuring temperature
-
Temperature setpoints can be configured at both order and load level
- Special fields available for single-zone and multi-zone use cases
-
Temperatures are typically entered directly on the order or in the freight details
-
The configured setpoint is used to direct the temperature settings the driver applies to refrigeration units
Adding the temperature field
Temperature is not a standard field on the order; it needs to be added as a custom field.
-
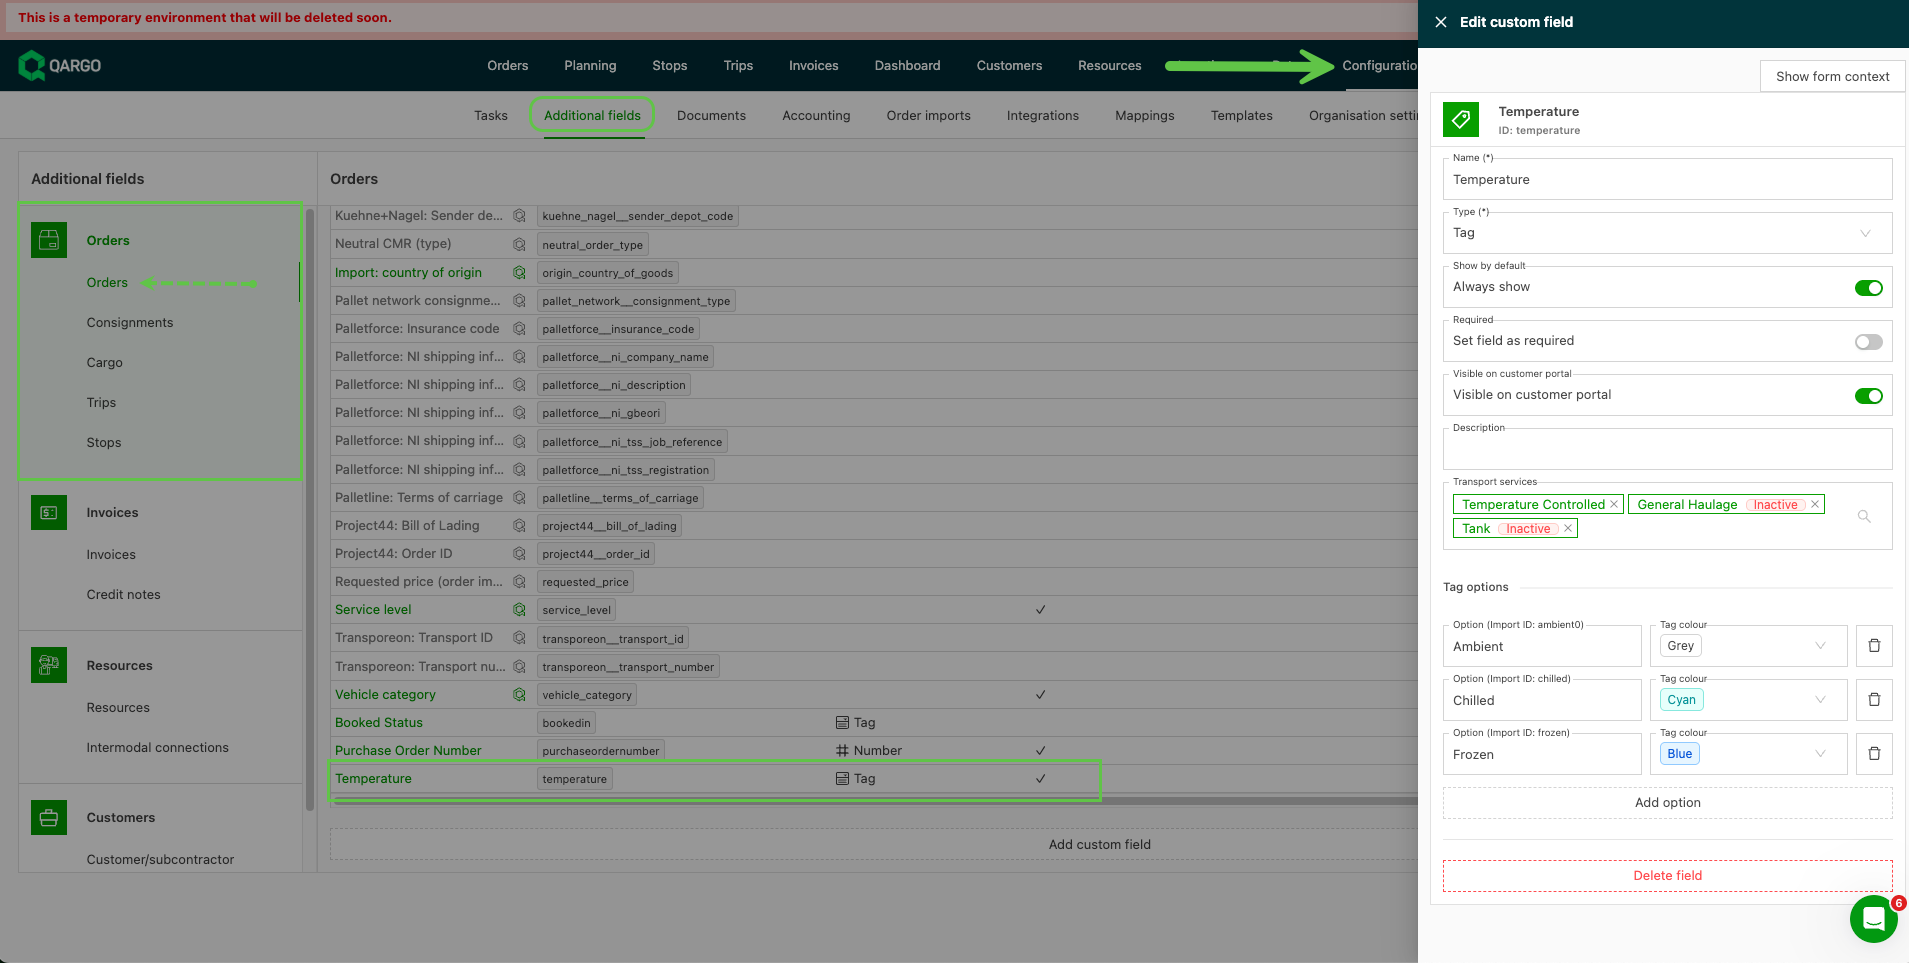
Navigate to Configuration > Additional fields
-
From Orders, click ‘Add custom field’
-
Complete the details for the new field, including:
- What type of field is this? (text / # )
- Is this field always visible and required?
- Is this available for customers in the portal?
- Which transportation service levels is it available on?
- If set as a tag, add the tag ID and corresponding color(s)
-
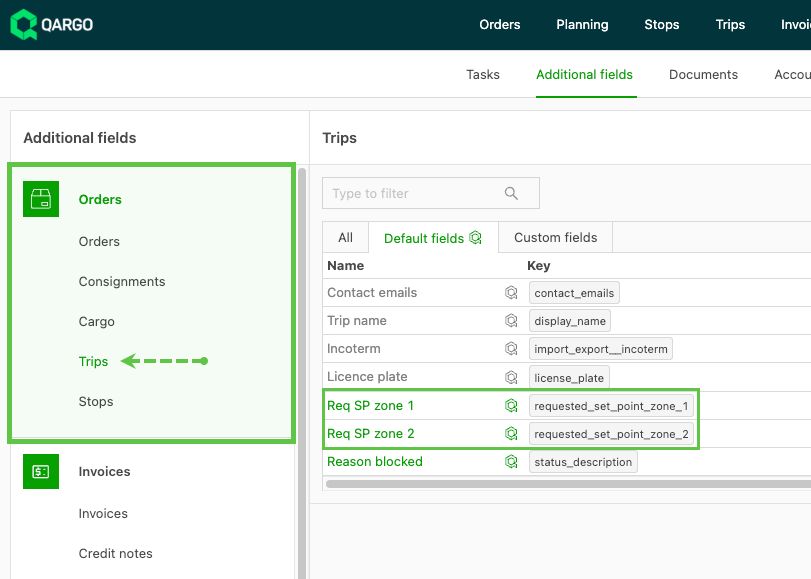
Loads with multiple temperature zones can use additional fields at the load level
- Req SP Zone 1 / Req SP Zone 2
-
Navigate to Configuration > Additional fields.
- In the side menu, Orders panel, click Loads
- Set the 2 fields to Active
-
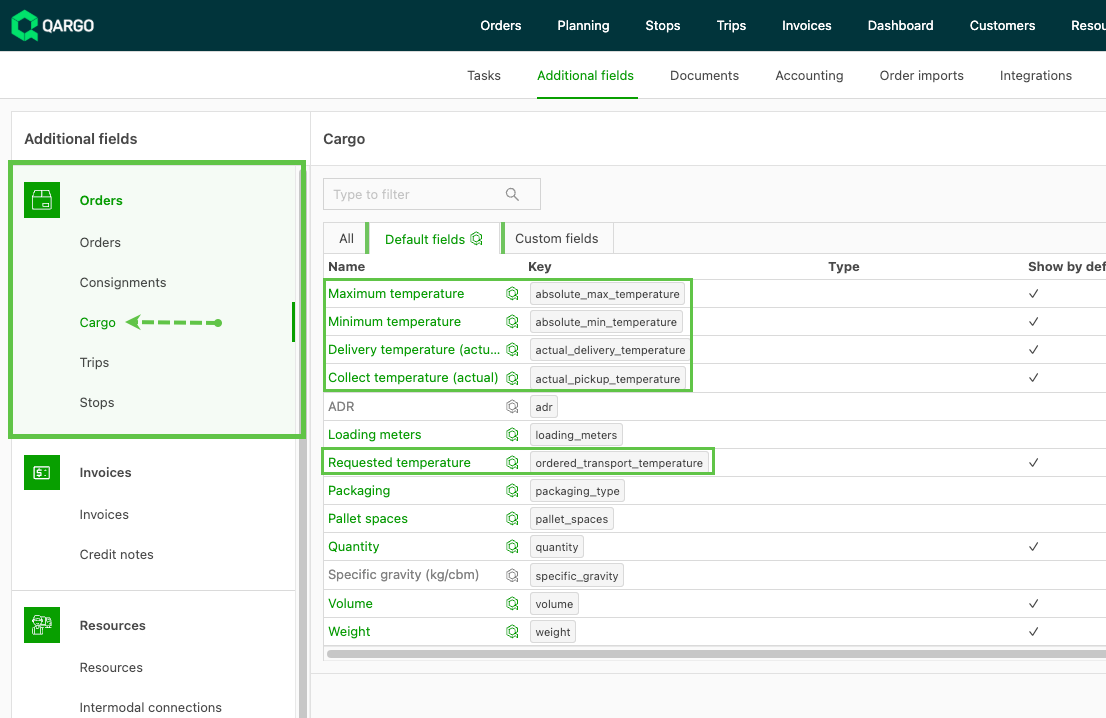
Freight temperature setpoints are available as default fields
-
Navigate to Configuration > Additional fields.
-
In the side menu, Orders panel, click Freight
-
Set the fields relating to temperature to Active
- Maximum temperature
- Minimum temperature
- Delivery temperature (actual)
- Pickup temperature (actual)
- Requested temperature
-
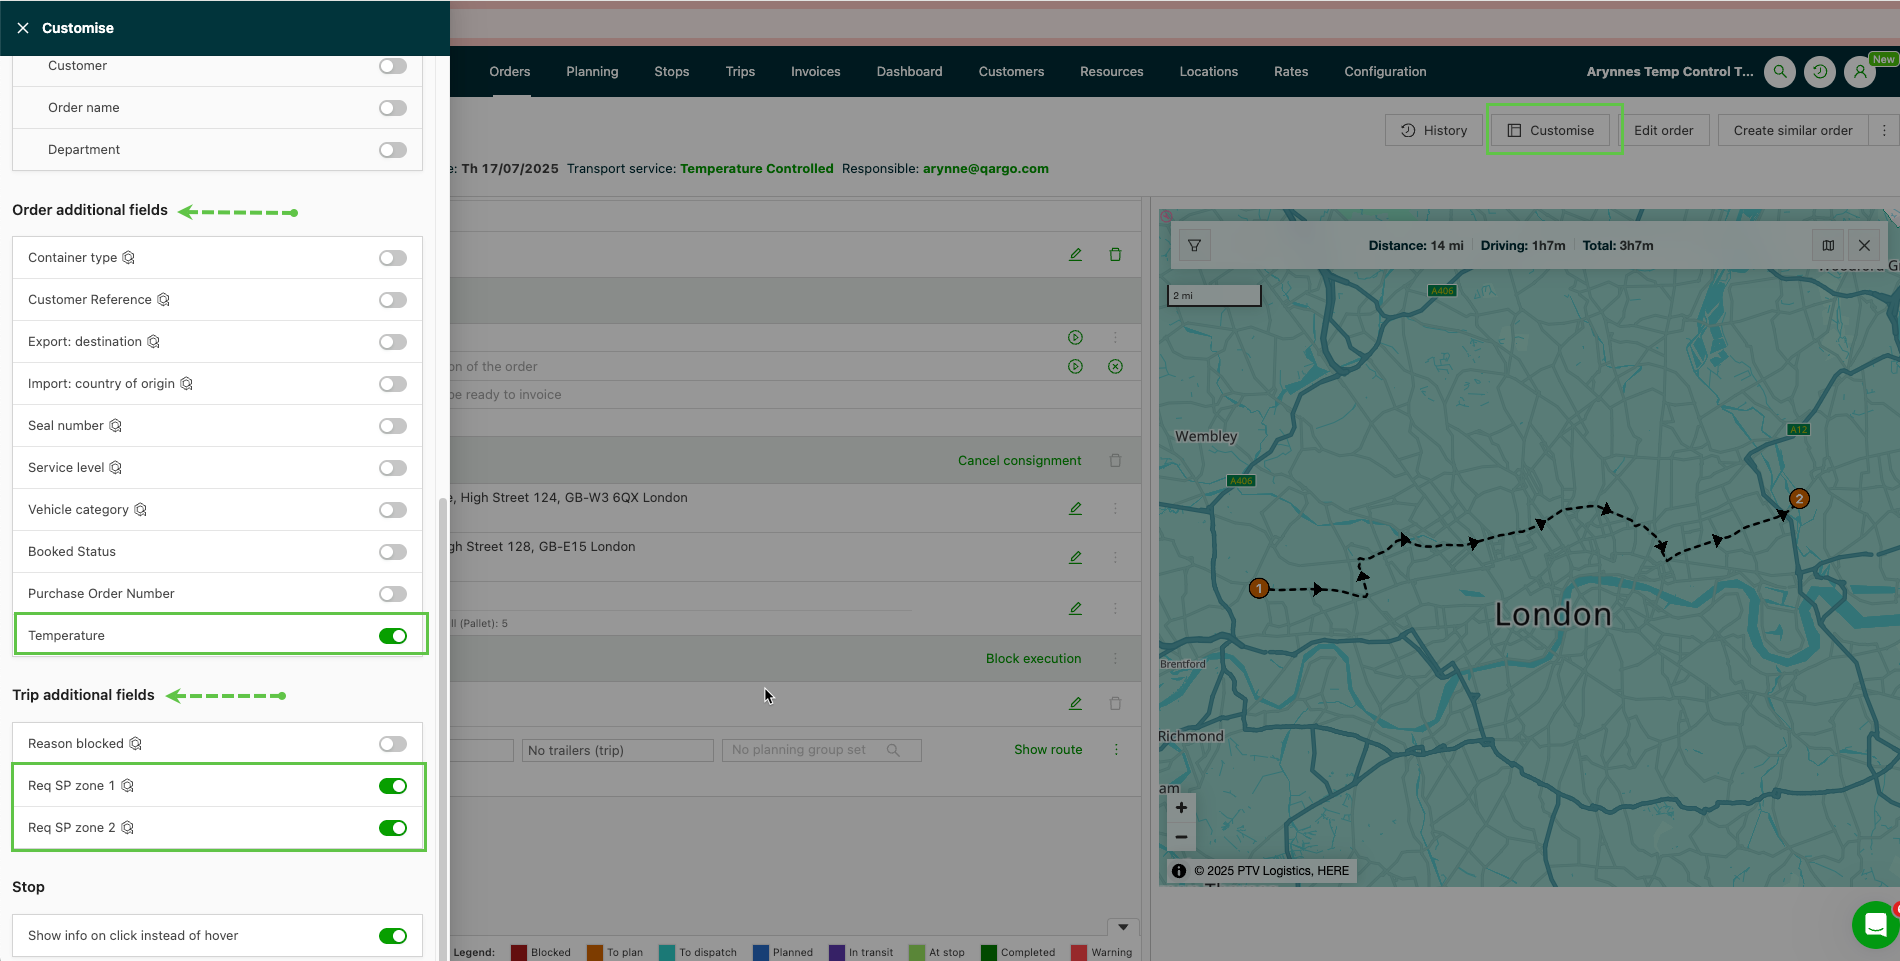
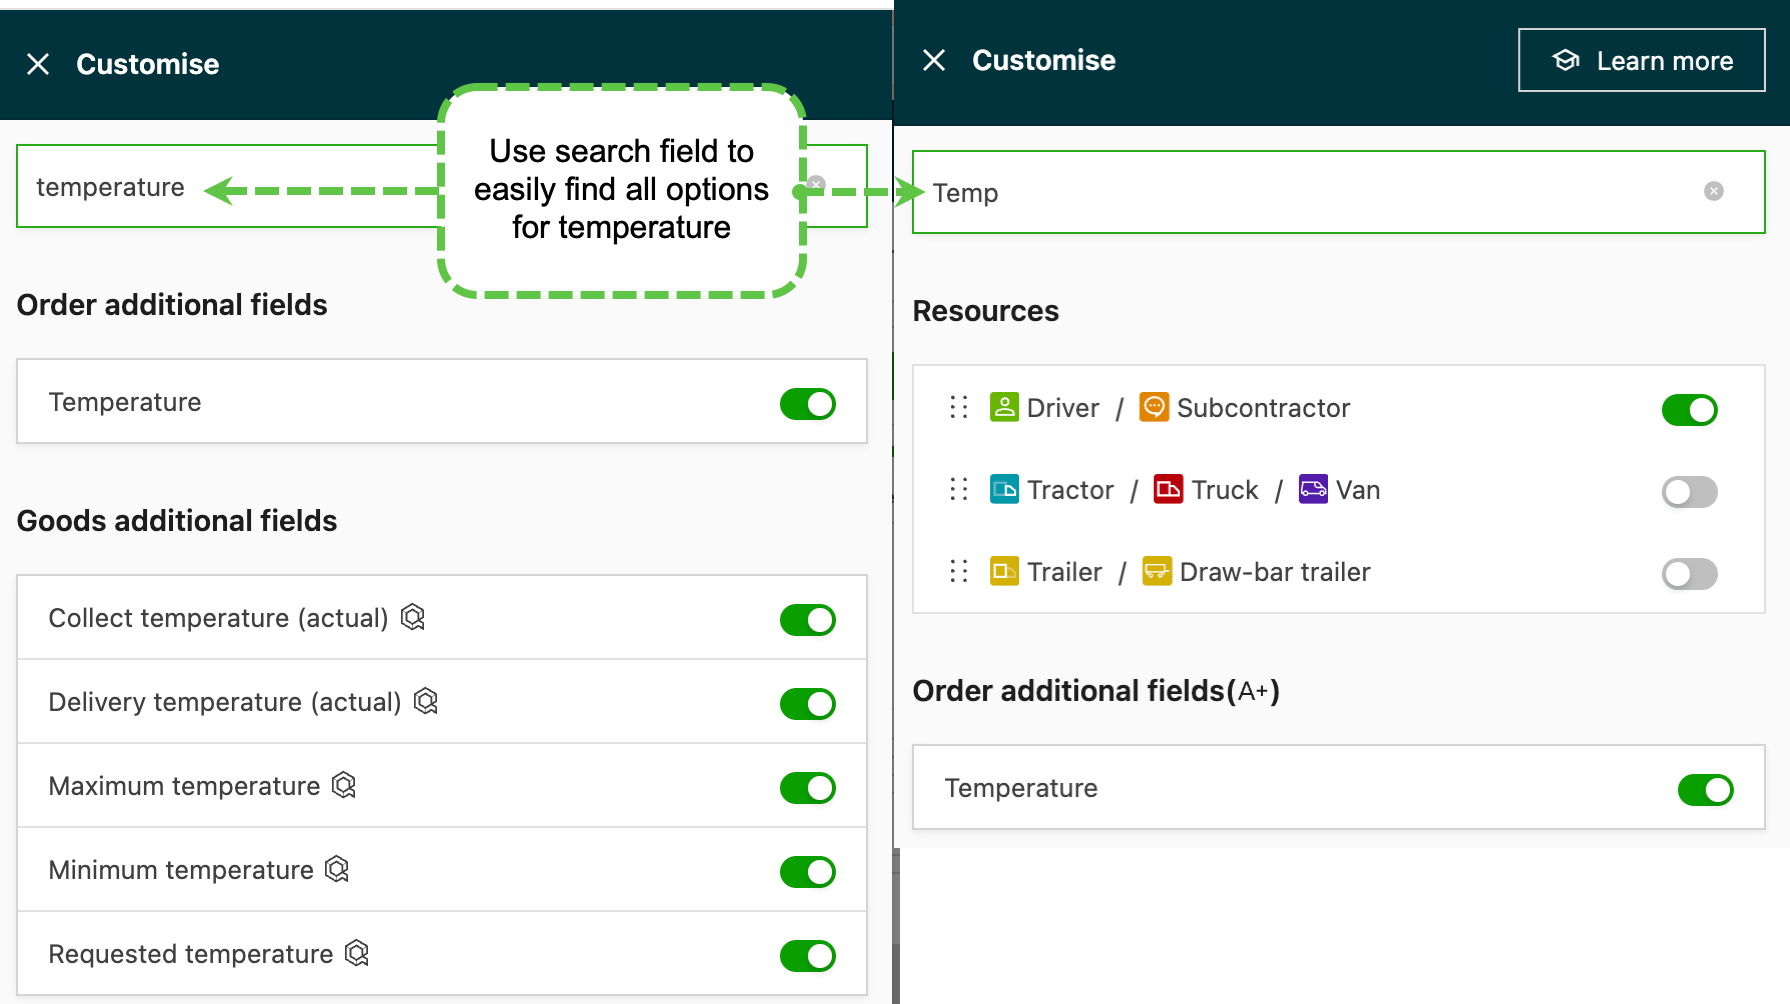
- From the order, click ‘Customize’ and toggle on the temperature options to show details:
-
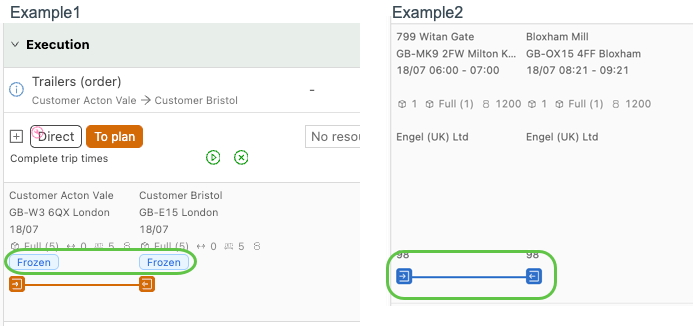
The temperature setting from the order is displayed in the configured format.
- The 2 examples below show Example1 with tags (the label shows Frozen) and Example2 with a numerical temperature (the temperature shows 98).
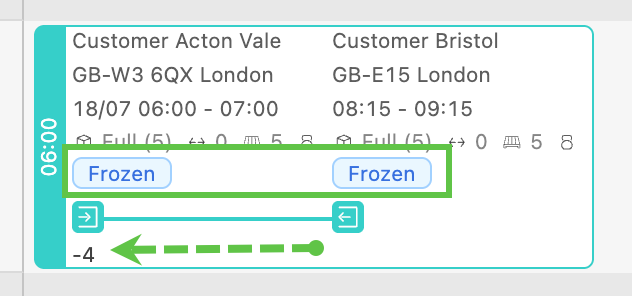
- On the planning board, use the ‘Customize’ buttons (both) to display temperature information. Toggle on the data elements that require visibility.

Using temperature in an order
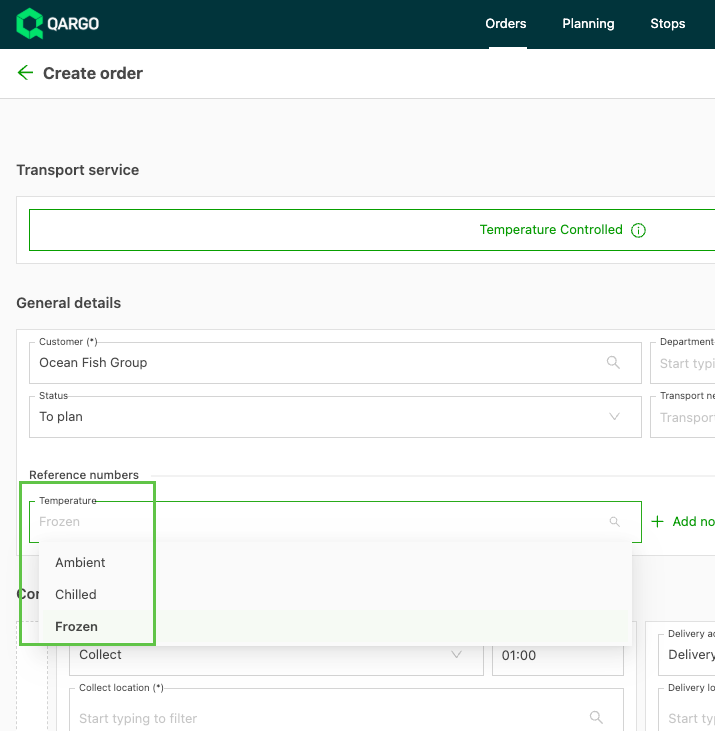
Once activated, the option to set the temperature on the order shows under the reference numbers.
-
The type set determines which options are available.
- In this example, it was created as a tag. The tag labels added show as the options to select on the order.
- When the temperature field is included on the Freight panel, options to enter temperature setpoints are available:
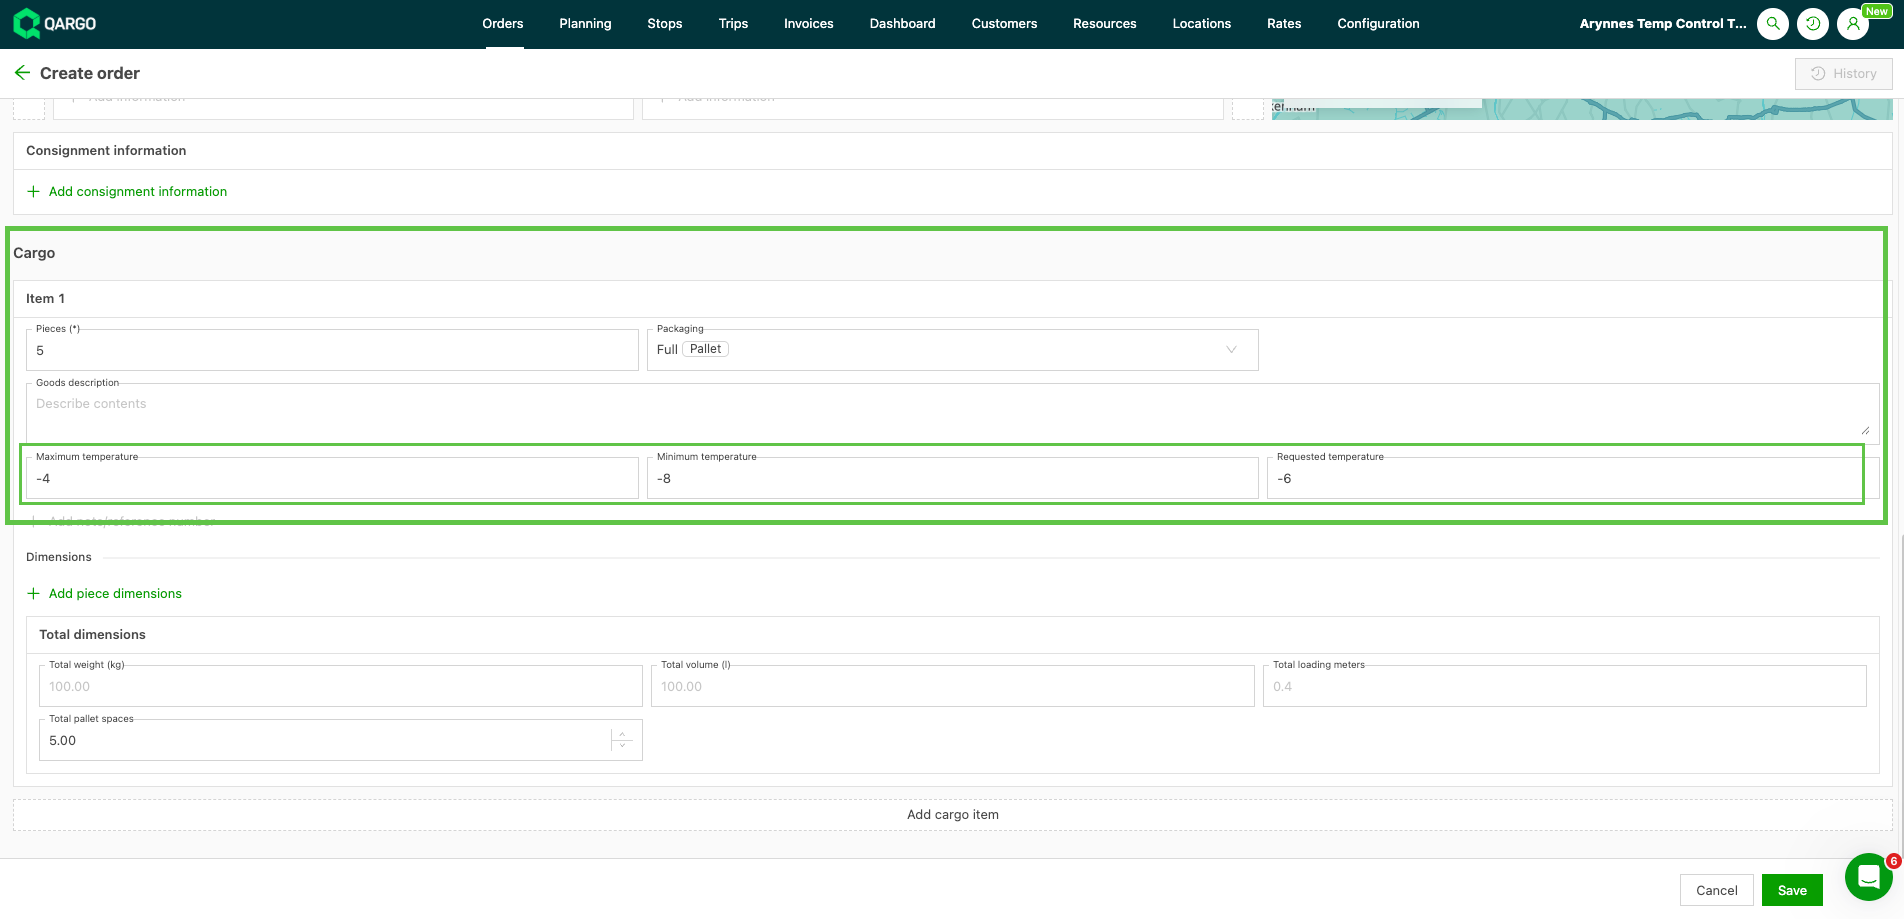
-
If a custom field for temperature uses the tag format, the saved order shows the selected temperature tag next to the order number.
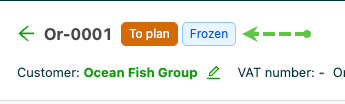
-
If a tag is used, the column header filtering includes the option to filter based on the temperature field:
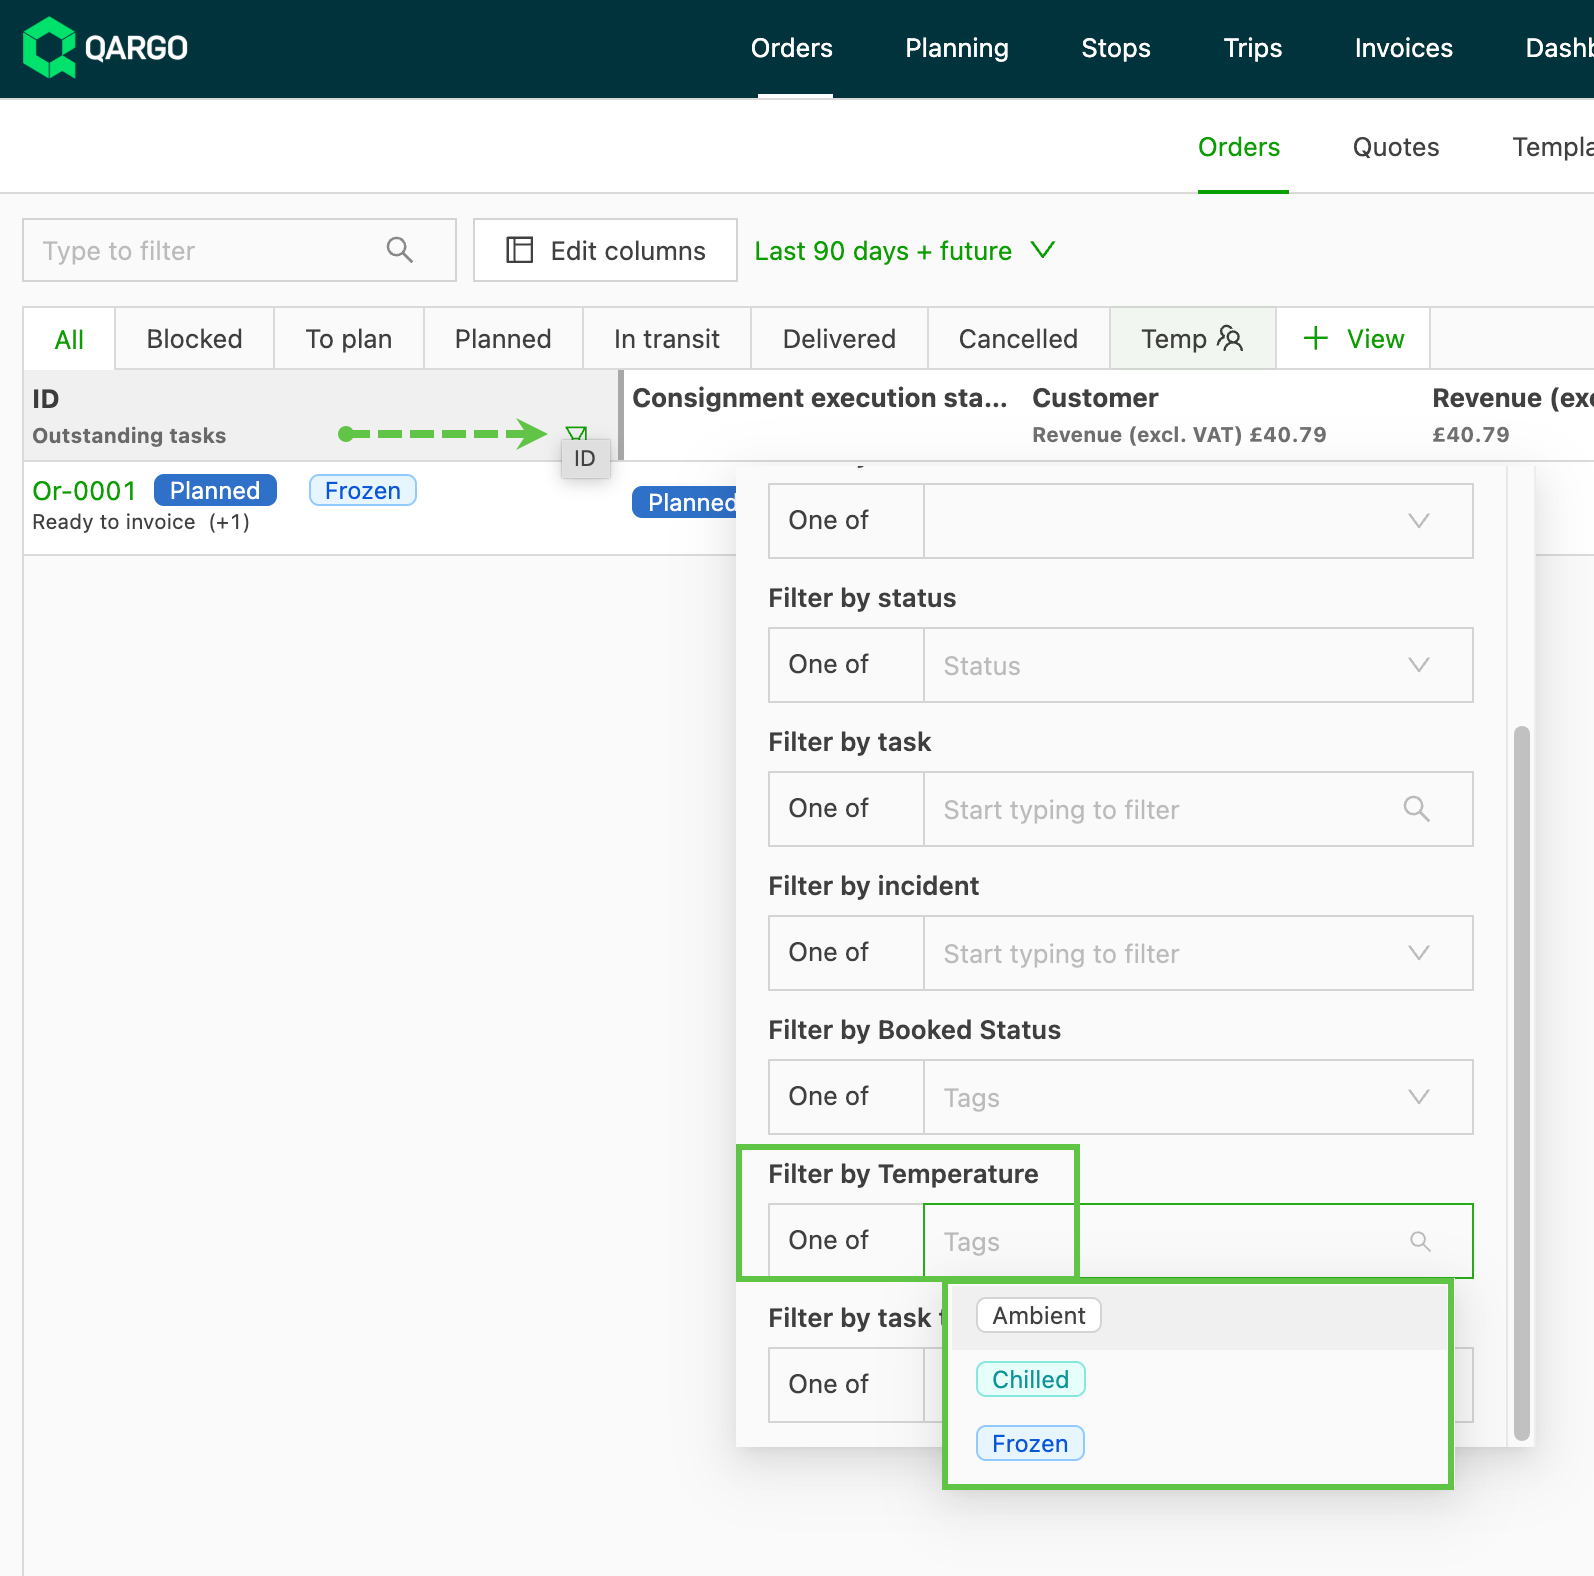
Using temperature in a load
-
Due to the complexity of groupage loads, the fridge temperature must be set at a point that works for all goods on a load
-
Enter the required setpoints on the load manually, even if they are set on each order.
-
Custom fields on orders (e.g., “Requested Setpoint Zone 1/2”) capture the temperature at order level.
- These fields do not automatically populate the load’s required setpoint fields. They are for visibility and must be referenced manually when planning.
- Rename fields or add custom temperature fields that support the workflow, making it easier to visually match order requirements when configuring loads.
-
Instead of opening each load individually, planners can edit setpoint fields for multiple loads in bulk from the Loads overview to speed up manual entry.
View temperature, voltage and plugged-in status for resources
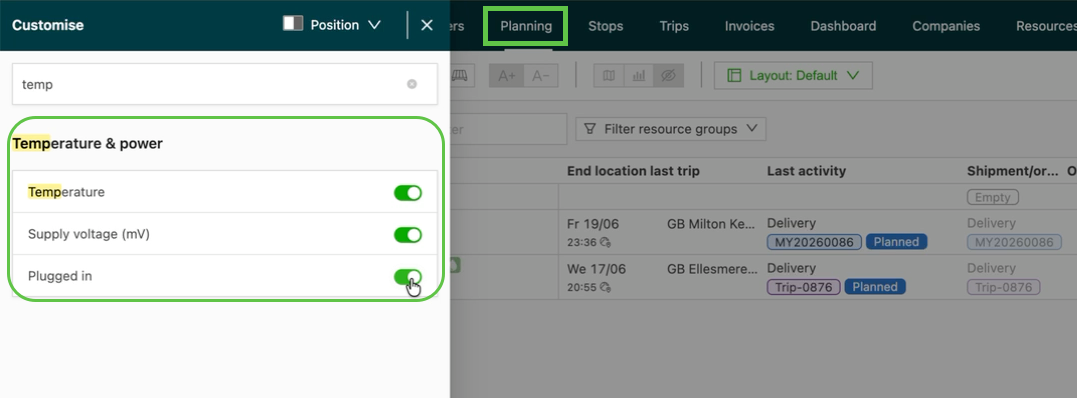
Container, trailer and chassis resources can show optional Temperature, Supply voltage (mV) and Plugged in columns in Planning and on container bookings, filled in automatically from the resource’s own tracking data.
Use cases
- Planners handling temperature-controlled intermodal tank containers can check, without leaving the planning view, whether a container is still plugged in and holding temperature while it is dropped at a terminal or on a vessel. This catches a container that has lost power before it drifts out of range.
- Plugging in a container at a terminal is often a billable extra, so seeing the plugged-in status directly in the planning views also helps confirm whether that charge applies, without checking an external track and trace tool.
Viewing the columns on To plan: Resources
-
Navigate to Planning > To plan: Resources.
-
Click the Customize icon.
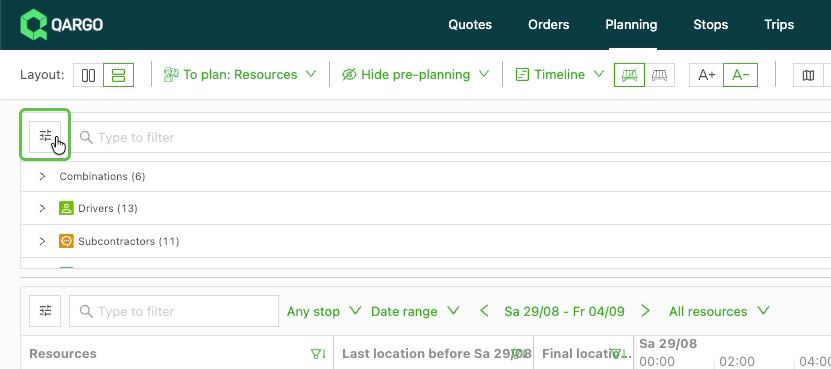
-
Enable the Temperature, Supply voltage (mV) and Plugged in toggles. All three are off by default and apply to resources of type container, trailer and chassis.
-
Close the panel to apply. The three columns appear on the relevant resource rows. They show the latest tracking reading for temperature and voltage, and a checkmark or cross for Plugged in (checkmark from 10,000 mV upward, cross below).
-
Filter on any of the three columns from the column header to narrow the list, for example to isolate containers that are not currently plugged in.
Viewing the columns on the trailer, container and intermodal booking views
-
Open the container or trailer booking view, or the intermodal booking view in Planning.
-
Click the ‘Customize icon’ and enable Temperature, Supply voltage (mV) and Plugged in
-
Review the values shown for the resource linked to each booking. These columns only fill in for bookings that have a container resource linked.
-
Use the filter icon to filter selections.
Troubleshooting
| Issue | Resolution |
|---|---|
| Column cells stay empty | The resource has not received tracking data for that reading yet. Confirm the telematics/tracking integration is configured to send voltage and temperature for that resource. |
| Plugged in looks wrong for a resource | The status threshold is a single global value (10,000 mV) in this release and cannot be tuned per tenant or container type. A telematics feed reporting voltage on a different scale reads incorrectly against this threshold. |
| Columns do not appear after enabling them | Confirm the resource is of type container, trailer or chassis. Other resource types do not carry these fields. |
Integration partners
-
Integration with selected transportation temperature control systems for trucks and trailers (e.g., Thermo King) offers:
- real-time tracking
- multi-zone monitoring
- alerts when temperatures deviate from setpoints
Users working with an integration partner follow these steps:
- Enable the integration using the account credentials provided by the telematics vendor.
- In the resource settings, link each truck or trailer with its corresponding telematics ID and enable the integration toggle.
- Once active, setpoints can be configured and live reporting viewed for each resource in Qargo.
-
For integration with systems like Thermo King, the load fields “Req SP Zone 1” and “Req SP Zone 2” can be auto-filled from hardware data
- They do not copy to or pull from the order; the fields are usually for reference and not used by Qargo’s integrations.
For ferry/intermodal workflows:
-
The temperature setpoint required by ferry plugins or other integrations is usually auto-calculated based on the order’s goods temperature data.
- It must still be entered manually or matched to the load field.
- Consistent custom fields at both order and load level can help streamline double-checking but do not eliminate manual entry.
Summary
- Use the order or load screen to set temperatures; configure custom fields for clarity.
- For multi-zone/dual-temperature loads, enter values for each relevant zone.
- Use the Loads overview screen to set temperatures in bulk after referring to the order values.
- For FTL, the requested temperature should be the same as the requested setpoint.
- For groupage, the requested temperature can differ due to the range of temperatures on the orders grouped on the load.
- When integrated, actual temperature values from hardware integrations may auto-populate these fields for real-time monitoring and alerting.