Orders: orders list view functions
Explanation of features and how to customize and share the order list page, including additional filtering tips.
Table of contents
- Customize the shown columns
- Save custom view columns
- Add and use the Packaging column
- Turn on the Packaging column
- Read the Packaging column
- Filter by packaging type or size
- Troubleshooting
- Add and use the Surcharge revenue column
- Select date range option
- Filter data
- Sort columns
- Sort and filter by revenue, cost, and profitability
- Display custom fields
- Best practices for managing filters
Customize the shown columns
Orders and order details can be customized in the list view.
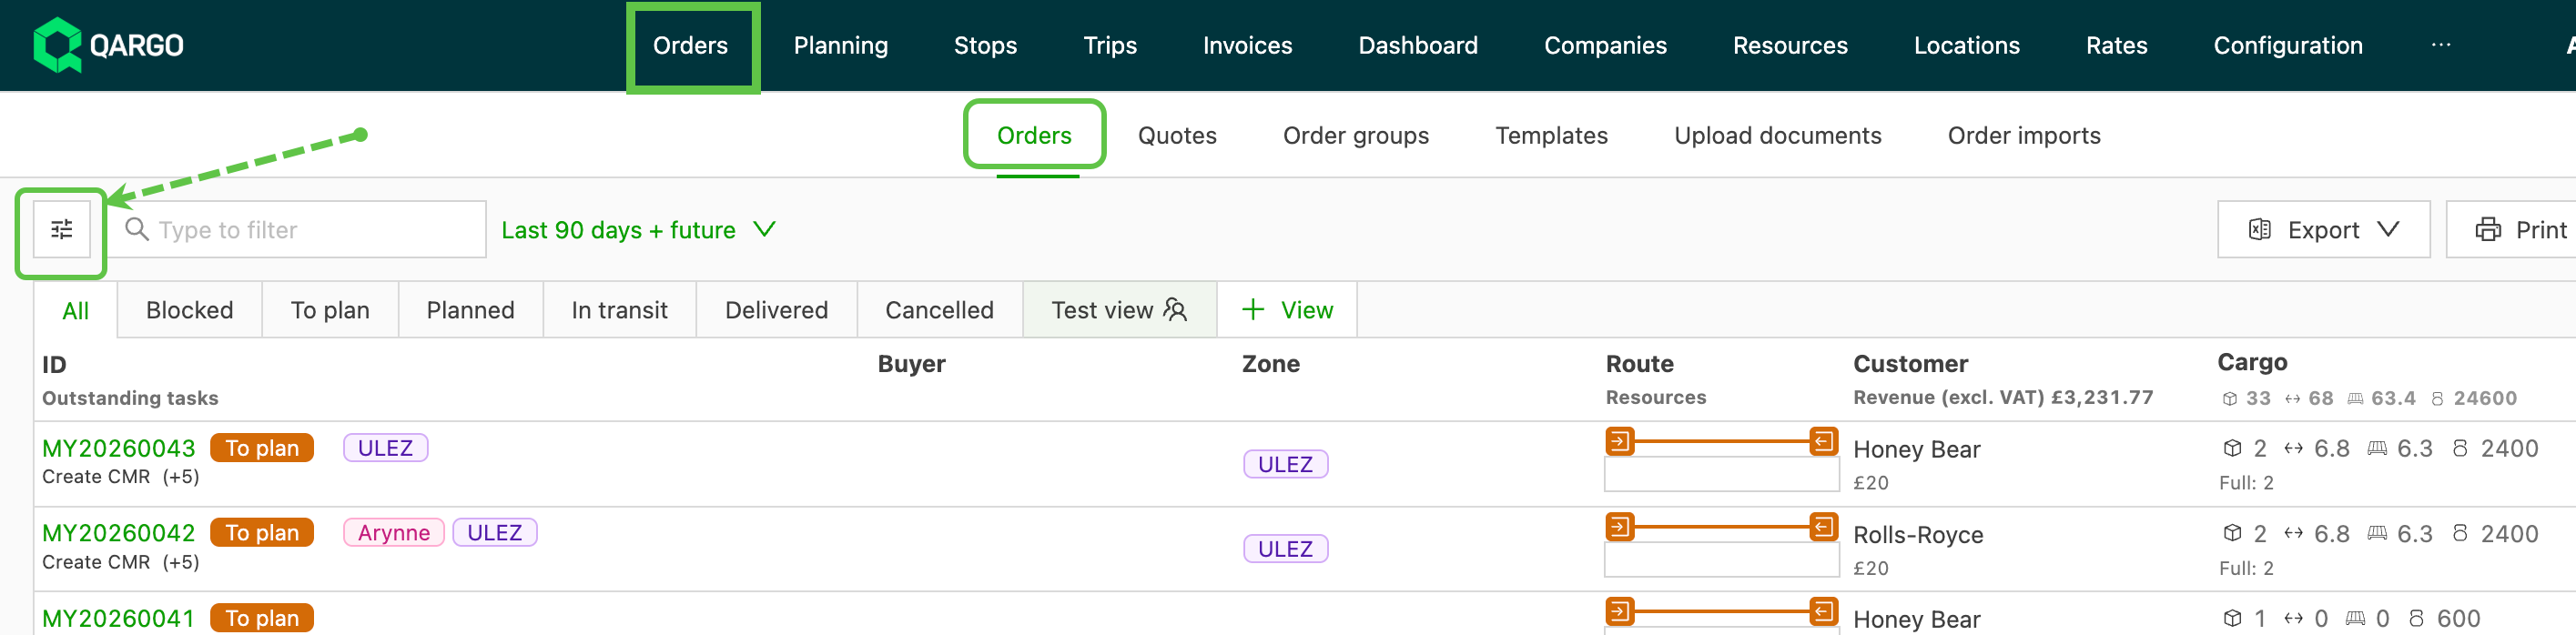
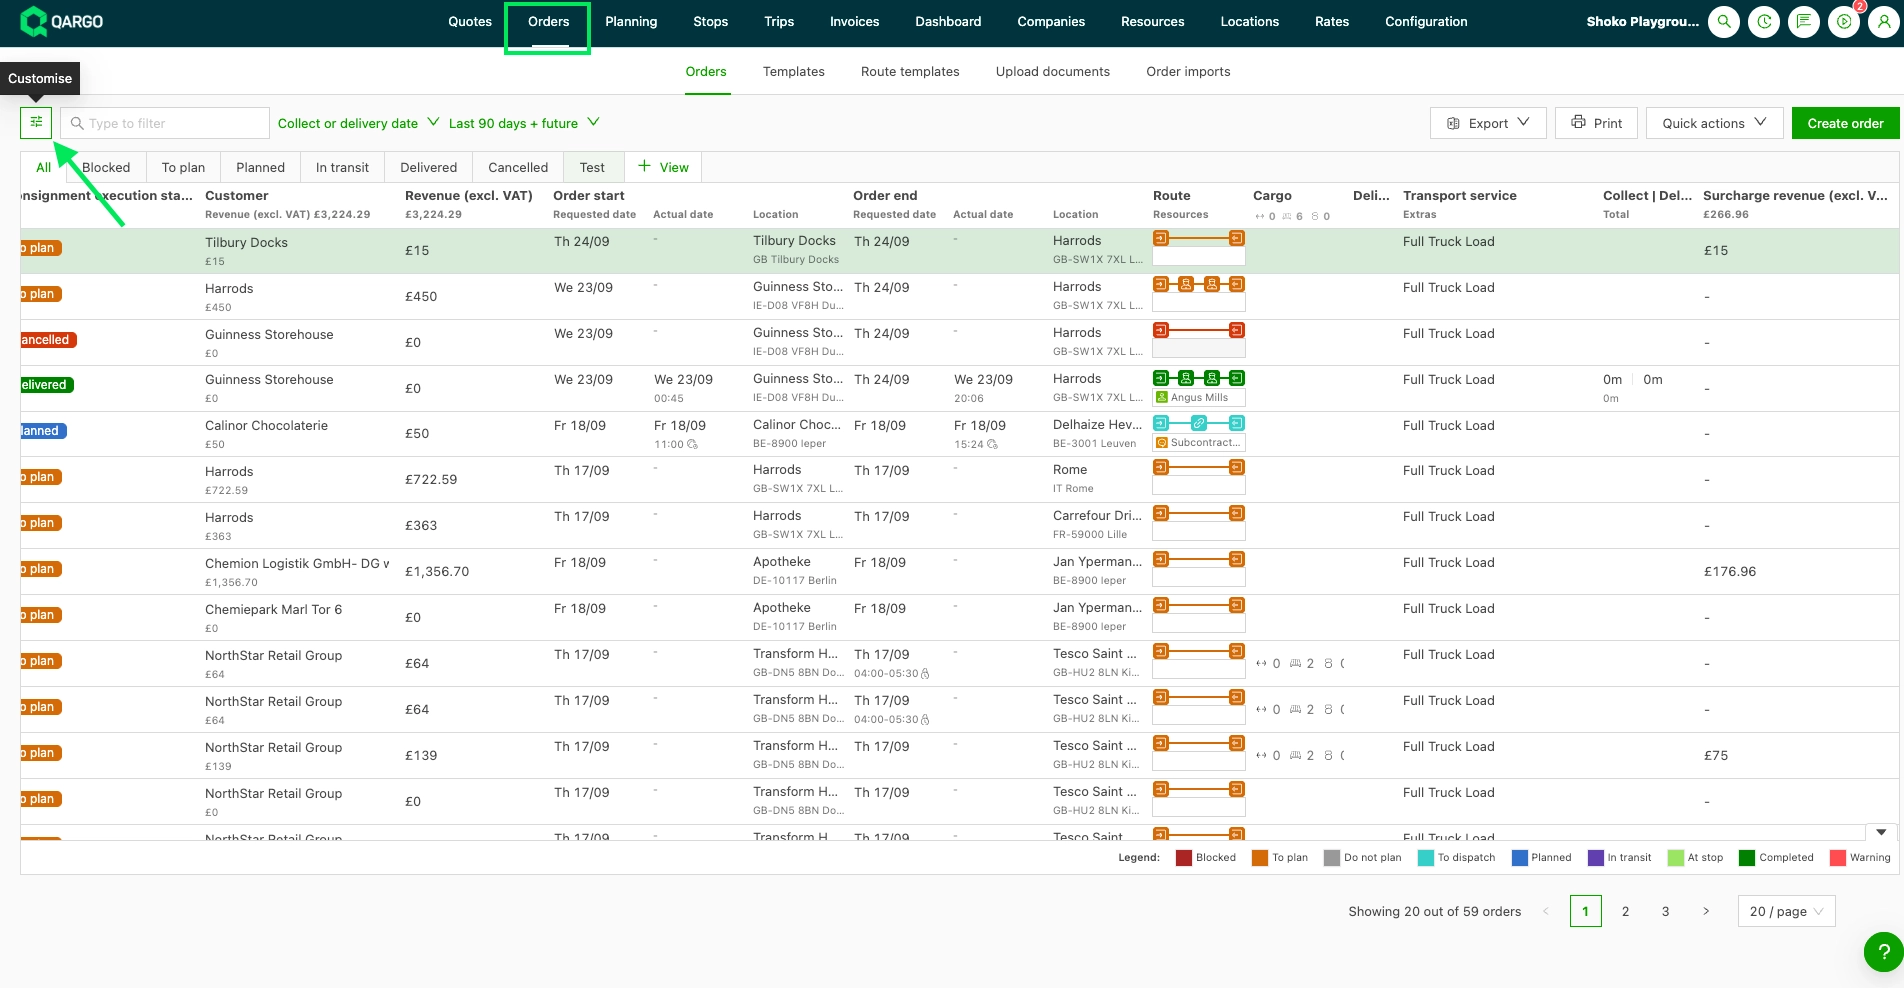
- Navigate to Orders > Orders
- Click the Customize icon
A side panel opens on the left side of the screen.
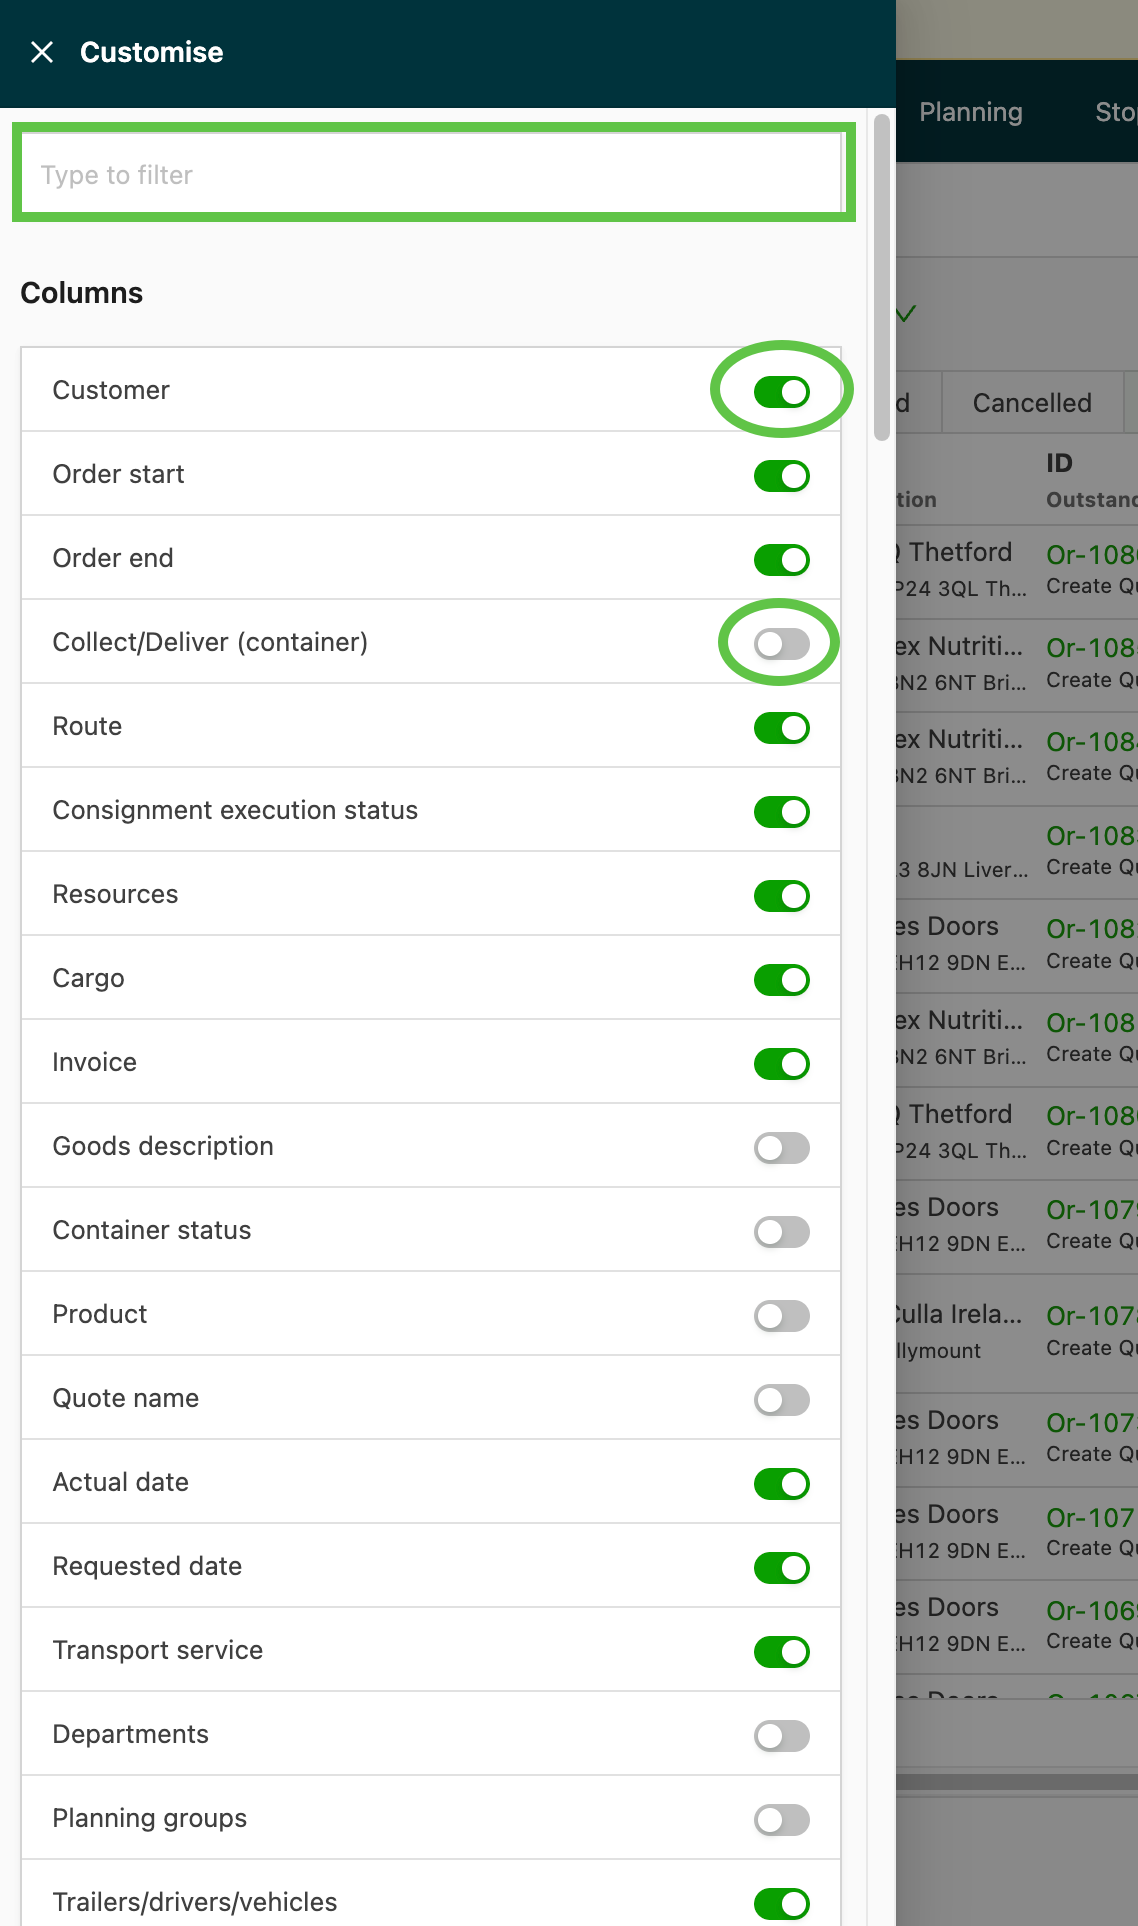
- Select the order details to show on the order list page.
- Use the Search filter to quickly search for specific data
-
Filtering is only possible on values that are available in the Columns section of the customization panel.
- For example, sorting and filtering by Customer is possible, but sorting by Weight is not, as weight is available only under Freight.
-
Drag and drop the column headers to change the order of the columns.
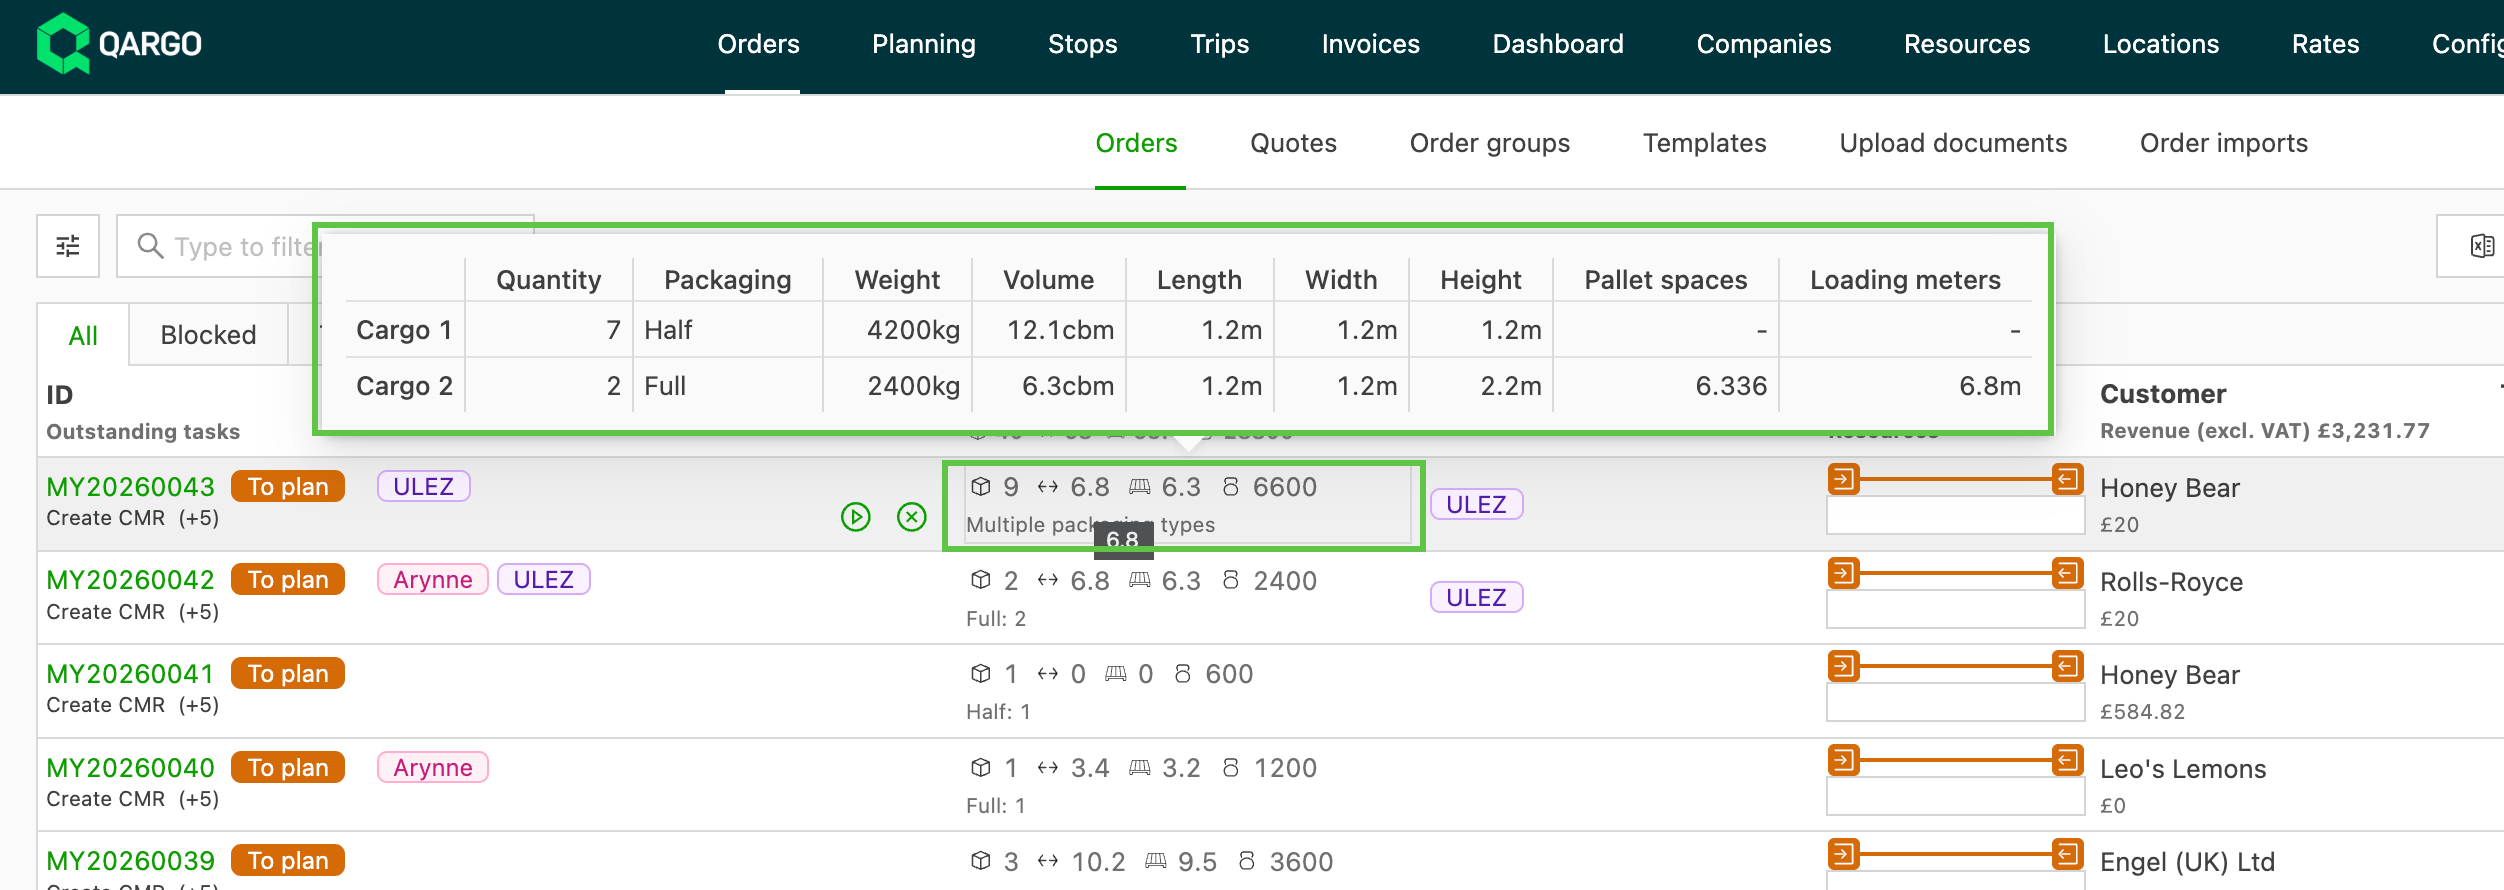
Shipment details are displayed, including:
- Quantity
- Packaging type
- Weight
- Volume
- Length
- Width
- Height
- Pallet spaces
- Loading meters
Show stop fields as columns in the orders list
- Add columns to the orders list that display information from individual stops, such as stop references, delivery receipts, or any stop-level custom field configured by the team.
How to enable stop field columns
-
In the Orders list, click the Customize button (the sliders icon at the top left of the list).
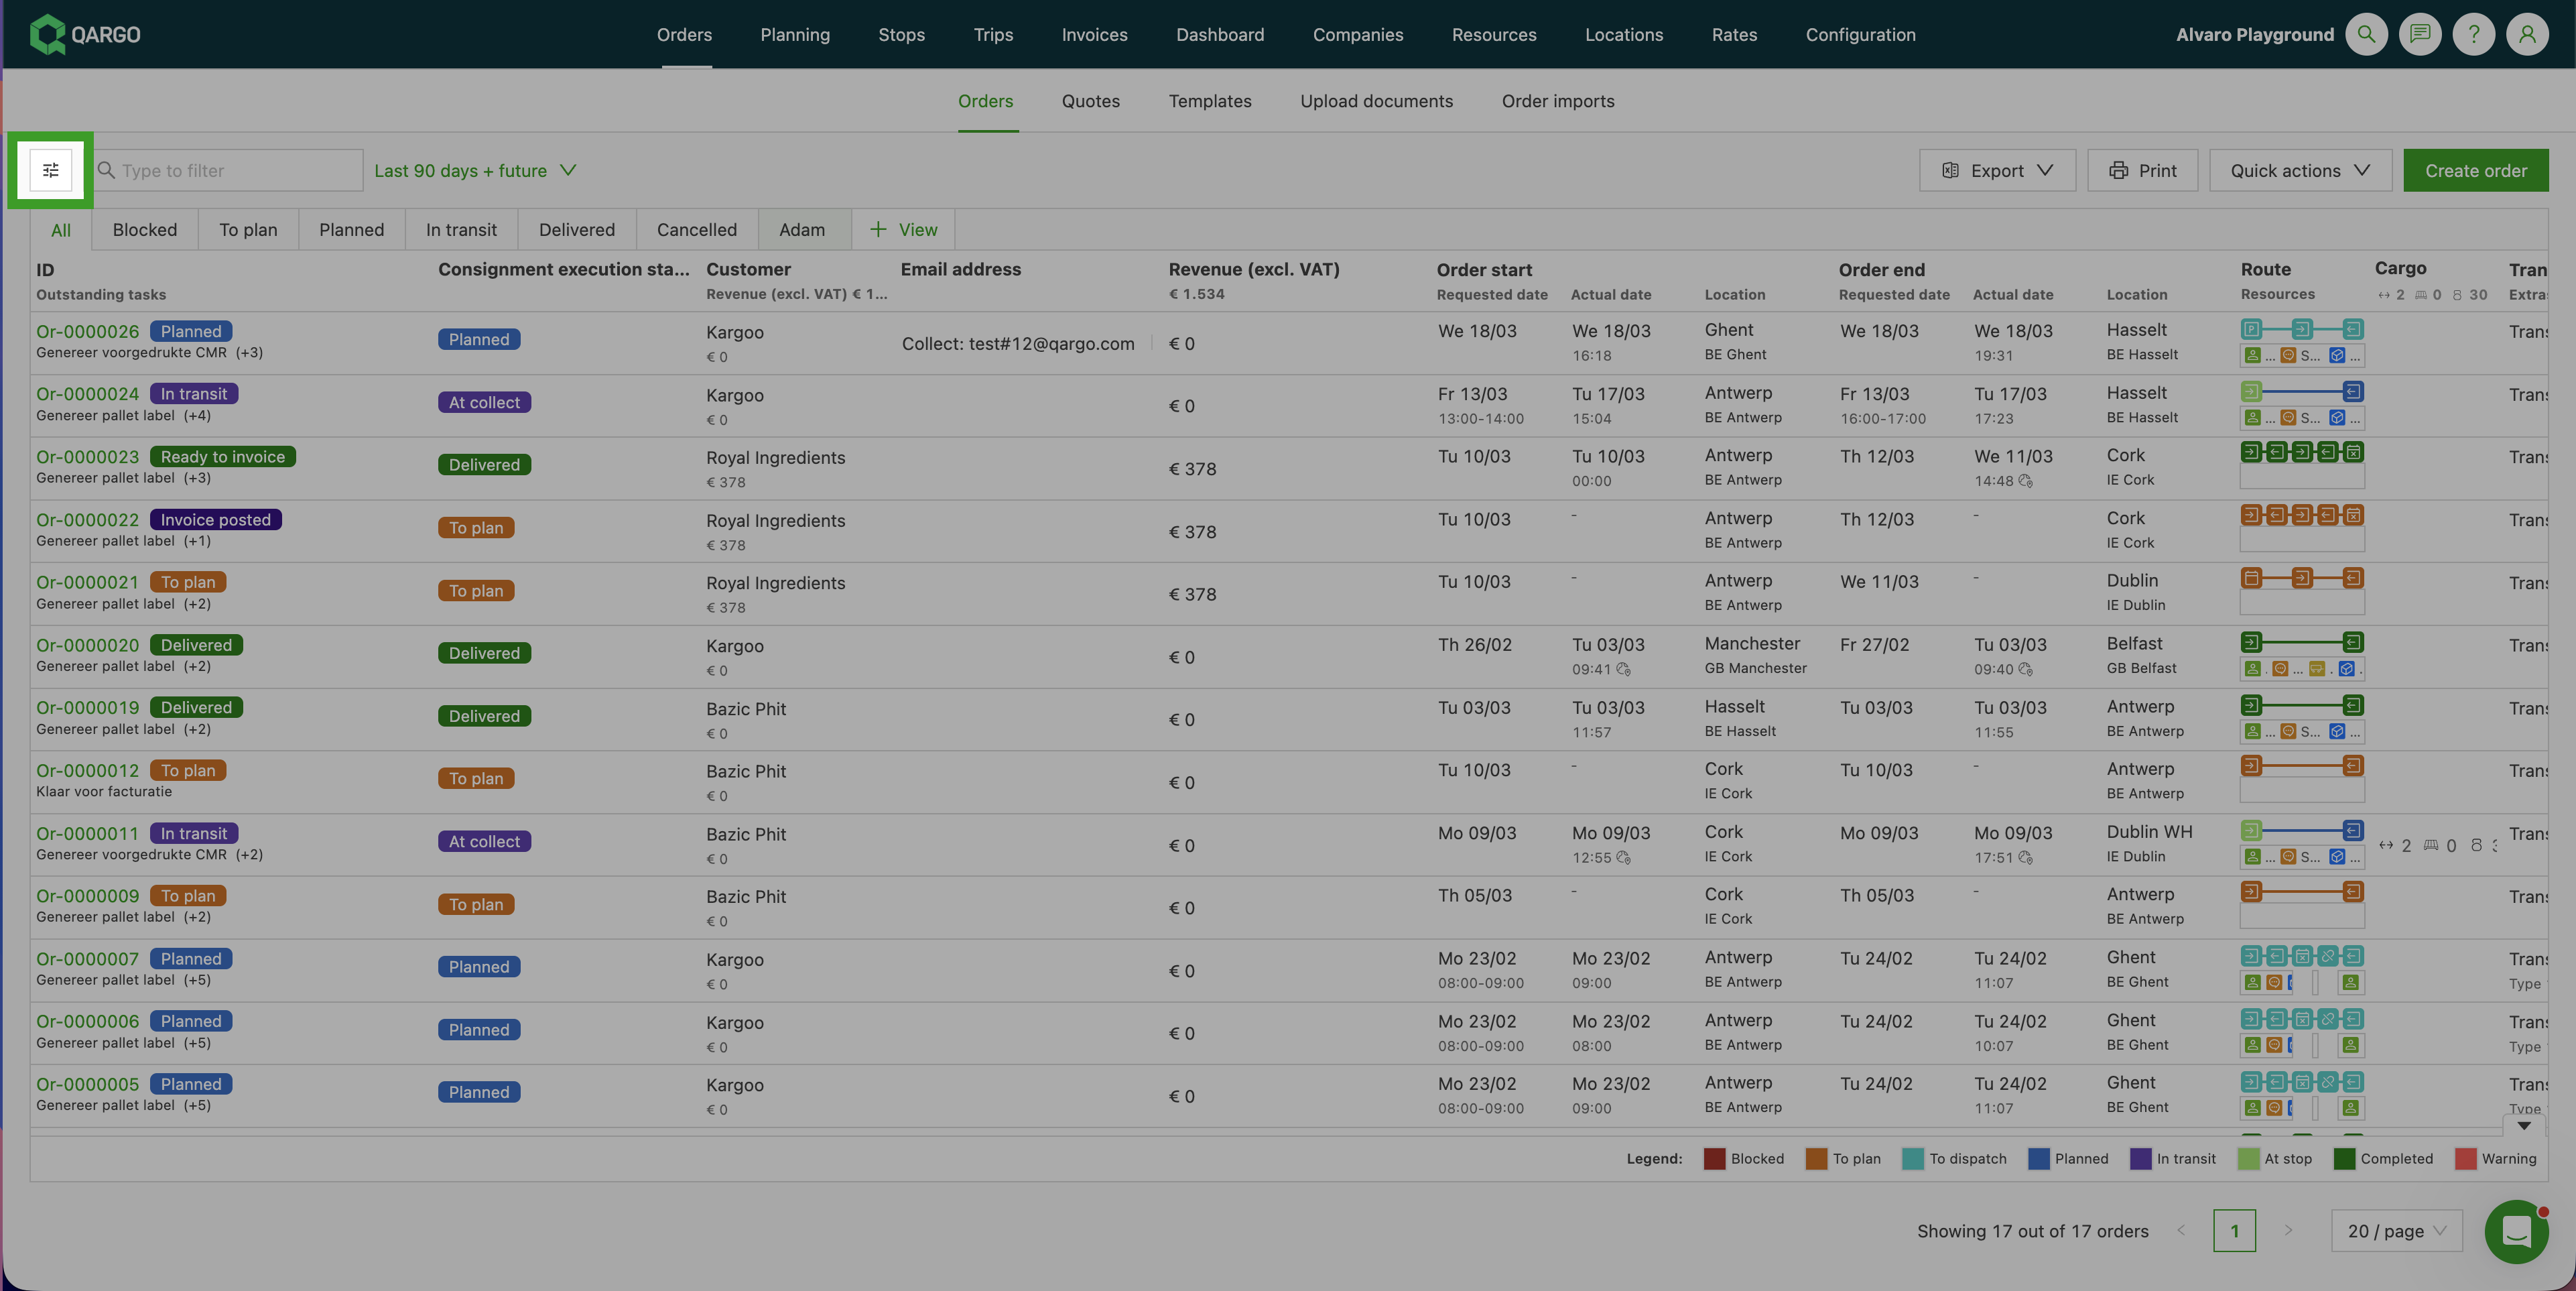
-
The Customize panel opens. Scroll down to the Stop additional fields section.
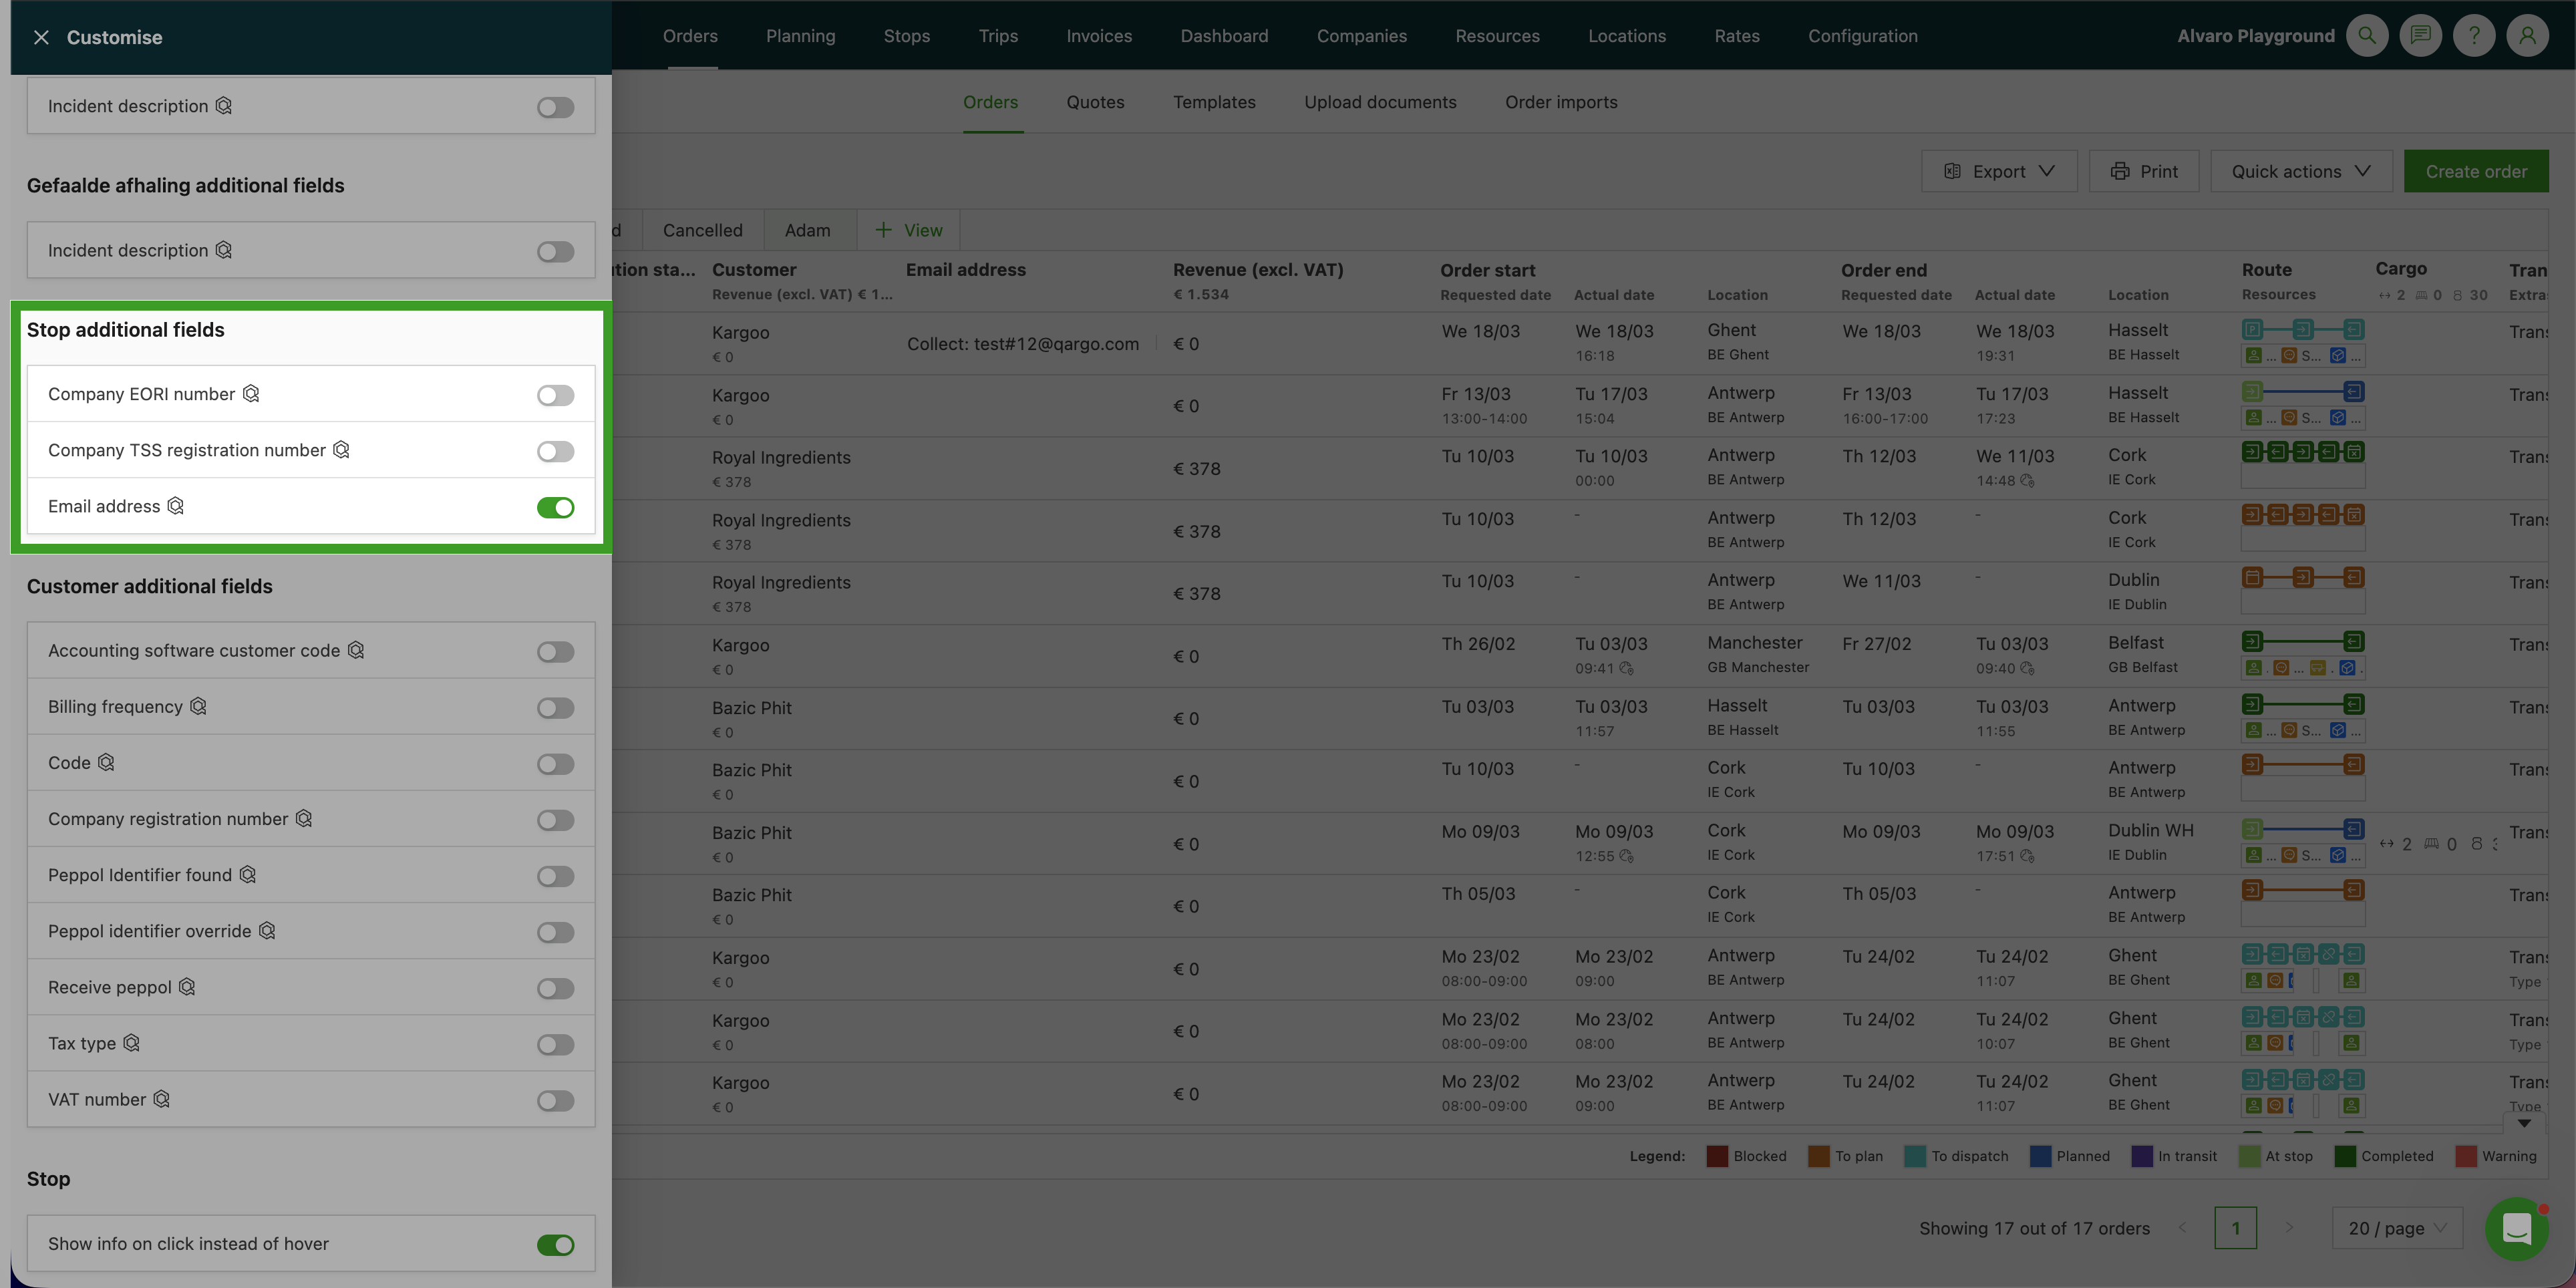
-
Toggle on any stop field to show as a column. Each toggled field appears as a new column in the orders list.
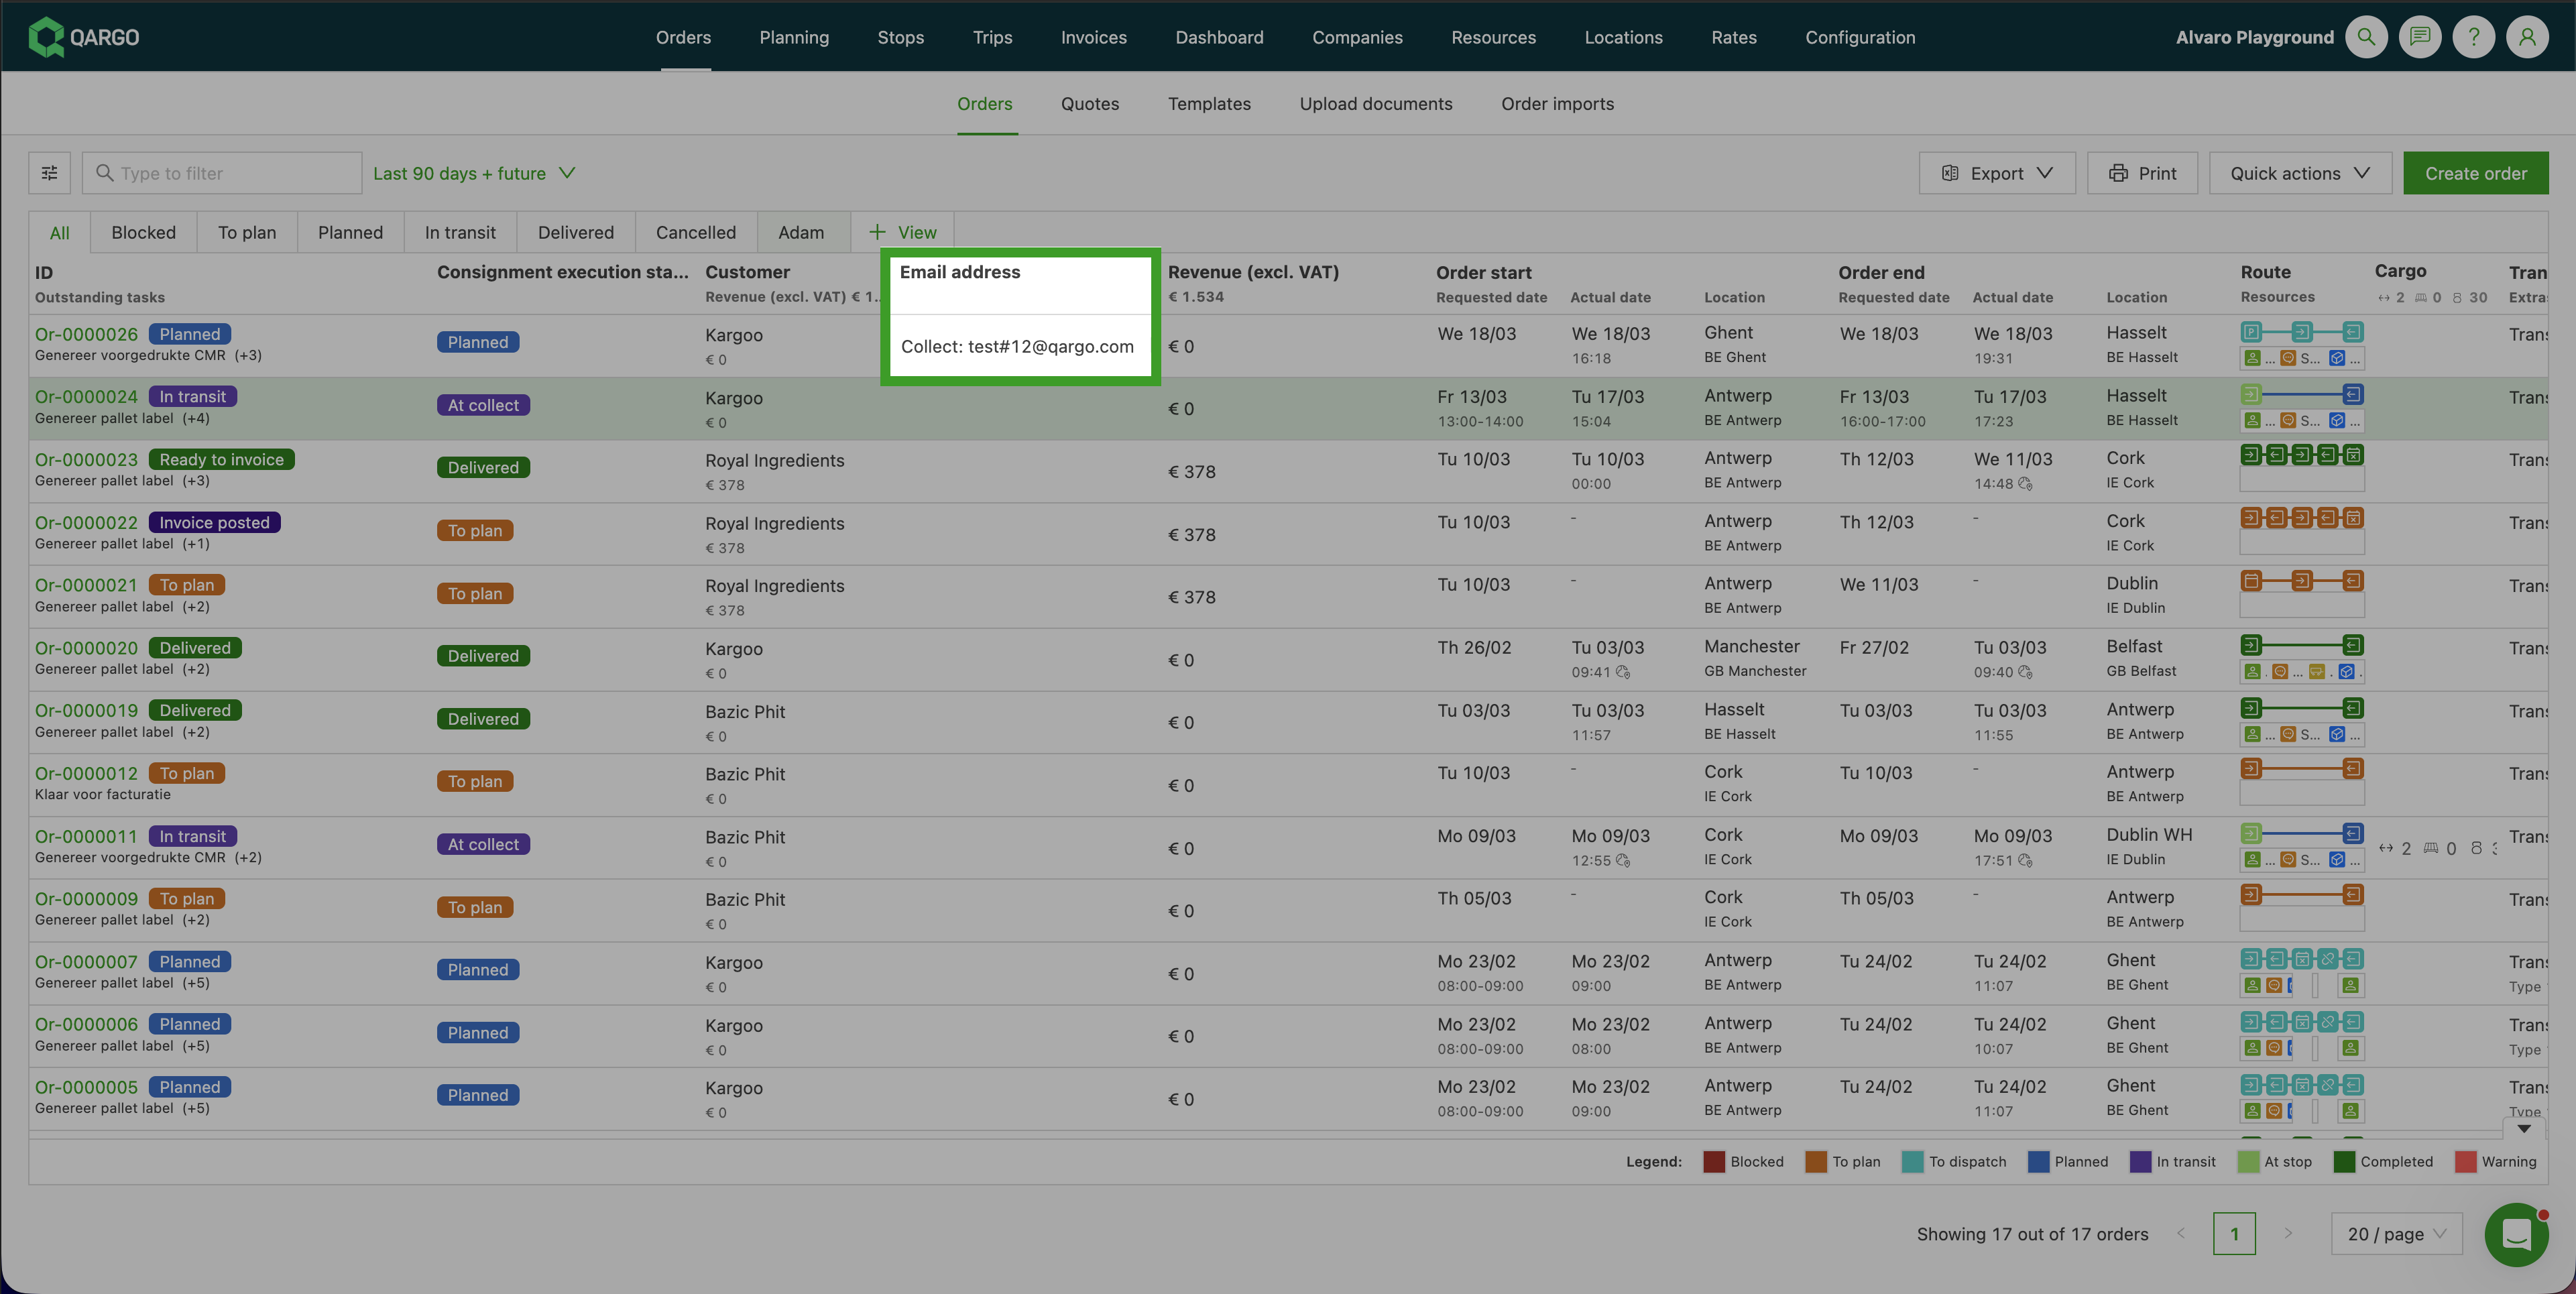
How values are displayed
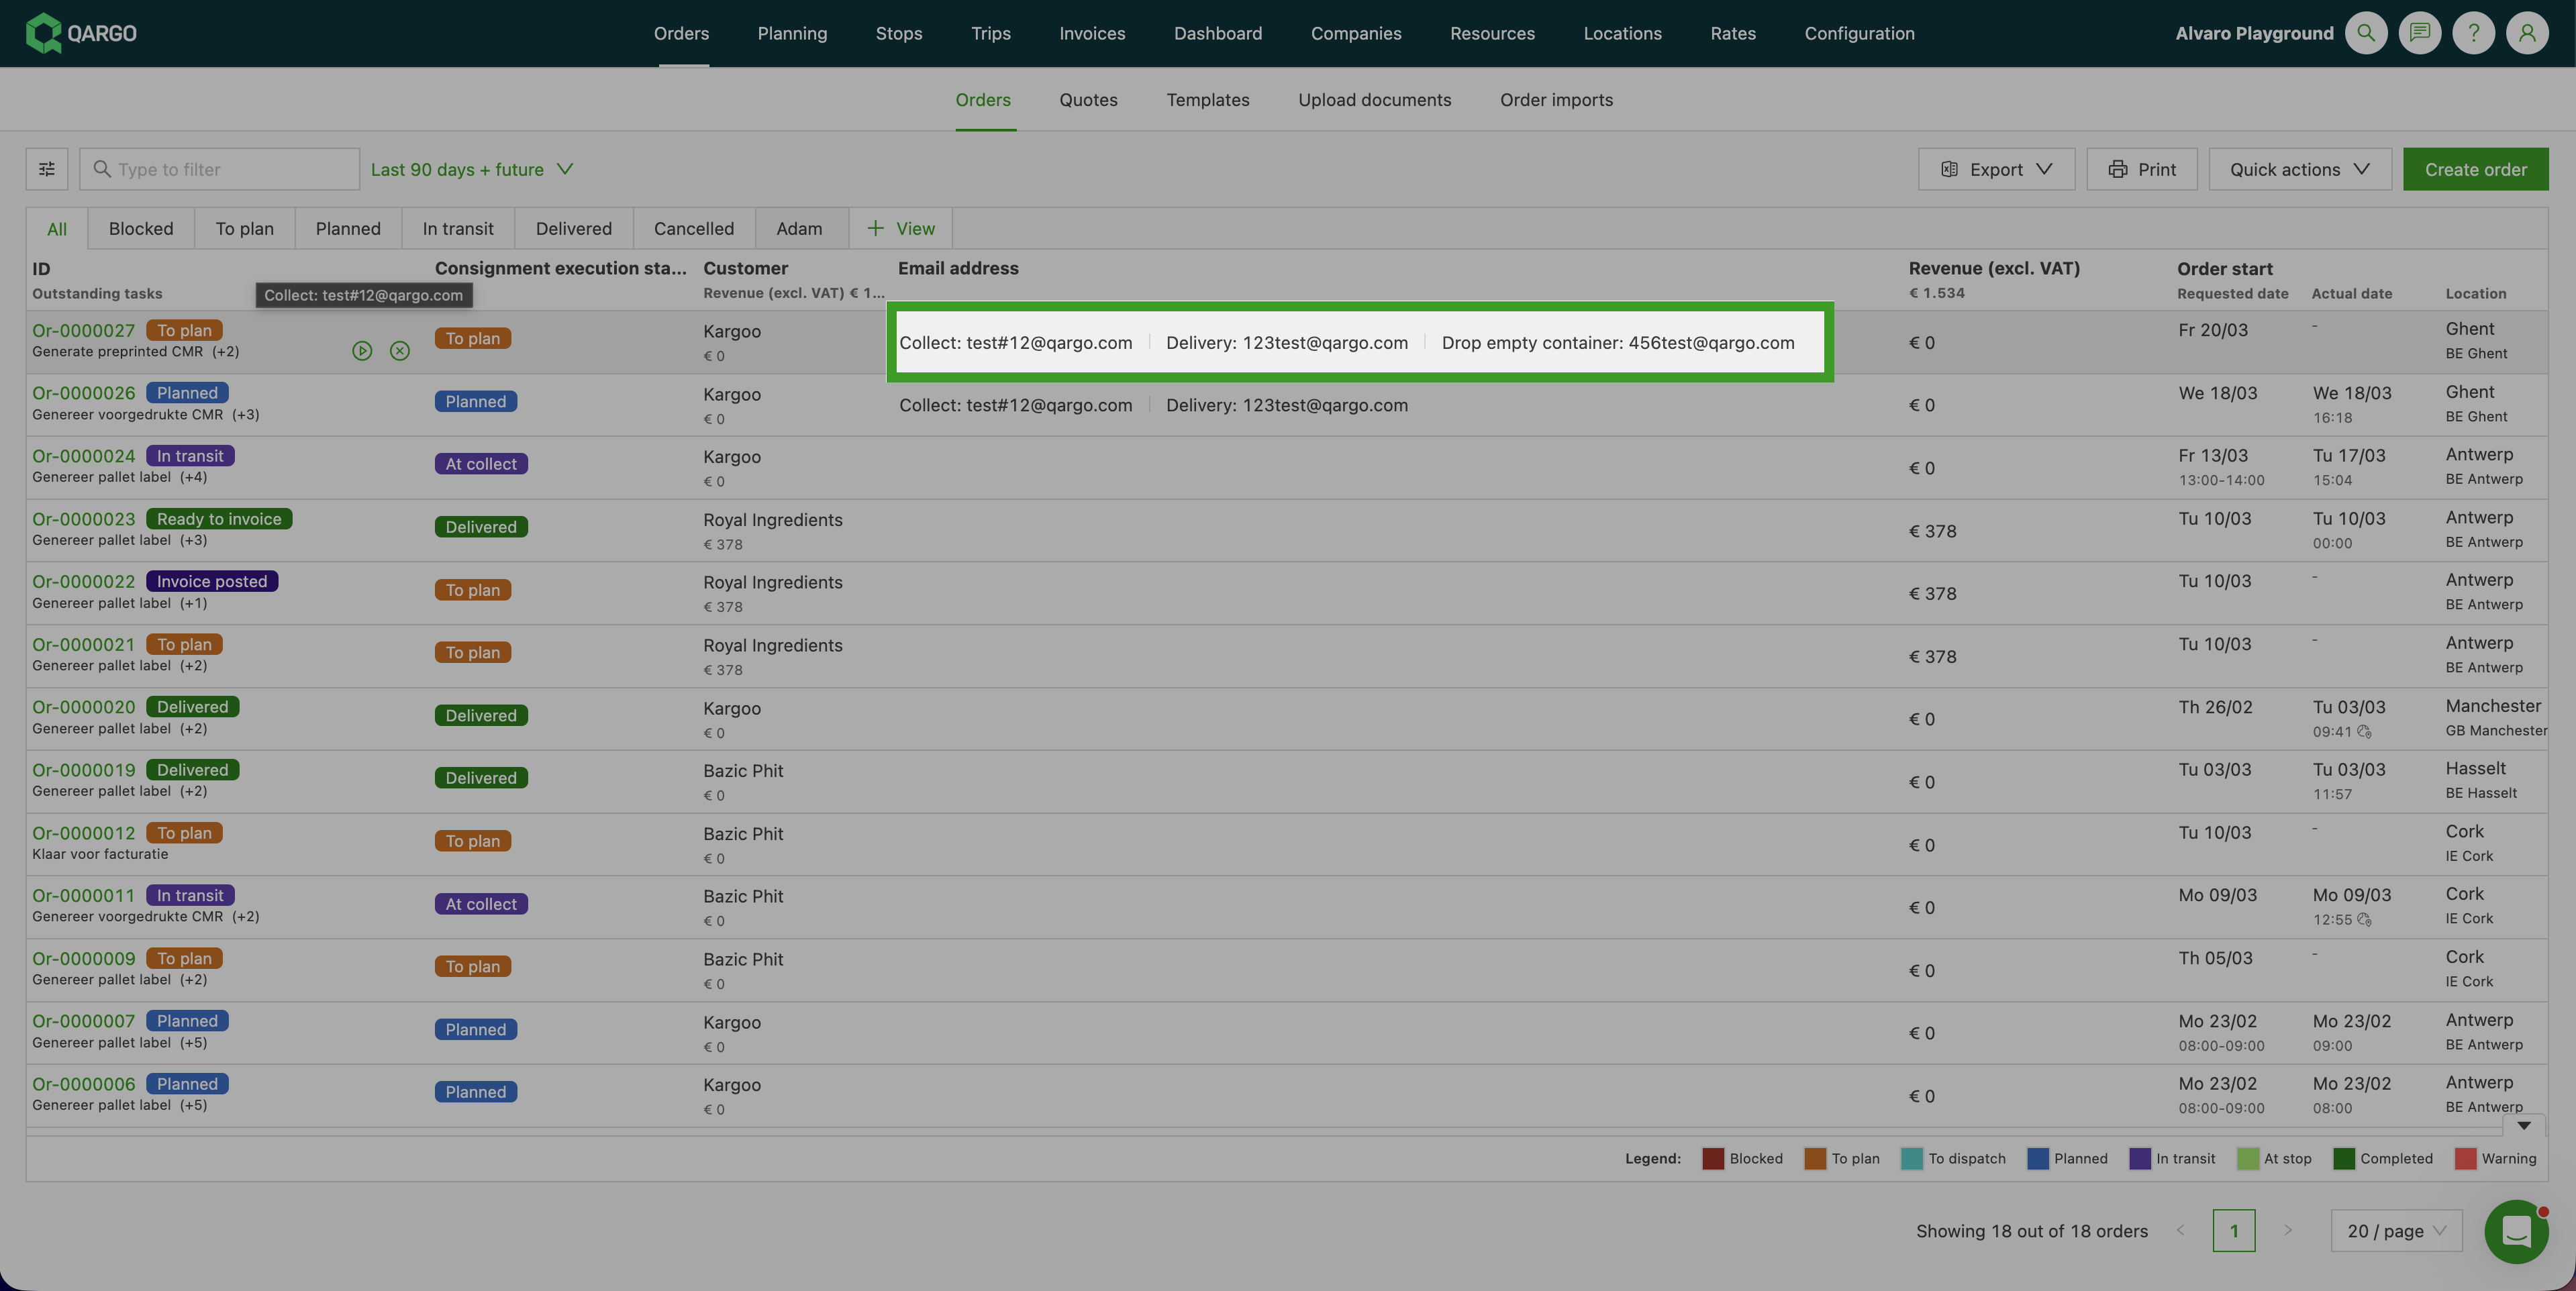
When an order has multiple stops, values from all stops are combined in a single cell, separated by |
- Multiple stops with a value: each value is prefixed with the stop activity name to show which stop it belongs to.
Example:
Save custom view columns
When a user creates a custom view, users can now modify the columns included in the view without affecting other views.
-
Create the custom view: click + View.
- Give the view a name and click Create view
-
Click Edit columns in the new view and toggle relevant columns on or off
-
Click Save changes
Sharing views (super admin users only)
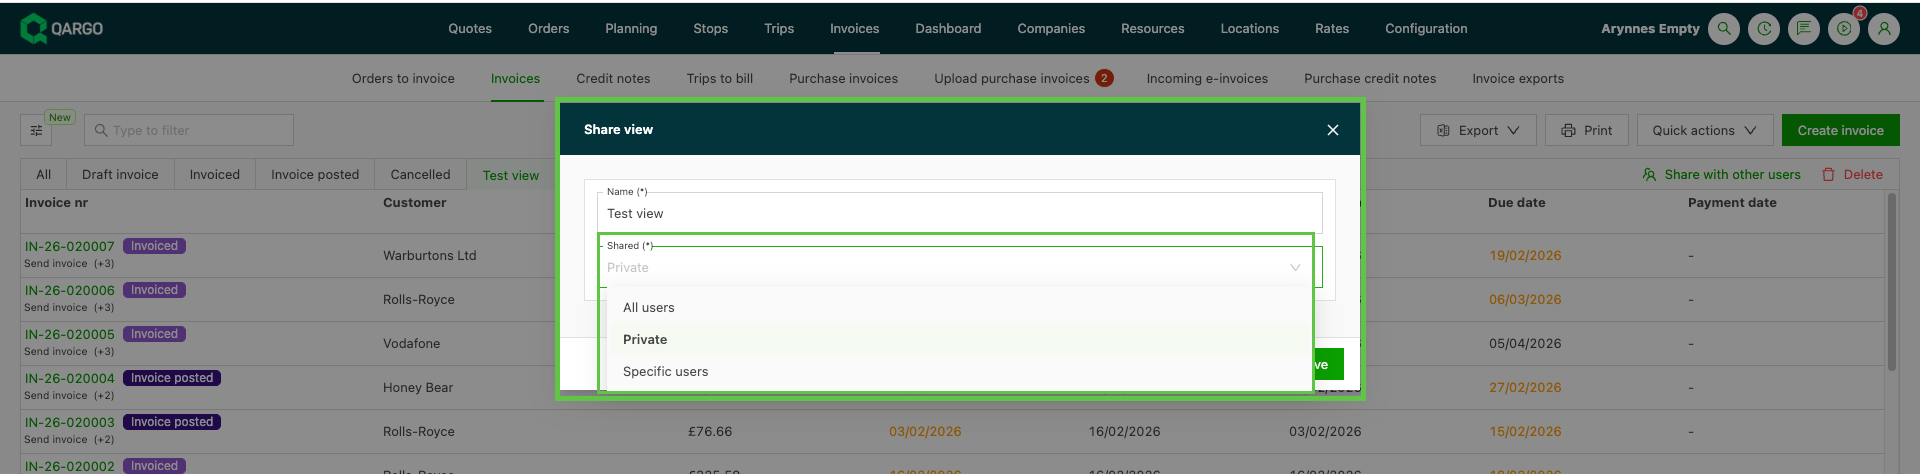
Custom views can be shared with other users. When a view is shared, both the filter configuration and the column order and visibility settings are included. This makes it easy for teams to work from a consistent data layout without each user needing to configure separate filters.
Options for sharing a custom view include sharing with all users or with selected users
-
For selected users, select ‘Specific users’
-
From the dropdown, select the users to share the view with (marked with ✅)
- Multiple users can be selected, but they must exist in the platform
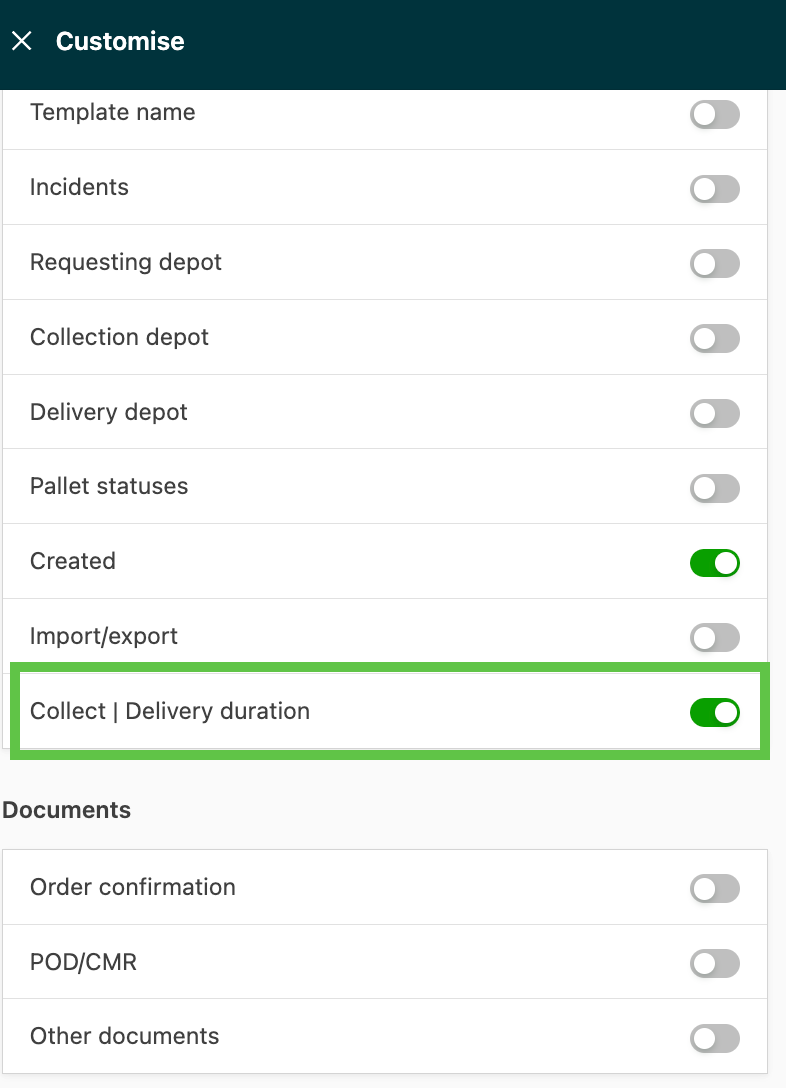
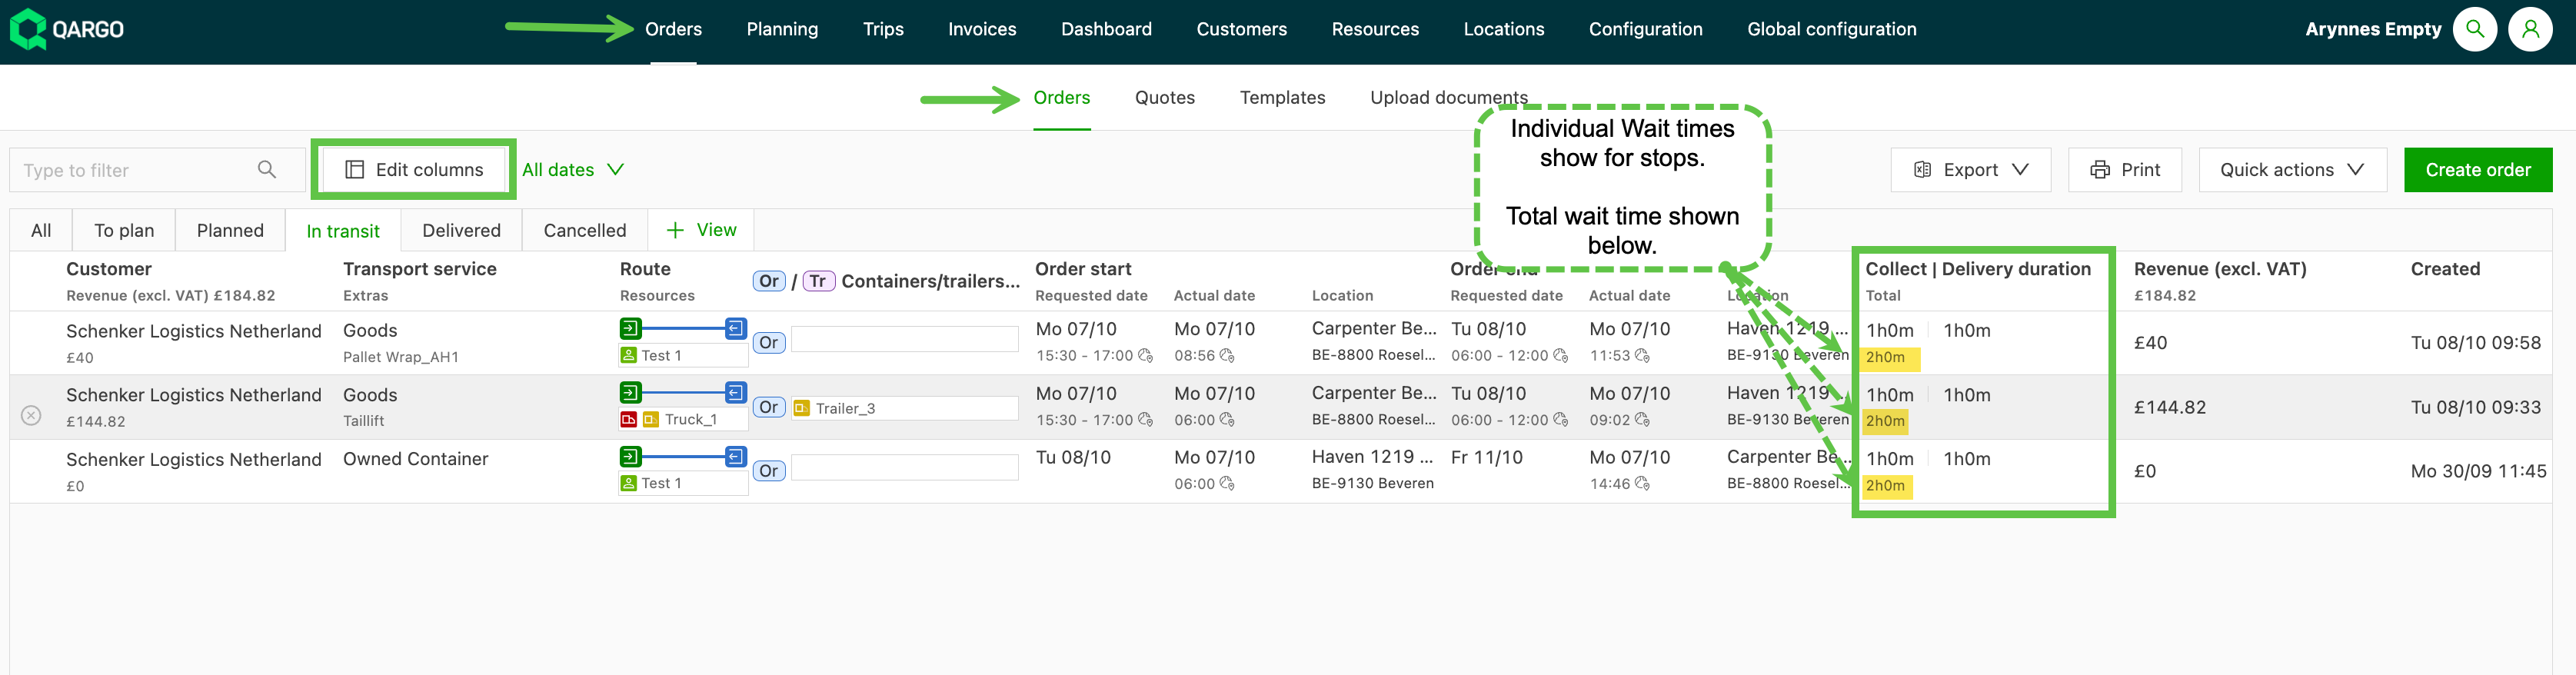
Order overview: add stop duration column
Stop durations can be displayed for loads, showing all pickups and deliveries. This feature is enabled by default (but can be turned off in the Edit columns panel) and improves visibility of waiting hours on loads.
The individual wait times are shown by pickup/delivery stop. These pull from the order details and the actual times when the load completes. The total times are consolidated and shown in the line below the stop times.
Order list view: show last order.
Clicking the order line (not the order number) opens the order in a detail view. Once this view is closed, the page highlights the last clicked order.
Orders: add load ID column to list view
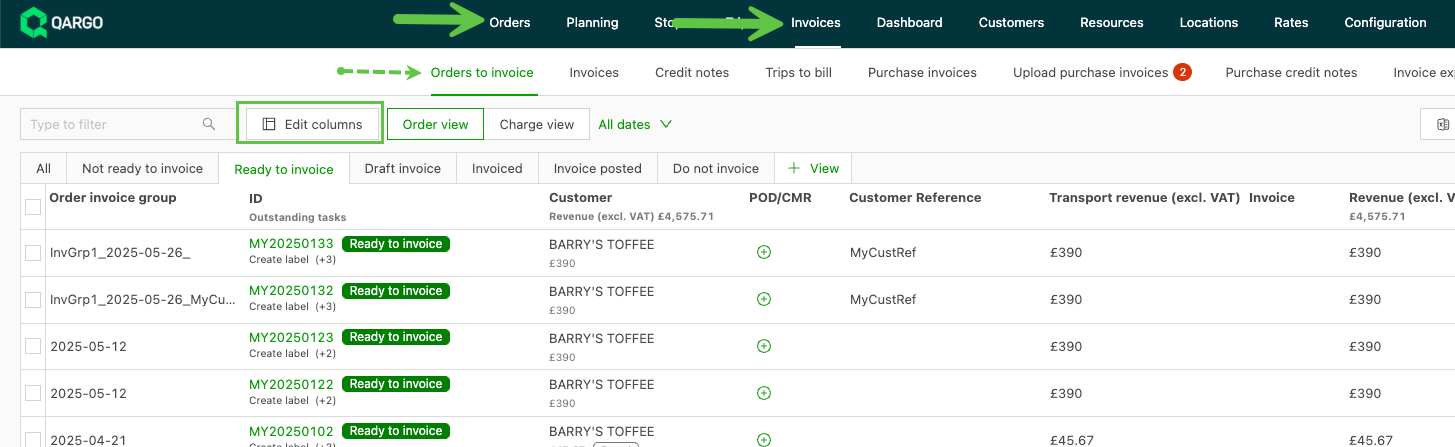
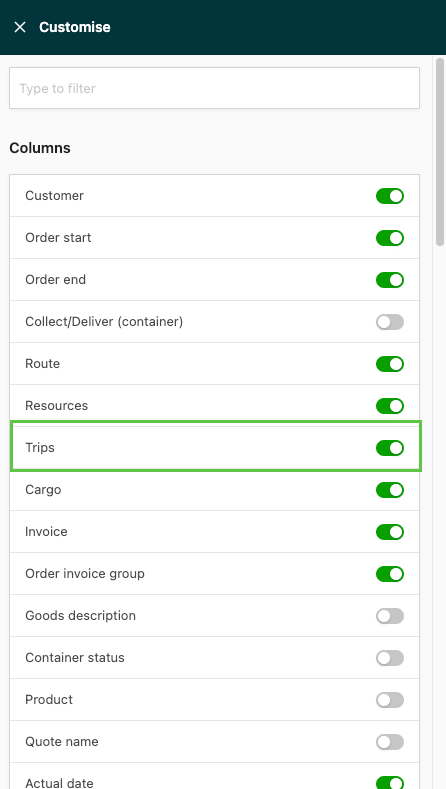
Enable ‘Loads’ to show as a column in the Orders and Orders to invoice list views. Adding this column to the table shows the load number, allowing easier access to details without navigating through other screens.
-
From Orders or Orders to invoice (Invoice), click Edit columns
-
Once toggled on, drag the column to the desired position in the table.
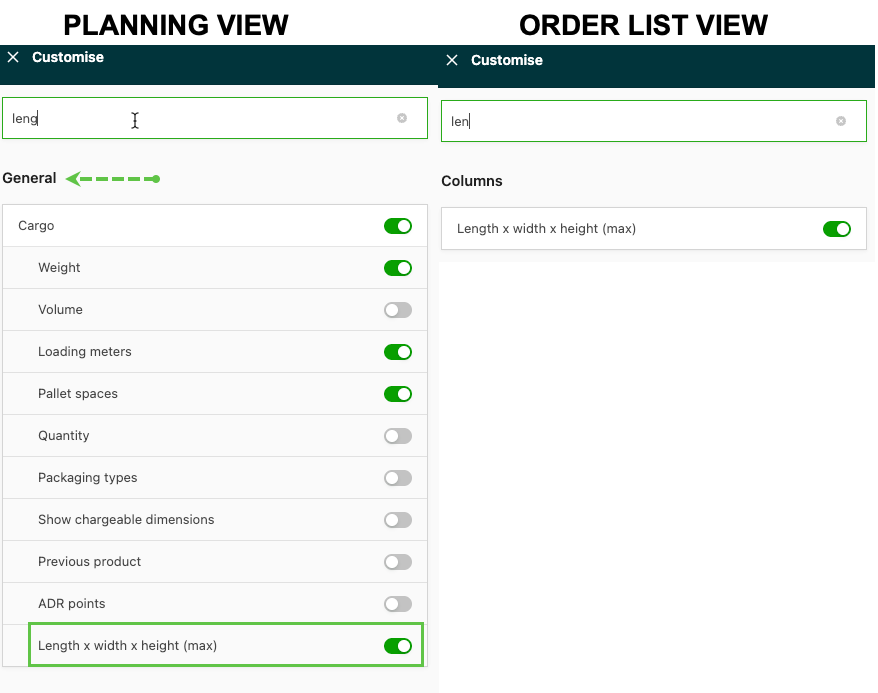
Orders: show max dimensions
- Toggle on max dimensions to help with planning vehicle capacity
- Better oversight of piece sizes helps to assess vehicle capacity more efficiently
Add and use the Packaging column
The orders list has a dedicated Packaging column that shows packaging quantity, size, and type per goods line, and can be filtered by packaging type and size.
Turn on the Packaging column
- Navigate to Orders.
- Click the Customize button (the columns icon next to the filter box).
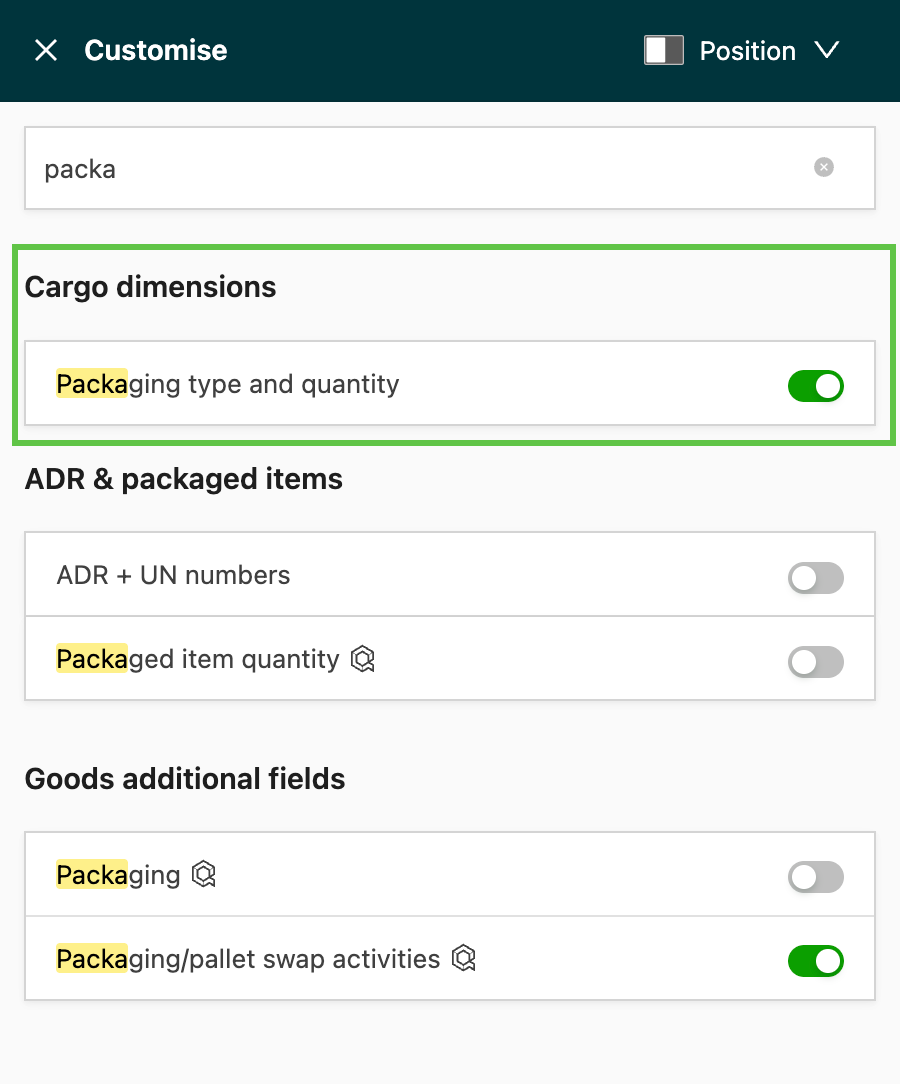
- Locate the Freight dimensions section in the Customize panel.
- Enable the Packaging type and quantity toggle. It sits as a top-level option under Freight dimensions, alongside Show freight dimensions.
- Close the Customize panel. The Packaging column now appears in the orders list.
Read the Packaging column
The Packaging column shows the packaging per goods line across two lines:
- Line 1: quantity and packaging size, for example 2 × Euro pallet.
- Line 2: the packaging type, for example Pallets, in a lighter style.
When an order has several goods lines, the column shows as many entries as fit, then a +X indicator for the remaining lines. Hovering over the Packaging column opens the same detail table shown when hovering over the Freight column.
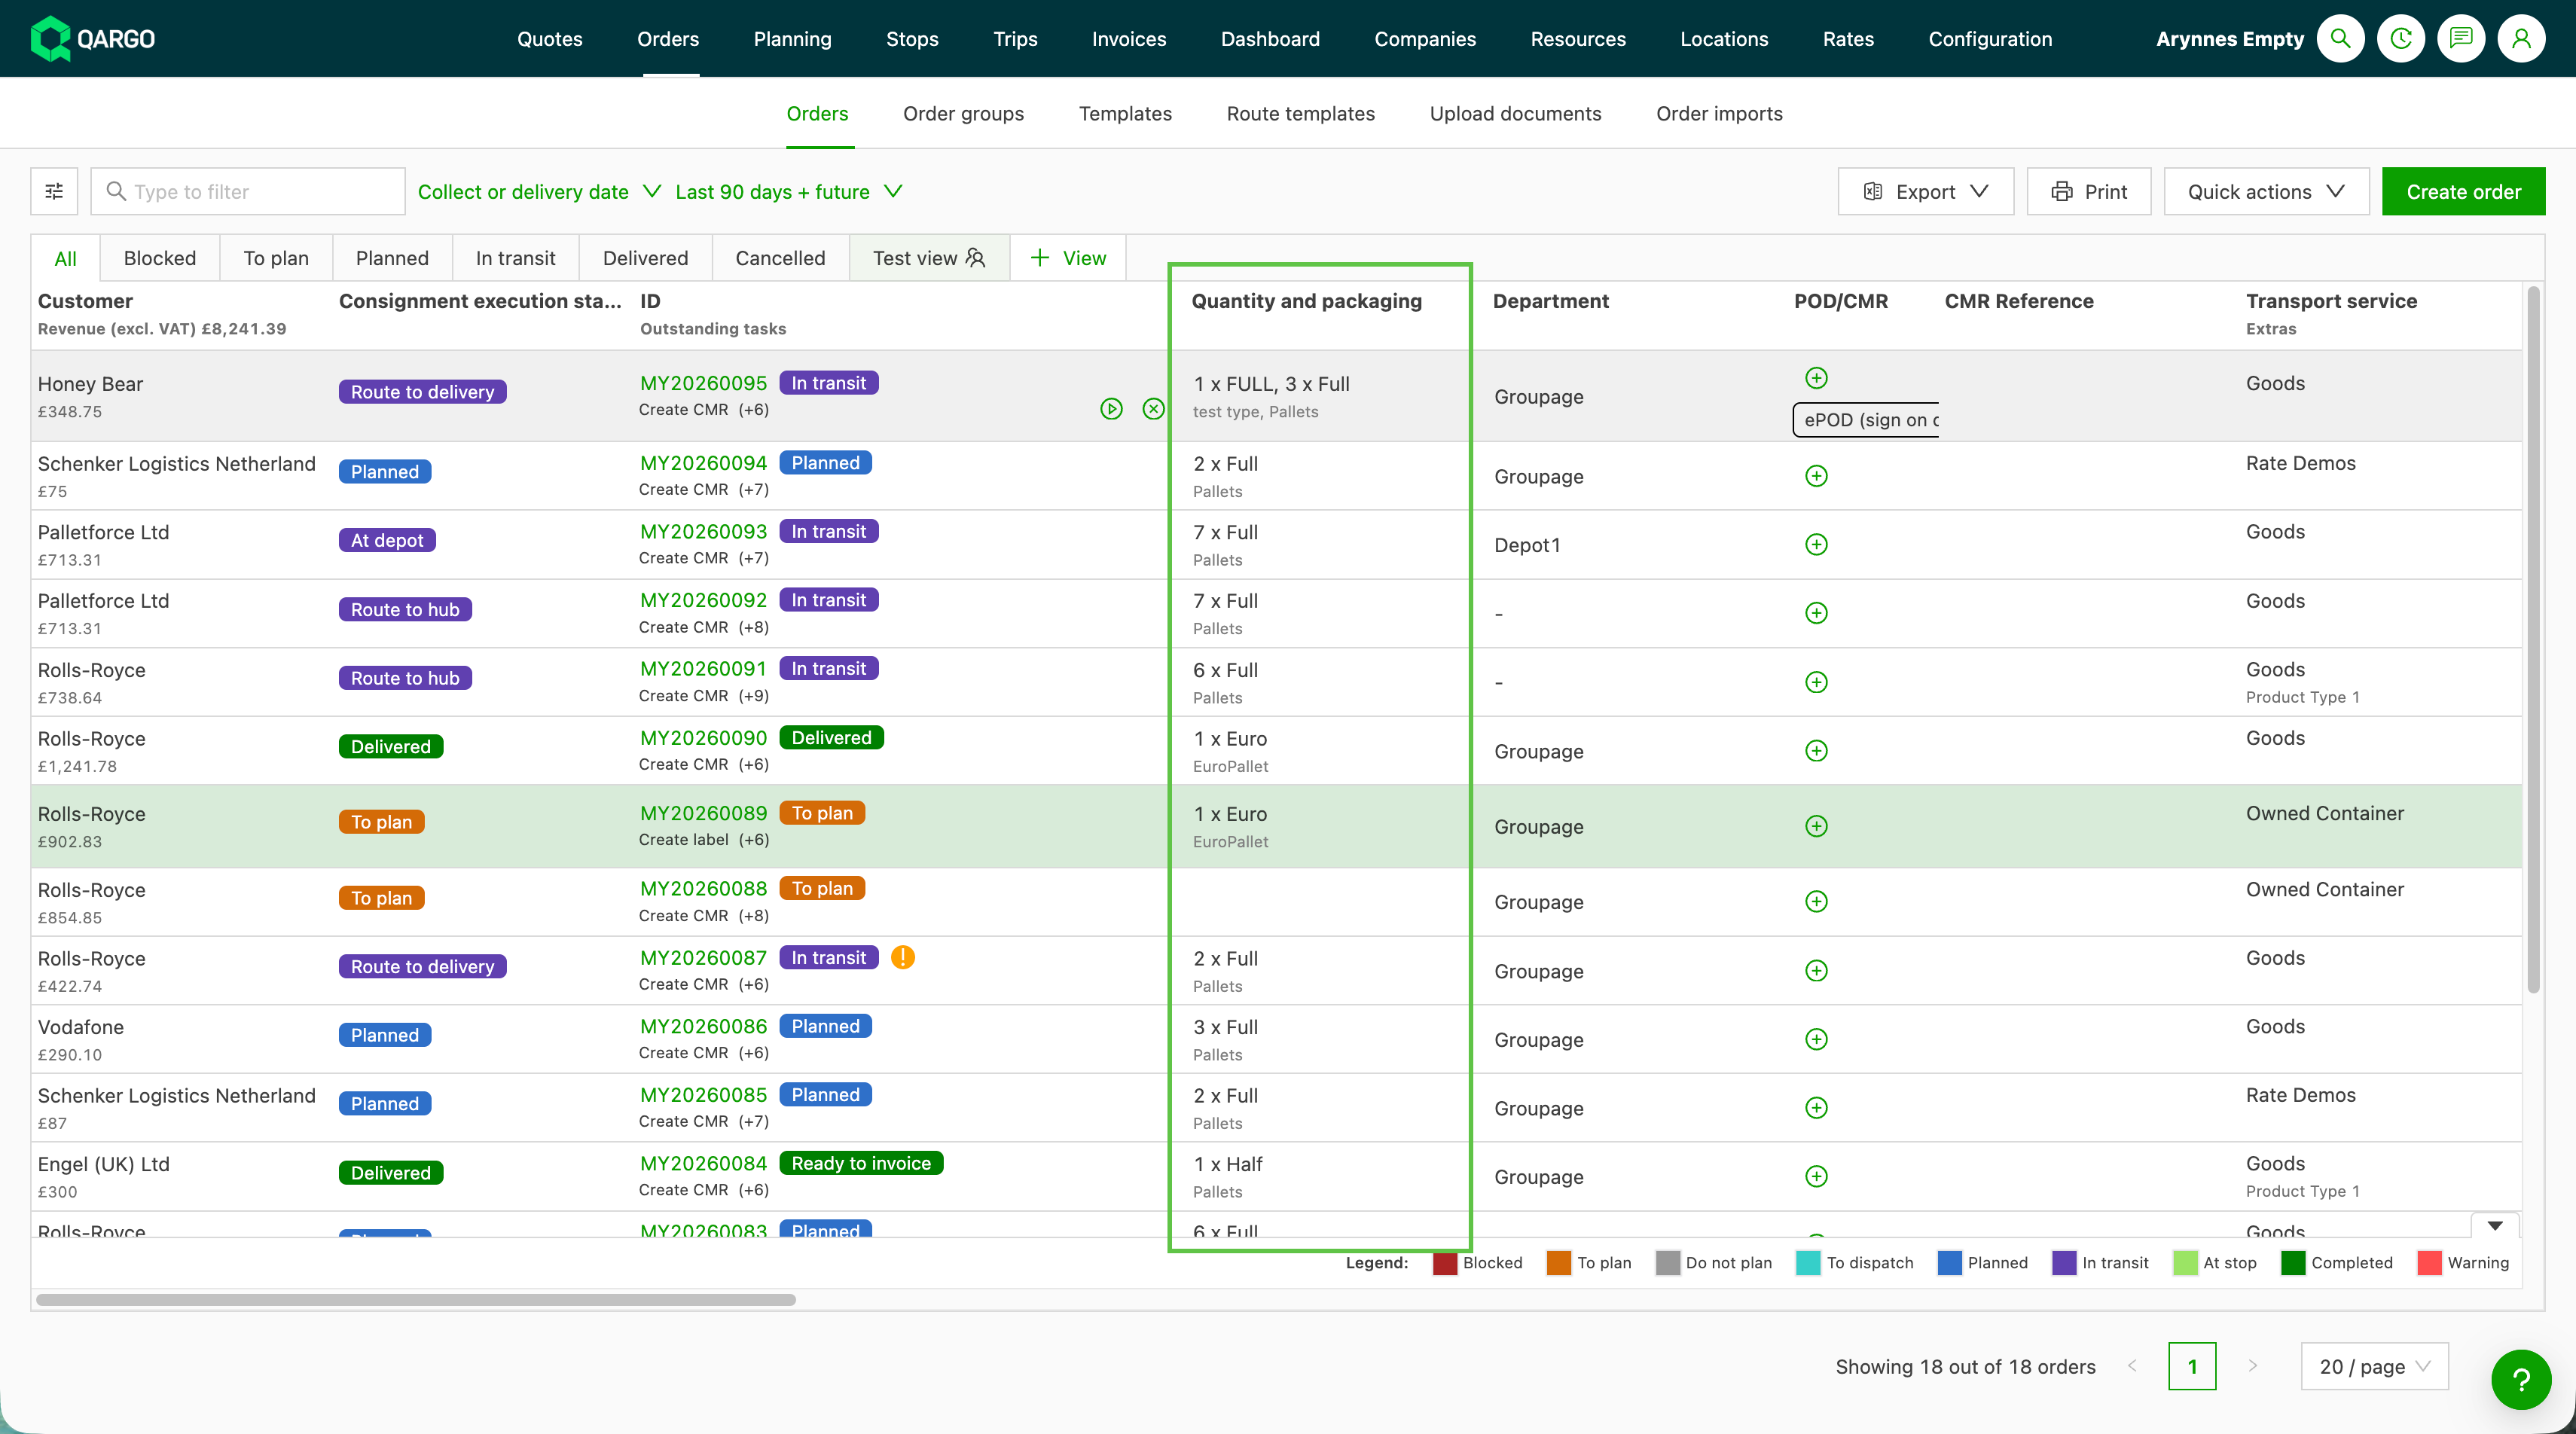
- Hover over the Packaging cell to see the full packaging detail table for orders with multiple goods lines.
- Click the Packaging cell to open the Edit freight modal, the same modal that opens when clicking the Freight cell.
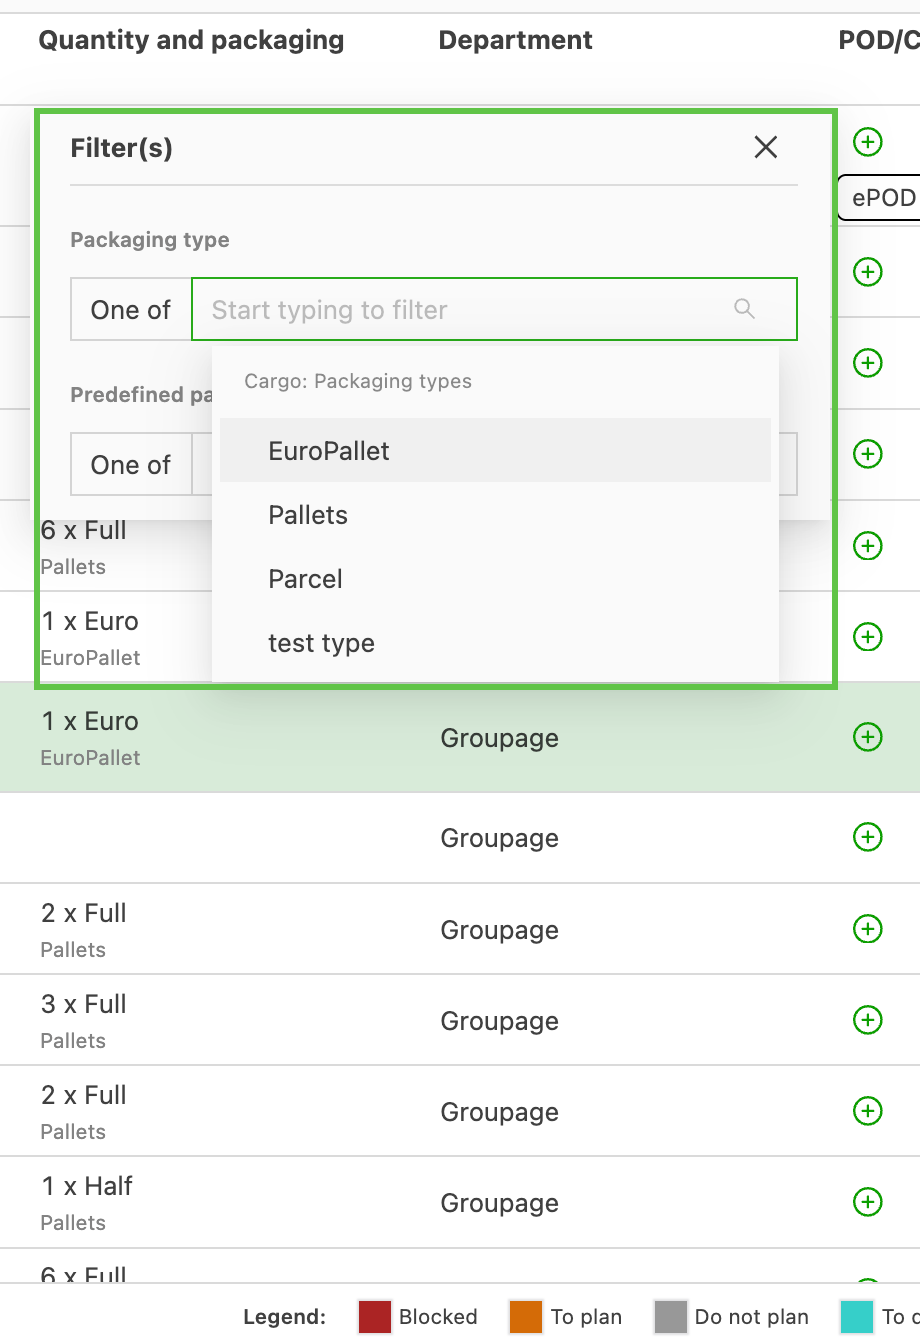
Filter by packaging type or size
- Open the filter on the
Packagingcolumn. - Select a packaging type, a packaging size, or both.
- Apply the filter to narrow the orders list to the matching orders.
Troubleshooting
| Issue | Resolution |
|---|---|
The Packaging column is not visible |
Open Customize and enable the Packaging type and quantity toggle under Cargo dimensions. |
Packaging still shows inside the Cargo column |
Confirm that the Packaging type and quantity toggle is on. When it is on, packaging always shows in the Packaging column and never inline in Cargo. |
| Packaging size cannot be filtered | Use the filter on the Packaging column, which supports both packaging type and packaging size. |
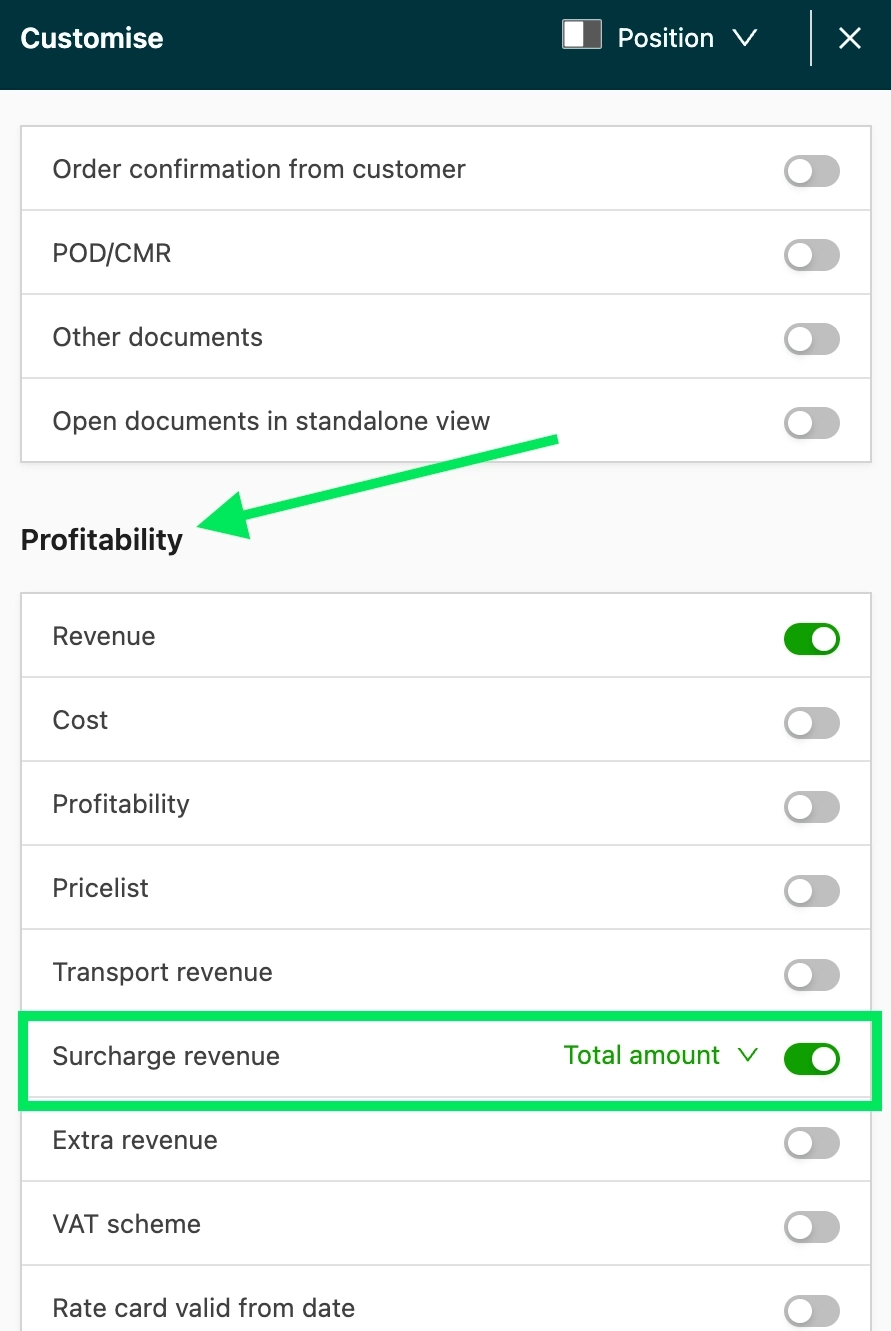
Add and use the Surcharge revenue column
The Surcharge revenue column shows which surcharges make up the total and can be filtered by surcharge name. This makes it possible to list every order that is missing a specific surcharge before billing, for example a booking surcharge or waiting hour.
Select date range option
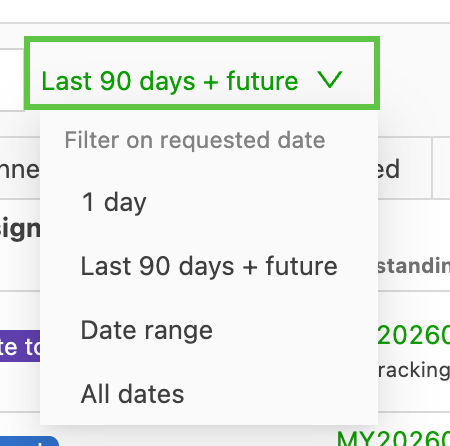
The following filter options are available:
-
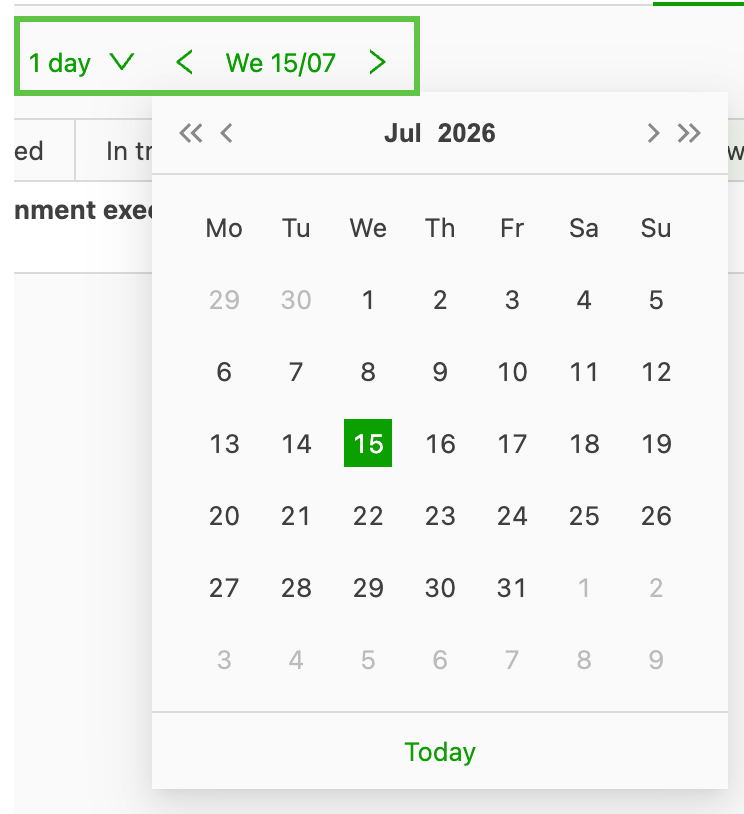
1 day: filters on one specific date. By default, this filters on the current date.
-
Last 90 days + future: filters on all orders from the past 90 days from the current date, and any future orders.
-
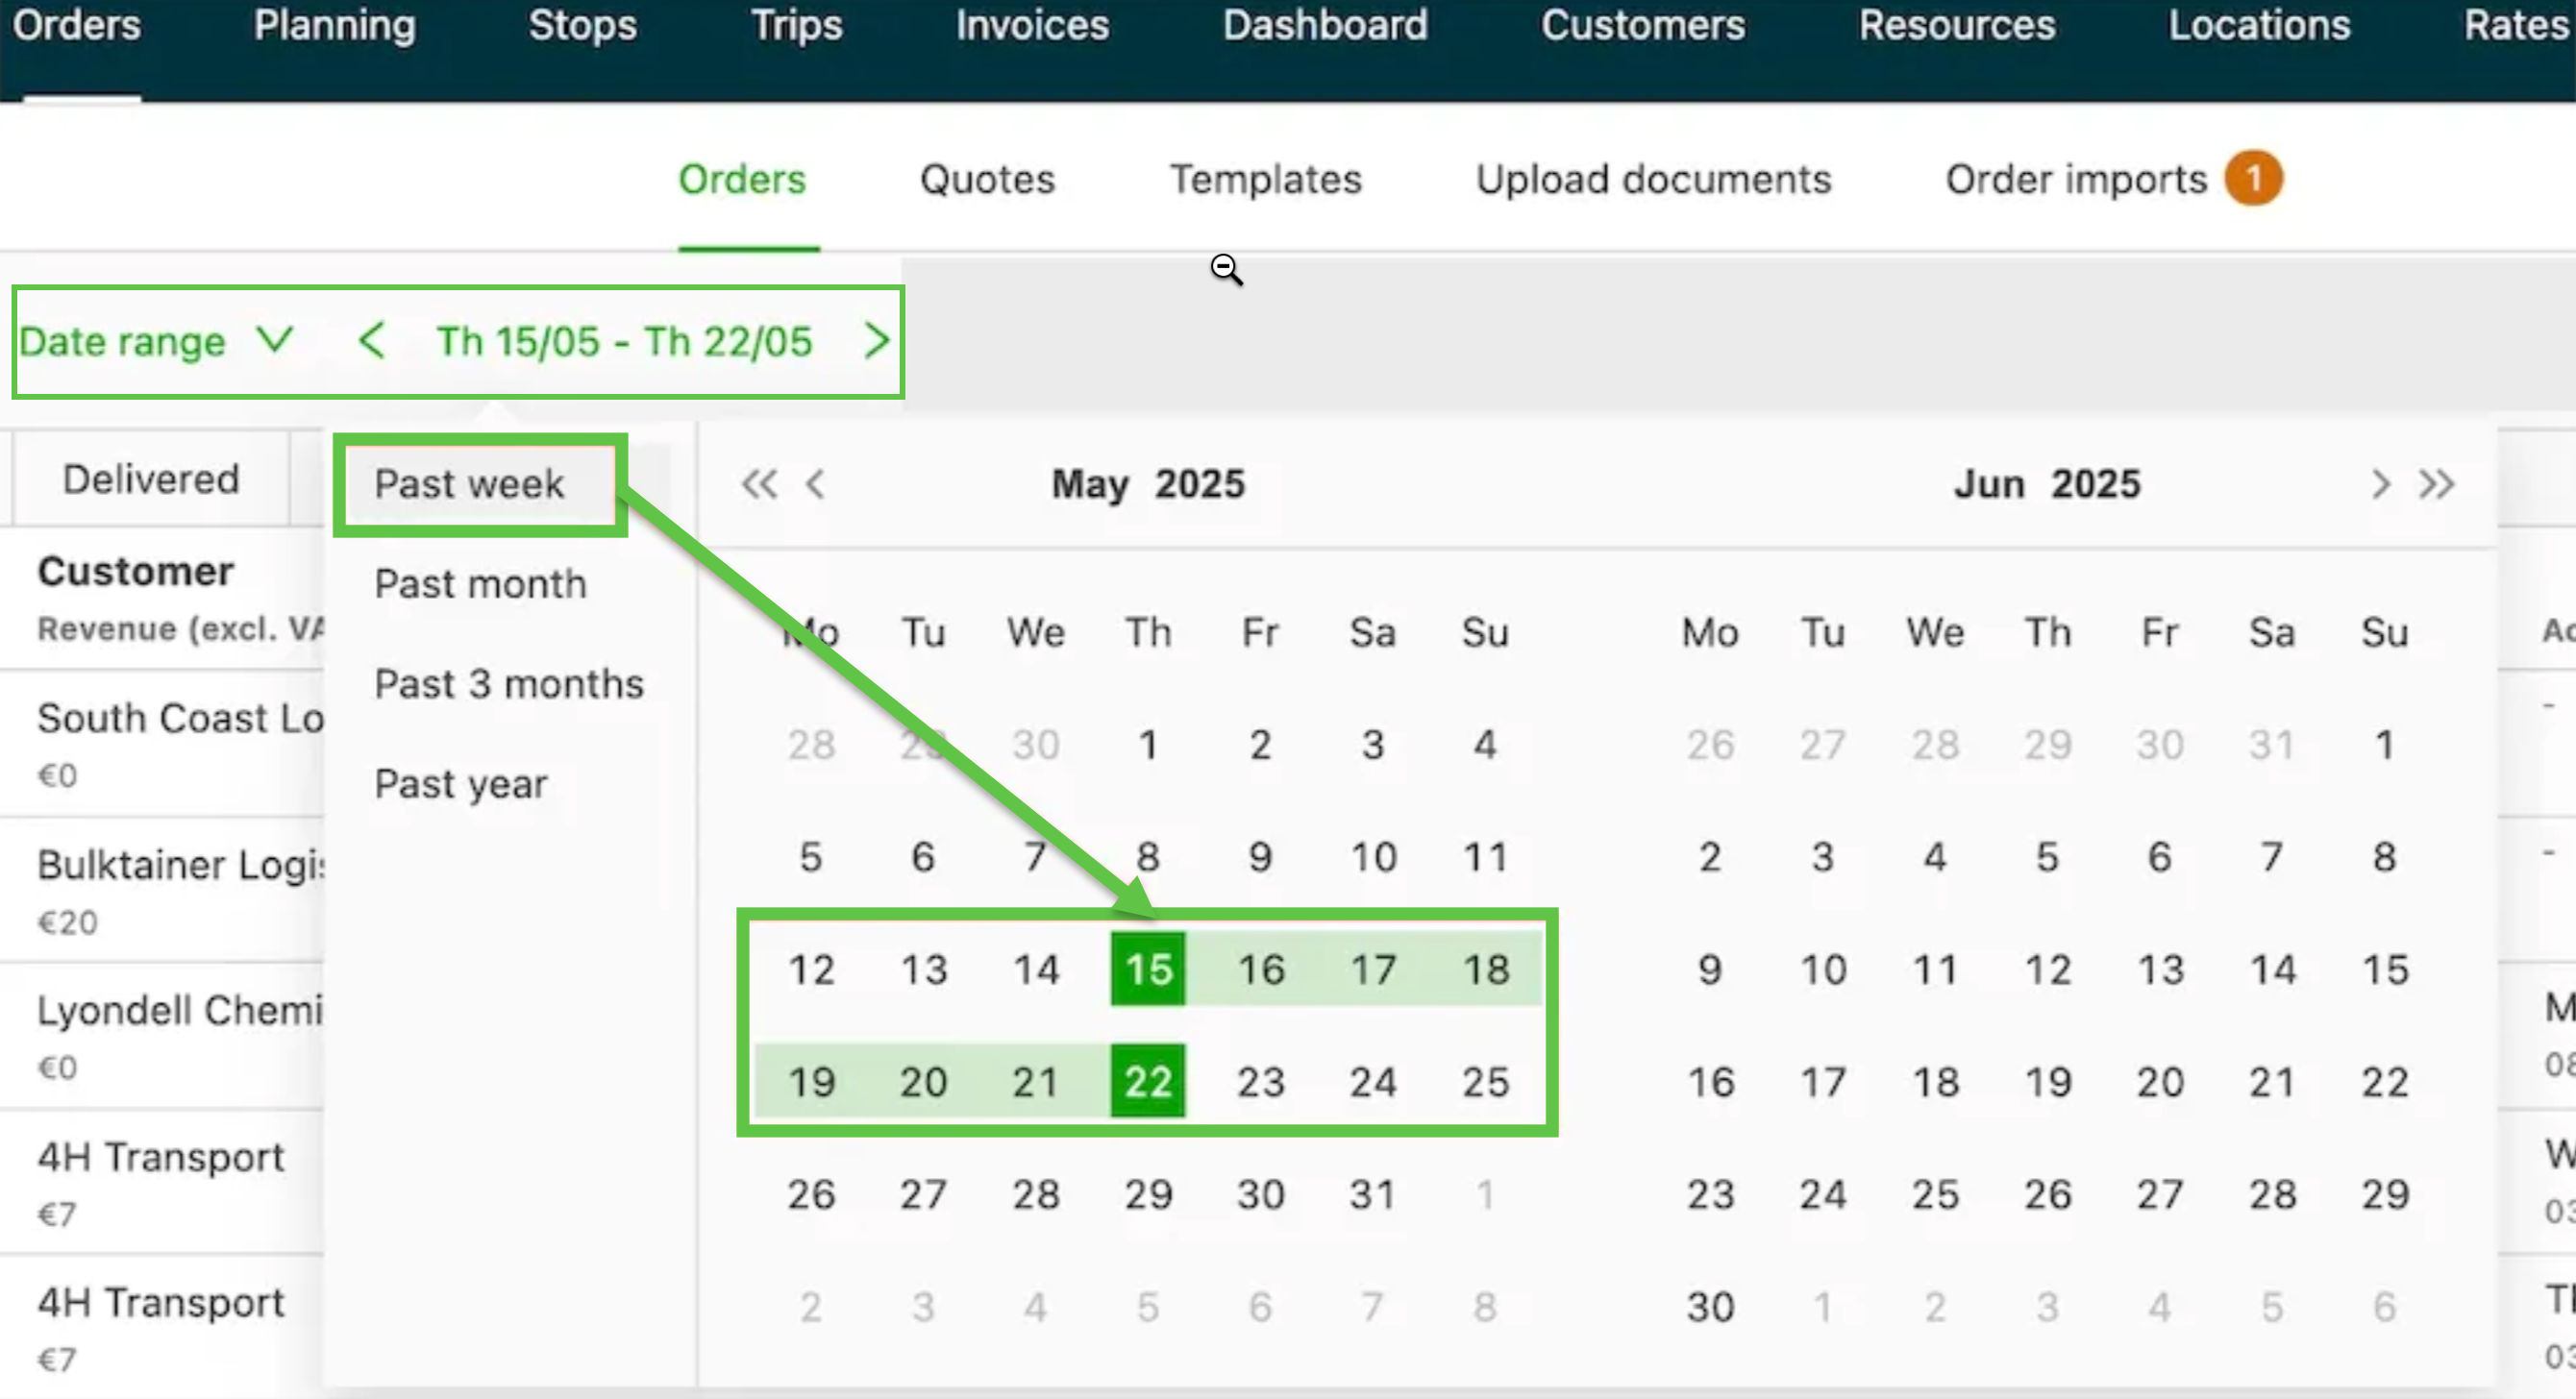
Date range: allows the user to easily select a date range on a calendar. For convenience, some preconfigured date ranges are available to make filtering easy. When one of these options is selected, the dates are selected automatically:
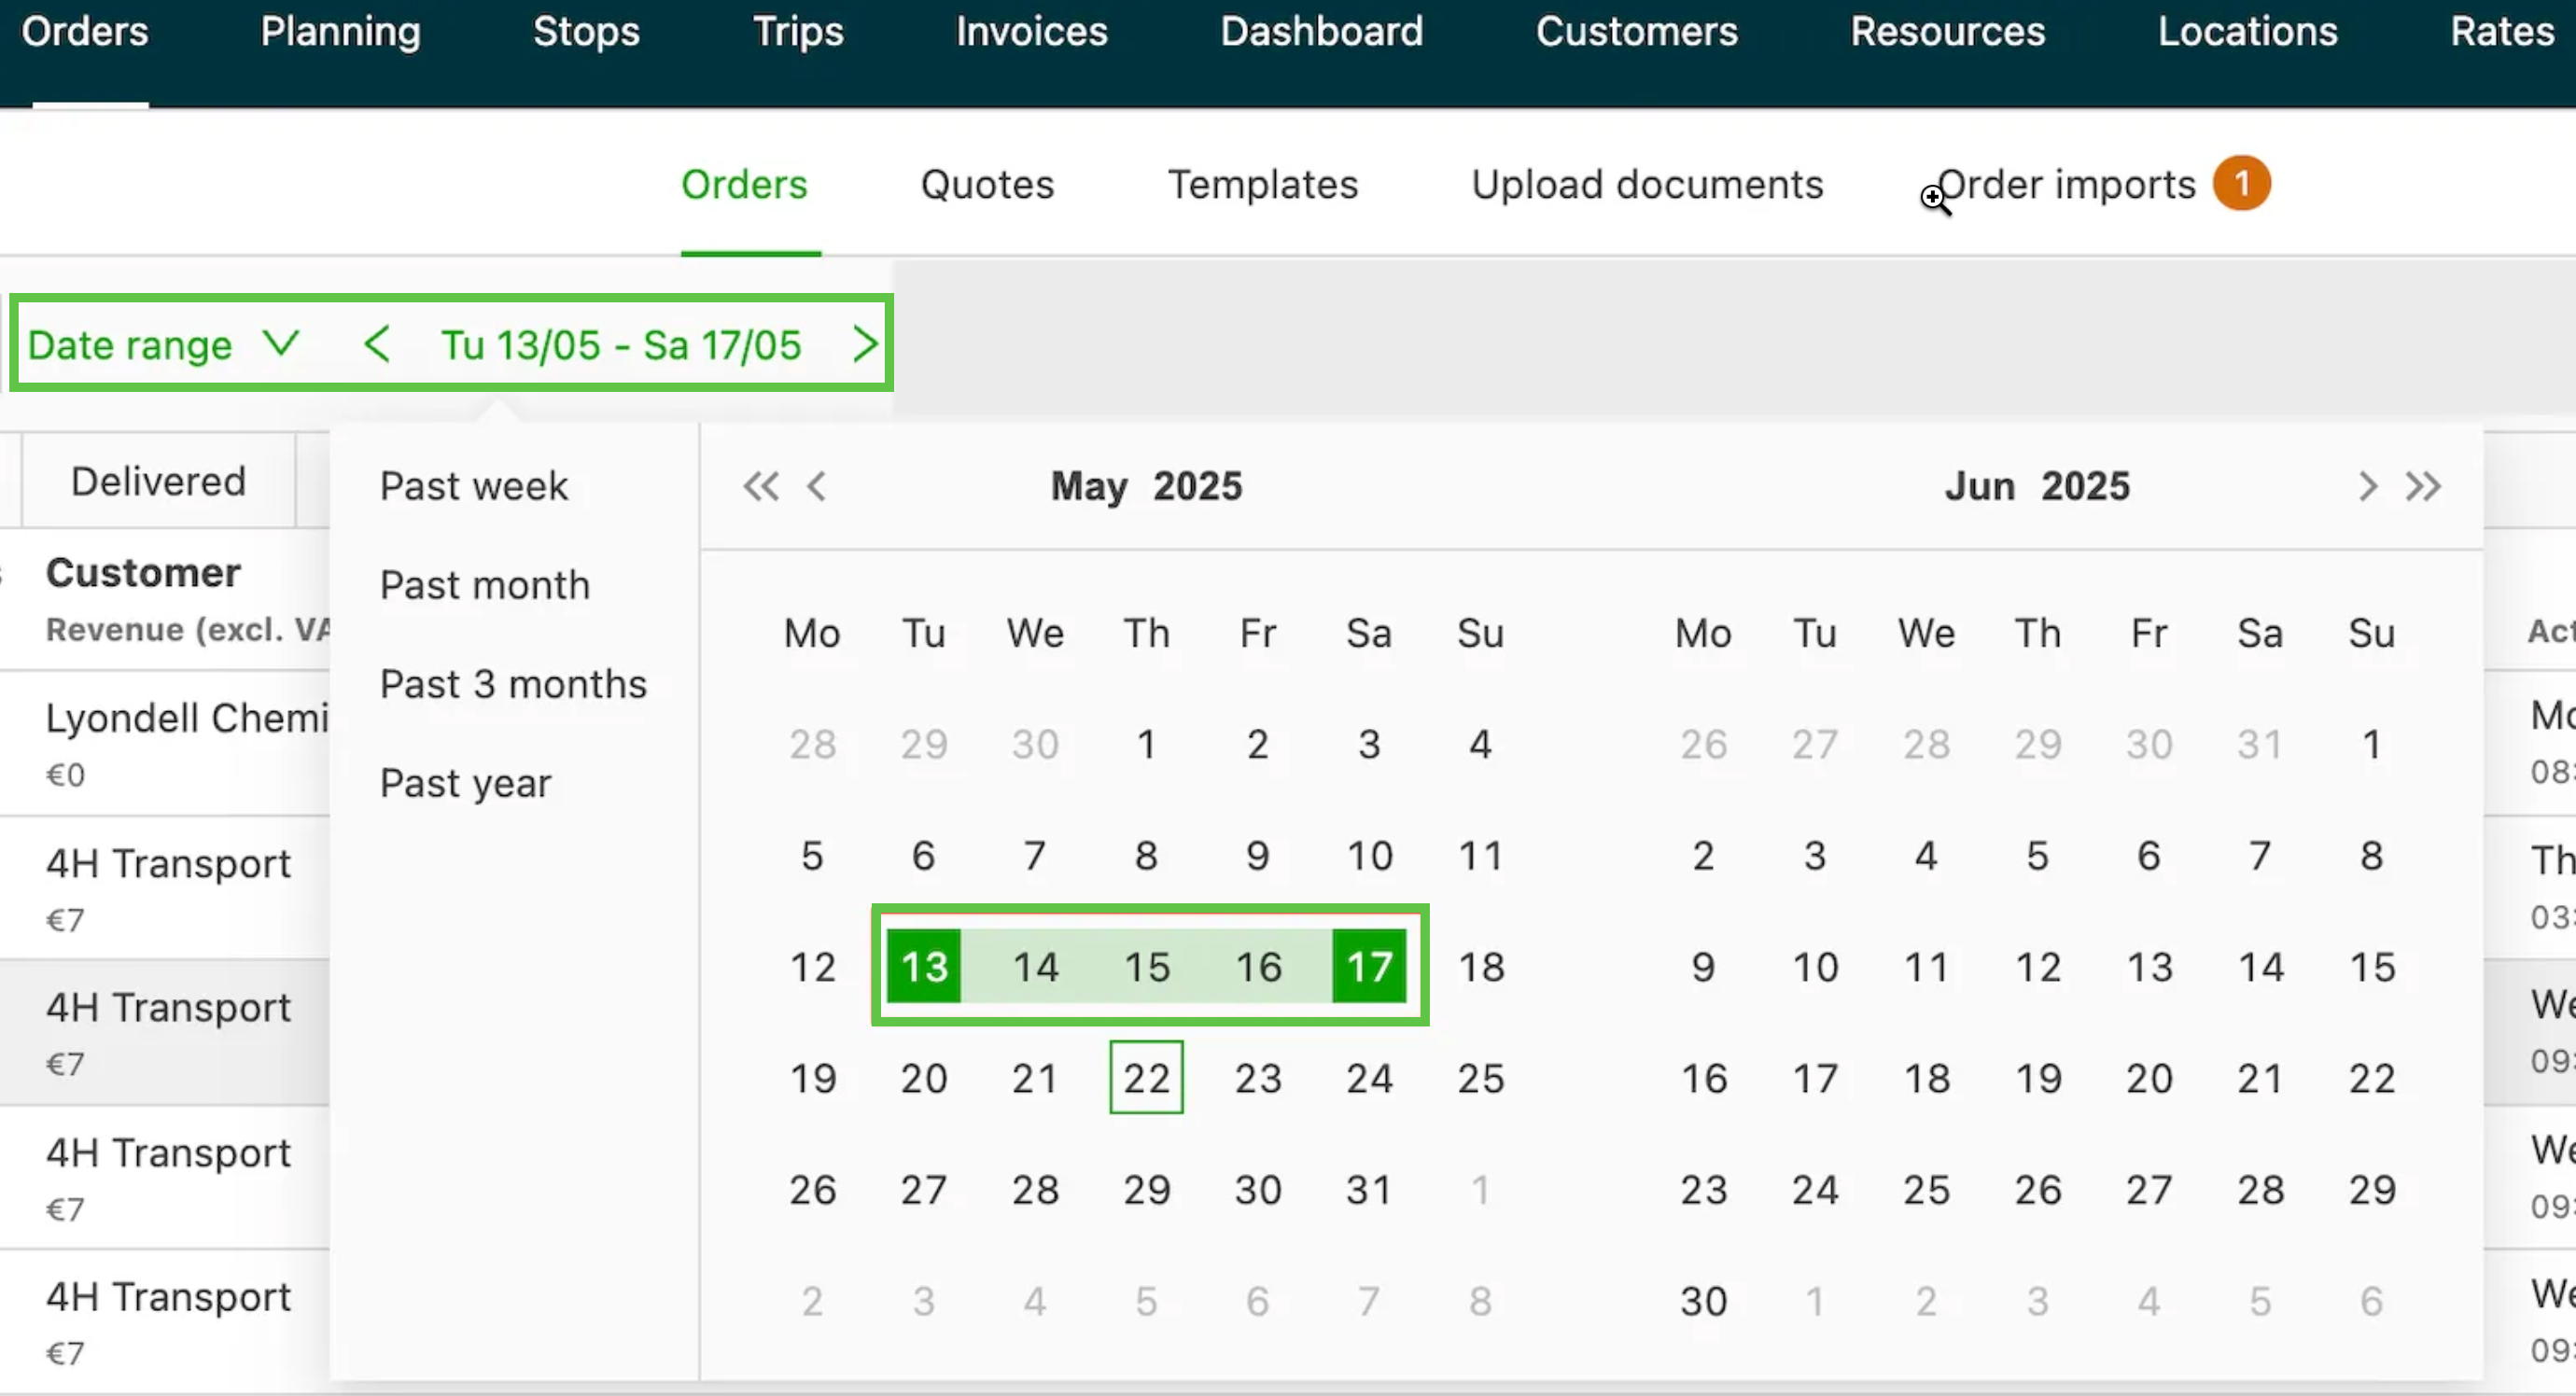
Users can also select any date range by selecting a start/end date on the calendar.
-
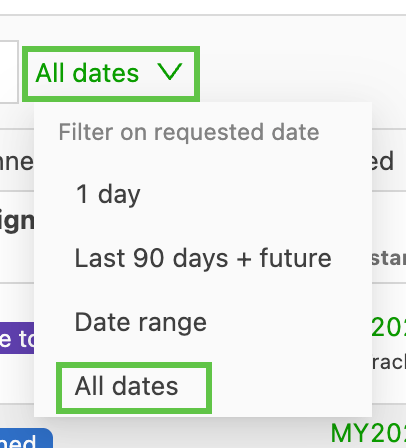
All dates: Selecting this option removes the date restriction entirely and returns every record regardless of date, without needing to configure a custom date range.
Which date each list filters on
As with the existing date range options, All dates evaluates a different date field depending on the list:
- Orders > Orders: filters on Requested date
- Loads > Loads: filters on Actual date
- Invoices > Orders to invoice: filters on Requested date
- Invoices > Loads to bill: filters on Actual date
Filter orders by pickup or delivery date
The orders overview can now be filtered by pickup date, delivery date, or both, using the same date filter already available on the planning board. This brings forward-looking, date-type filtering to the orders list. Planners can find upcoming pickups or deliveries without widening the generic date range and scanning the list by hand.
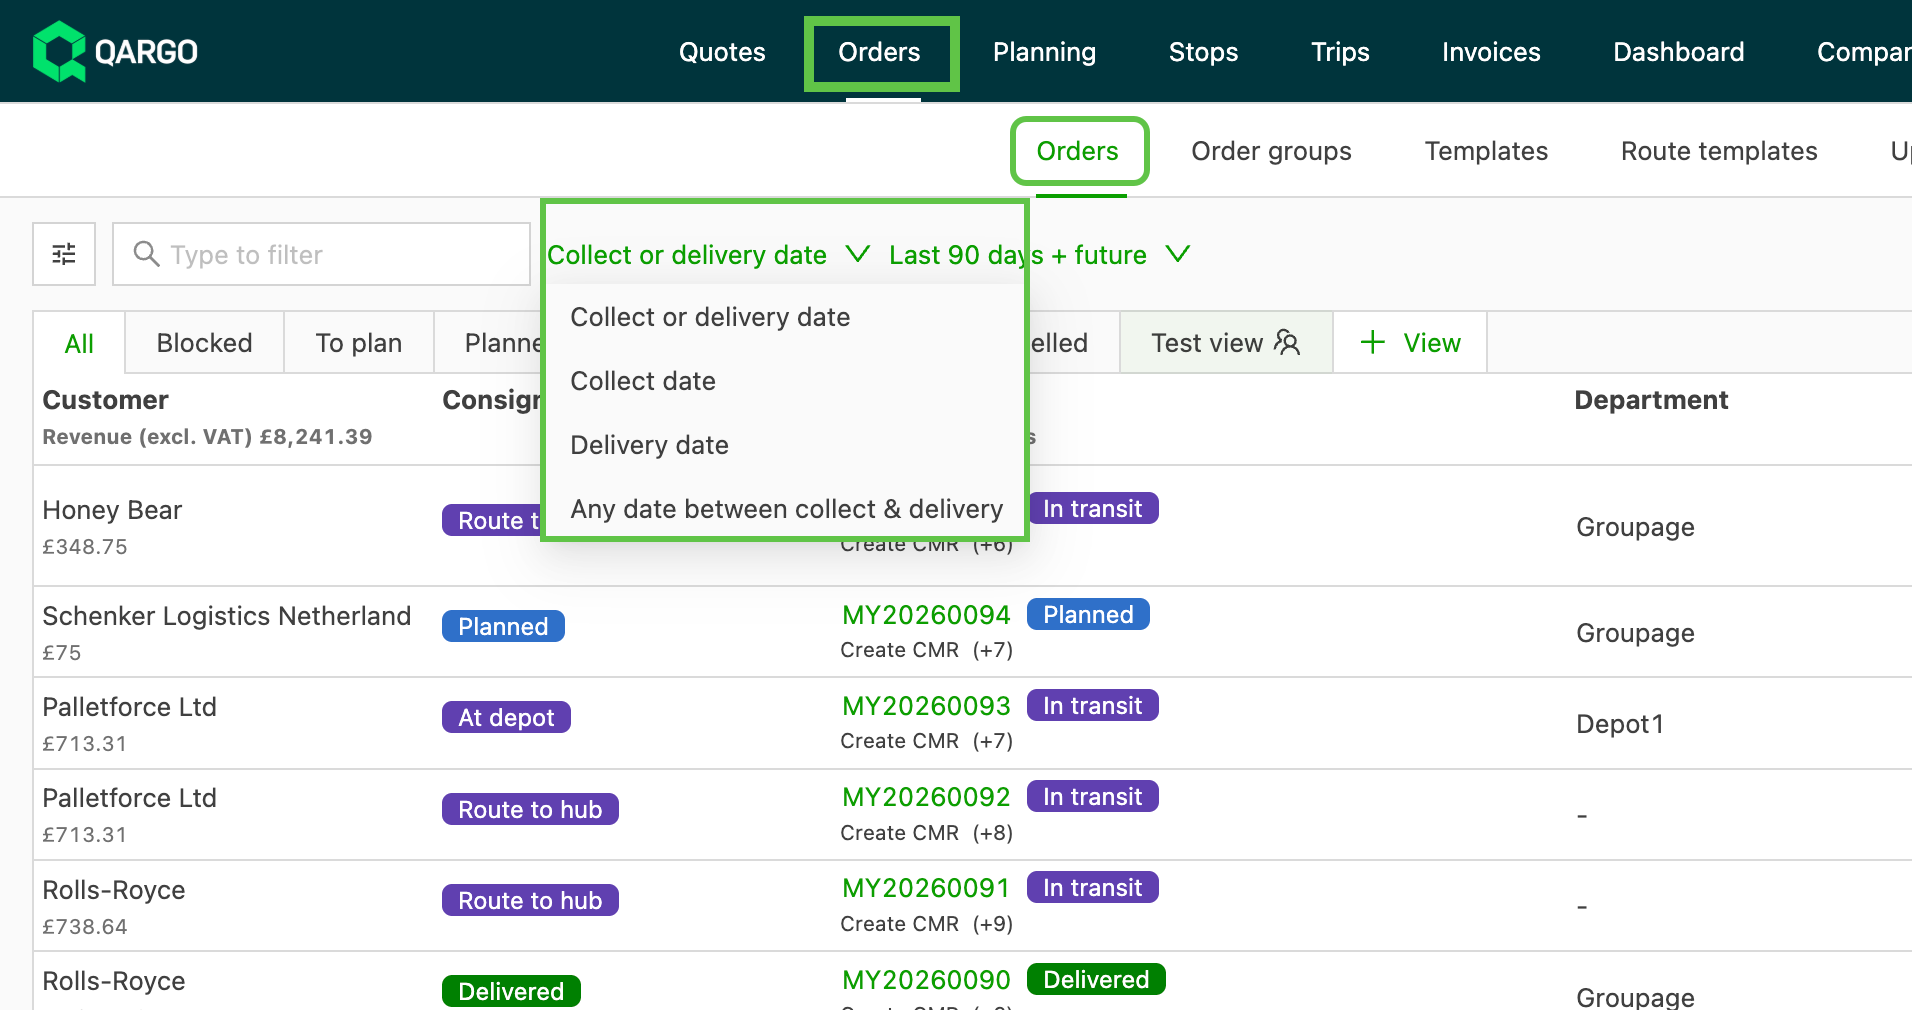
The existing date filter (see Select date range option above) filters the orders list on the Requested date. This filter adds the pickup and delivery (actual) date dimension, and its behavior matches the planning board date filter.
Turn on the pickup/delivery date filter
-
Navigate to Orders > Orders.
-
Click the Customize button (the sliders icon at the top left of the list).
-
In the Customize panel, enable the pickup/delivery date filter section. Nothing needs to be configured beforehand: the section is available to every user.
-
Select a date type: pickup, delivery, or both.
-
Choose a date or one of the preset ranges (for example, today, this week, or next week).
-
The orders list refreshes to show only the orders whose selected date type falls within the chosen range.
Save the filter with a view
The pickup/delivery date filter works with saved views. After setting the date type and range, save the view so the same filter is applied the next time the orders overview is opened. See Save custom view columns above for how to create and save a view.
Troubleshooting date filters
| Issue | Resolution |
|---|---|
| All dates is not visible in the date filter dropdown | Confirm that the list view is one of the supported views (Orders, Loads, Orders to invoice, or Loads to bill). It is not available on the Stops list, Legs, or other planning views. |
| Selecting All dates returns too many results to be useful | Apply additional filters, such as customer, status, or transport type, alongside All dates to narrow the results. |
| The date range changes back to the last 90 days + future each time the page loads | Expected. The date filter is not saved. After a page refresh, it goes back to “Last 90 days + future”, whichever option was selected. Select the range again. |
| The filter reset to the default after a refresh | Expected behavior. All dates is not persisted; reselect it after each refresh. |
| The list feels slow after selecting All dates | Expected on large datasets. All dates removes the date bound and is slower than the bounded presets; switch back to Last 90 days + future or a Date range for routine work. |
If orders are not showing as expected, make sure the date filter type (Requested date or Actual date) matches the workflow. For example, billing customers on load dates requires filtering via Requested date.
- Adjust the settings accordingly to capture all relevant orders.
- Make sure the Requested date field is activated in the view settings before applying the filter.
- Select the Requested date option from the date filter dropdown and specify the desired date range for filtering.
- Distinguish between the Requested date, which is customer-focused, and the Actual date, which represents operations dates.
Filter data
When hovering over a column header that displays a funnel icon, filter options are available. Data on the order list page can be filtered using the filter icon in the table header.
- Click the filter icon.
- Select the data to filter.
- Close the modal.
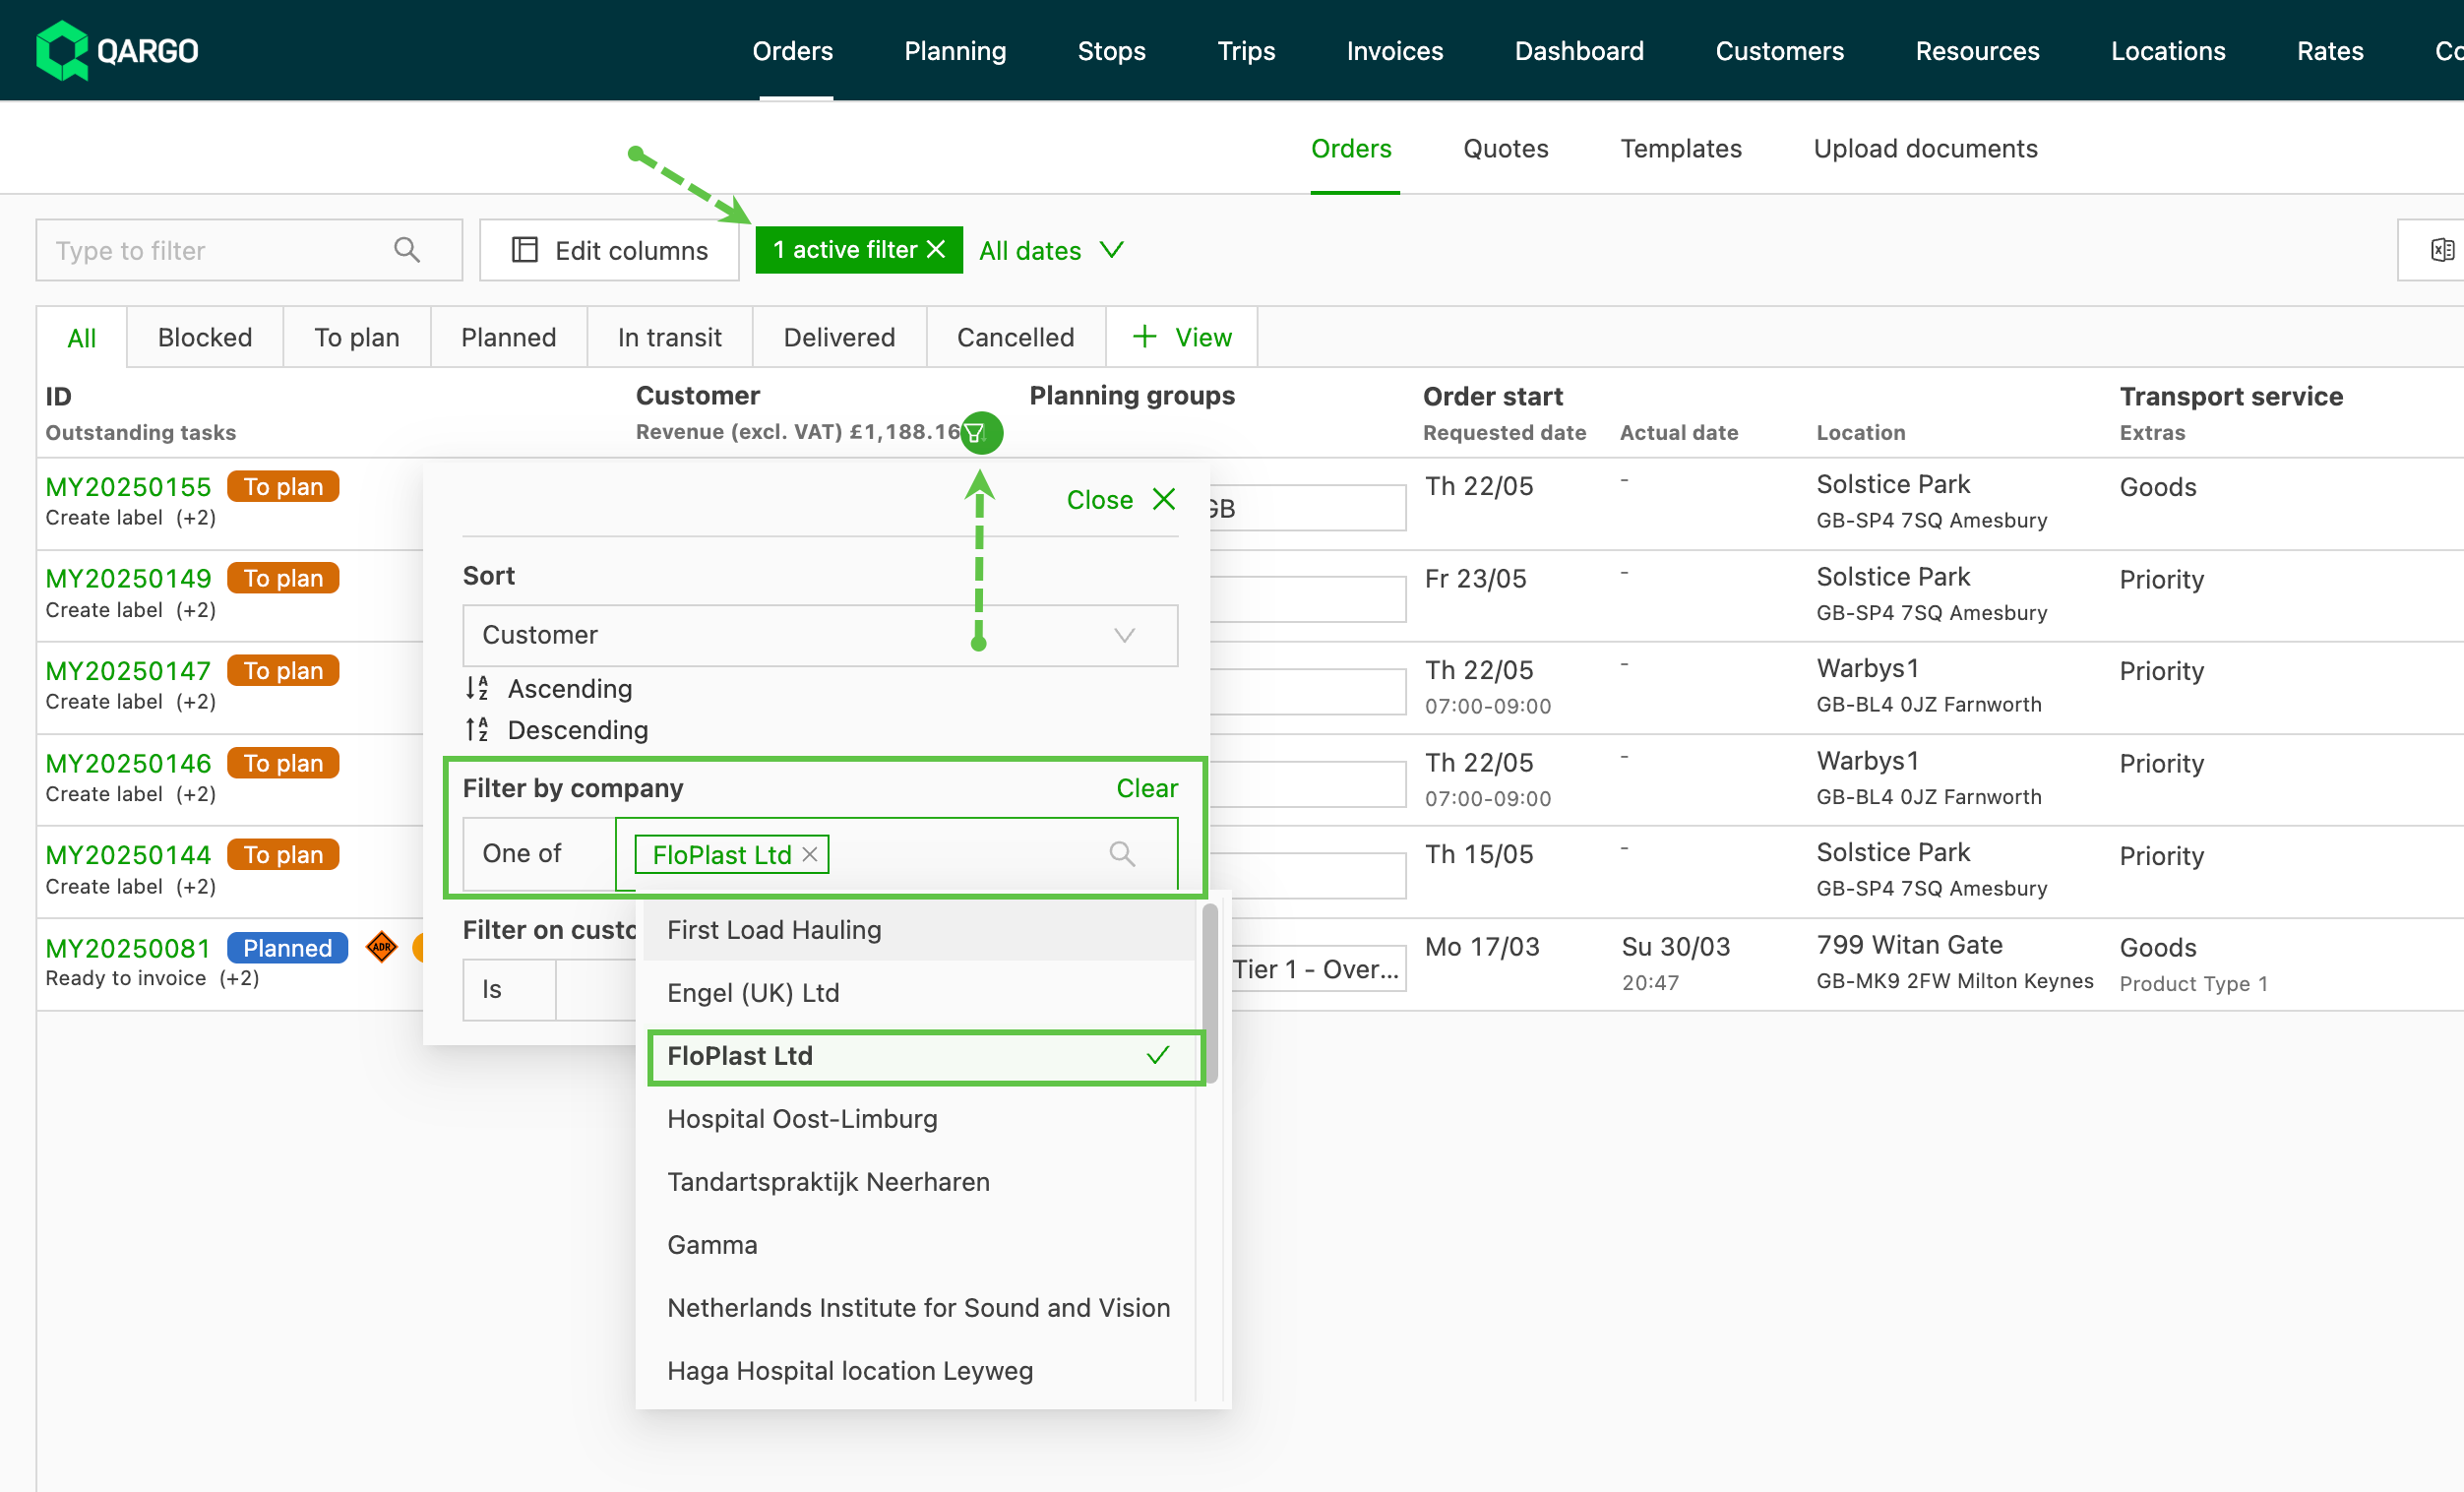
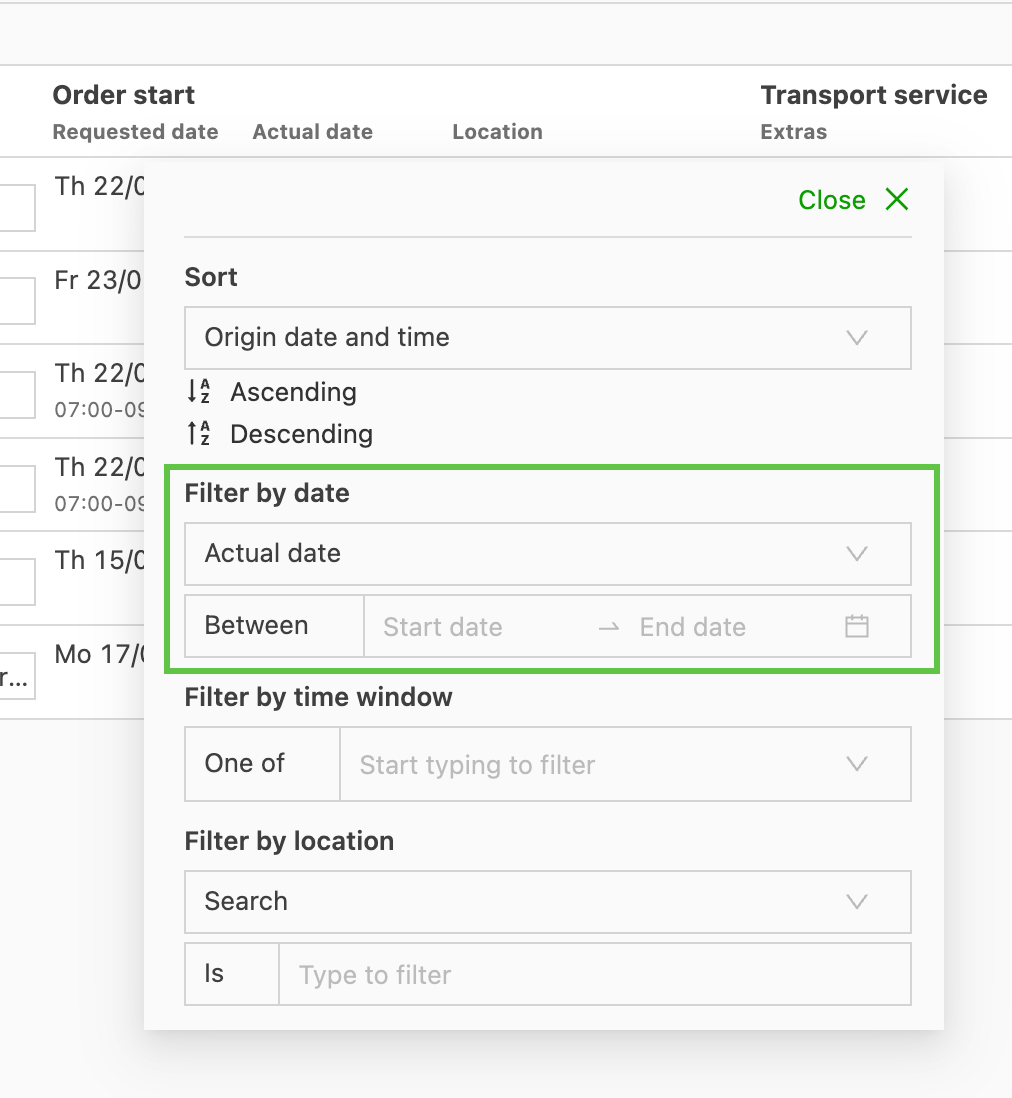
The filter is saved. The next time the order list page is opened, the same view is shown. Filter options can include:
-
Customer
-
Dates/times
-
Groups
-
Locations
- Option to select map coordinates and filter based on the selected region.
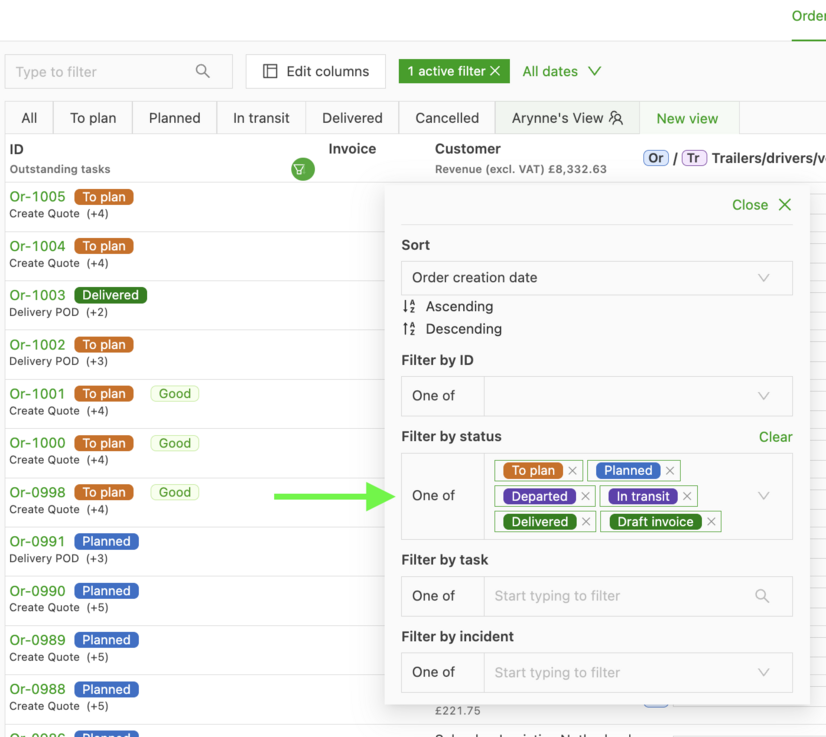
The status can also be filtered by clicking the standard available filters:
- All
- Blocked
- To plan
- Planned
- In transit
- Delivered
- Canceled
- View (custom)
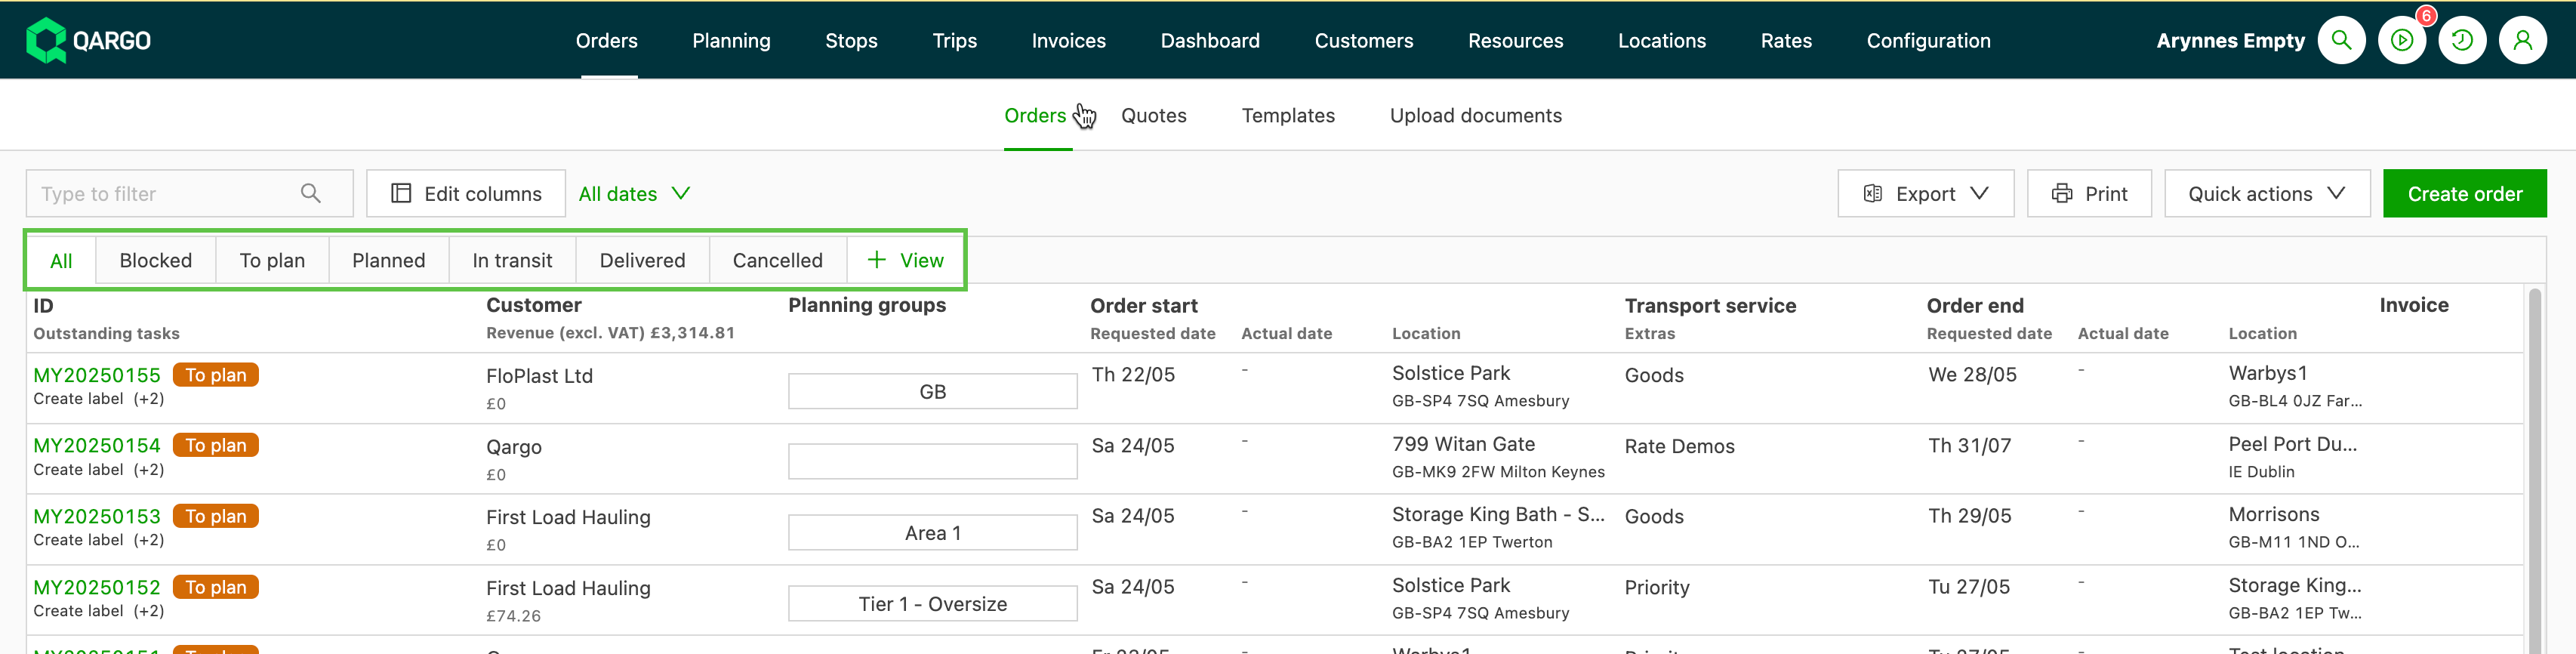
When searching on the Status, only 1 value can be entered using the ‘is not’ statement. This is correct for individual views.
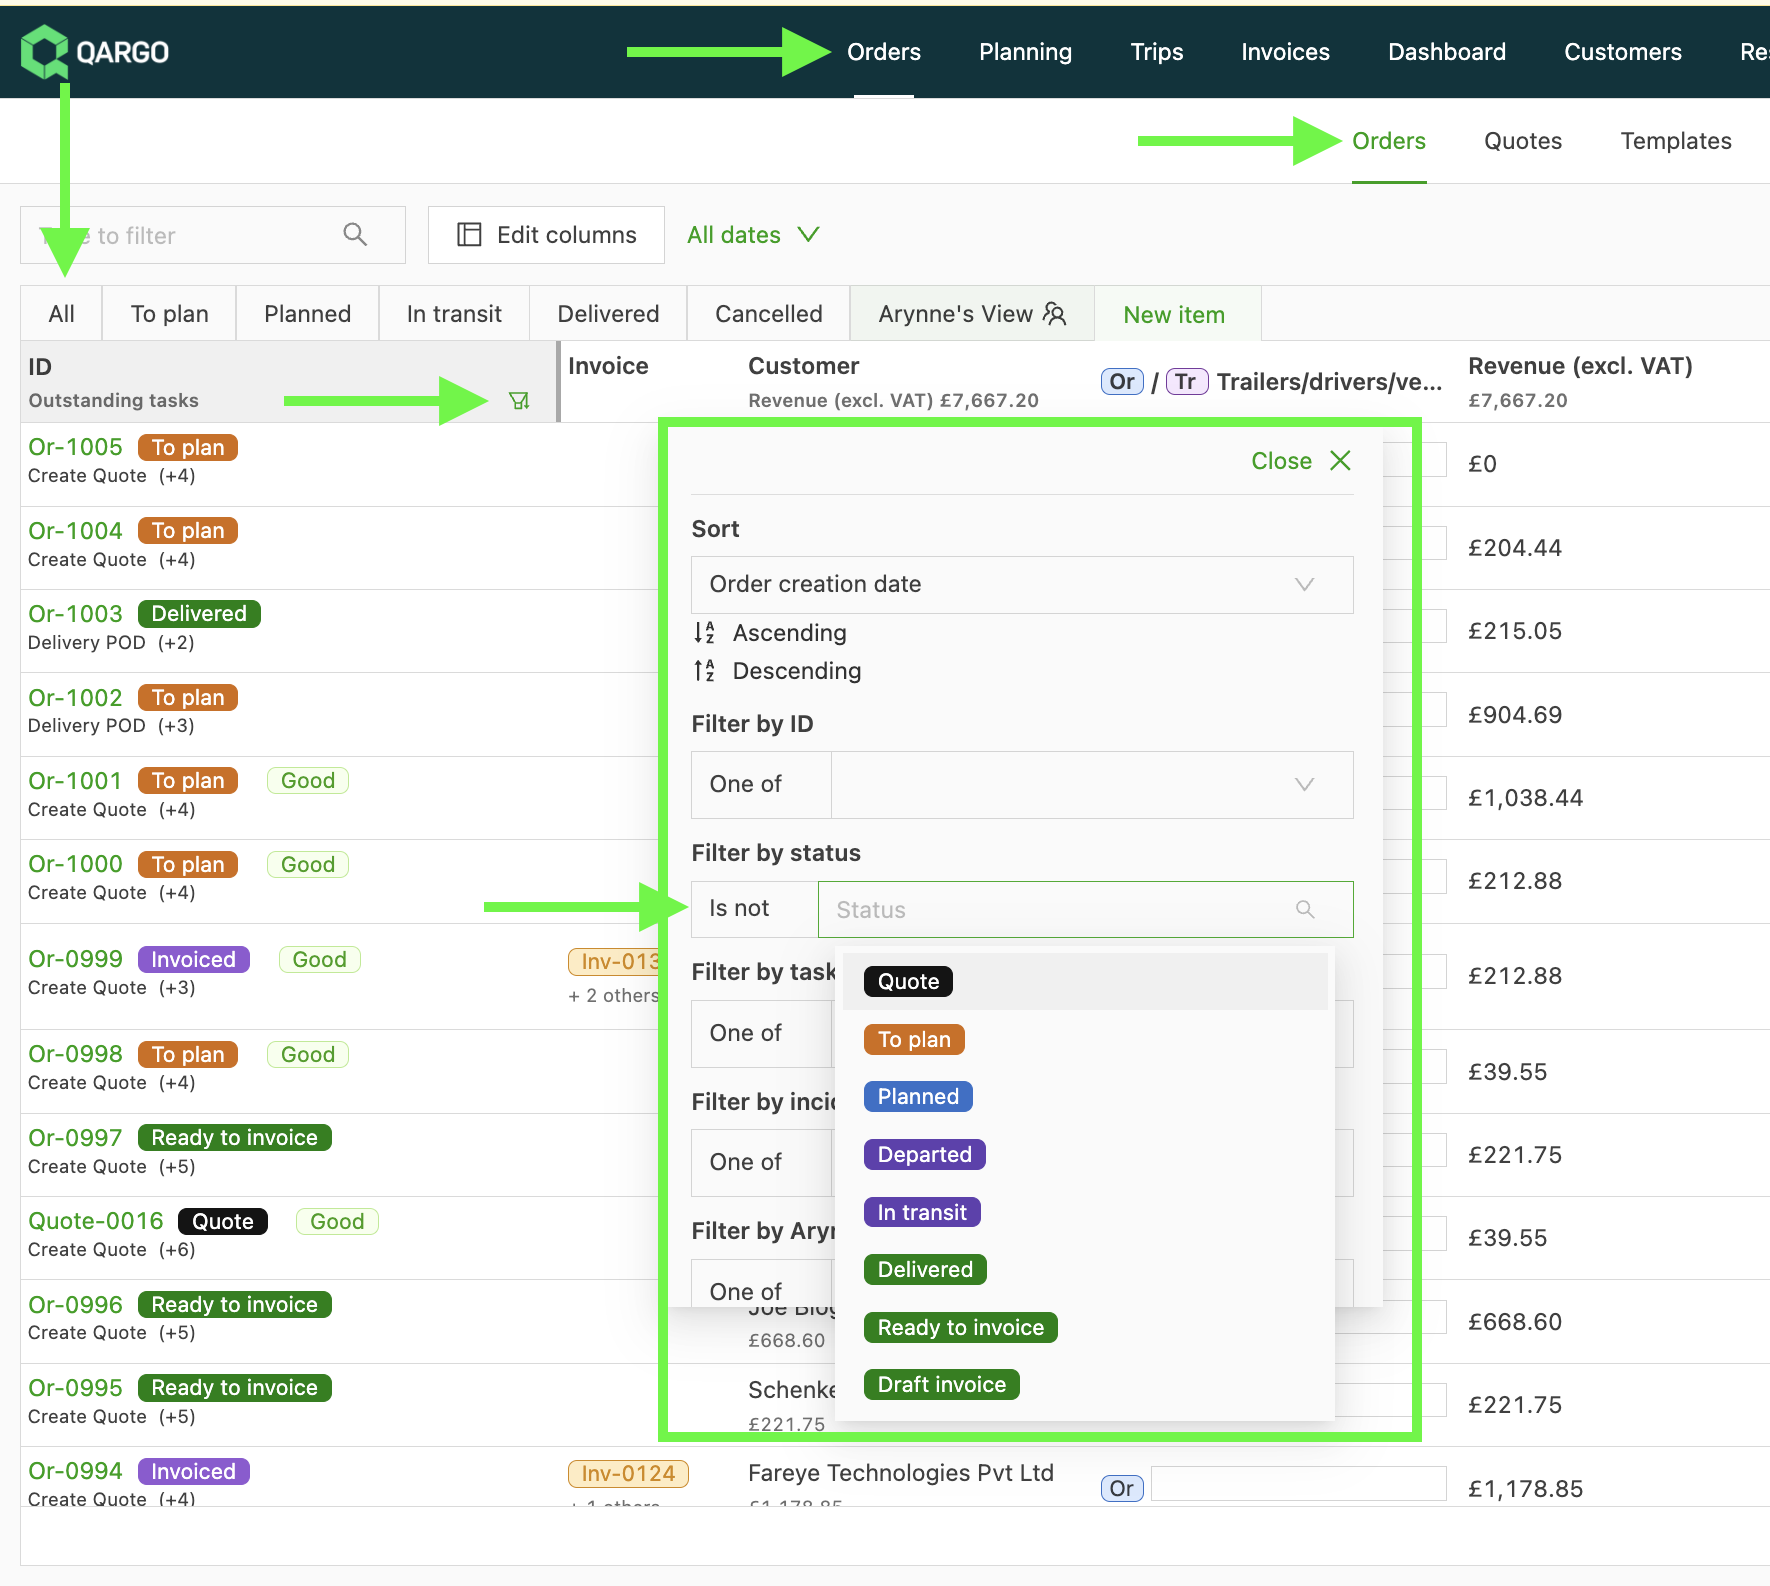
To consolidate all the pending tasks into 1 view, use the status filter ‘one of’ instead.
Sort columns
The order list view supports sorting on some columns to help prioritize and organize the view.
- To sort by a column, click the column header.
- An arrow indicator appears, showing the current sort direction (ascending or descending).
- Click again to reverse the sort order.
Sortable columns
Sorting is available on columns that contain structured, comparable data. Typical examples include, but are not limited to:
- Order number (ID)
- Customer
- Shipment operations status
- Order start date
- Department
- Network
Freight data and weight: display only
Freight details (including weight, volume, loading meters, pallet spaces, and dimensions) are displayed in the orders list as summary data only.
- Hovering over the Freight column on an order row reveals a tooltip with the full breakdown per shipment line.

Sort and filter by revenue, cost, and profitability
Orders and loads can be sorted and filtered by these amounts. This replaces the old on/off toggle and makes it quick to find the orders needed.
When to use this
- Find orders running at a loss (negative profitability)
- Spot unusual revenue or cost amounts that might be data-entry errors
- Check for orders where costs were not recorded (cost = zero)
- Save a filtered view so the team sees the same prioritized list each time
How to use it
Click the sort and filter icon in the Revenue, Cost, or Profitability column header. In the panel that opens:
- To sort: choose Ascending or Descending
- To filter: enter a minimum amount, maximum amount, or both, then close the panel
- Select whether to filter for negative or non-negative amounts (Profitability column only)
Sort and filter choices are kept when navigating away from the screen and returning.
Extra filters
The Revenue and Profitability columns have additional options:
- Revenue: show or hide charges; show orders without charges
- Profitability: show only orders with negative profitability (losing money)
Important
- Clicking the column header does not sort. Always use the Ascending or Descending buttons in the panel.
- The Loads list has Cost and Profitability columns but no Revenue column.
- All amounts are shown in the default base currency
Display custom fields
Custom fields of type Text and Date in the Order list and Load list are now sortable in ascending and descending order. Shipment fields (e.g., CMR reference) are also now sortable in the Order list. Clicking a column header with a custom field toggles the sort order, consistent with built-in field behavior.
| Custom field type | Sort behavior |
|---|---|
| Text | Alphabetical: A to Z / Z to A |
| Date | Chronological: earliest to latest / latest to earliest |
Shipment fields such as CMR reference are also now sortable in the Order list.
How to sort by a custom field
- Open the Order list or Load list.
- Click the column header to sort in ascending order; click again to sort in descending order.
Notes and limitations
- Available in the Order list and Load list only. Planning, Legs, Stops, and other list views are not yet supported.
- Dropdown custom fields are not sortable in this release.
Best practices for managing filters
- Regularly review filter configurations to keep them aligned with operational goals.
- Differentiate between Actual date and Requested date filters and understand their use cases.
- Stay informed about updates from Qargo to take advantage of enhanced functionality and address potential issues with filters.