Planning: board filter options
Plan faster with planning board filters: date range, resource availability (loads and current time included), custom fields, column headers, location and customizable Timeline and Blocks views.
Table of contents
Filter data using the ‘Customize’ view option
 Use the Customize button in the To Plan or Plan board panels
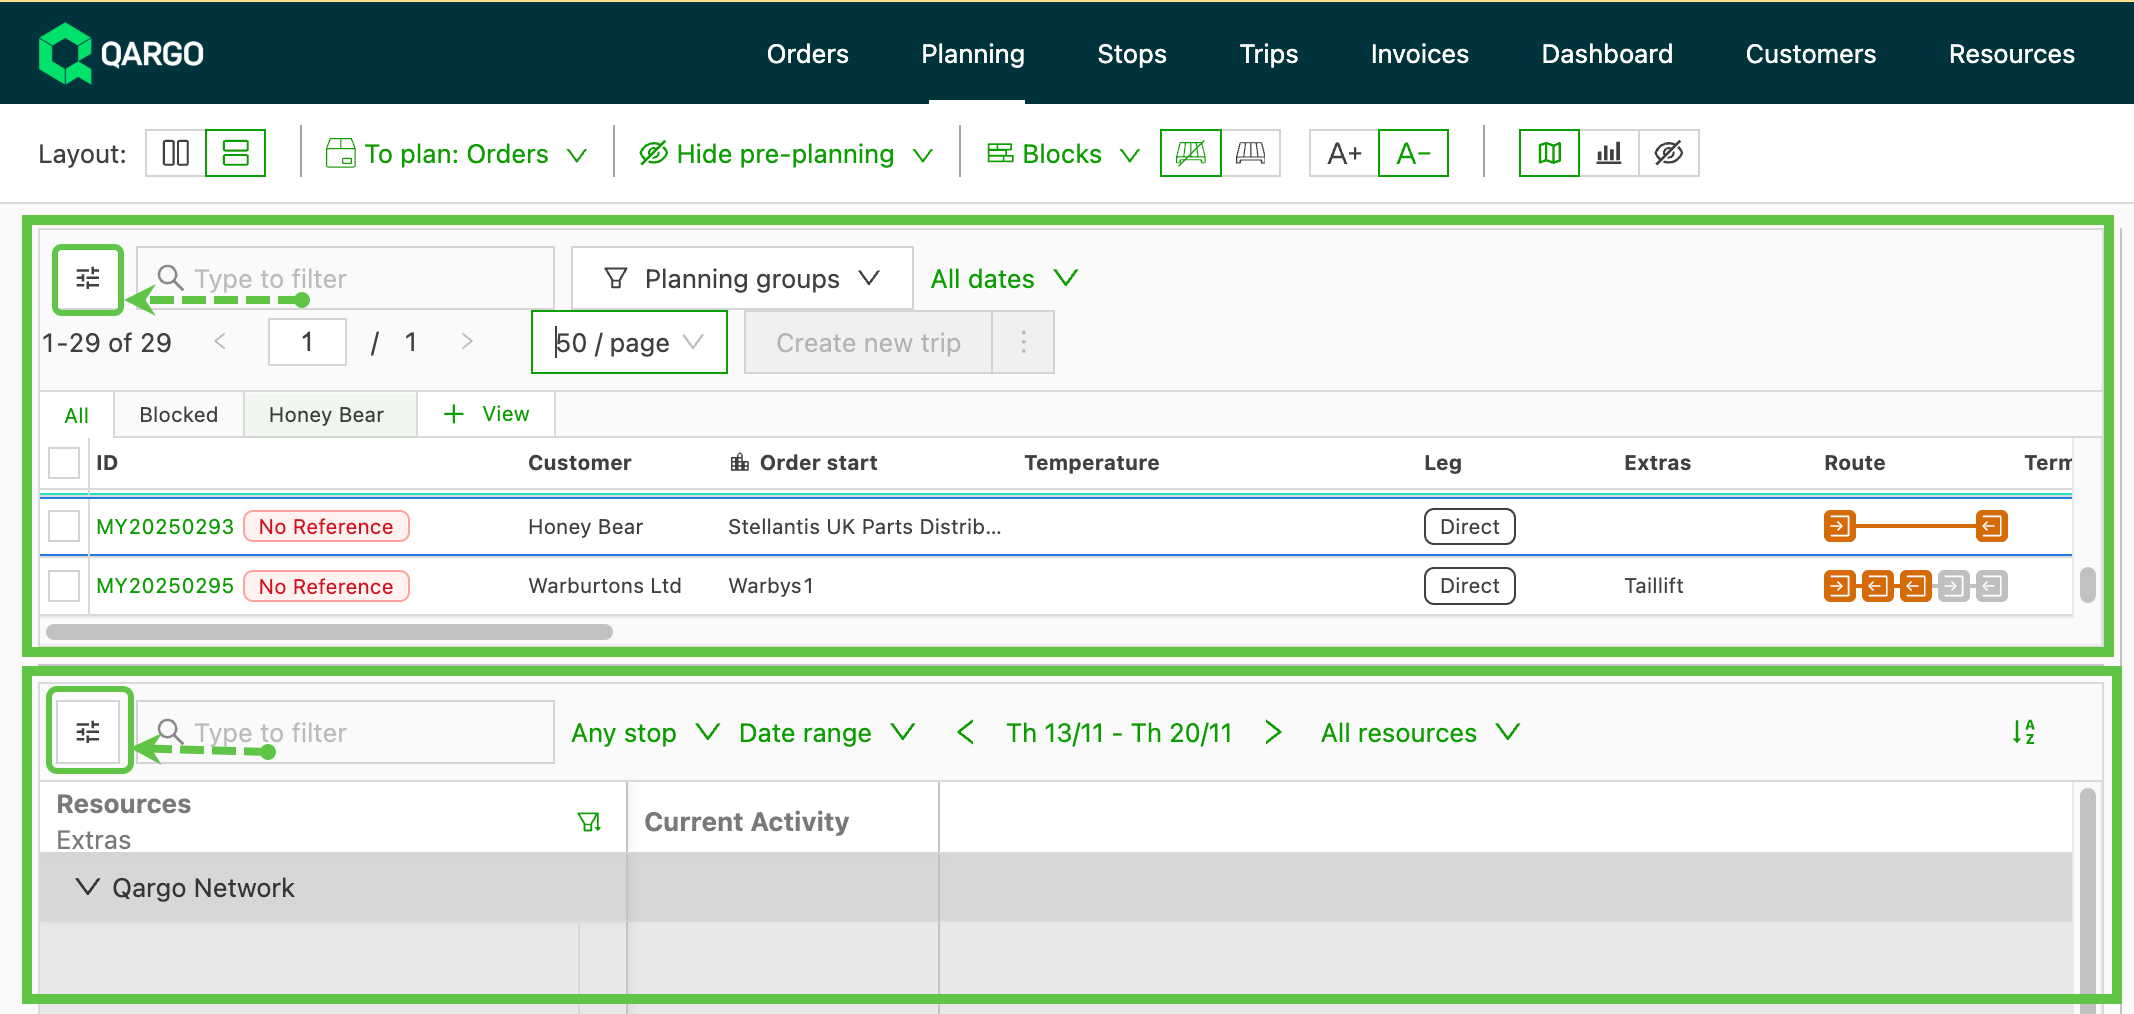
-
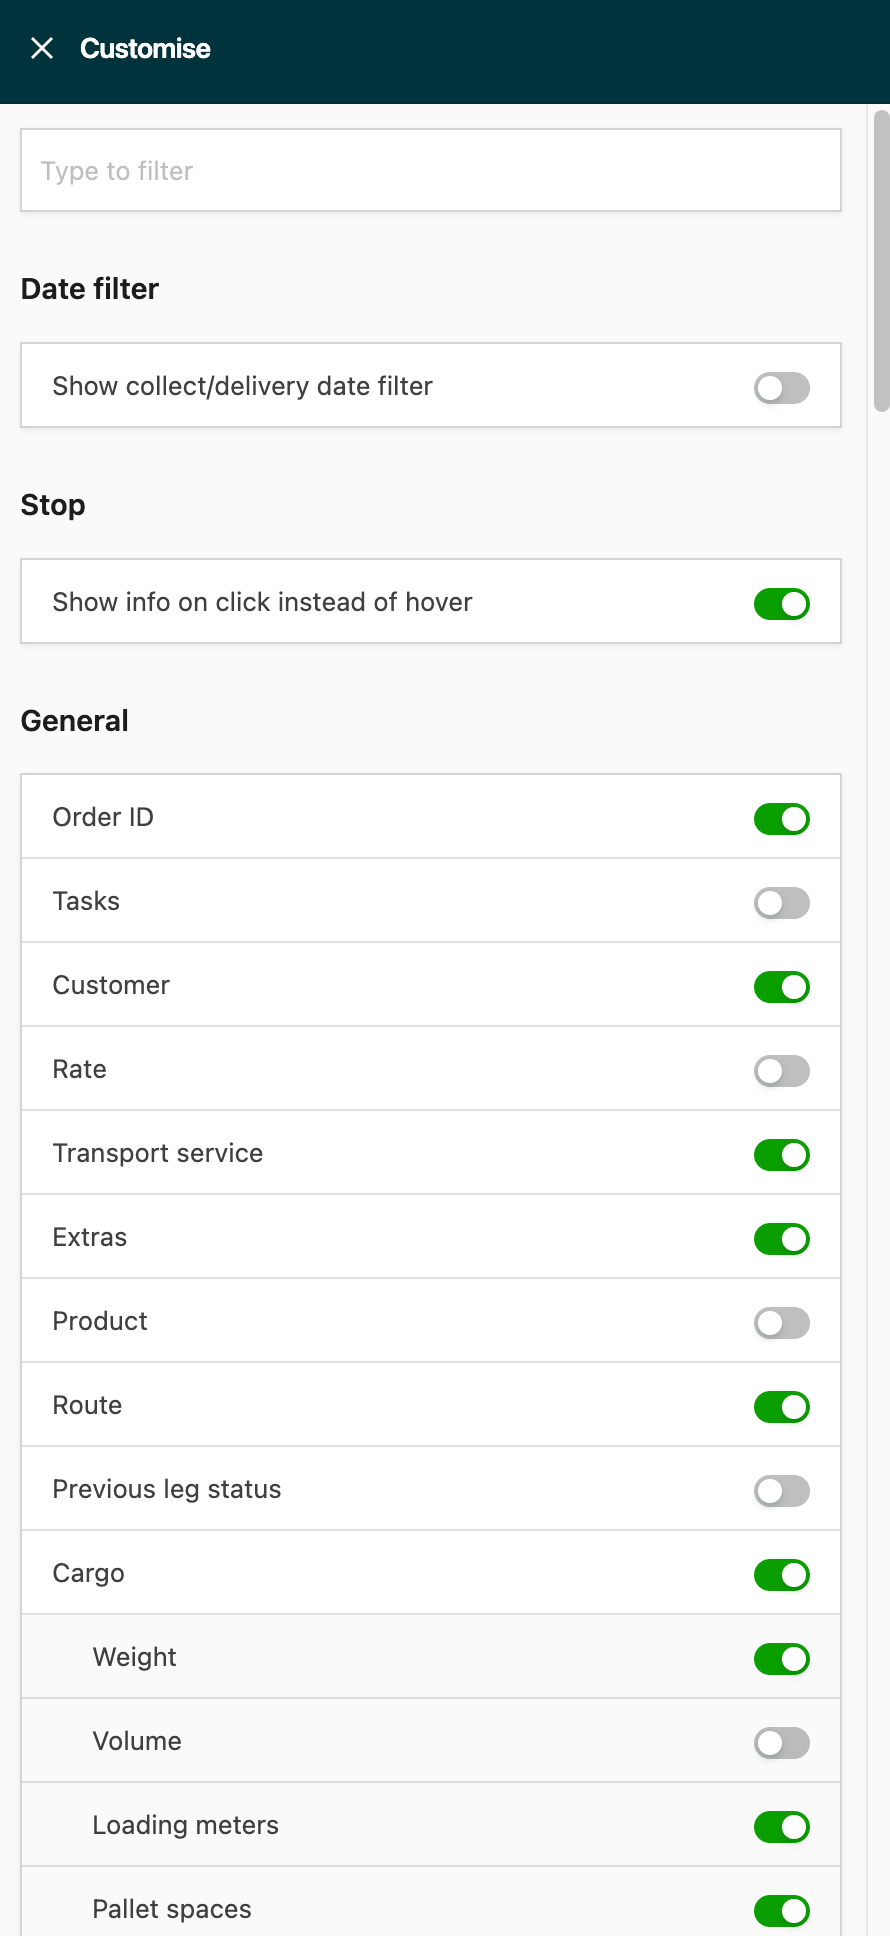
Each option opens the Customize panel, where users can toggle on/off the specific data sets to include or exclude in the view
-
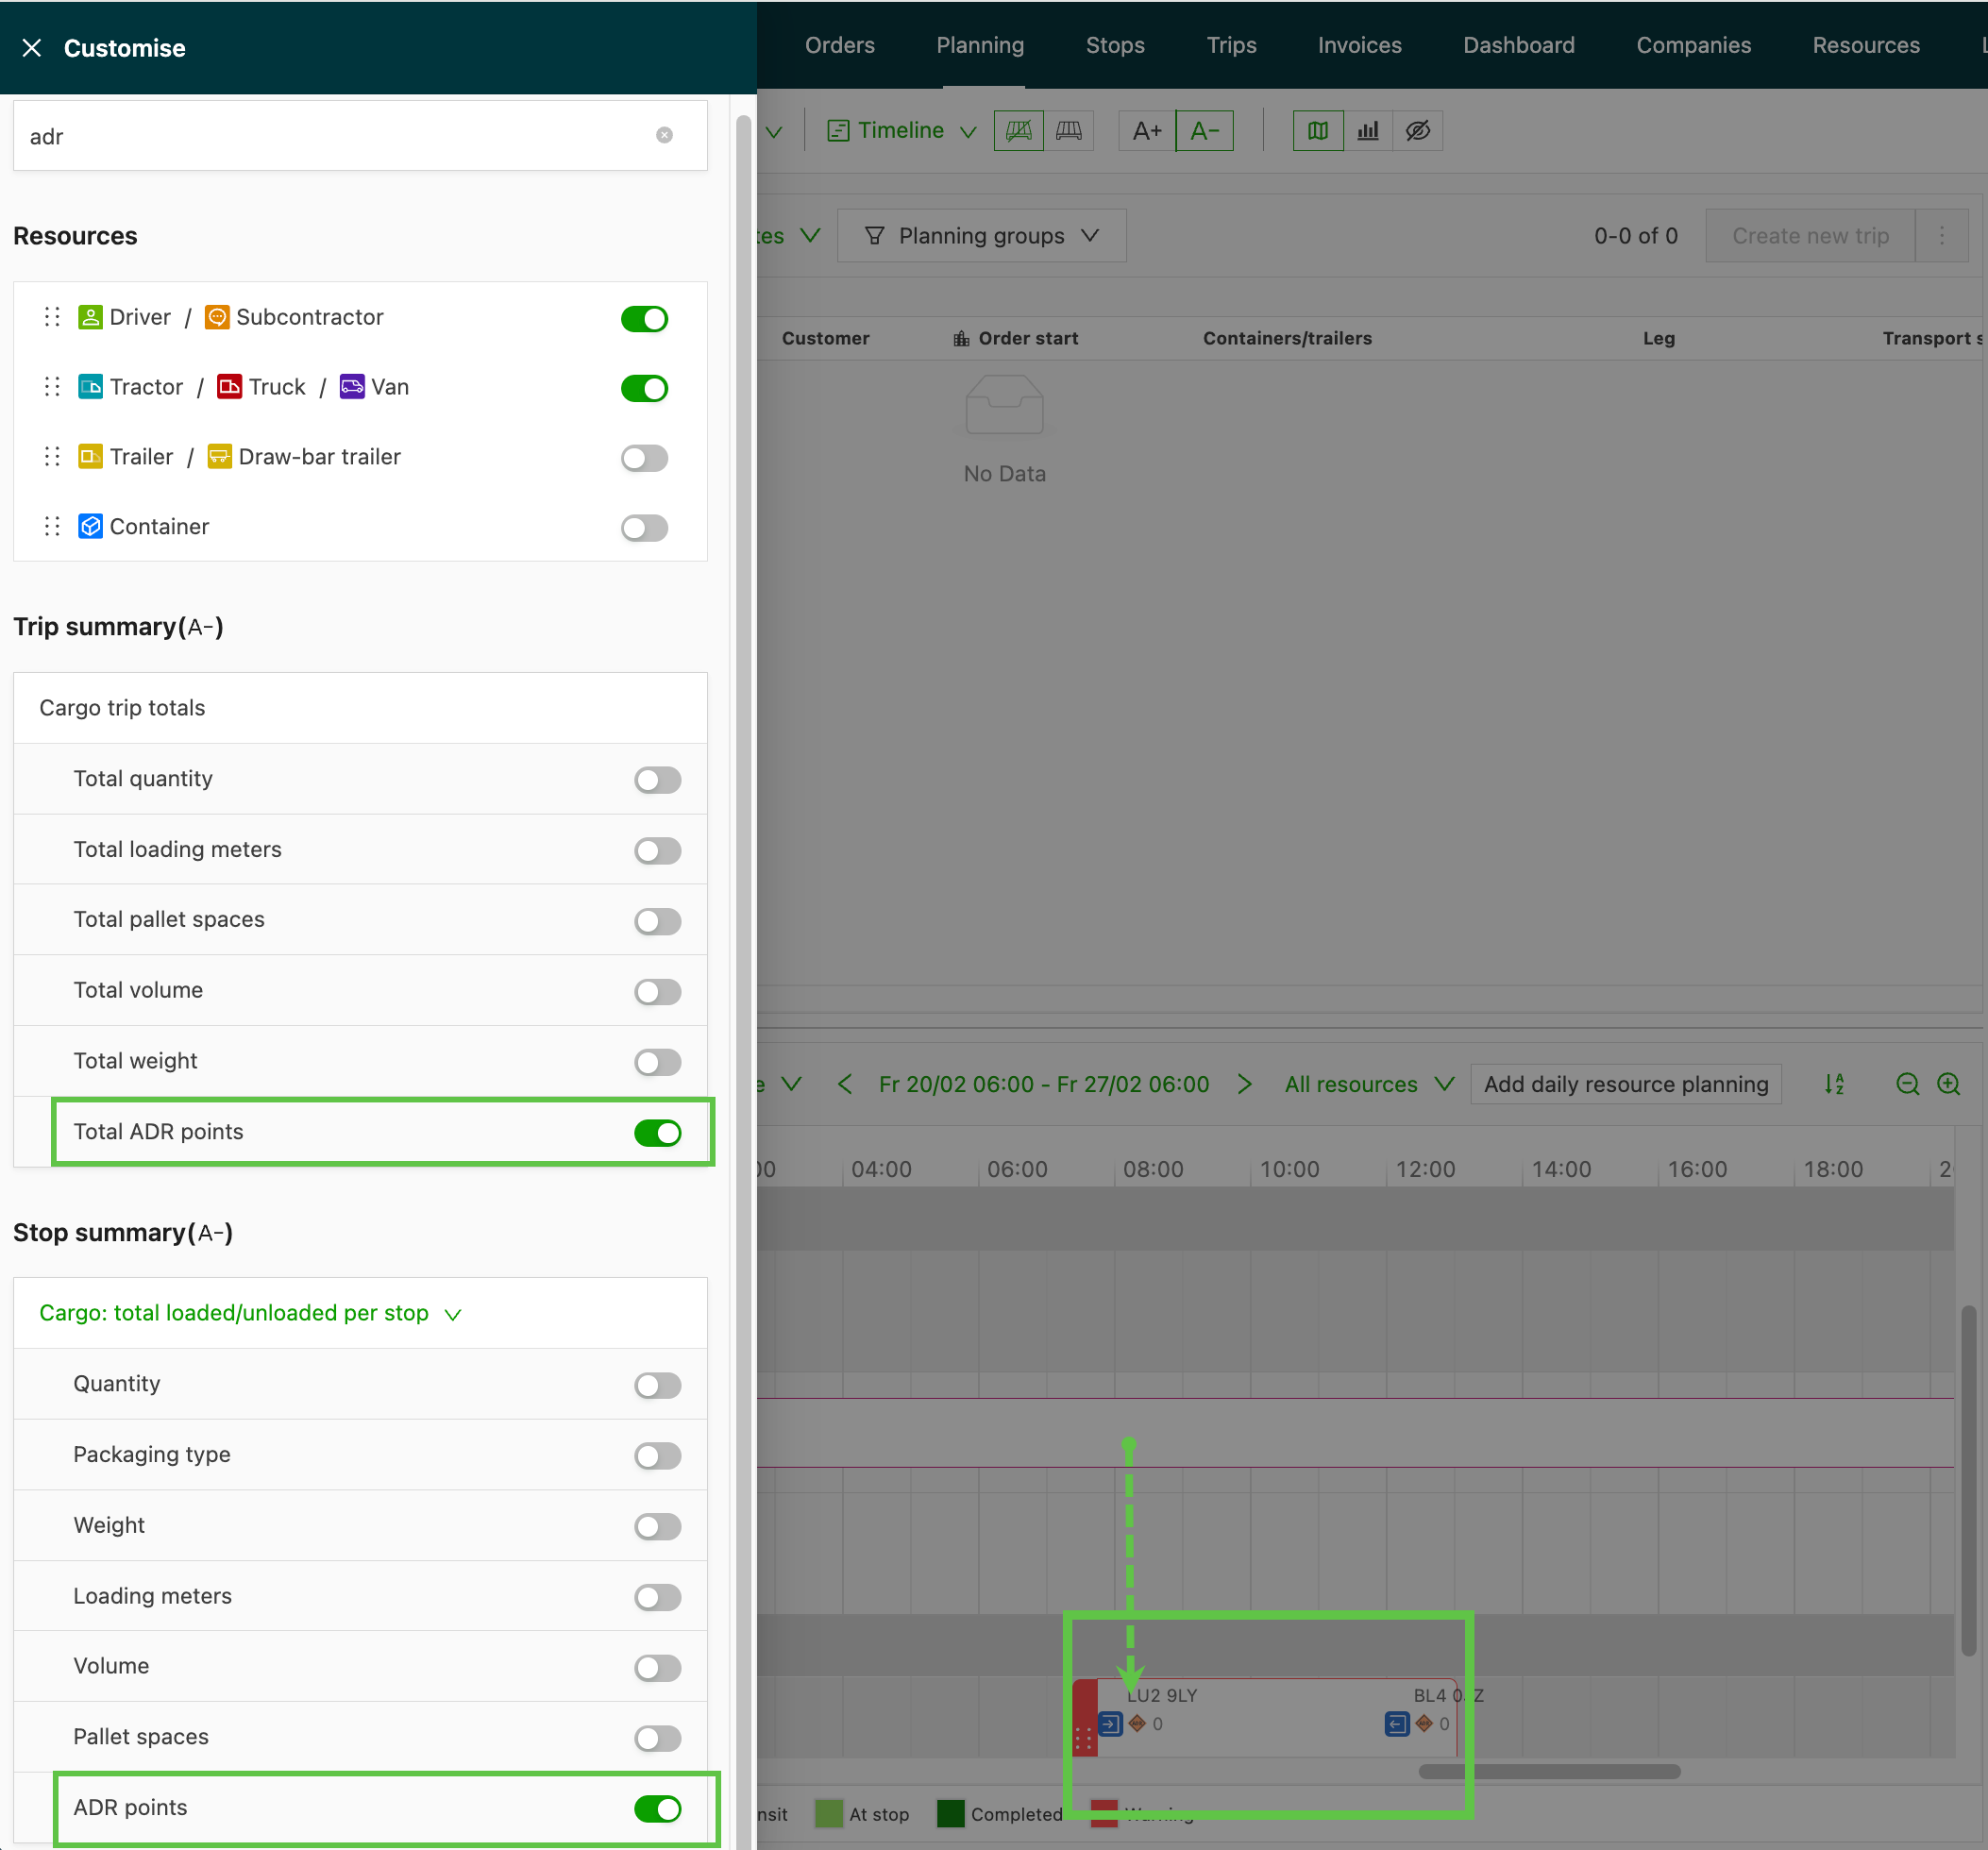
To maximize the screen view on the plan board, use the Customize option on the A+/A- views and toggle off any data that isn’t required.
-
Reducing visibility in this way reduces each load to a much smaller line on the board.
-
Including HazMat points visibility in load details shows the ADR icon, making it easy for planners to identify loads
Filter by date / time
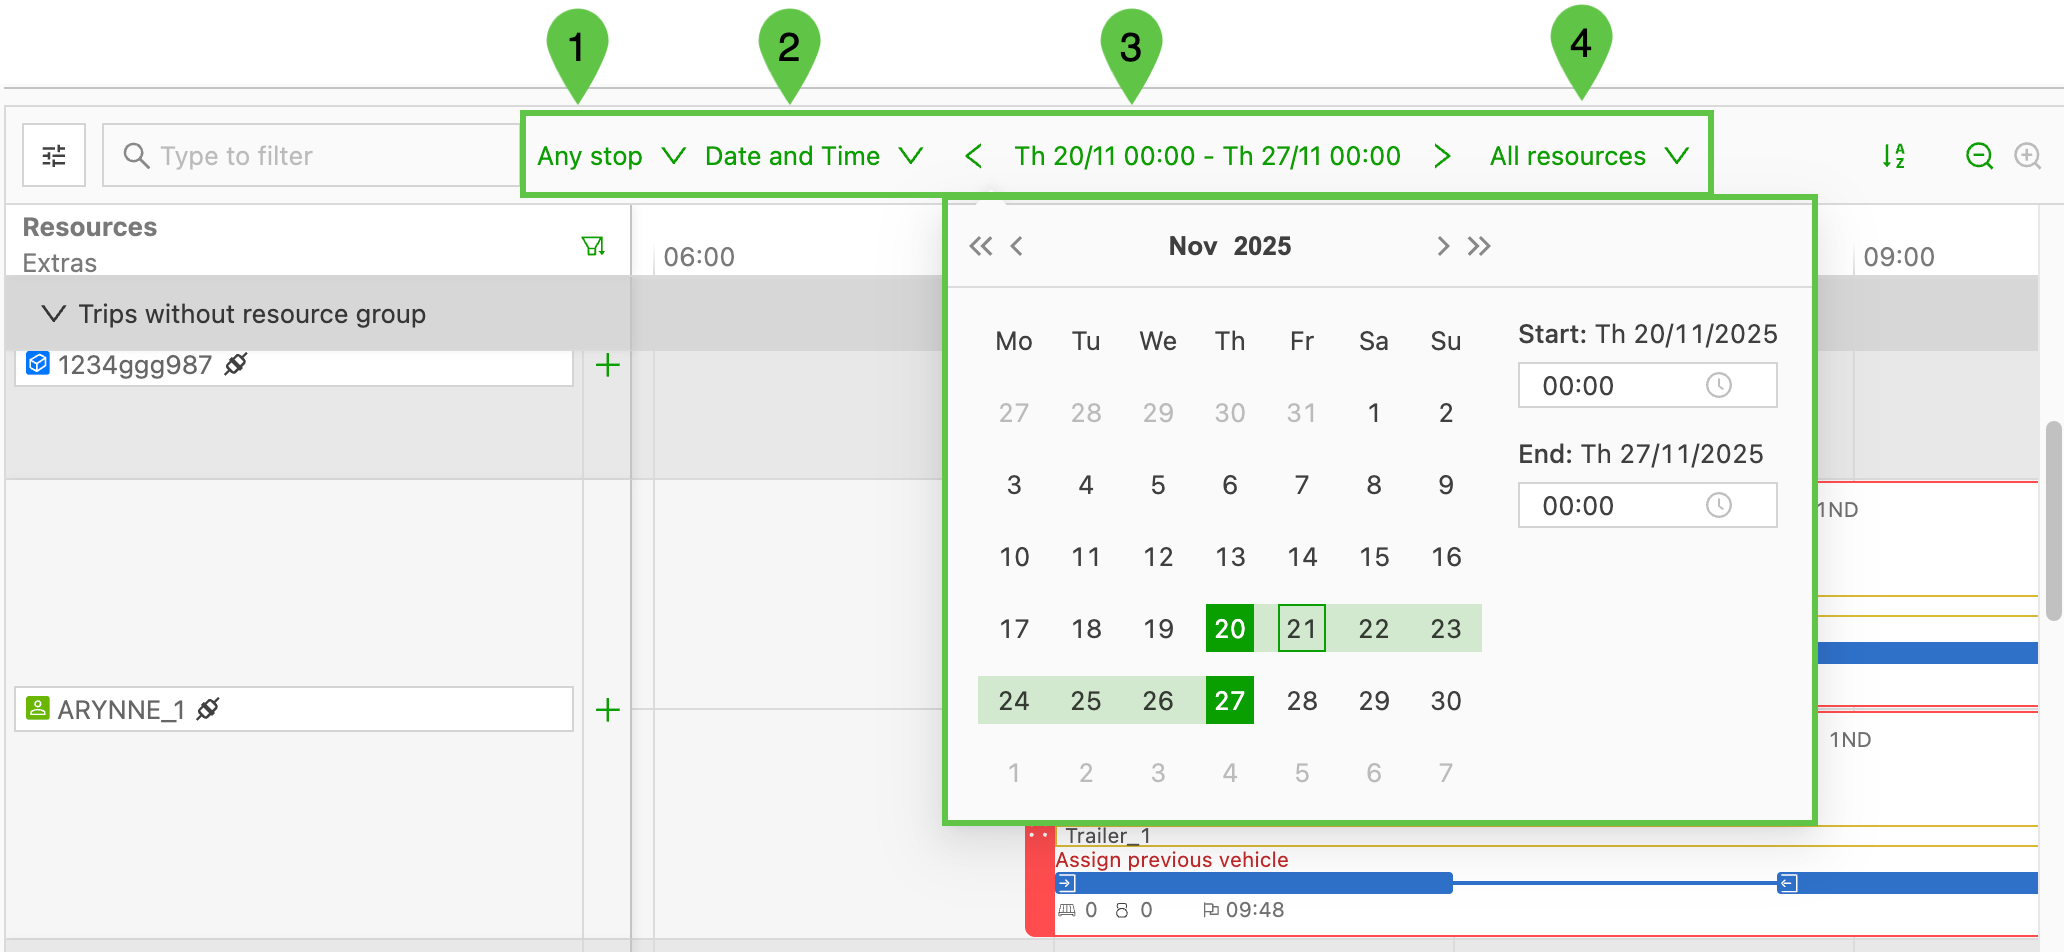
Users have the additional options to select a specific number of days and a date and time range.
-
Any stop or Start load: The default is ‘Any stop’. Manually update to ‘Start load’ to only see loads starting (with the first stop activity) within the selected dates
-
Date options including:
- 1 day
- Date range
- Date and time
-
Date or range selected. Use the arrows to move forward / backward in time
-
Resources: Show all resources / Only dummy resources / Hide dummy resources
Any date between pickup & delivery
The Any date between pickup & delivery option applies a broader check: an order appears in the To Plan queue if any date in the selected range overlaps with the full pickup-to-delivery window, inclusive of both the pickup and delivery dates.
Use cases:
- Orders with multi-day pickup and delivery windows imported via EDI or API (e.g., pickup Mon–Wed, delivery Thu–Fri) appear in the To Plan queue across all days within those windows. This gives dispatchers full visibility without switching the date filter for each day.
- Groupage and LTL operations where pickup windows span multiple days can surface all available-to-plan orders in a single view.
Prerequisite:
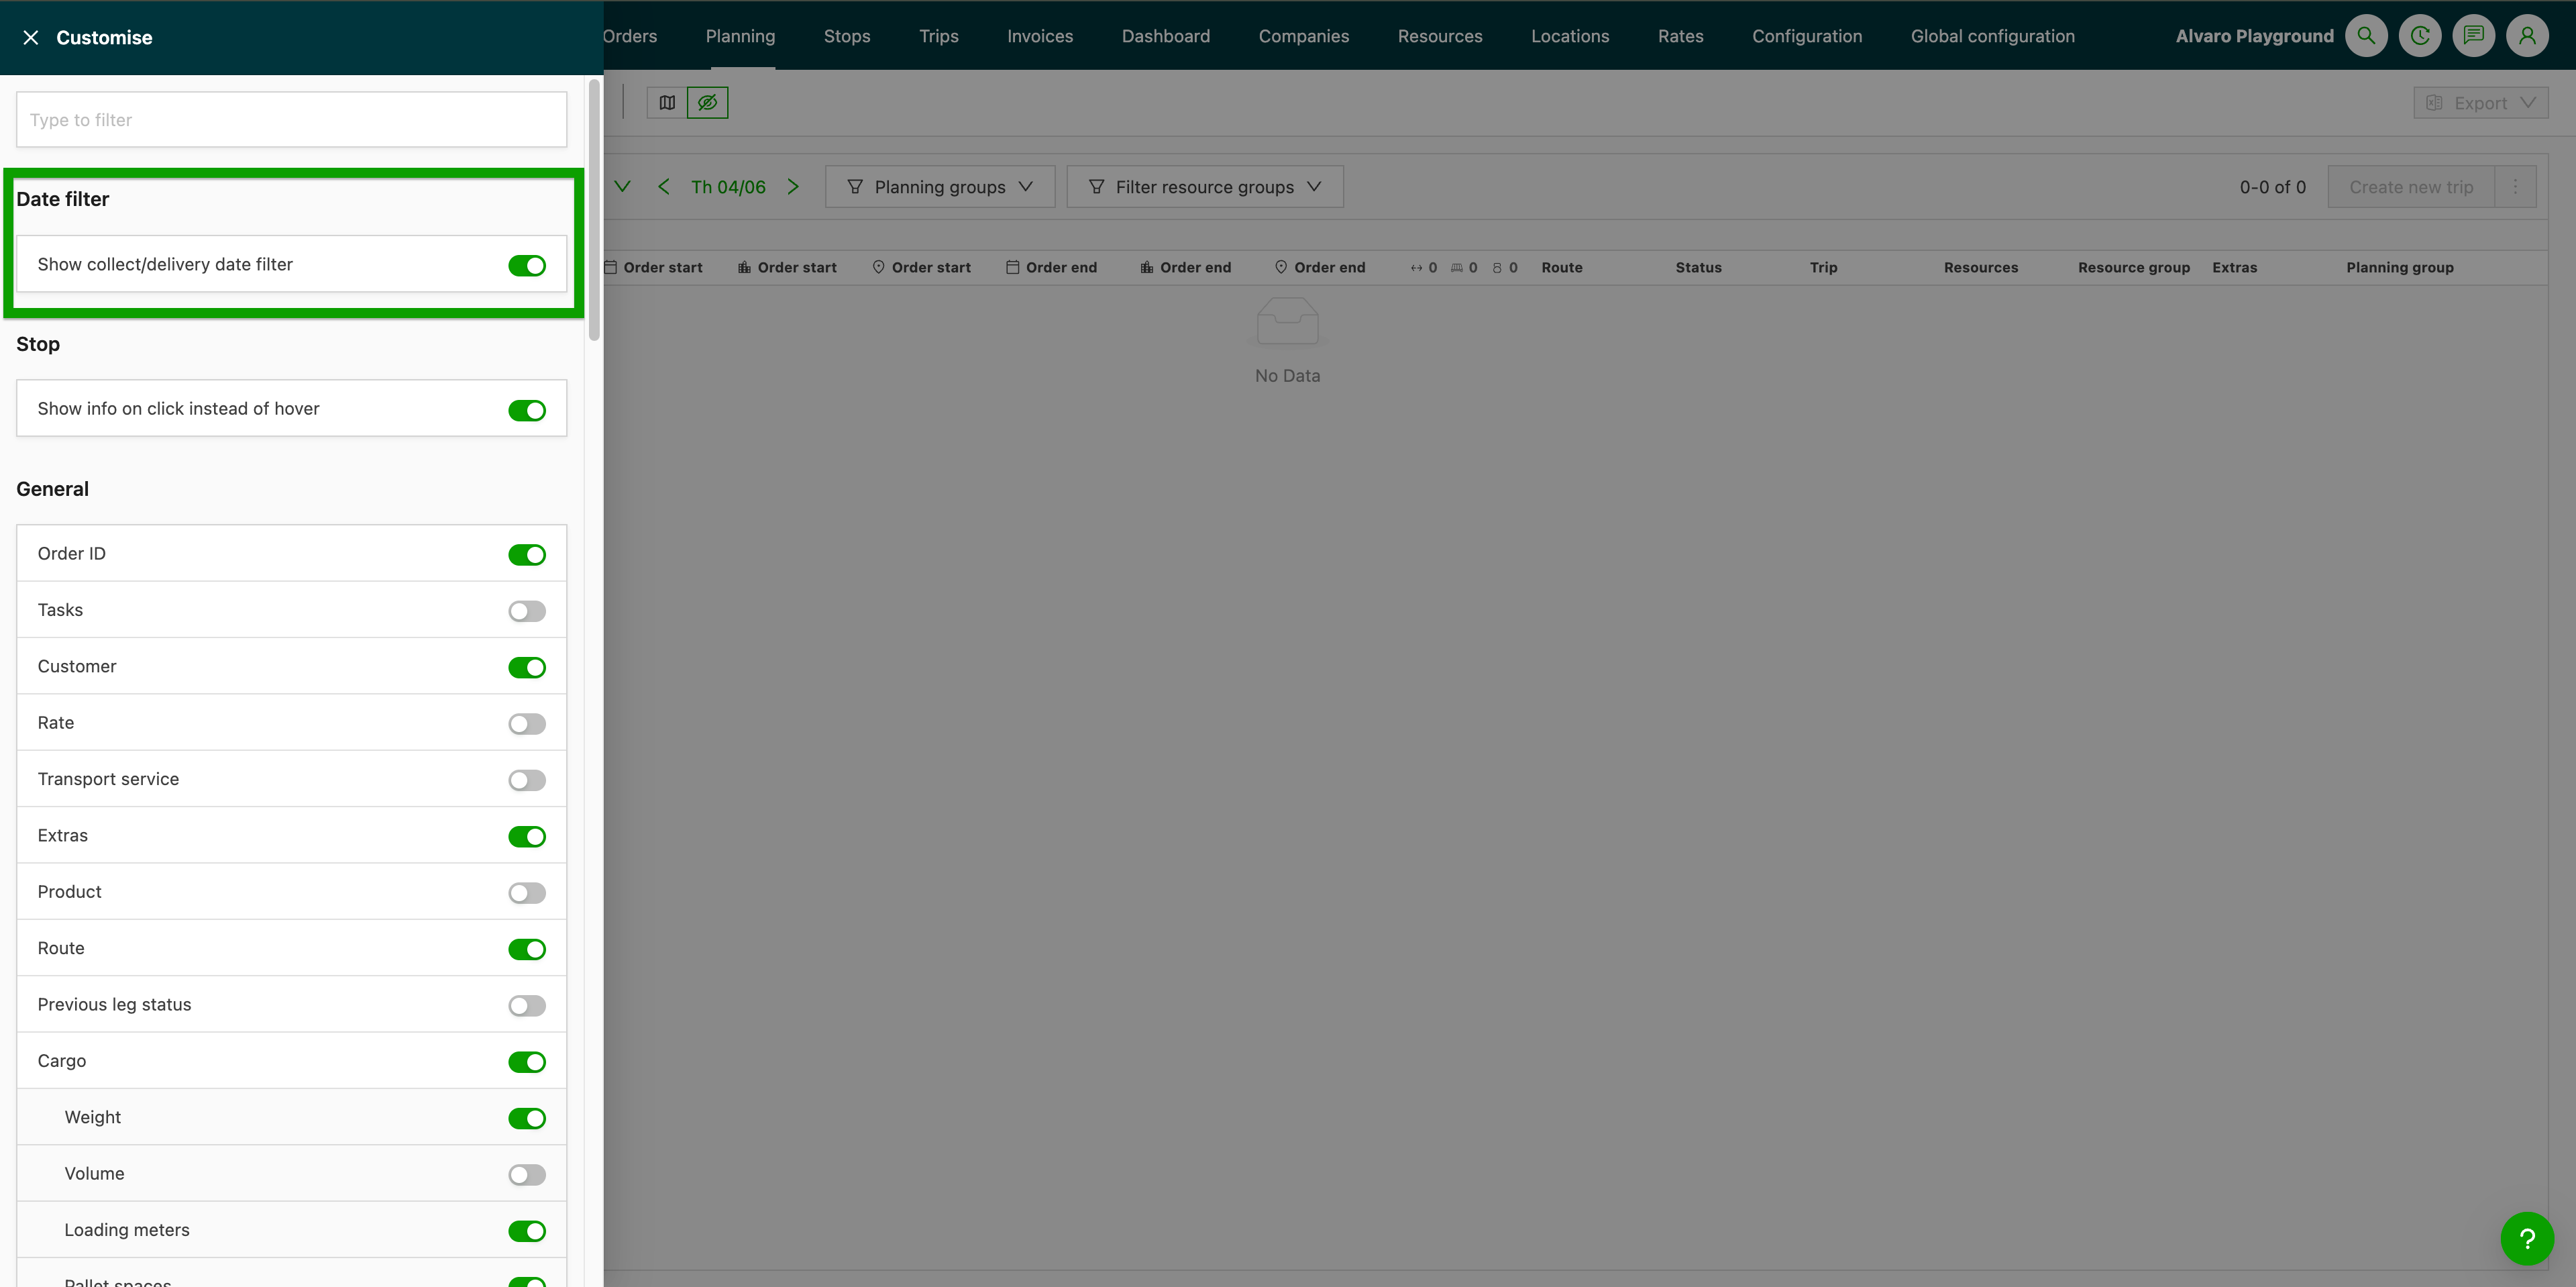
- Make sure to toggle on “Show pickup/delivery date filter” in the Customize section.
Steps:
-
Navigate to the Planning board.
-
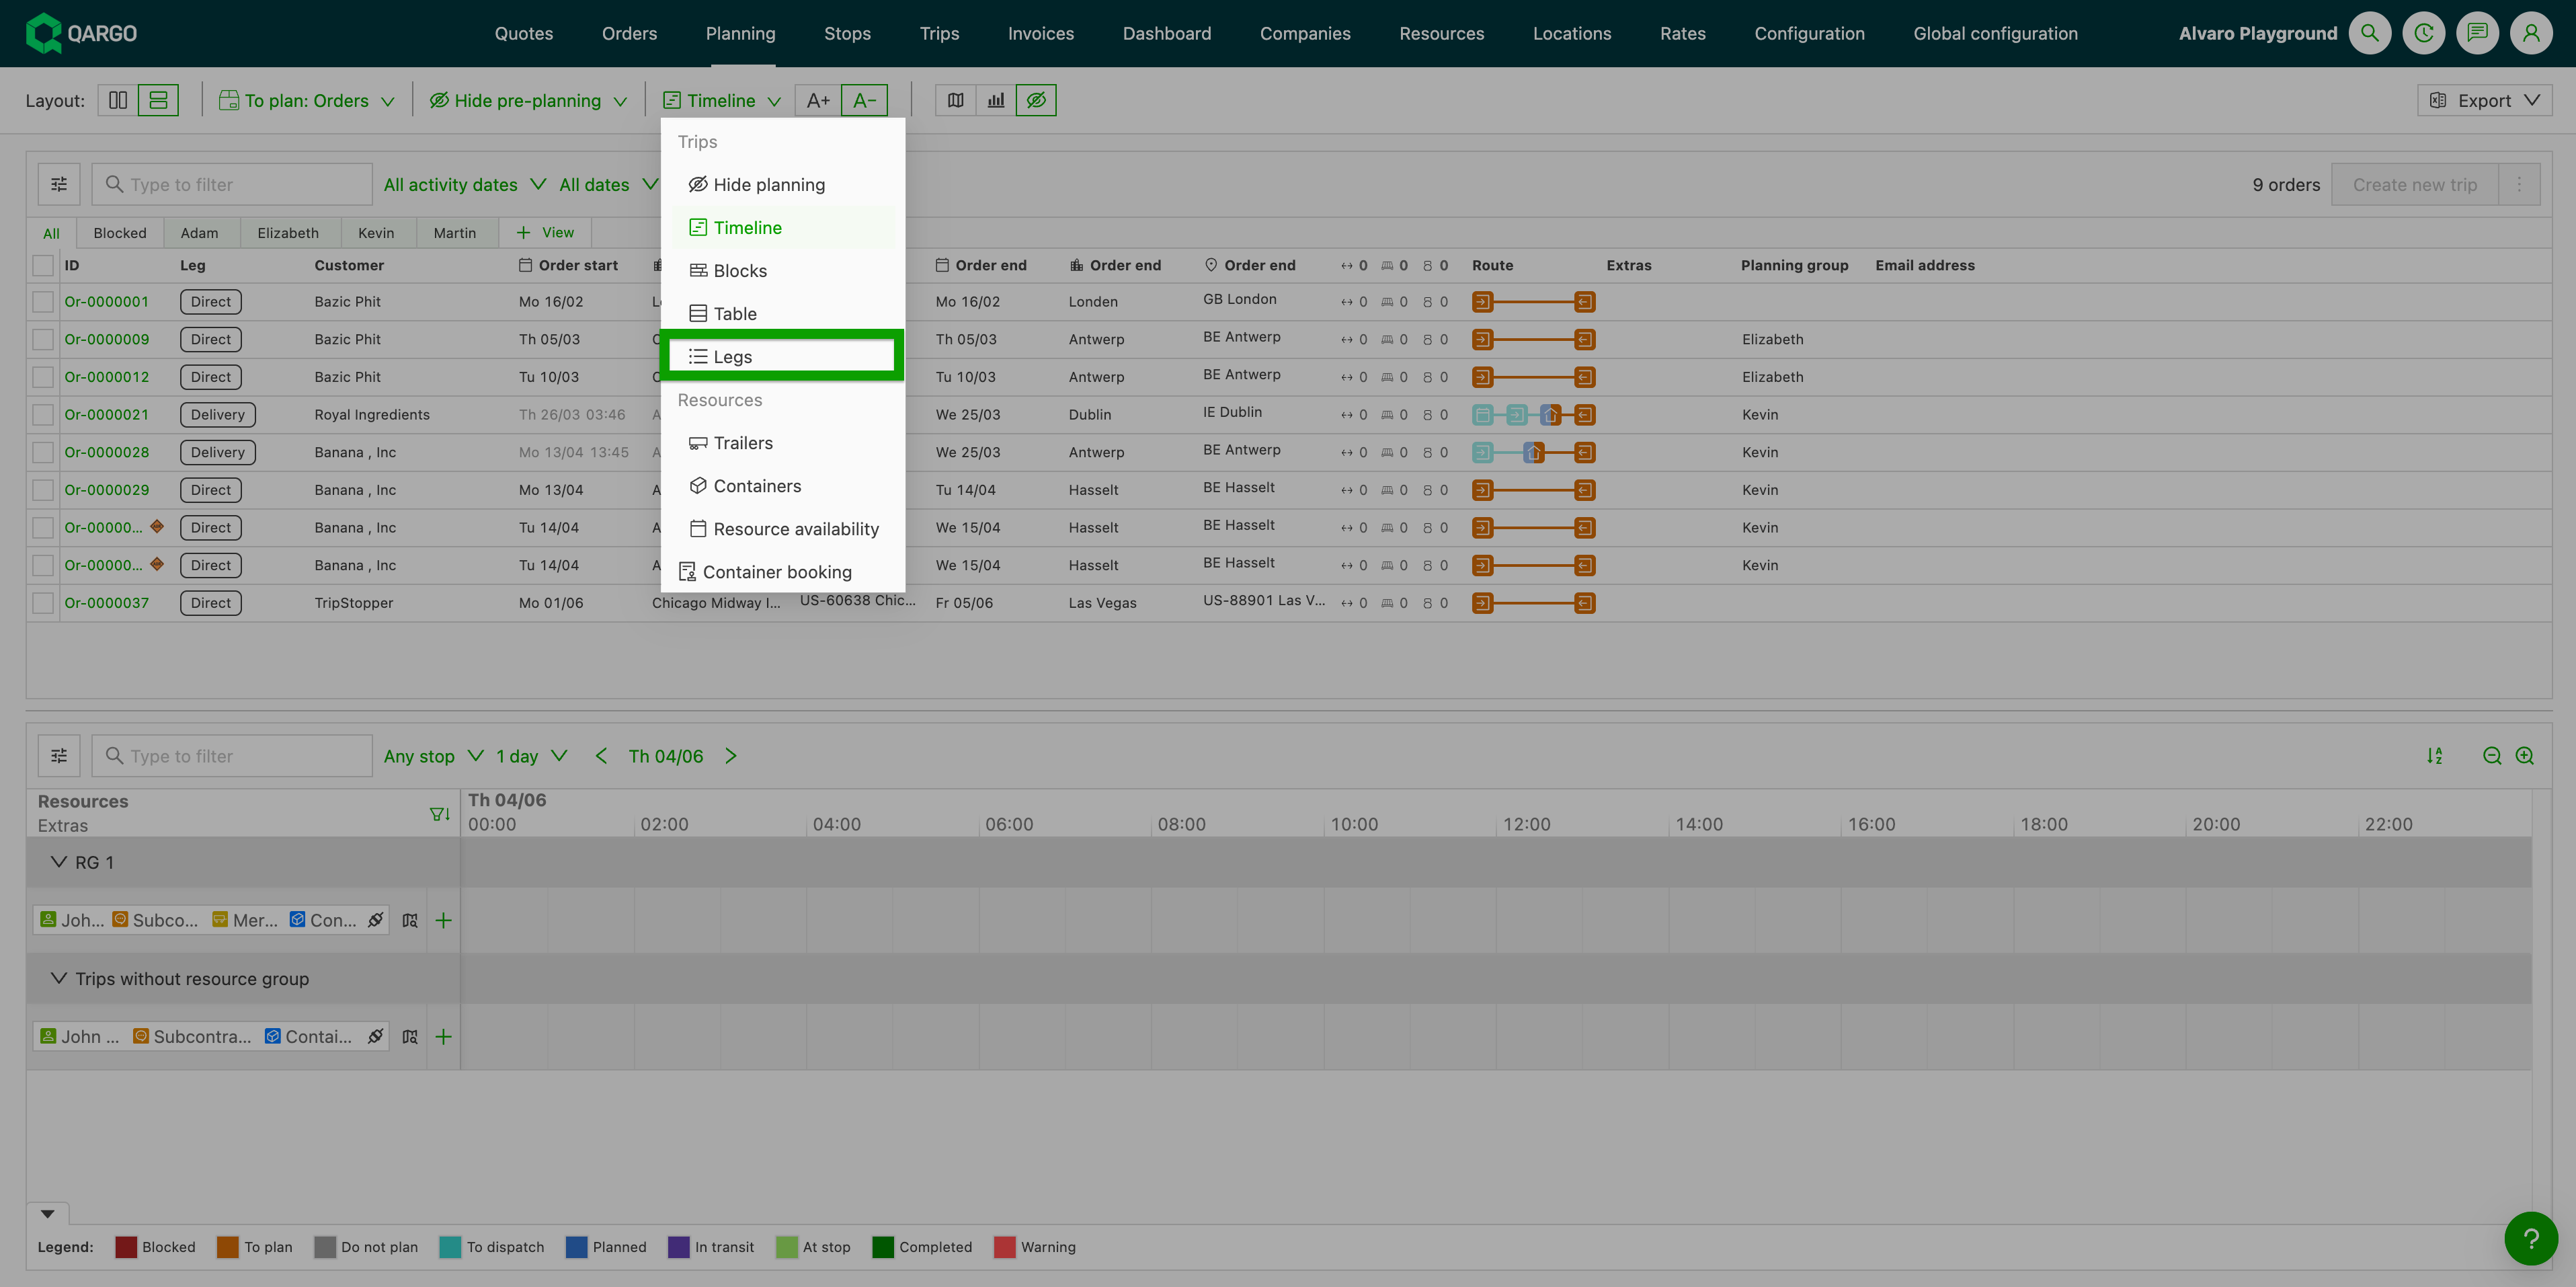
Open the Legs ▾ dropdown in the toolbar and select Legs.
-
Locate the date filter in the To Plan filter bar (defaults to Any stop).
-
Open the filter dropdown and select Any date between pickup & delivery.
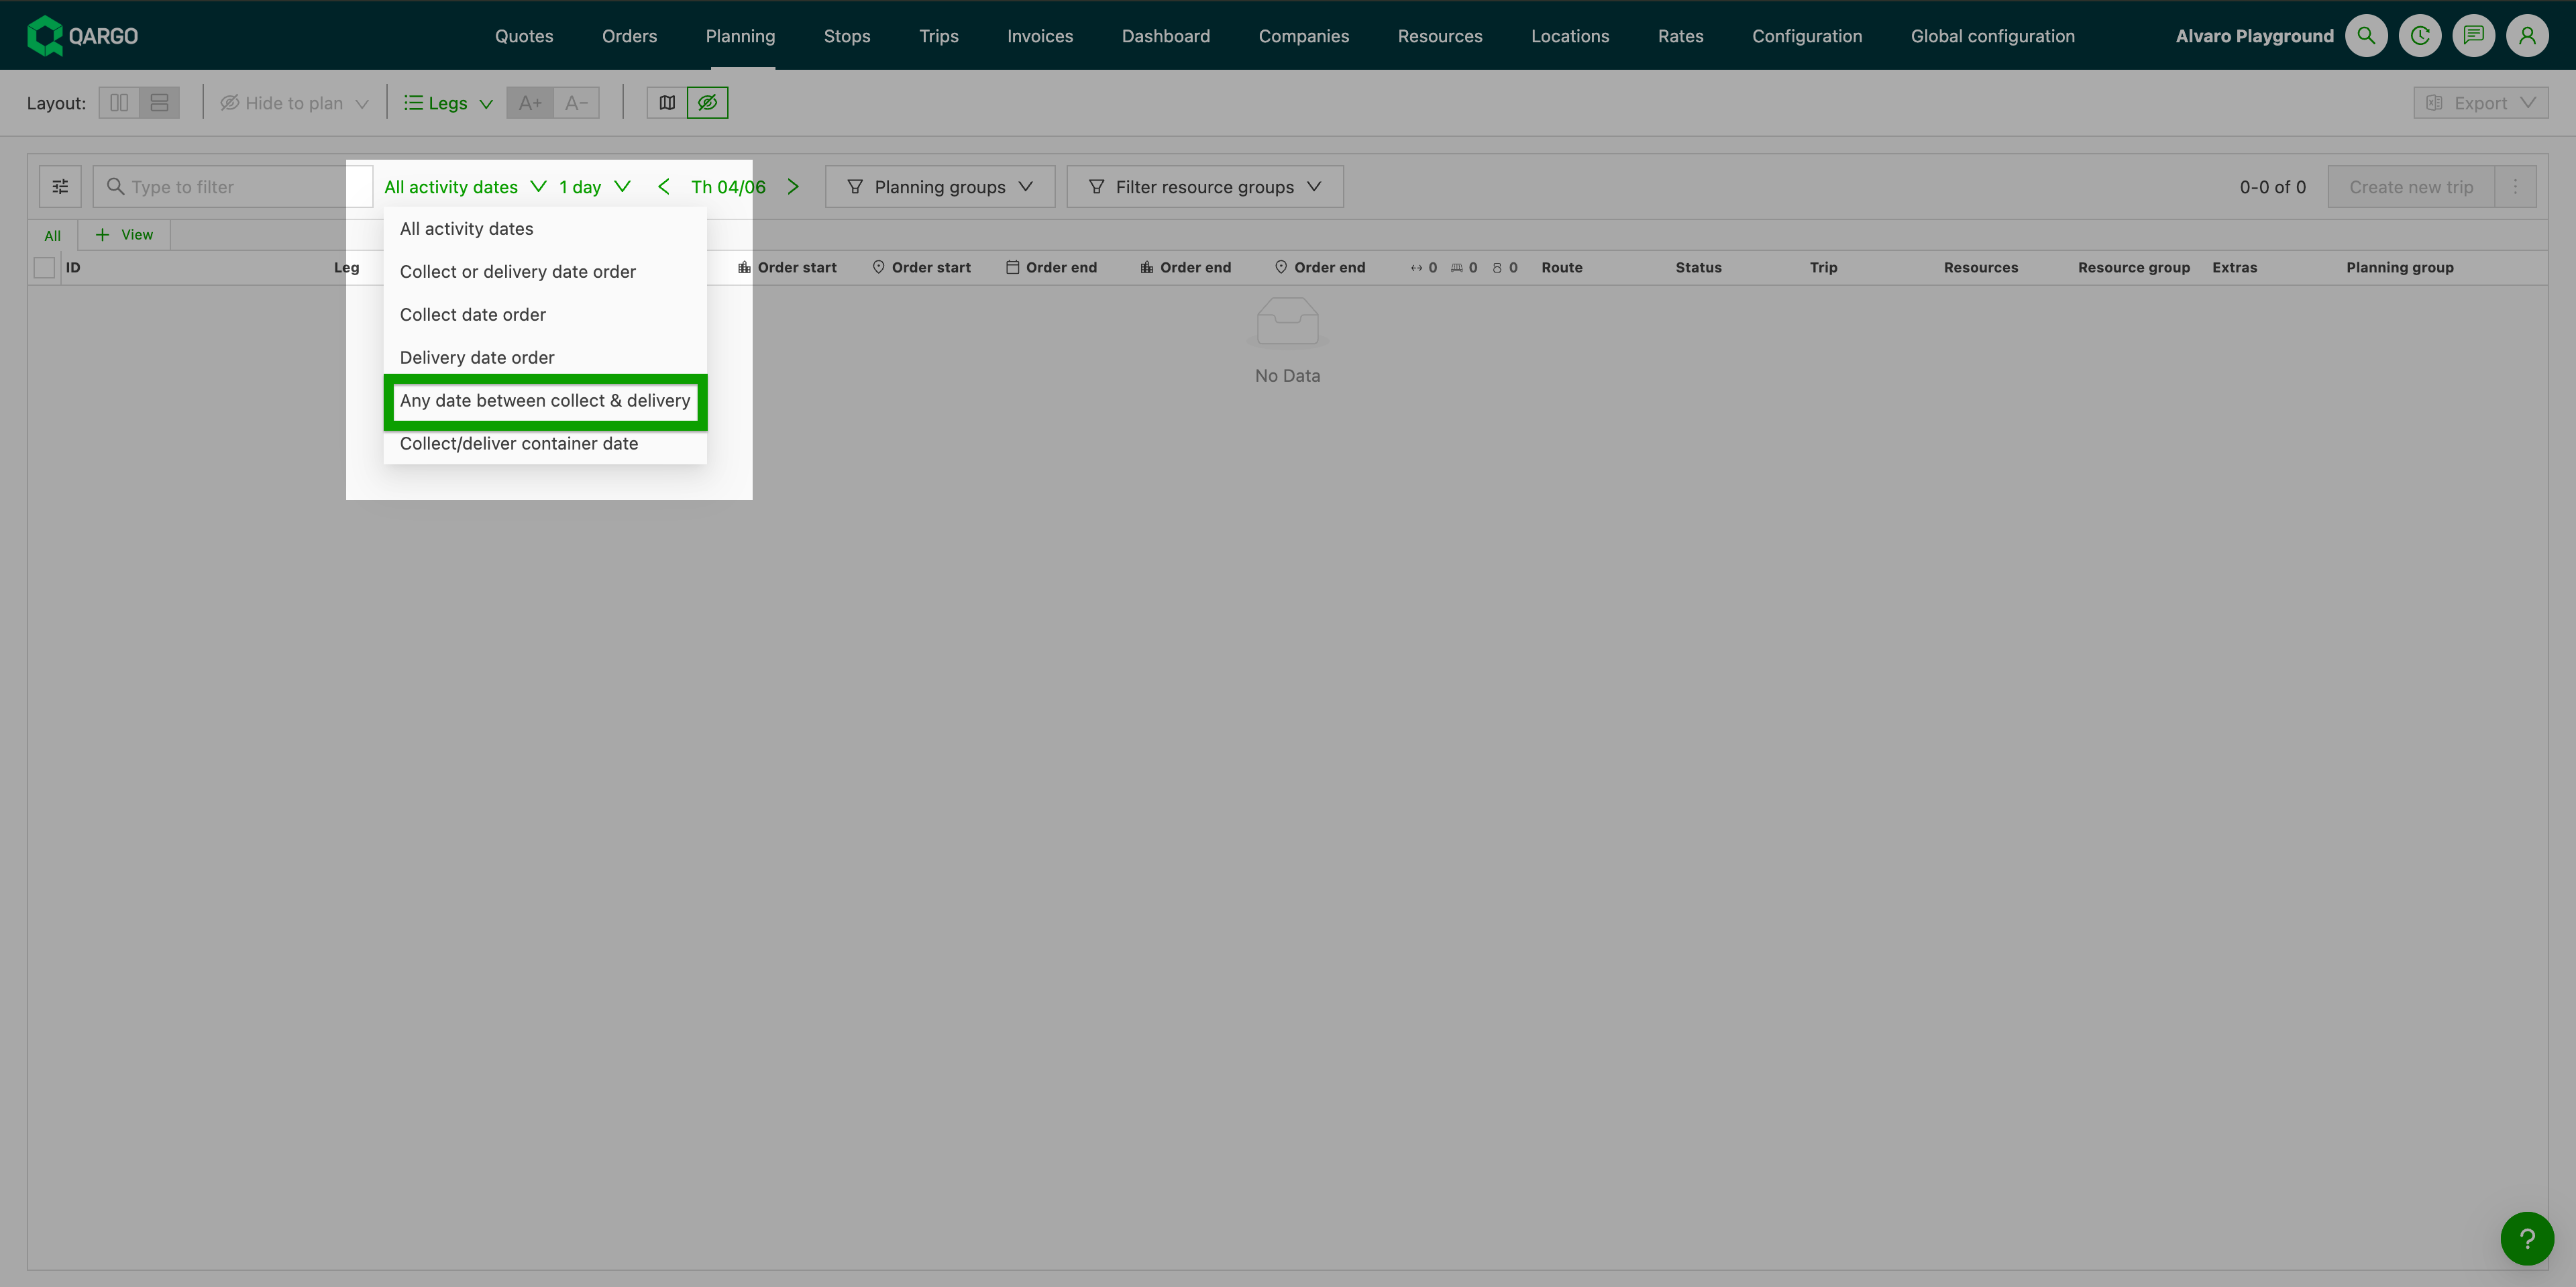
All orders with a to-plan stop dated anywhere within the selected range appear in the queue.
Filter by column headers
-
Hover over the column header to display a ‘funnel’ icon. Click it to show the available filter options.
-
Filter options vary depending on the specific column, but can include:
- Customer
- Leg
- Date and time options
Filter by location
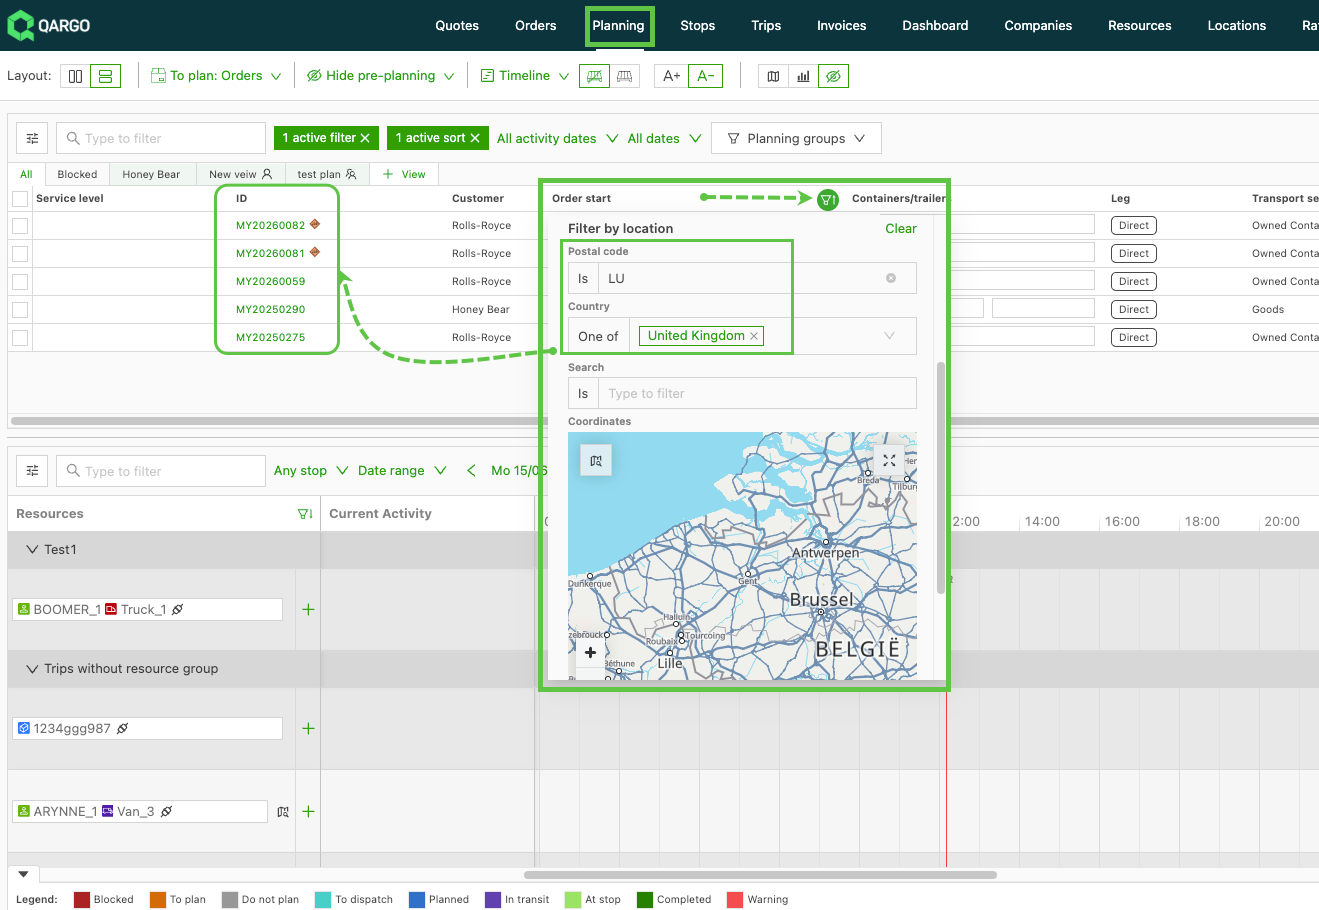
The location column filter shows its sub-fields (Search, Location, ZIP code, Country and Coordinates) simultaneously. This enables complex, multi-field searches with “AND” logic across all application screens, without the need to toggle between options. The enhanced functionality streamlines workflows and enables specific queries, such as filtering for both countries and ZIP codes at once.
Using the combined filter
- Open the filter on any location column.
- View all sections at once
- Combine sections as needed, for example Country = FR together with ZIP code starts with 25, to return only rows matching all conditions.
- Apply the filter; it also combines with filters set on other columns.
Saved views
- Existing saved views migrate automatically. A view that filtered on, for example, ZIP code keeps working and shows that value in its own section.
- No cleanup is required after migration.
Planning & pre-planning views
-
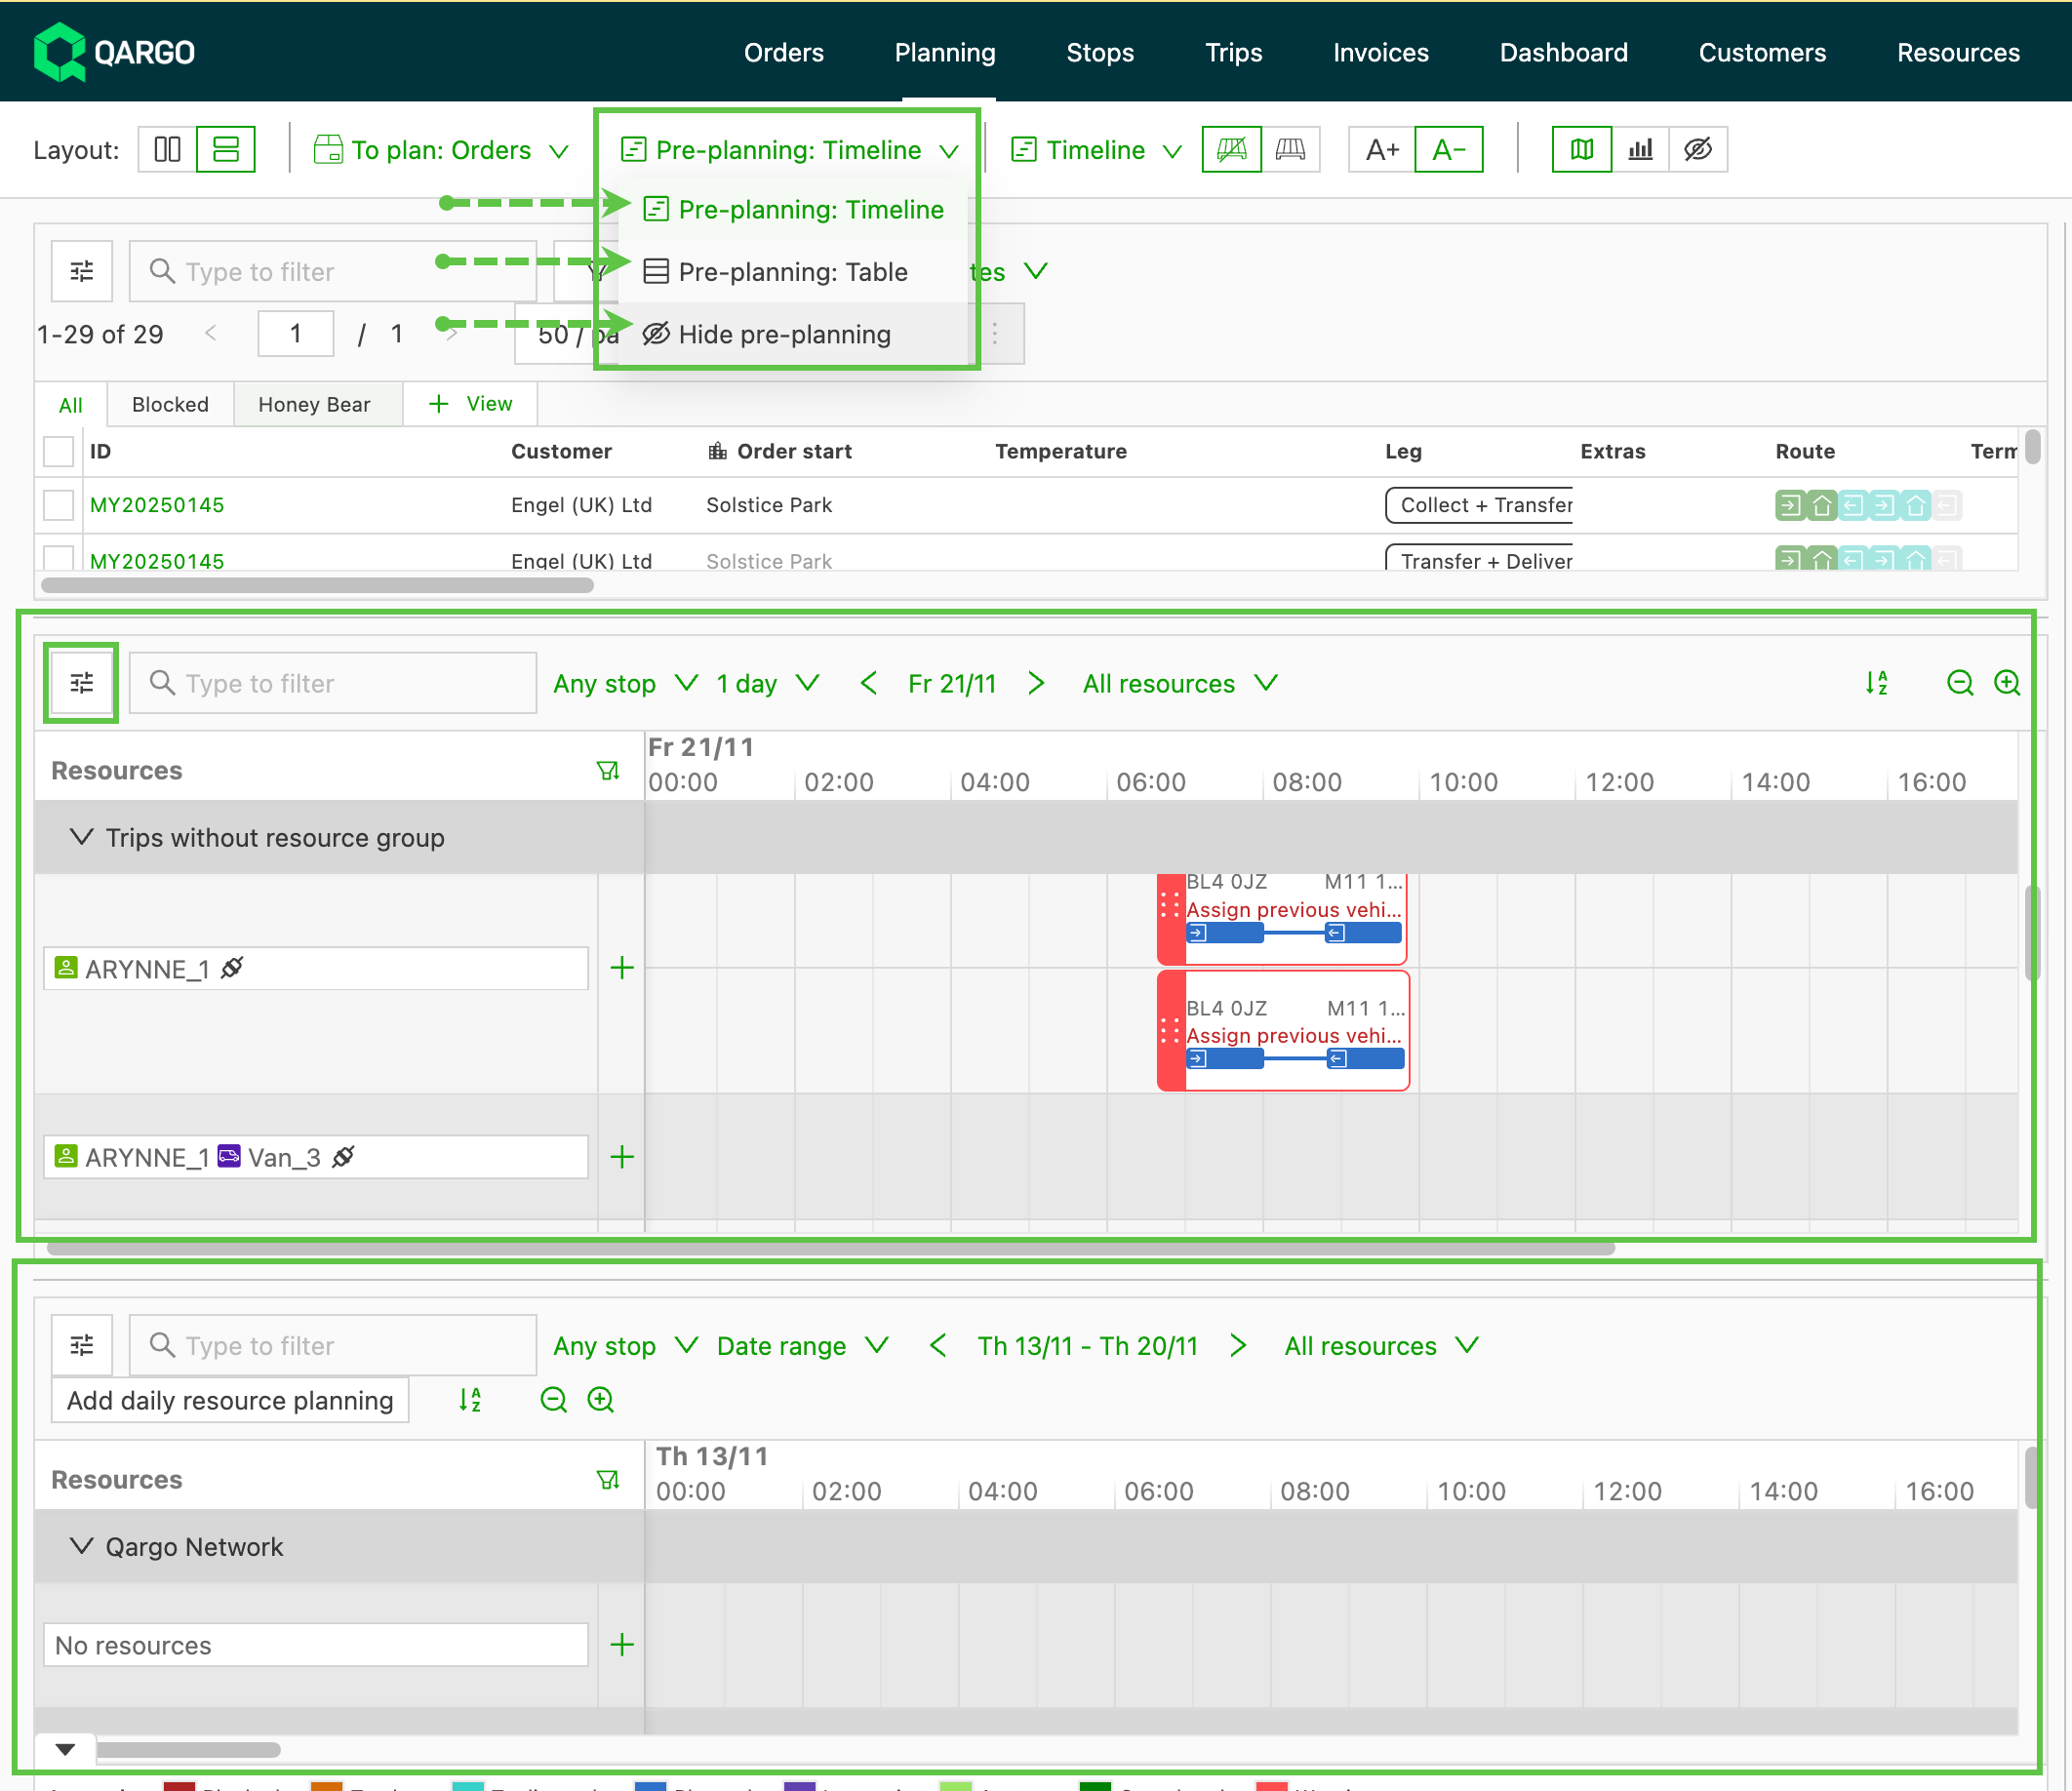
Separate views are available for the planning and pre-planning tables.
- Pre-planning is matched to the plan board, i.e., if Timeline is selected, it is shown as the default.
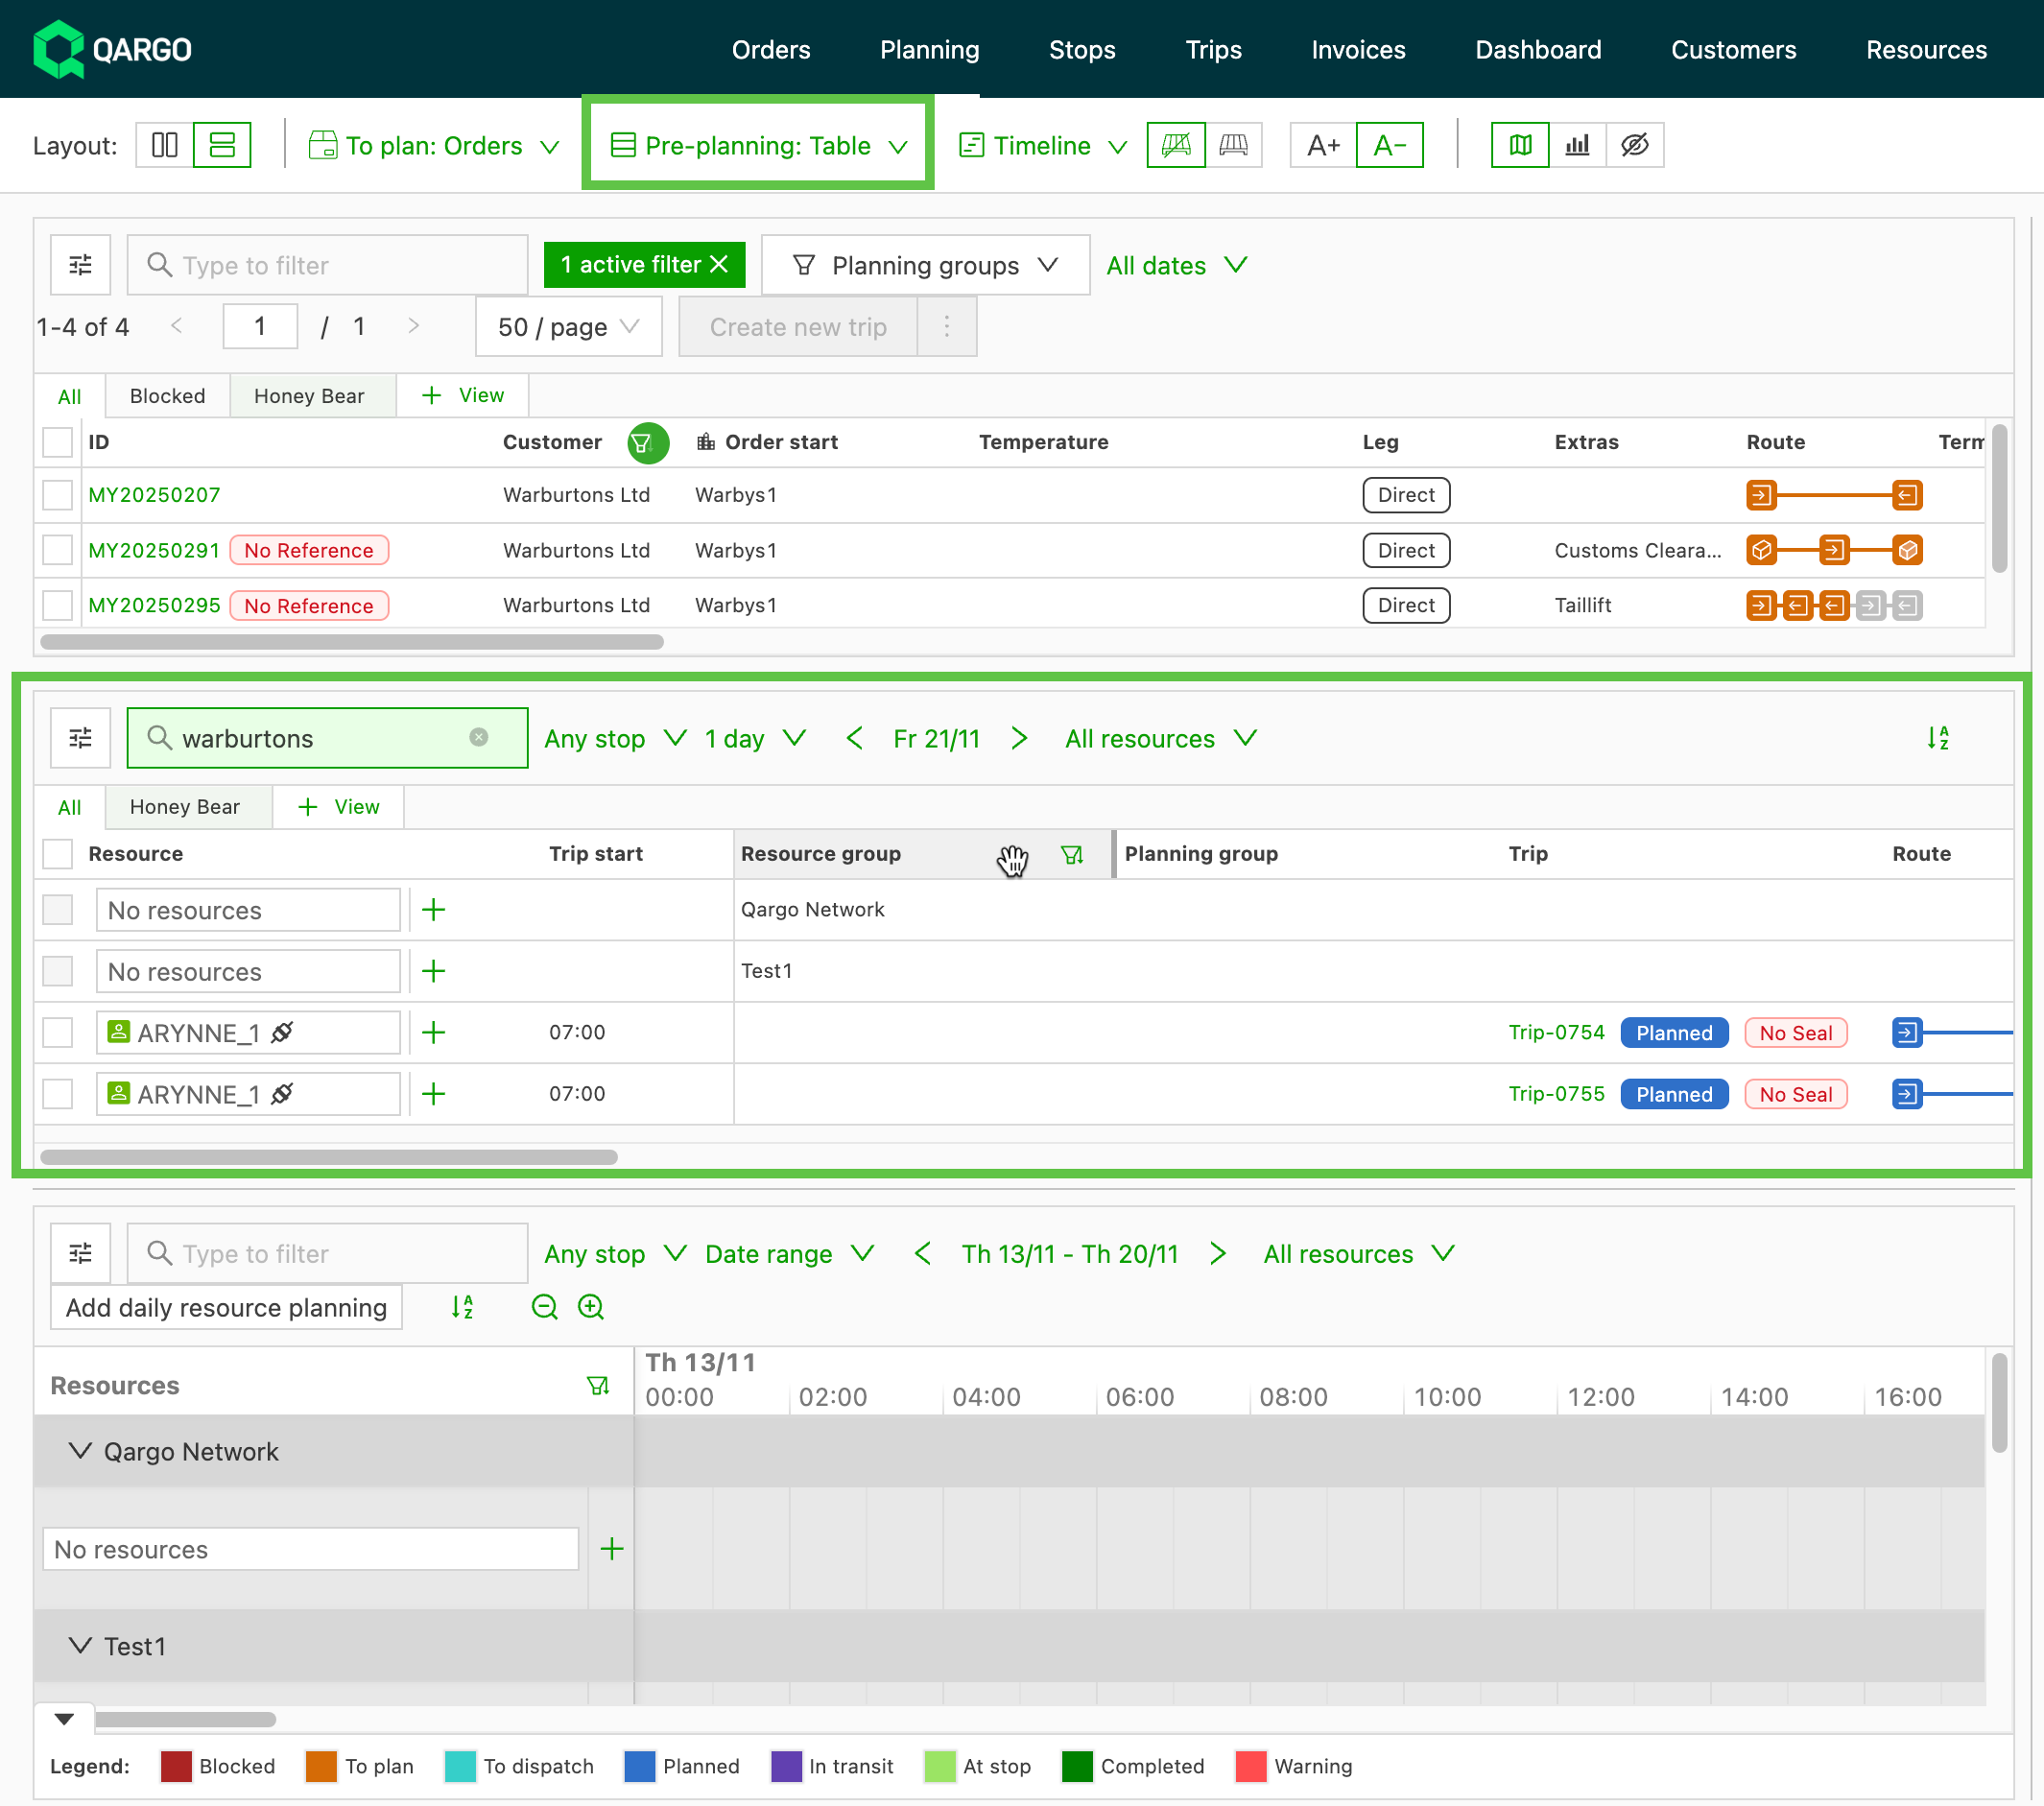
- Manually update to use the Table for a simple row view
-
Use the ‘+View’ tab to create a specific view in To Plan (orders only)
- Column headers can be filtered to create the subset of data to display in the custom view.
- Use the search filter to look for a specific customer to plan
Filter by resource availability
The Available? filter shows which resources or resource combinations can still take work in the selected date range. It looks at logged unavailabilities and planned loads, and it only counts the time from now onward.
A truck that is fully planned for the rest of the day no longer shows as available.
The filter is in the resource filter menu on these views:
- Loads: Timeline (planning board)
- Loads: Blocks (planning board)
- To plan: Resources - Timeline
- Pre-planning
Apply the Available? filter
-
Open the planning board and set the date range with the date selector.
-
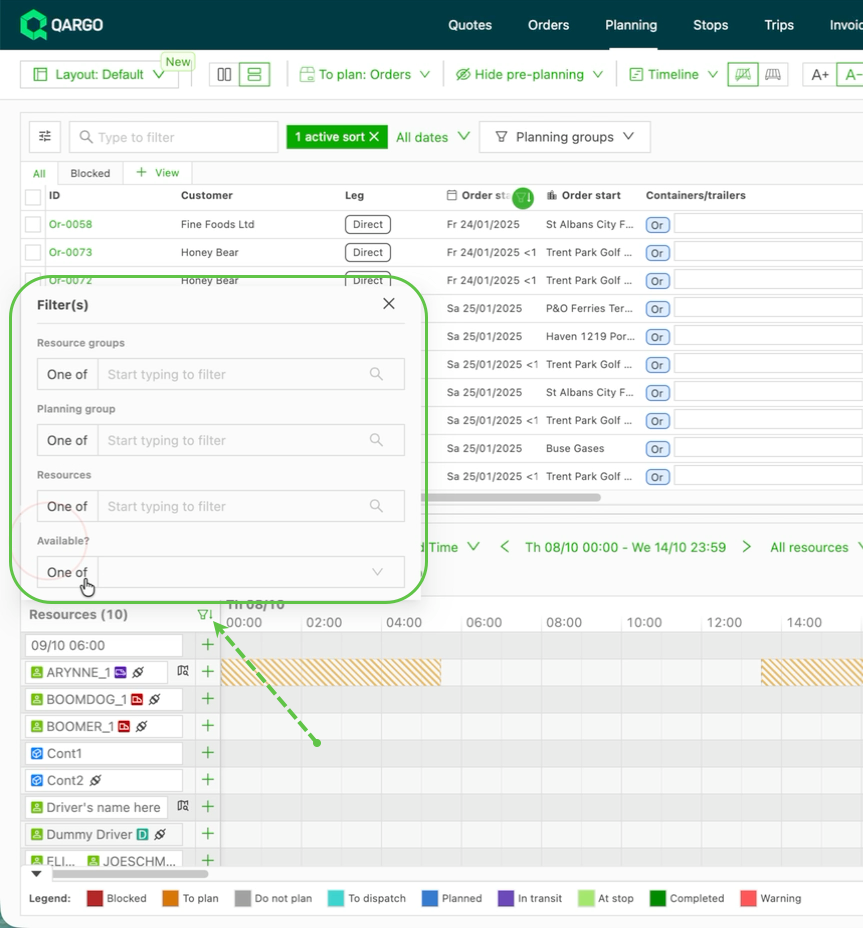
Click Filter(s) in the Resources column header.
-
Select Available? and choose an operator: Is, Is not, One of or Not one of.
-
Select one or more options:
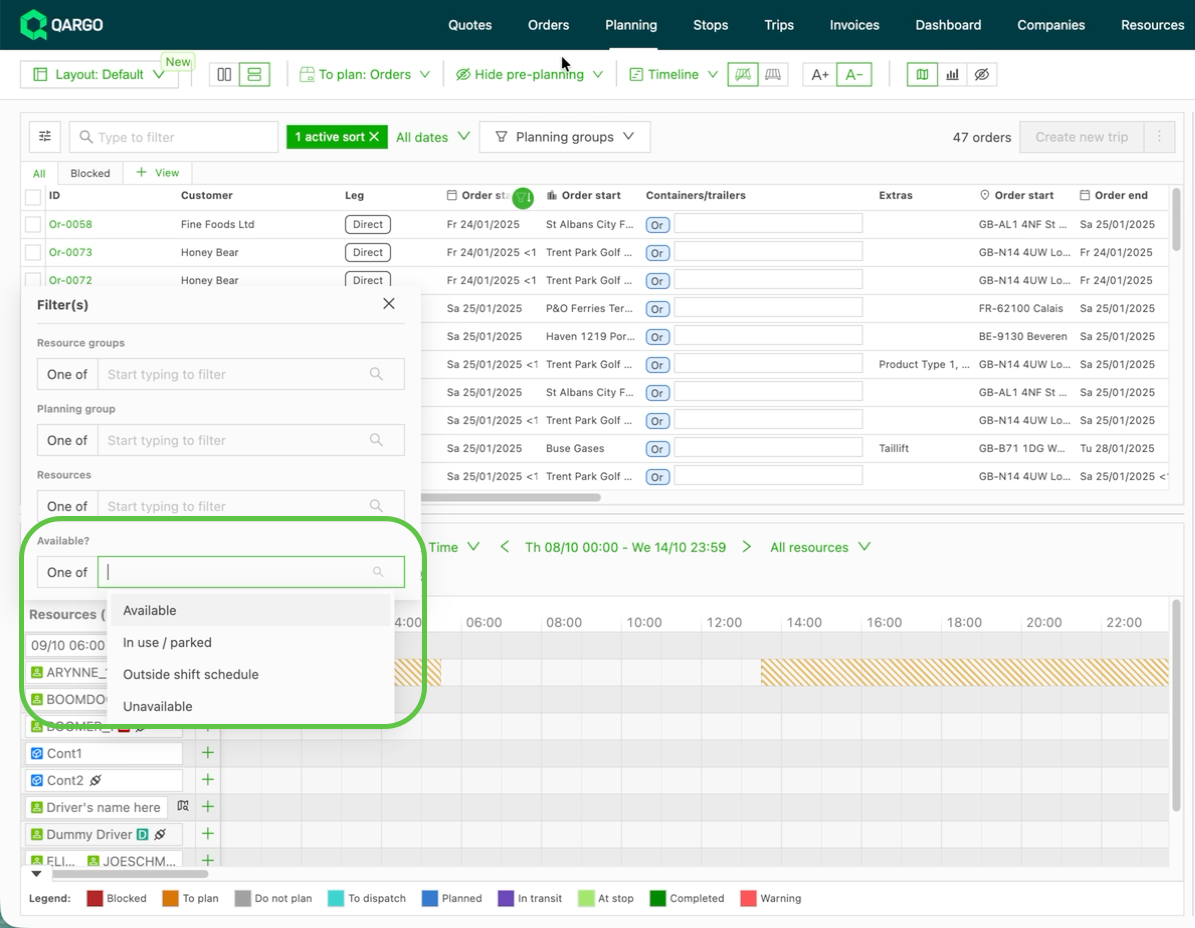
- Available - the resource has some free time left in the range
- Outside shift schedule - every day in the range is a rest day in the resource’s shift schedule
- Unavailable - the remaining range is fully covered, and at least one logged unavailability is part of it
- In use / parked - the remaining range is fully covered by planned loads only, or the resource is parked
How availability is calculated
- Only time after the red line counts. The red line on the board is the current time. When the date range includes today, anything before the red line is ignored. Earlier days in the range are ignored too.
- Any free time counts. A resource stays Available as long as any time between the red line and the end of the range is unplanned, even a short gap between two loads, on any day in the range.
- Loads and unavailabilities that cross the red line still block. A load that started this morning and runs until 6:00 PM blocks the resource until 6:00 PM.
- Planned, in-progress and completed loads block.
- Canceled loads never block.
- Trailers are freed at their drop stop. A trailer dropped mid-load becomes available after that stop, while the truck stays blocked until its load ends.
- The filter updates every minute. As the red line moves, a resource whose load is about to start drops out of Available without refreshing the page.
- A date range fully in the past returns no available resources.
Saved views and older links
Saved views and shared links that used the previous Available Yes / No filter keep working and return the same resources:
| Old filter | New filter |
|---|---|
| Available = Yes | Available? One of Available, Outside shift schedule |
| Available = No | Available? One of Unavailable, In use / parked |
| Limitation | Details |
|---|---|
| Reservations do not block | A reserved resource with no loads or unavailabilities still shows as Available. |
| Shift schedules never make a resource Unavailable | A resource whose shift schedule marks every day in the range as a rest day shows as Outside shift schedule, not Available. |
| Start load date filter | With the Planning date filter set to Start load, a load that started before the selected range does not block the resource. The default Any stop setting is not affected. |
| Single row count | The header shows one total of resource rows, not a count per resource type. A resource listed in two planning groups counts twice. |
| Absence type not distinguished | All unavailability types (vacation, sickness, maintenance, etc.) are treated the same. Notes are not treated as unavailabilities. |
Troubleshooting
| Issue | Explanation / Resolution |
|---|---|
| A busy truck still shows as Available | Check for a gap between loads after the red line. Any free time, however short, keeps the resource Available. A reservation also does not block. |
| A truck with a canceled load shows as Available | Expected. Canceled loads never block a resource. |
| Available? returns Resources (0) | Check the date range. A range fully in the past returns no available resources. |
| A resource is missing from Available but has no loads | Check its shift schedule. If every day in the range is a rest day, it shows under Outside shift schedule. |
| An old saved view shows different filter options | Expected. Available Yes / No was converted to Available? with the matching options and returns the same resources. |
Filter by custom fields in To Plan Resources
Transport companies managing large fleets can now bring custom resource fields directly into the To Plan Resources panel and filter the resource list by those fields.
Custom field columns and filtering are available in the following views:
- To Plan Resources table
- Timeline view (custom field values visible below the resource name)
- Resource Availability view (custom field values visible below the resource name)
Show custom field columns in To Plan Resources
Configure custom field columns
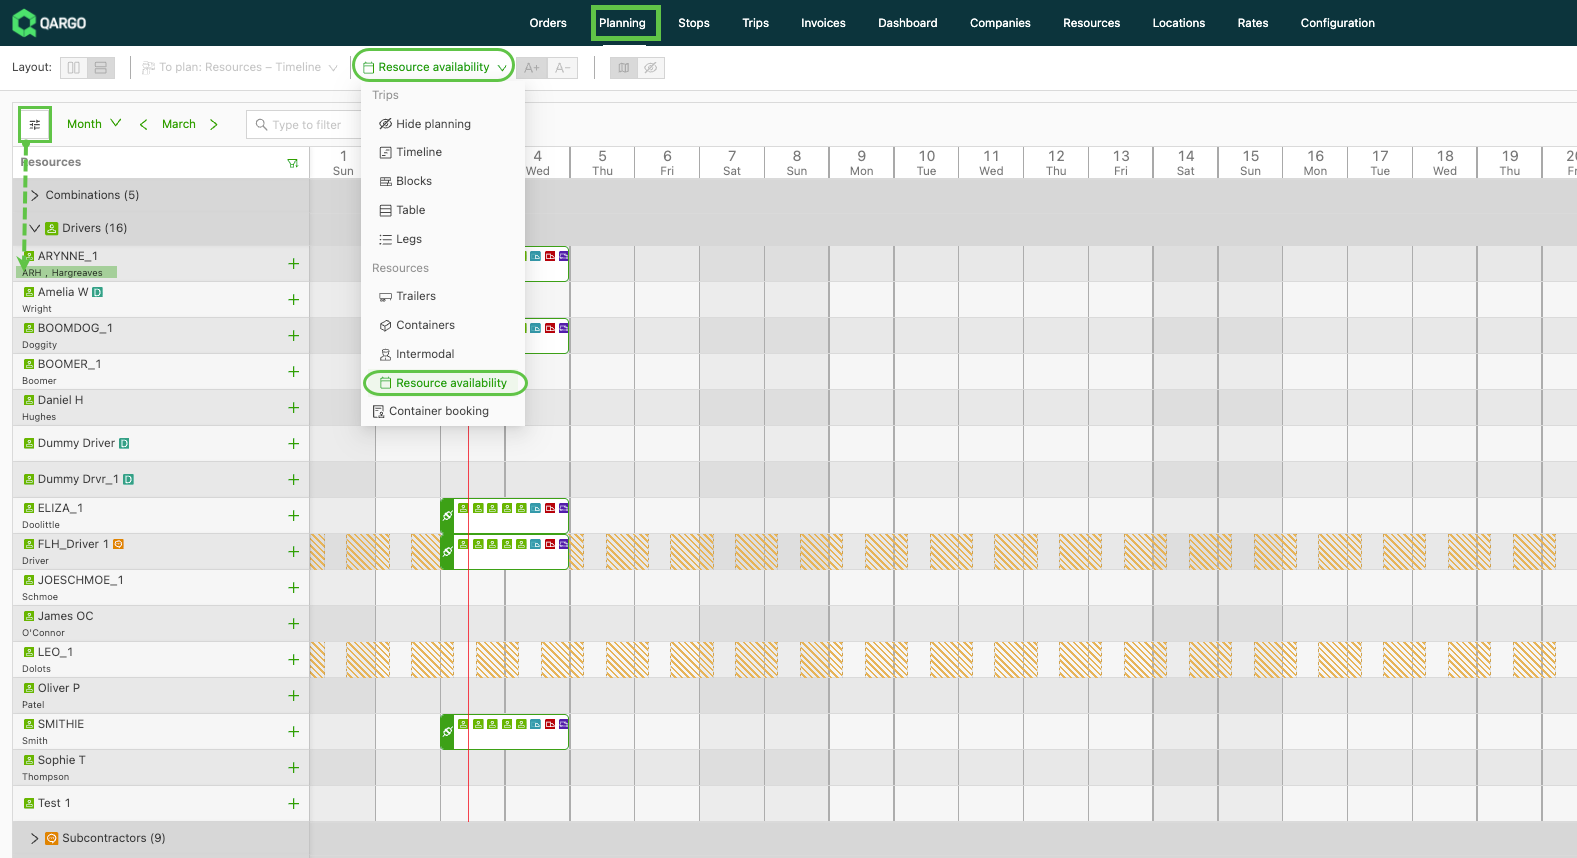
- Navigate to the planning board and open the To Plan Resources panel.
- Click the Customize button within the To Plan Resources section.
- Toggle on the custom fields to display as columns. Only fields that have been configured on the resource type appear here.
- Close the Customize panel. The selected columns now appear in the resource table.
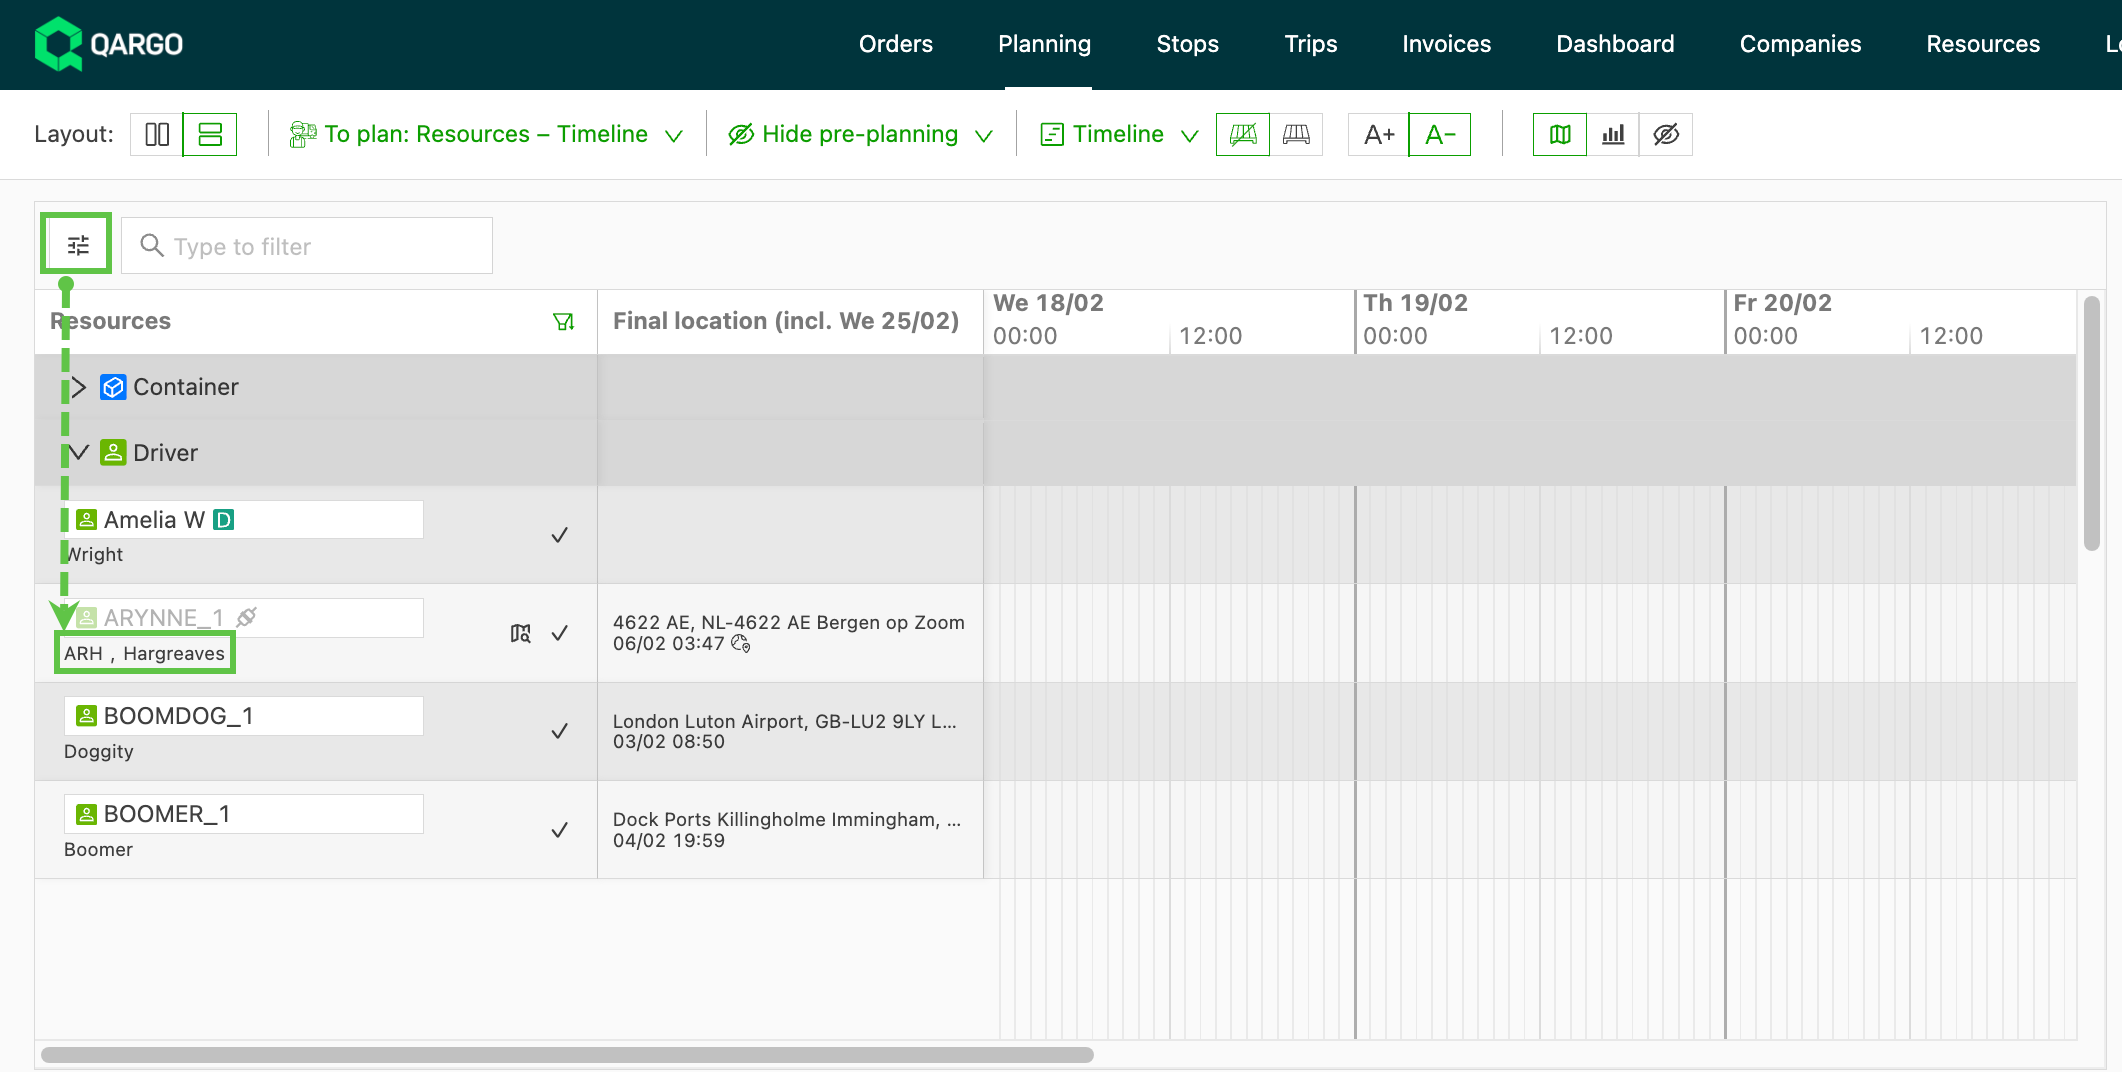
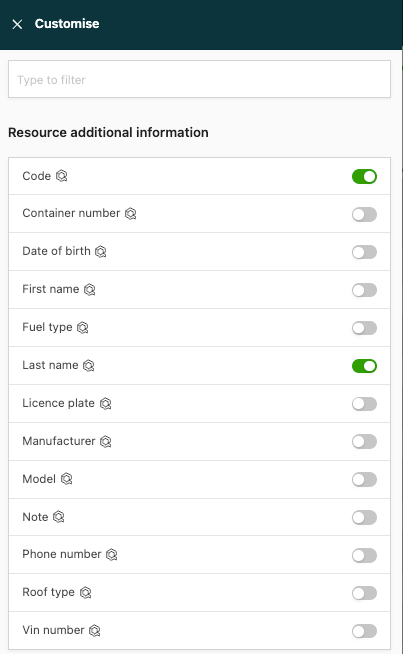
-
Custom field values are also displayed below the resource name in:
- Timeline view
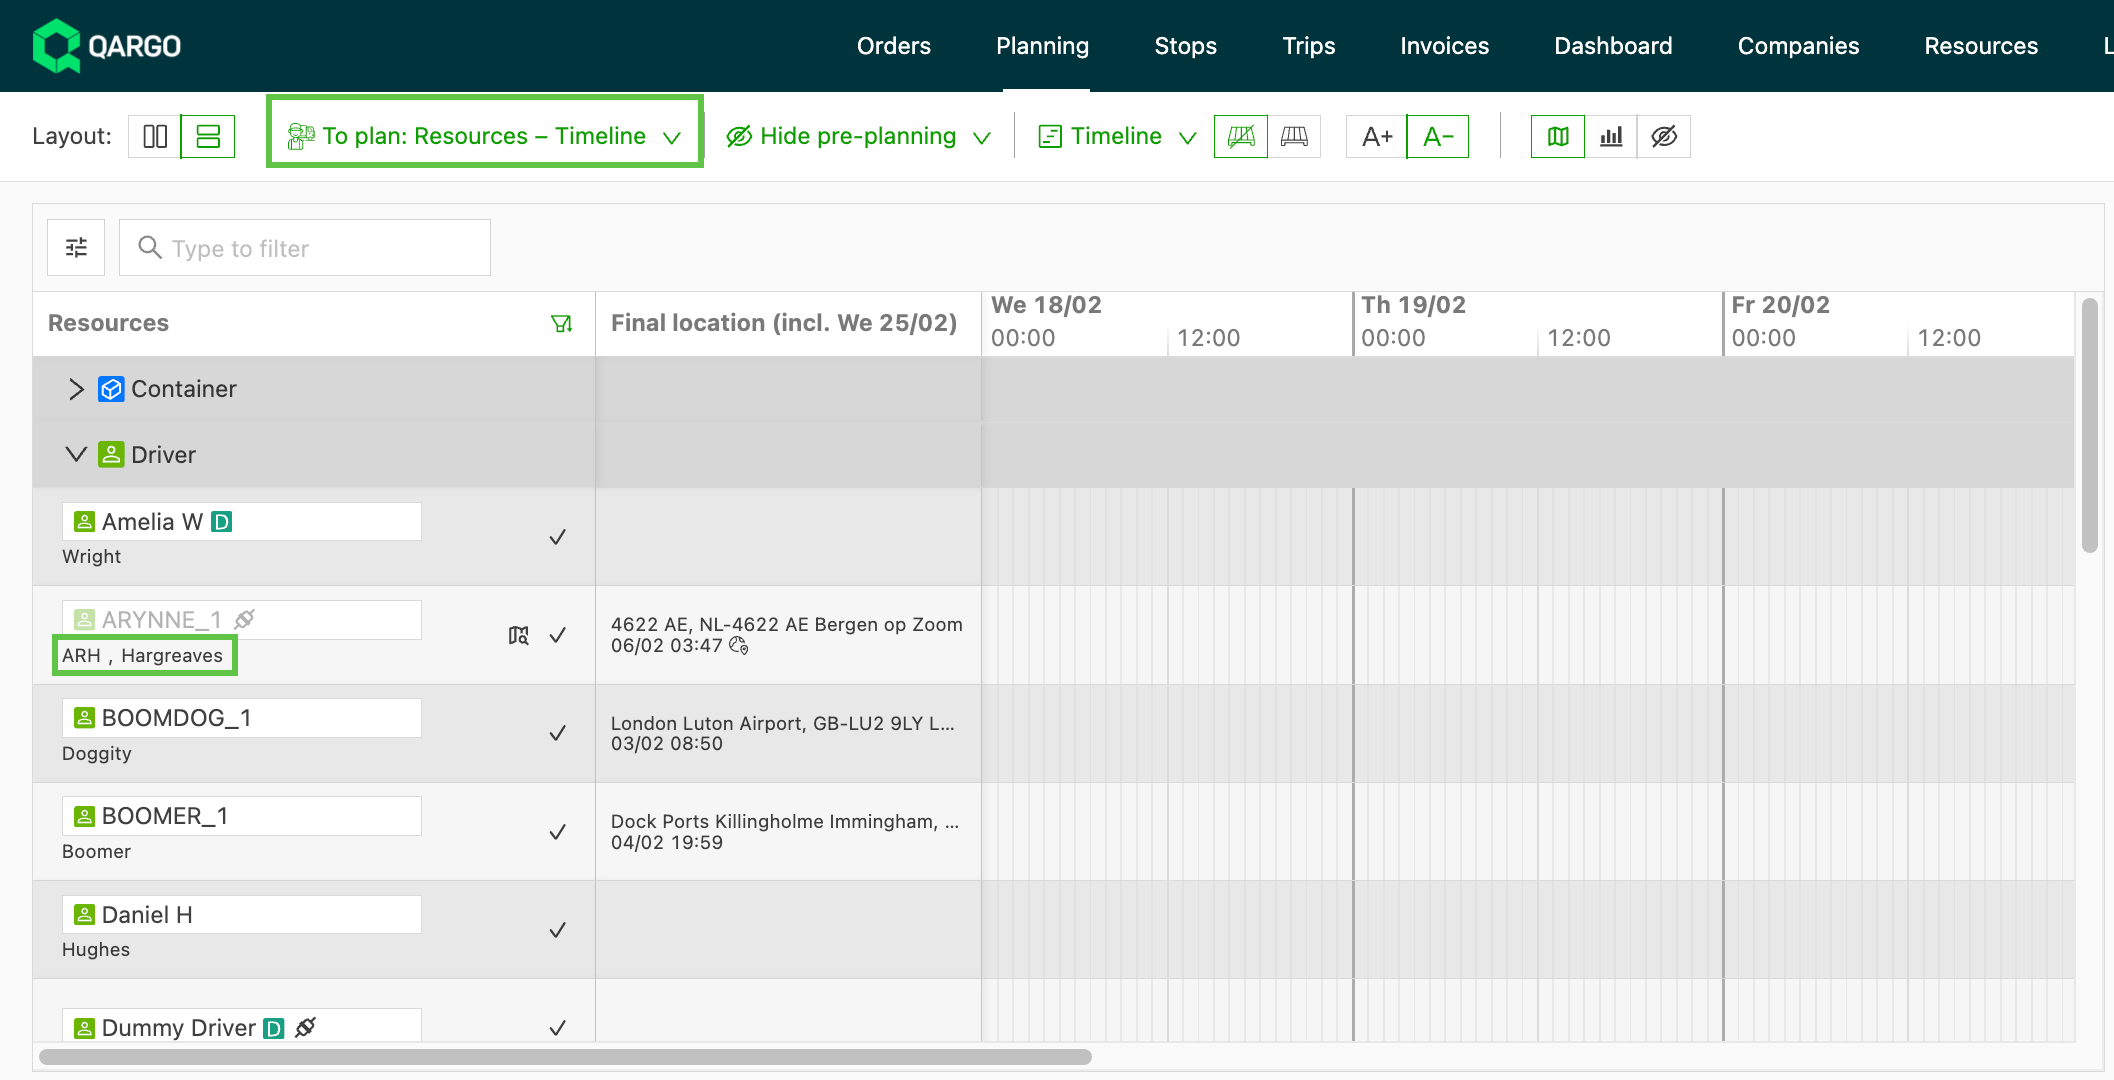
- Resource Availability views, providing at-a-glance context without opening the resource record.
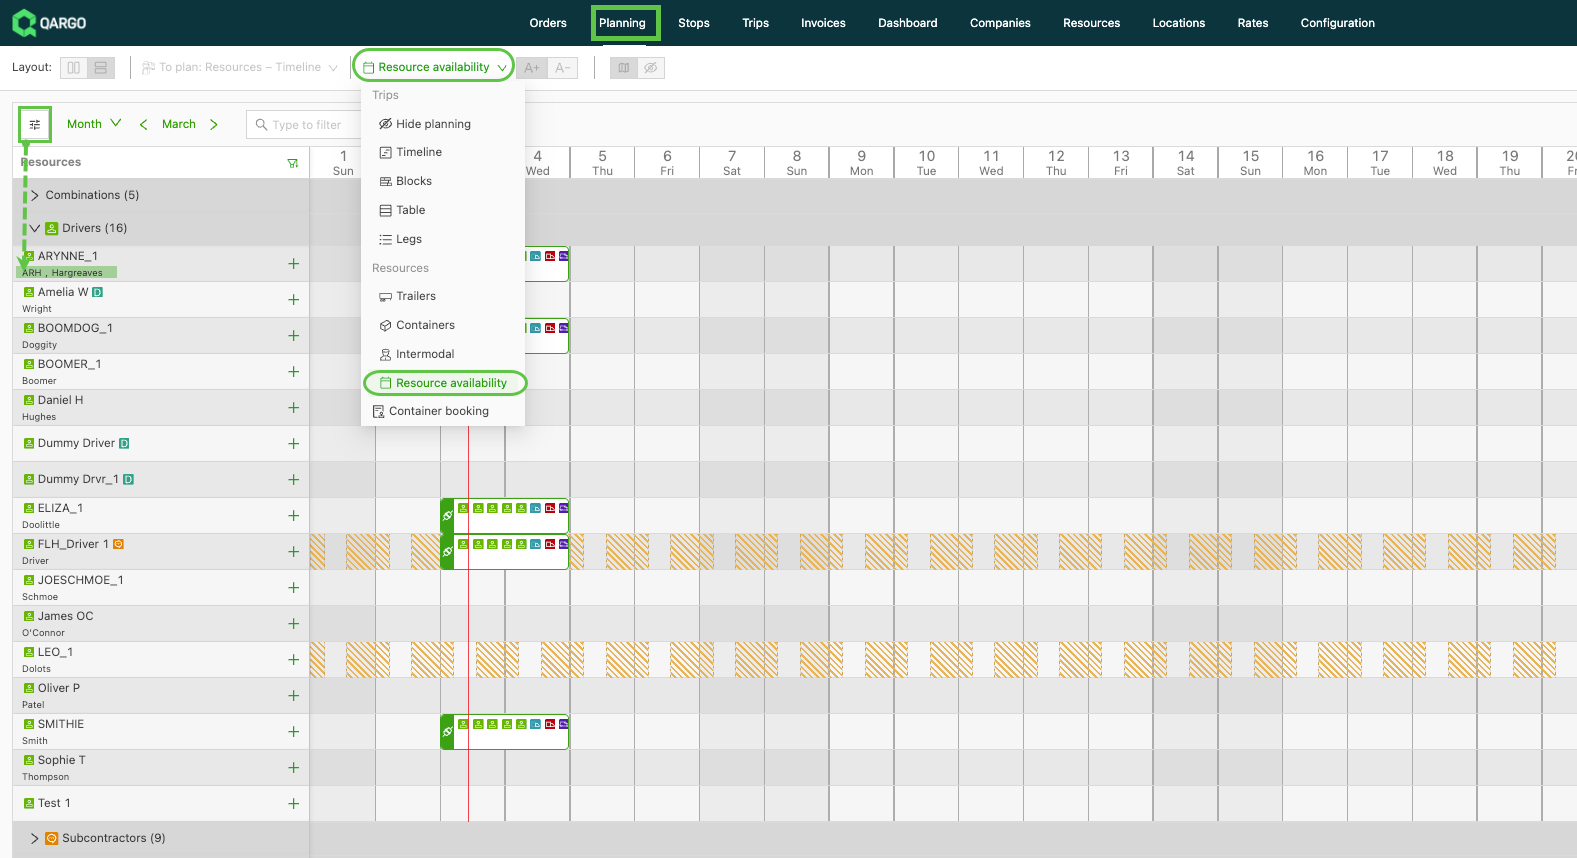
Filter by custom field values
Once one or more custom field columns are visible, those columns can be used to filter the resource list.
Filter resources by a custom field
- Hover over the custom field column header in the To Plan Resources table. A filter icon appears.
- Click the filter icon to open the filter options for that column.
- Select the value(s) to filter by. The resource list updates immediately to show only matching resources.
- Repeat for additional columns to apply multiple filters simultaneously.
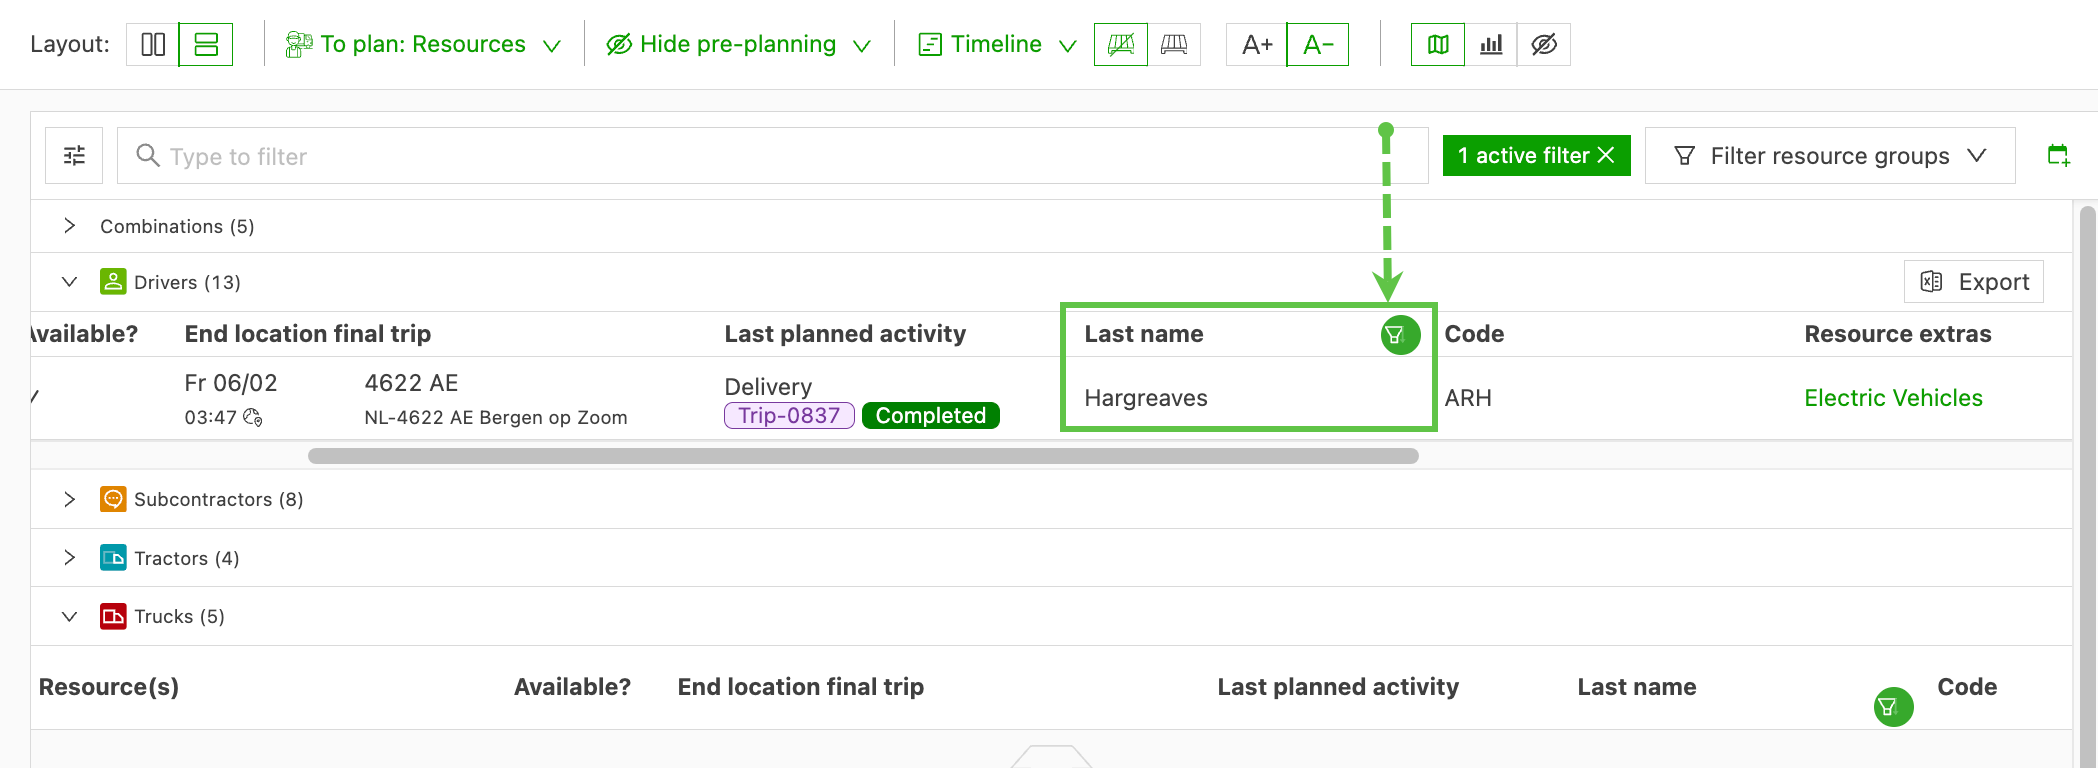
When one or more column filters are active, a Clear all filters button appears in the panel header. Click Clear all filters to remove all active column filters at once.
Limitations
| Limitation | Details |
|---|---|
| Sorting not yet supported | Resources cannot be sorted by custom field column values. The default sort order applies. |
| Custom fields must be configured on the resource | Only fields that have already been added to the resource type appear in the Customize panel. Fields are configured in Settings > Resources. |
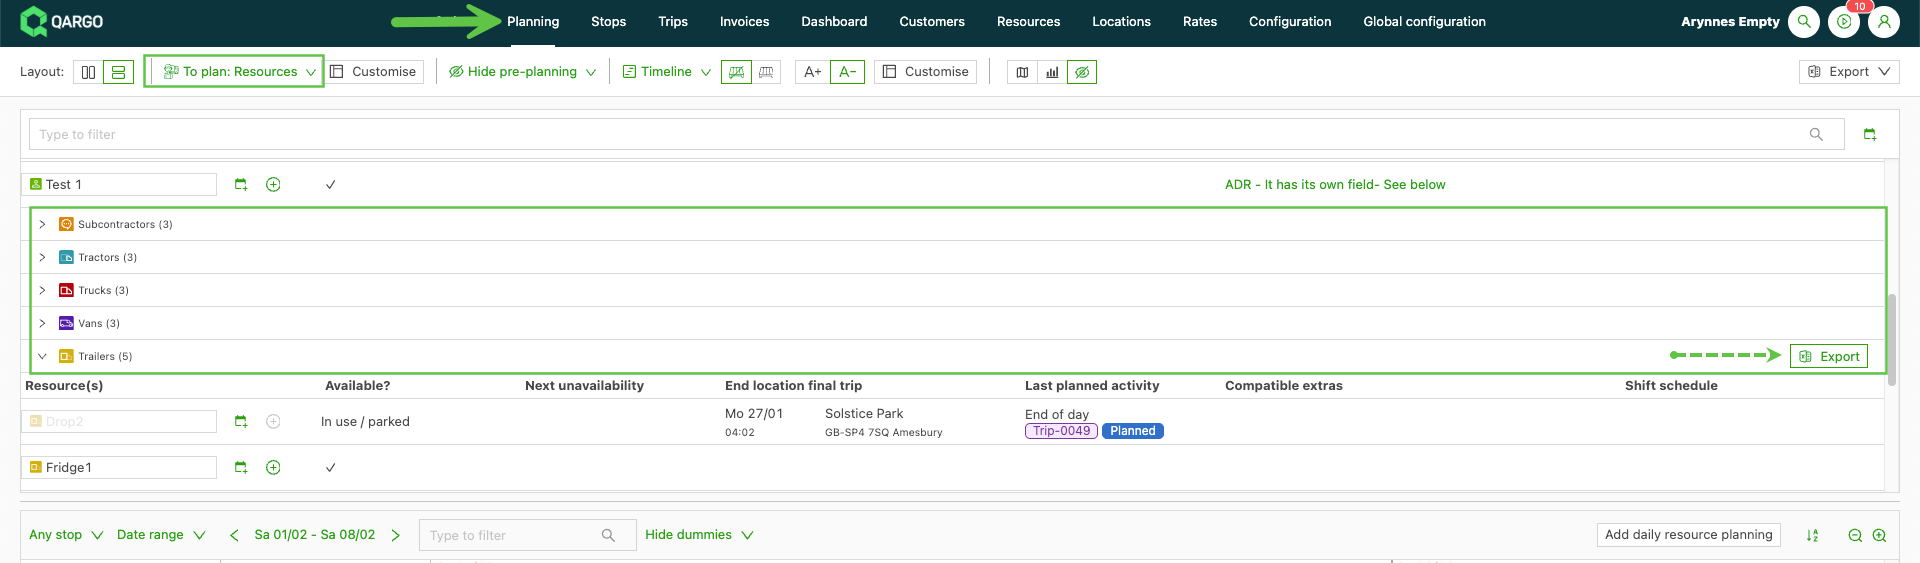
Planning: Resource availability report.
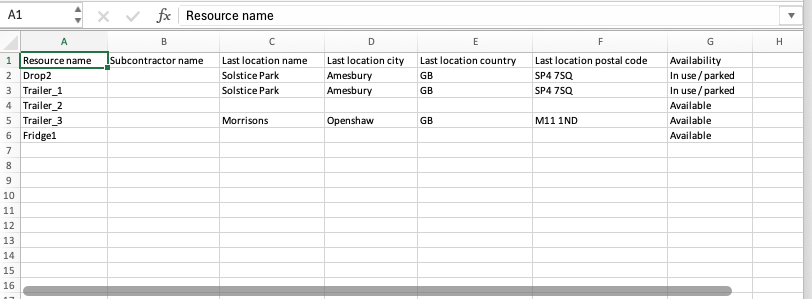
Under Planning, it is now possible to export an overview of resource availability, based on the resource type. Under To Plan, select Resources. When hovering over each line, the Export option shows on the right side. The export shows the resource availability, including last location details.