
Invoices – Create a contract carrier self-bill from loads
Learn how to create and manage contract carrier self-bills in Qargo: generate billing proposals, add and validate charges, upload invoices, complete tasks, and post invoices efficiently.
Table of contents
A third-party contract carrier needs to invoice for its services. These costs can be estimated in a billing proposal, which can then be used to validate any subsequent invoices. This also applies to intermodal services, such as a ferry or rail service.
Selecting loads in bulk
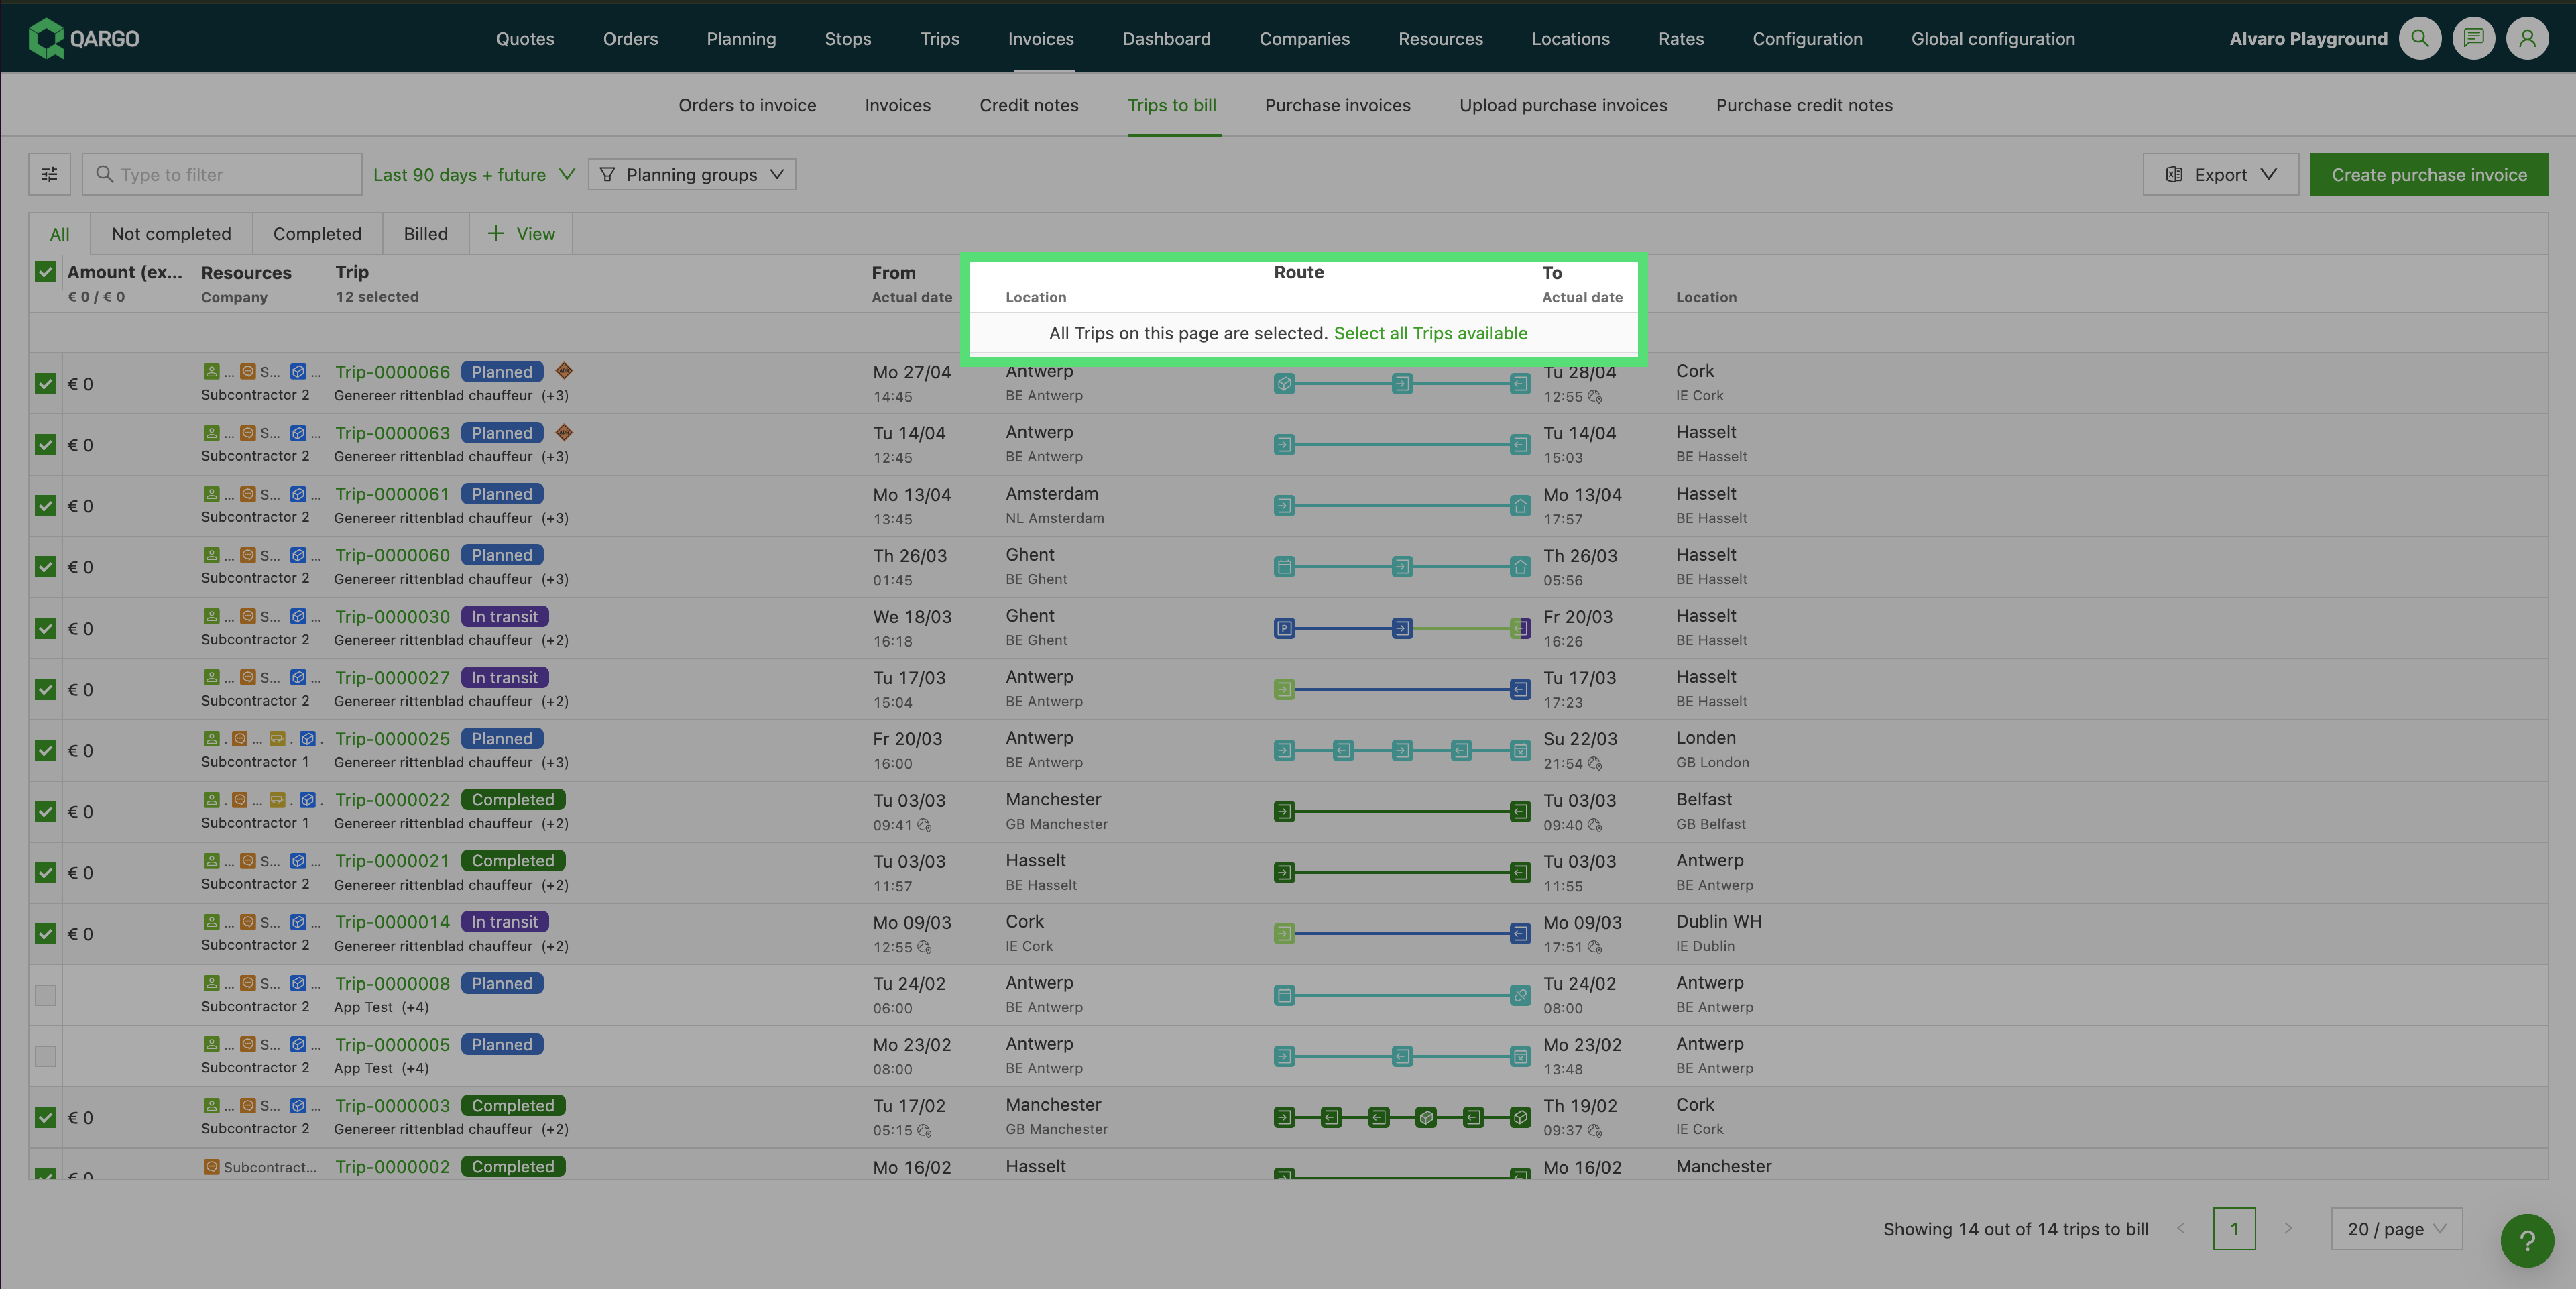
The Loads to bill view supports selecting every load that matches the current filters in a single action. The header checkbox of the Loads to bill table covers the full filtered result set across all pages. The selection is preserved when navigating between pages. The same selection behavior is available on Orders to invoice.
This is useful when a single contract carrier invoice covers a high volume of loads, for example at month-end, when the loads span multiple pages of the list.
- Navigate to Invoices > Loads to bill.
- Apply the relevant filters to narrow the list, such as contract carrier, date range, or resource.
- Check the checkbox in the table header to select all loads in the filtered set.
- Choose a bulk action from the toolbar: Create billing proposal, Create carrier invoice / self-bill, or Bulk complete.
Create a contract carrier self-bill.
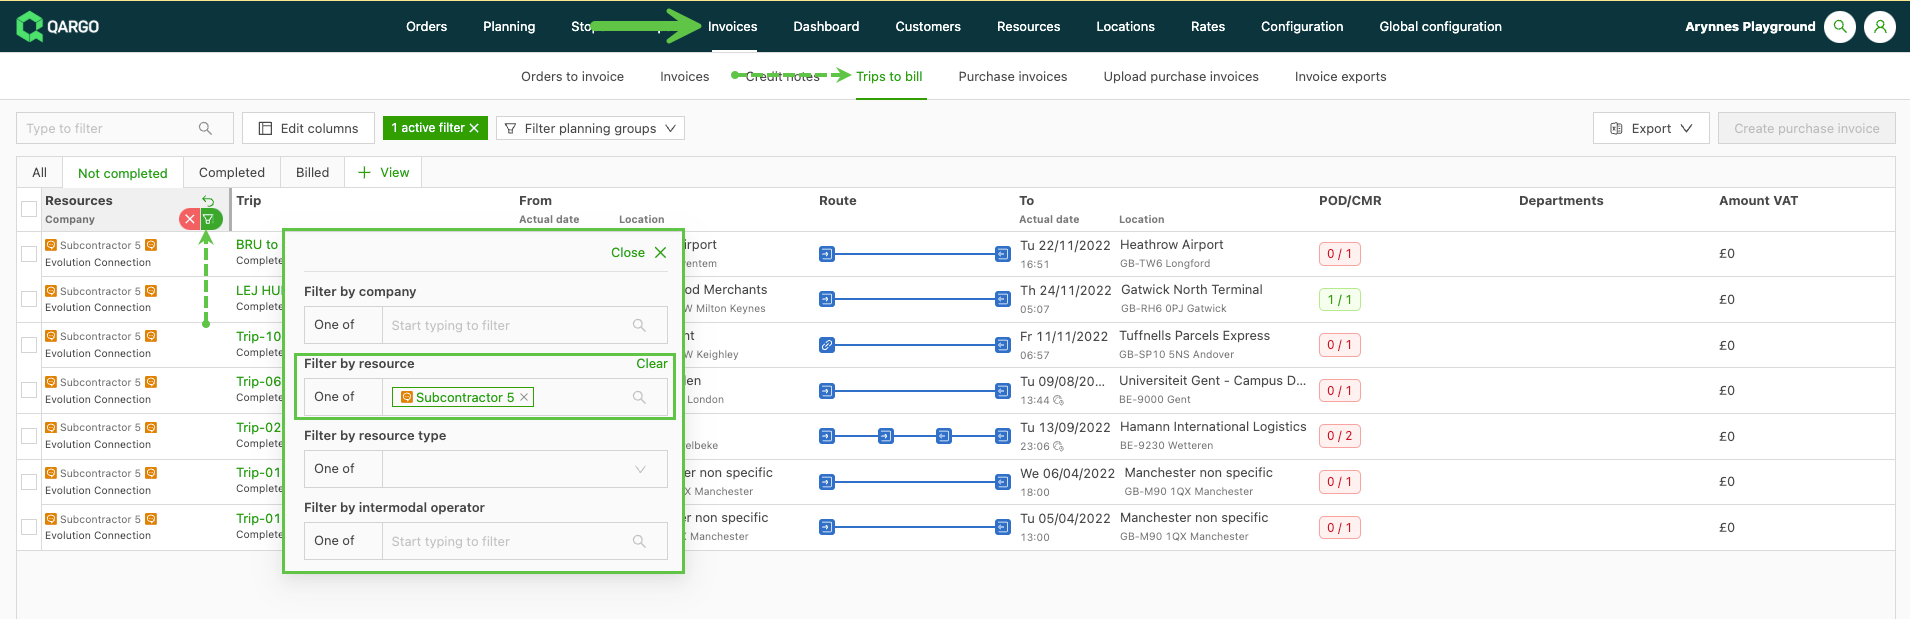
- Navigate to the Invoices menu and the Loads to bill submenu.
- Apply any filters, such as date or resource, to narrow down the selection (see also Customize the invoice page)
-
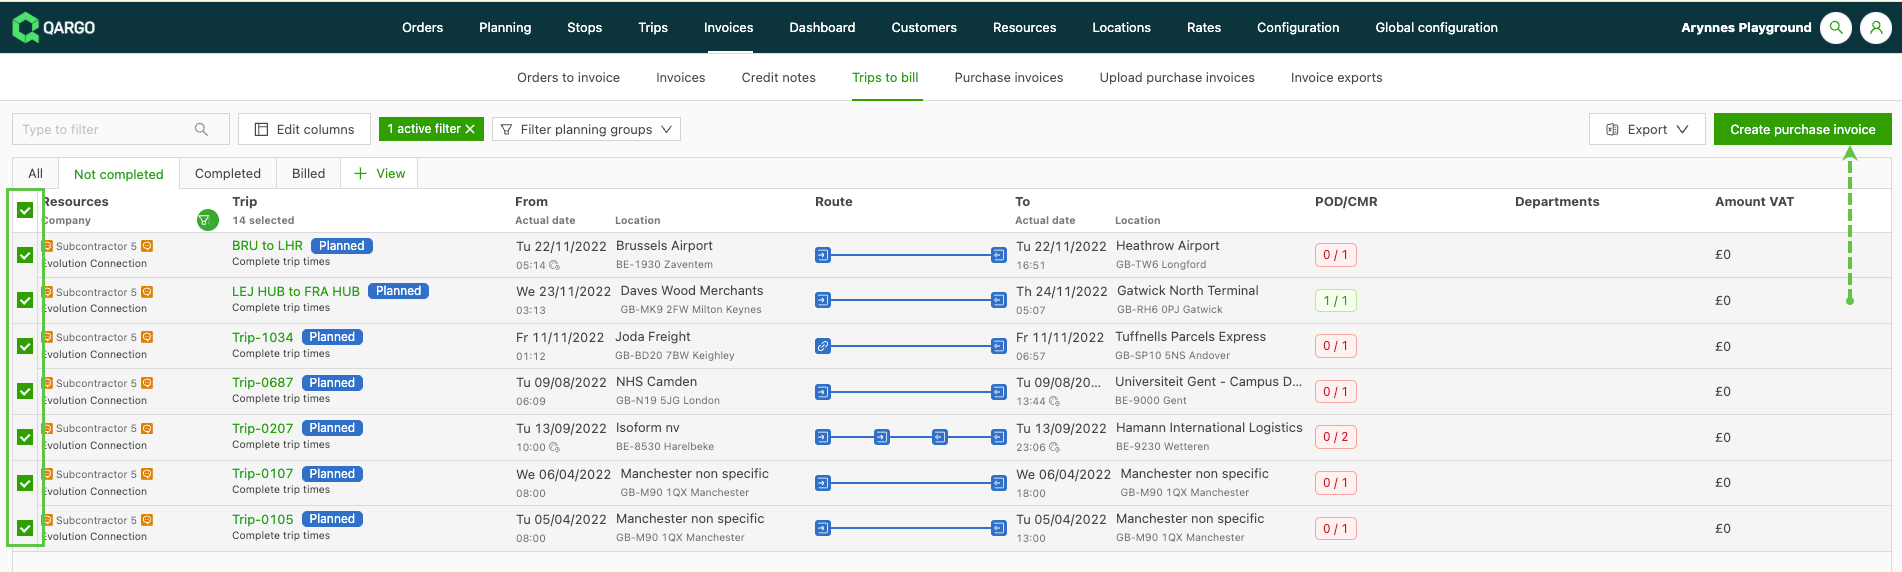
Select the loads/costs to add to the self-bill and click the Create carrier invoice button:
-
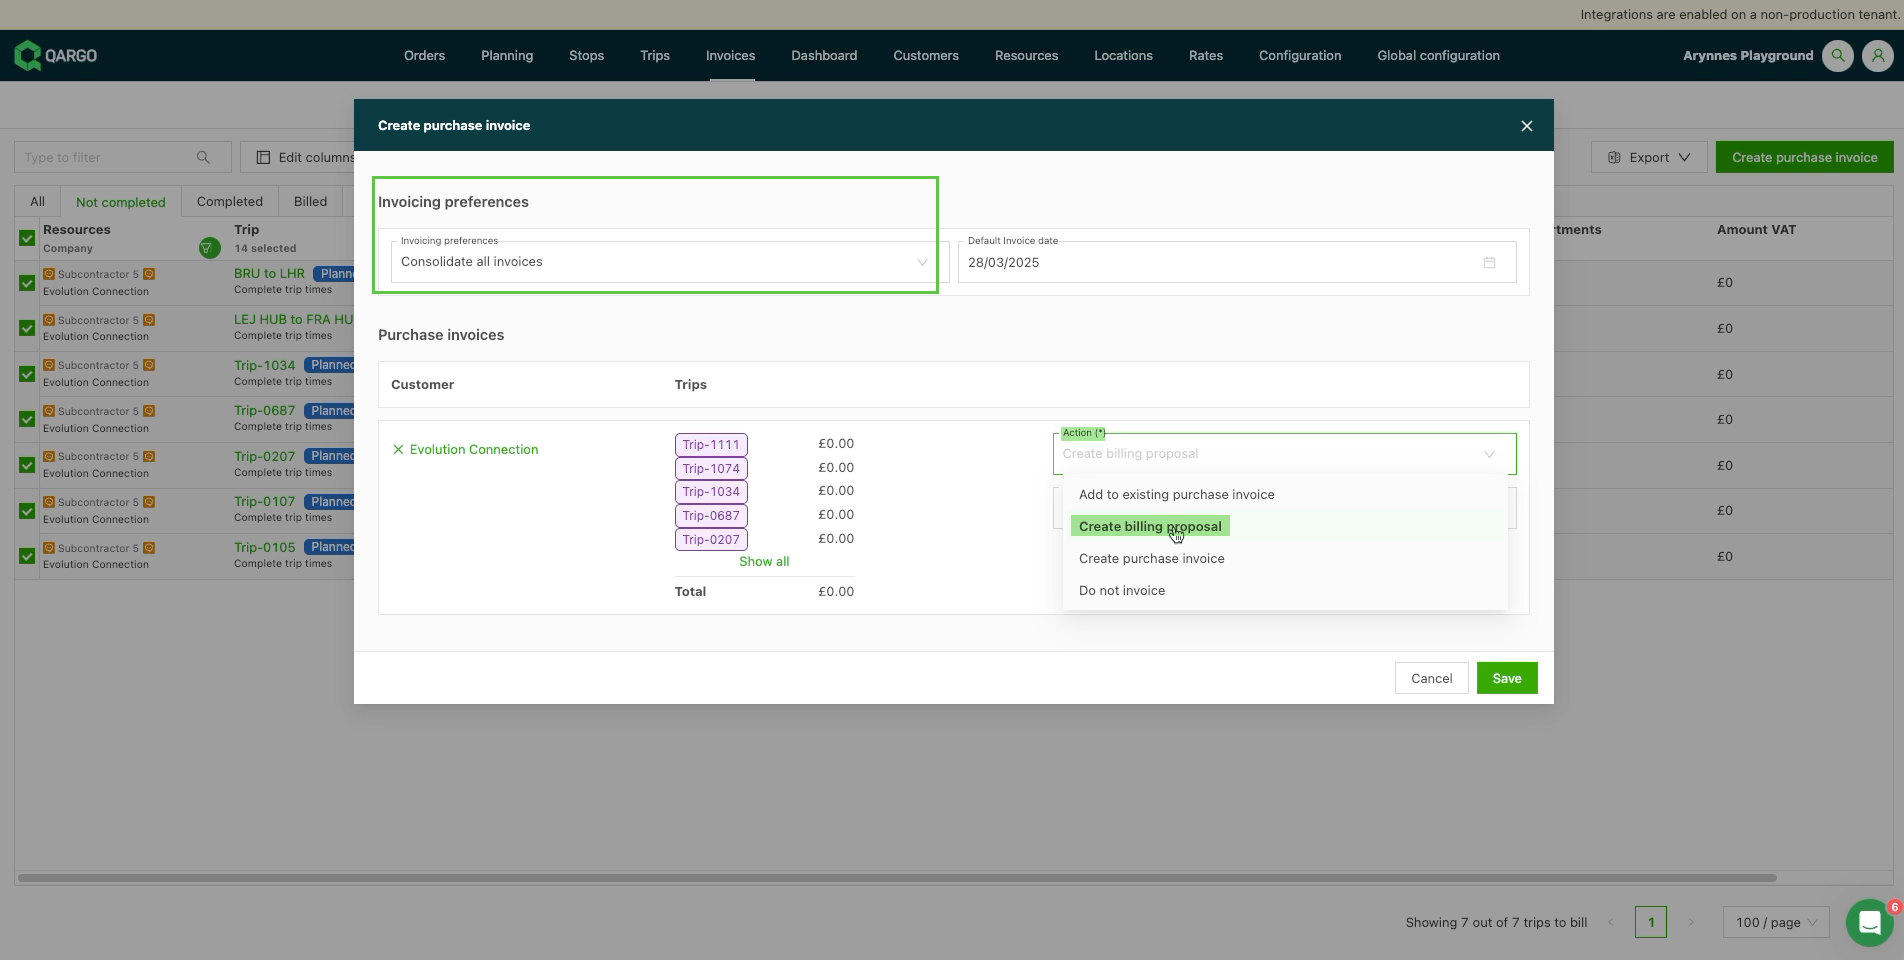
The Create carrier invoice window opens. Select the billing preferences. By default, all invoices are consolidated.
-
From the Actions field, select Create billing proposal and save the settings:
-
The billing proposal is generated in Draft status.

Auto-completing the Upload carrier invoice task for self-bills
When Qargo generates the invoice on the contract carrier’s behalf, a dedicated Self-bill document type now satisfies the Upload carrier invoice task automatically. Post carrier invoice and Mark as paid then become available without a manual upload. A separate path also lets charges be marked as invoiced entirely outside Qargo, with no carrier invoice document at all.
Self-bill document type and tasks
With self-billing, the contract carrier never sends an invoice, so Qargo produces it instead. Three related changes support this:
-
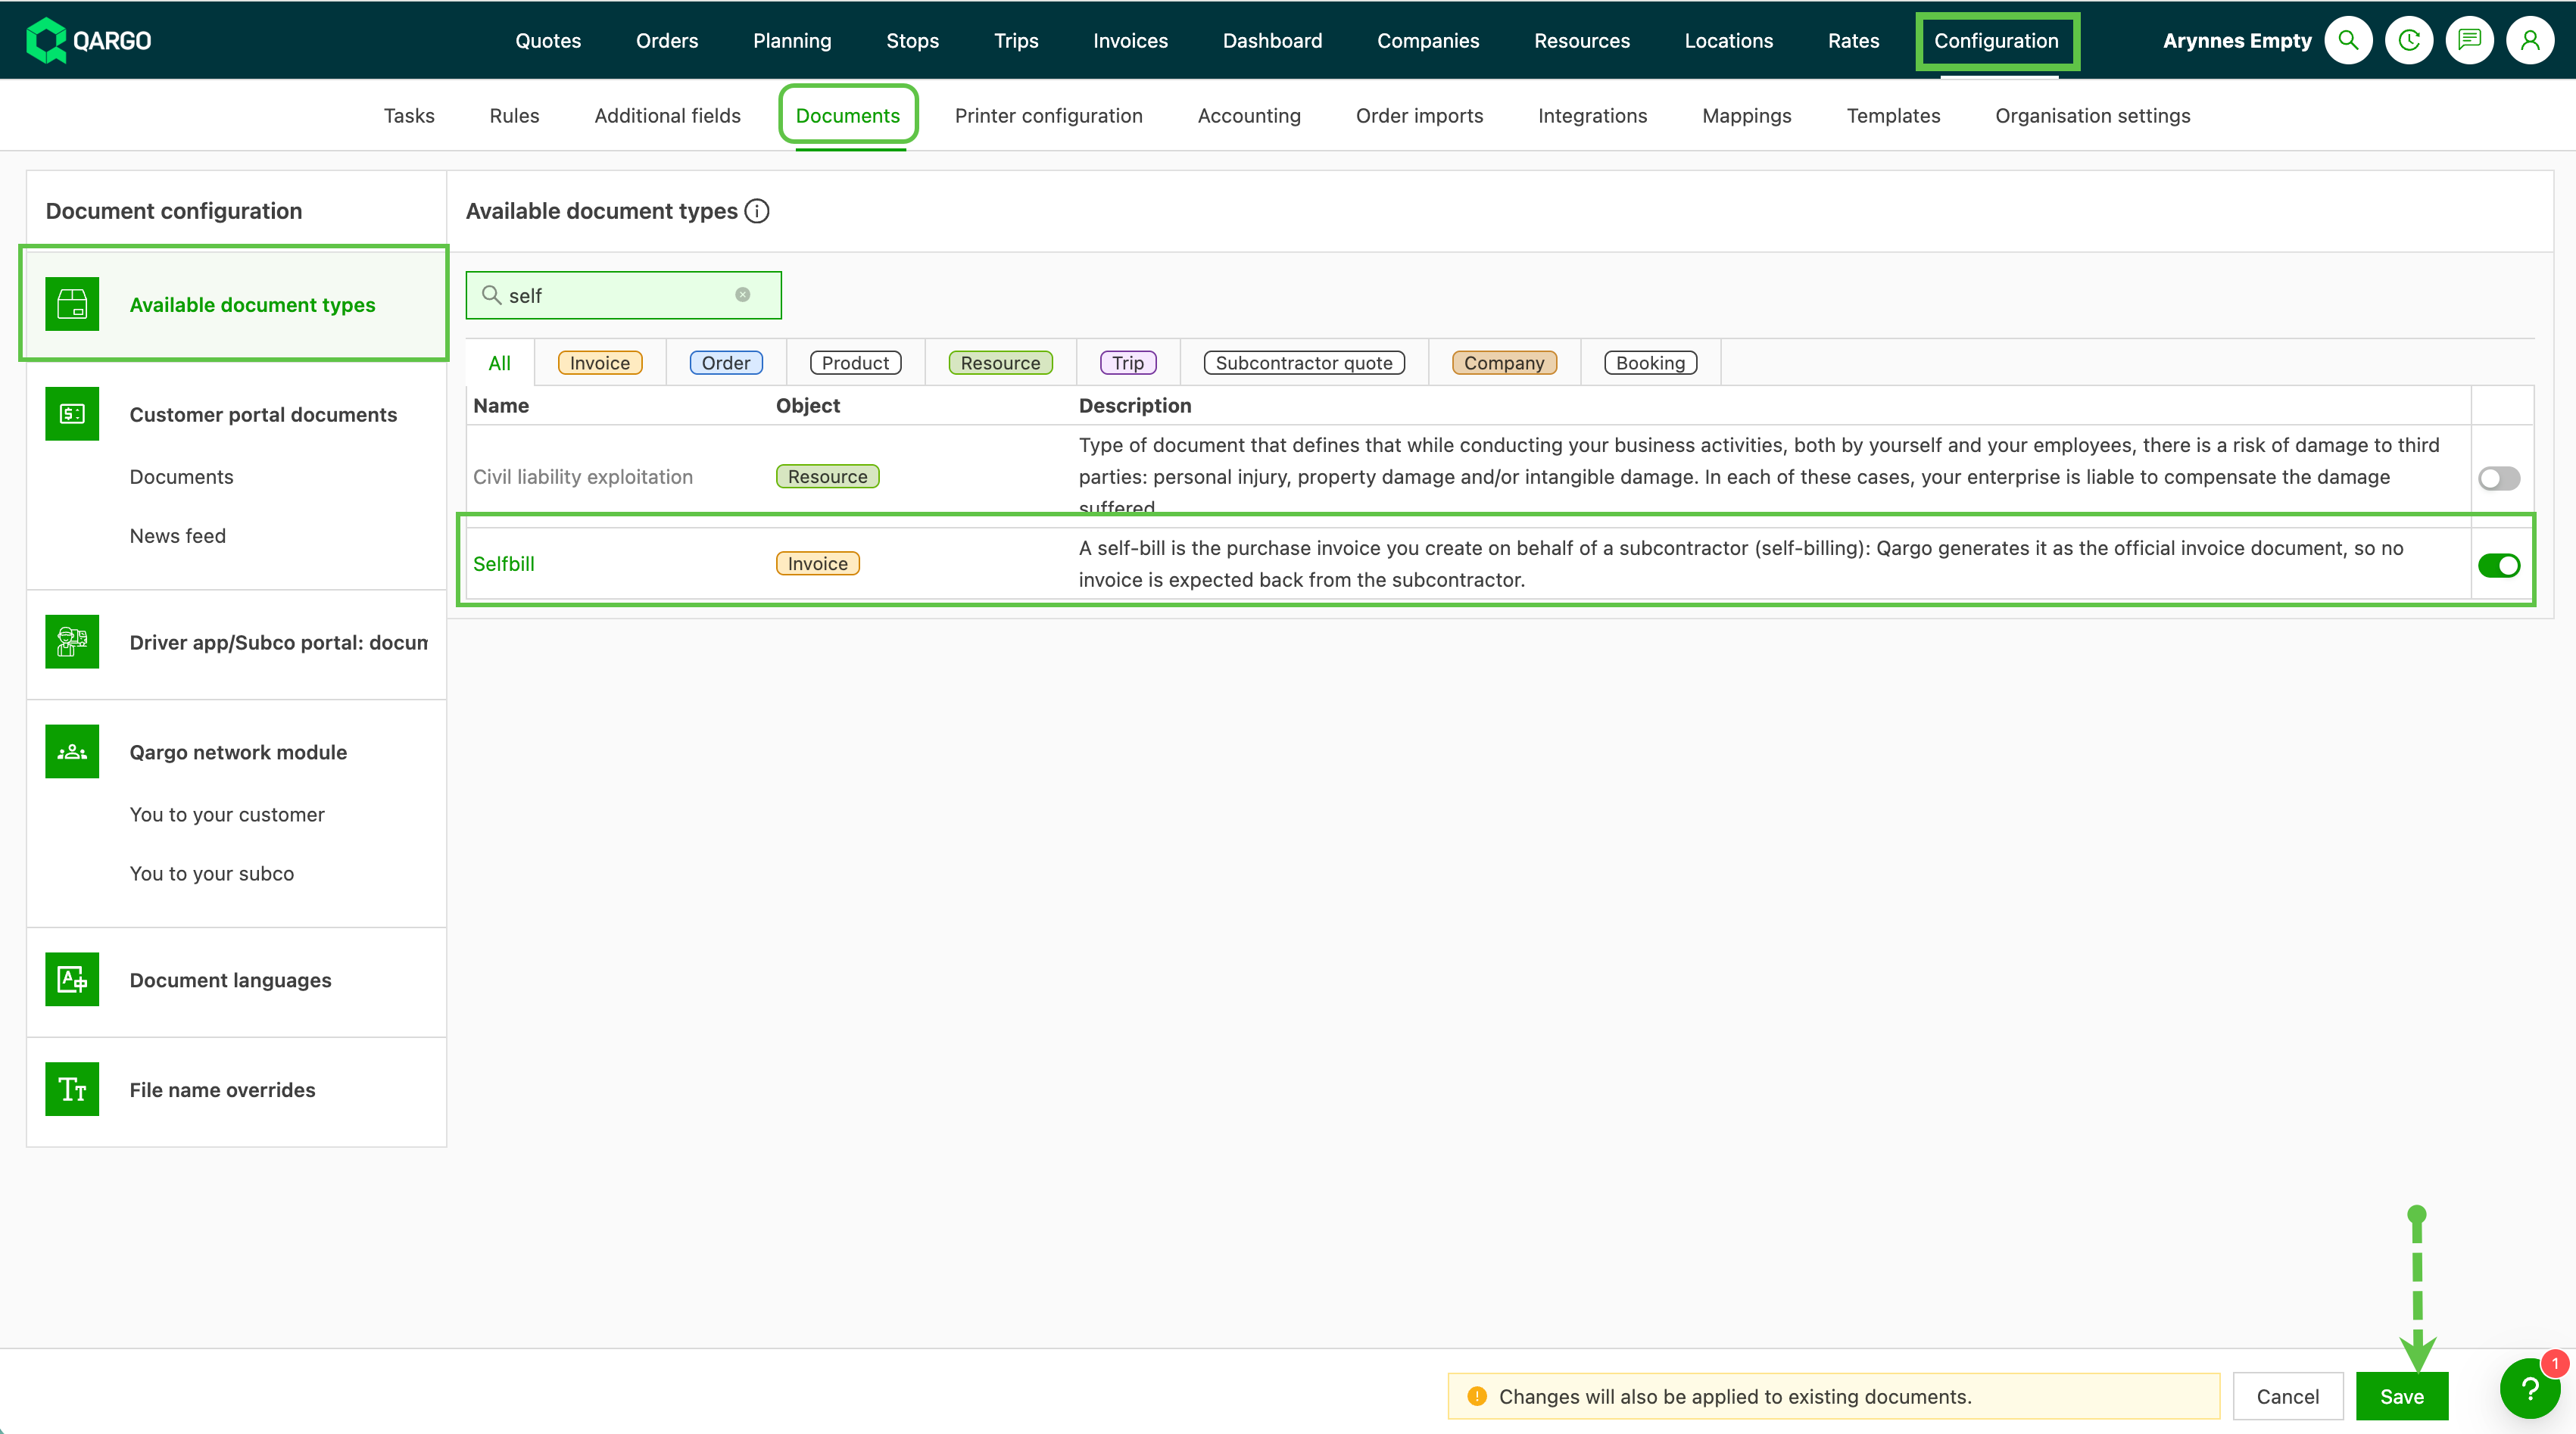
A new Self-bill purchase-side document type is available under Configuration > Documents > Available document types, separate from Billing proposal and Invoice.
- Add the document type and its template before assigning the new task.
-
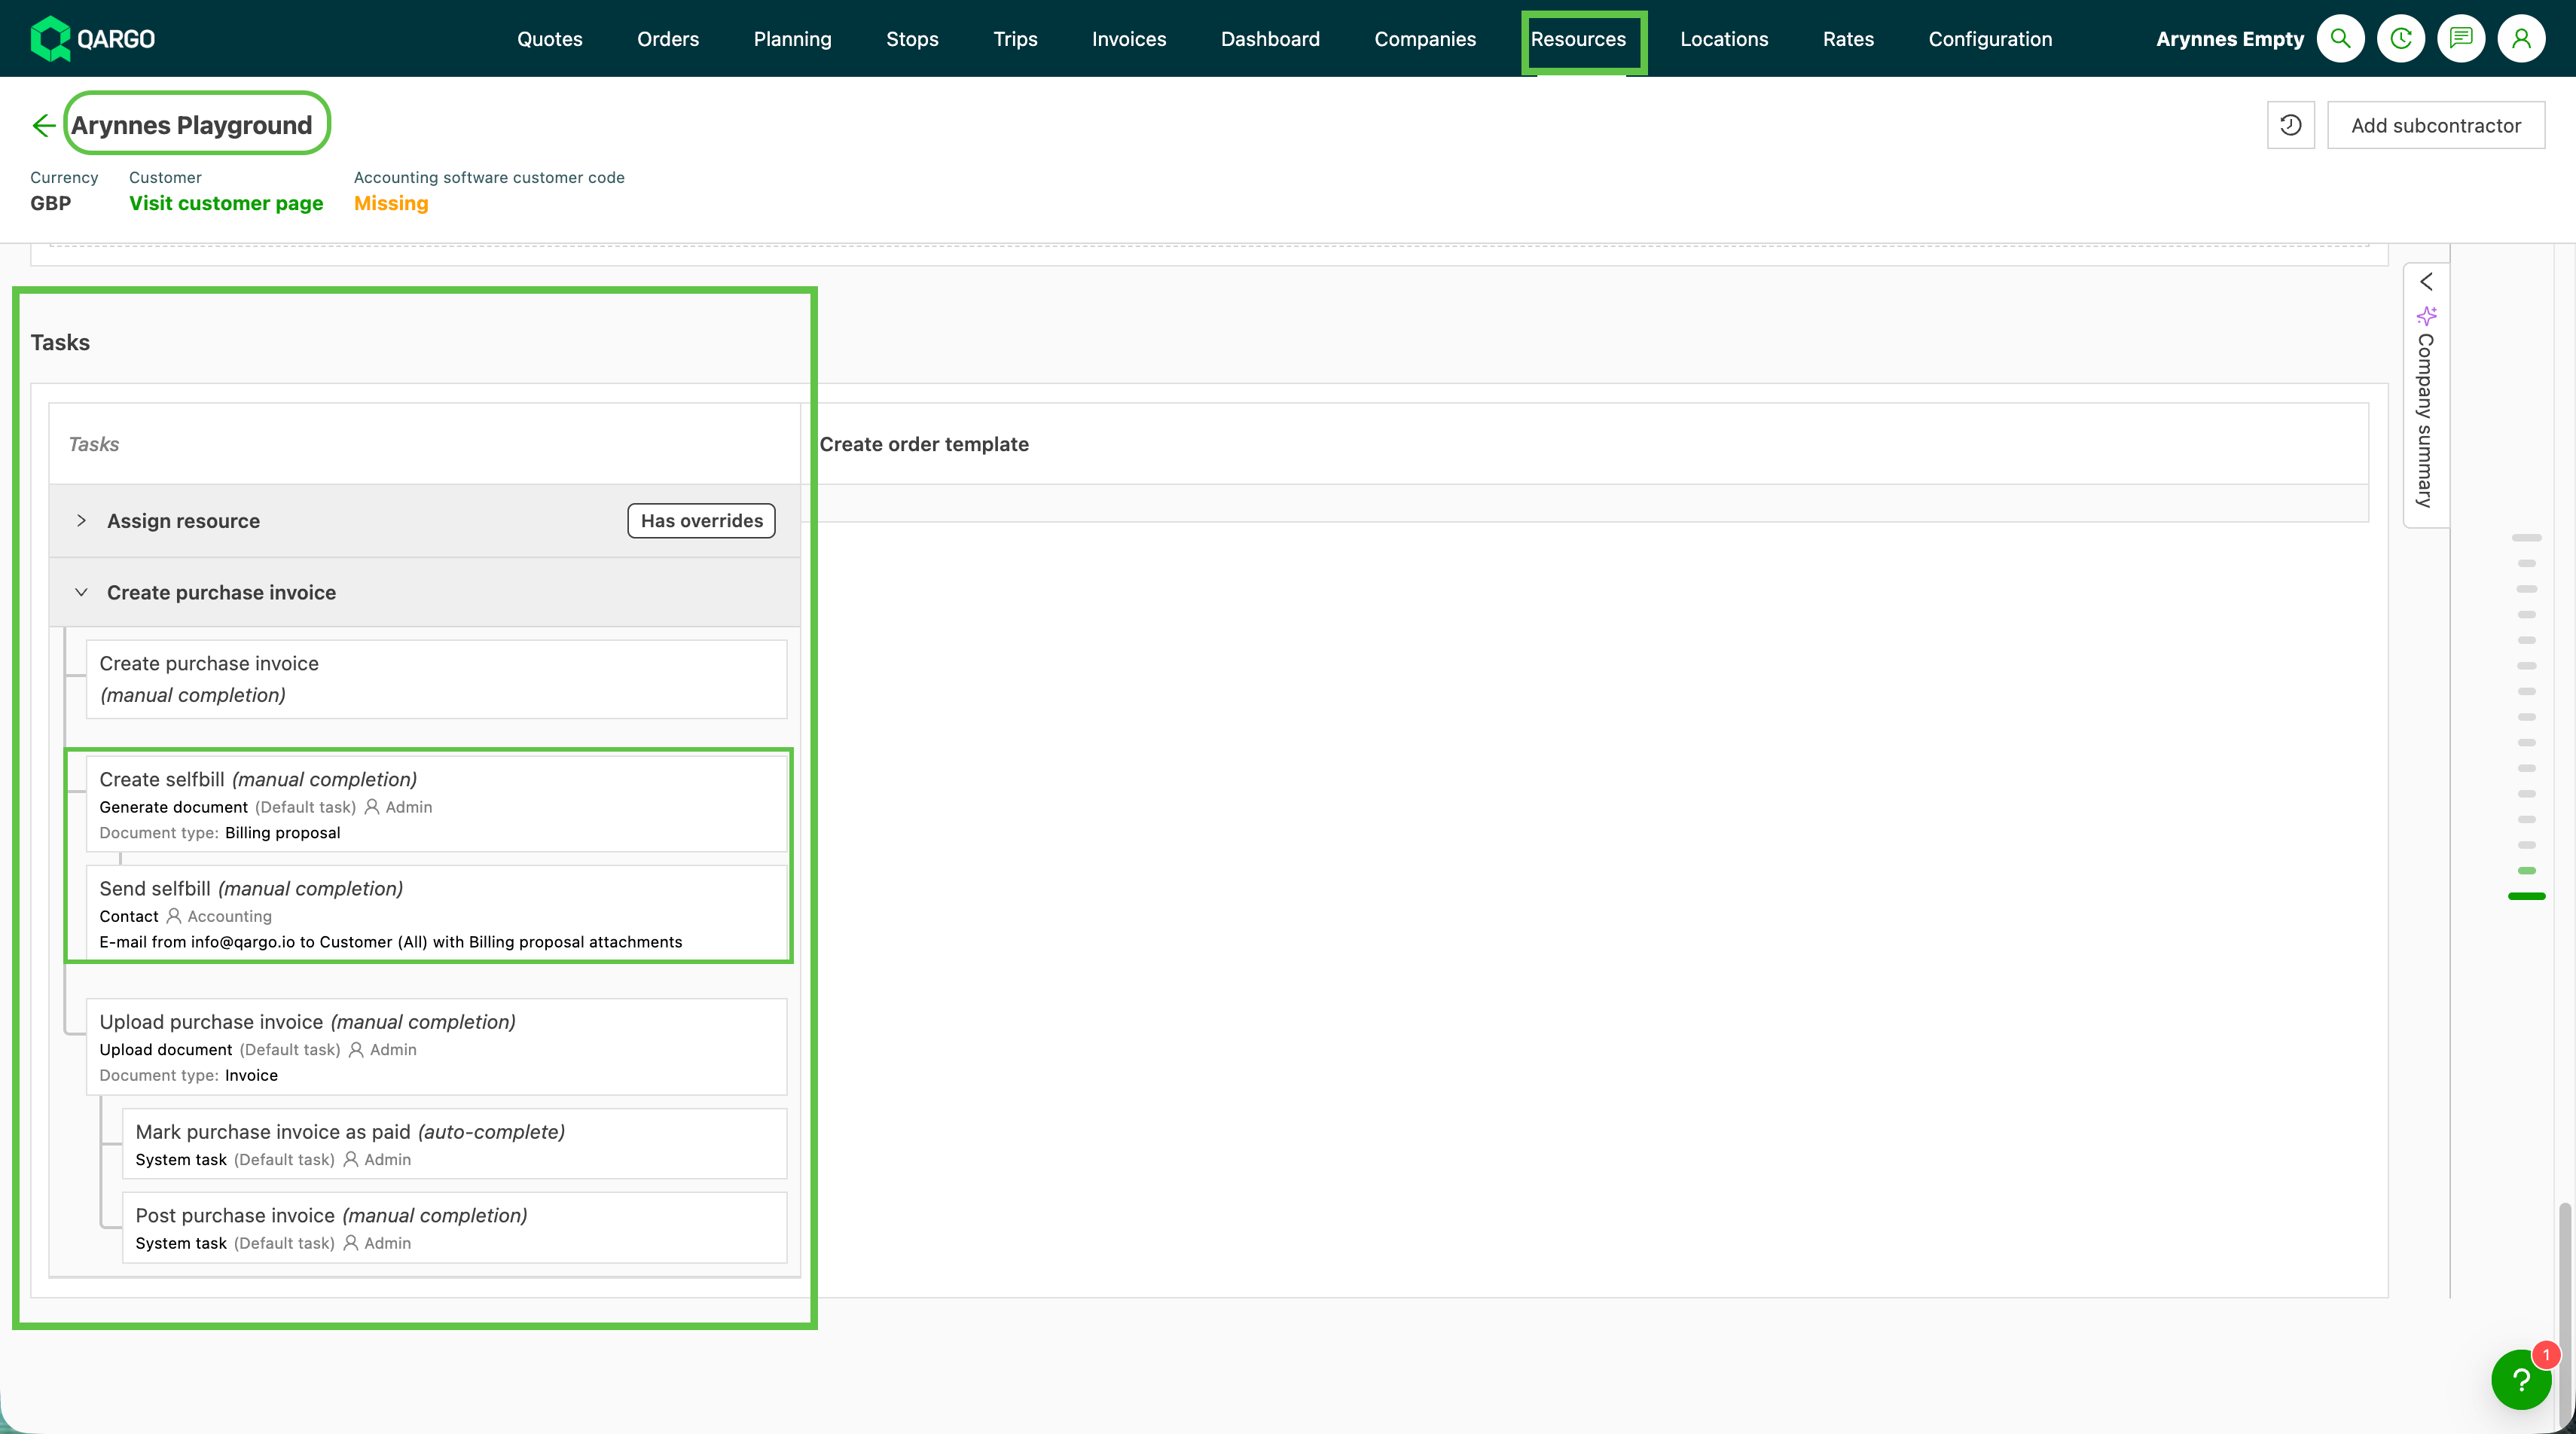
A new Create self-bill task can be added per contract carrier under Resources > Contract carriers > [contract carrier] > Tasks. This task generates the Self-bill document.
-
The existing Create selfbill task is renamed to Create billing proposal. This is a label change only, with no change in behavior. The task still generates a draft billing proposal (a confirmation draft, not a final document).
- Once a Create self-bill task is configured, the Upload carrier invoice task recognizes either an Invoice or a Self-bill document. It auto-completes the same way it already does for the default Invoice type.
- Because the generated self-bill document satisfies the upload task, no manual upload is needed. The follow-up tasks (Post carrier invoice and Mark as paid) unblock automatically.
Marking charges as invoiced externally
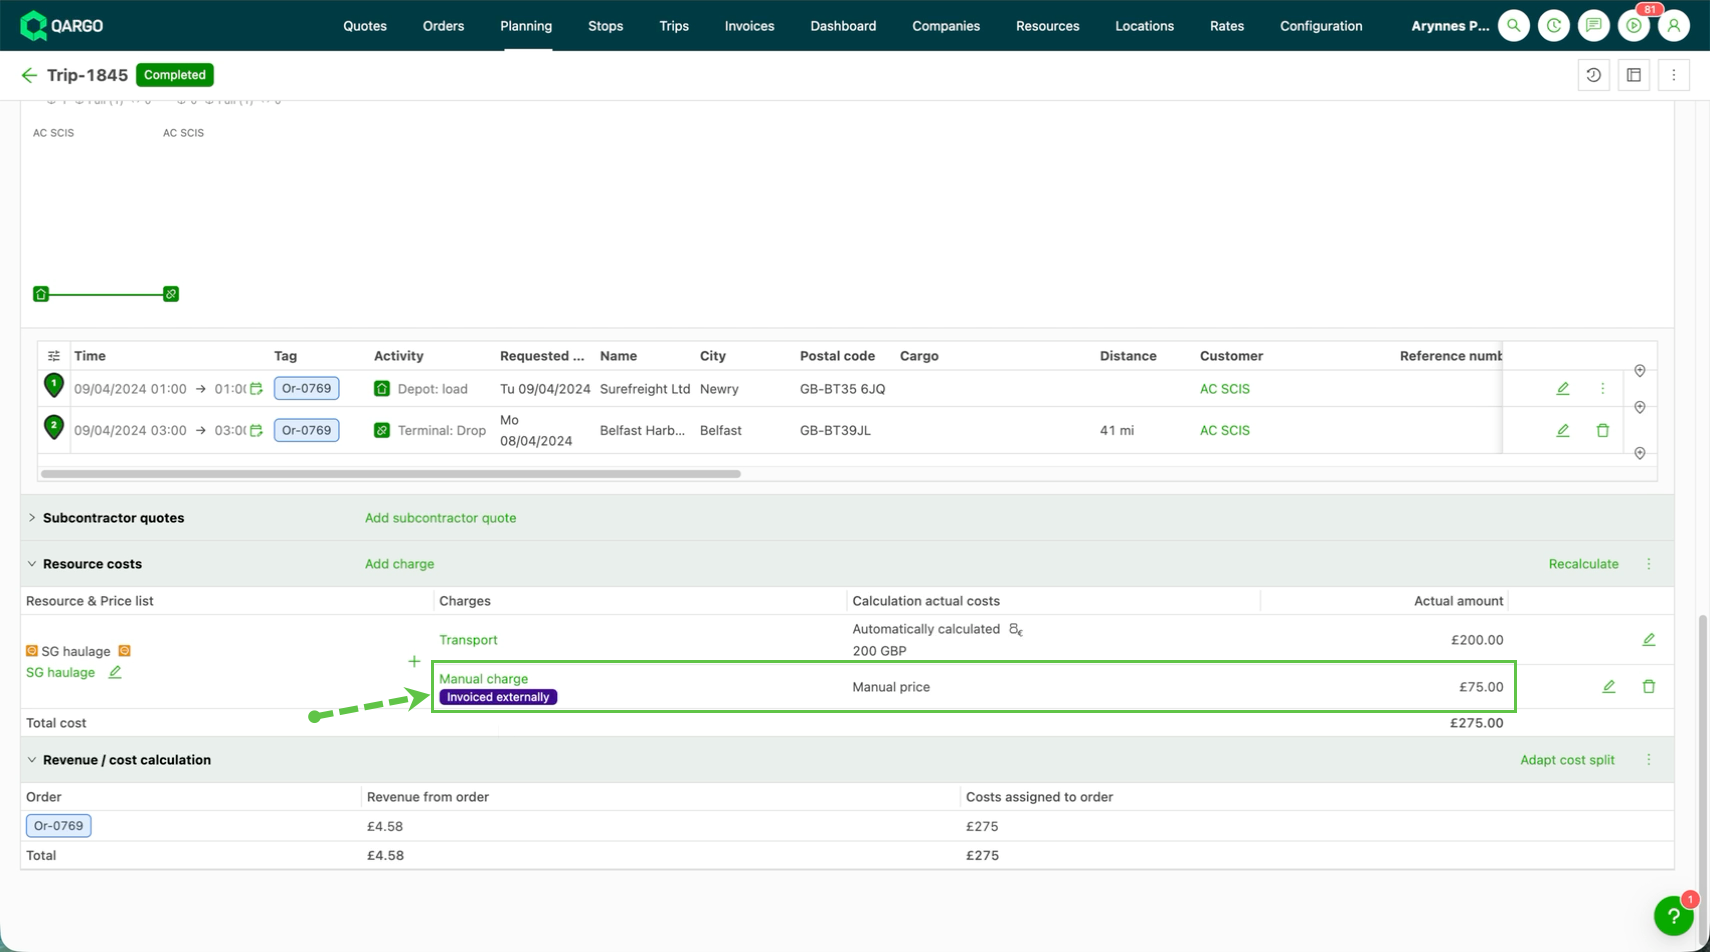
Some invoices are created and matched entirely outside Qargo, for example in a separate finance system. In that case, no carrier invoice document is needed in Qargo:
- Navigate to Invoices > Loads to bill and open the Charge view.
- Select the charges that have already been invoiced externally.
- Create the invoice with the action set to Invoiced externally.
This marks the selected charges as invoiced without creating a carrier invoice or starting a task chain. There is nothing further to upload or post in Qargo.
Update info and charges
-
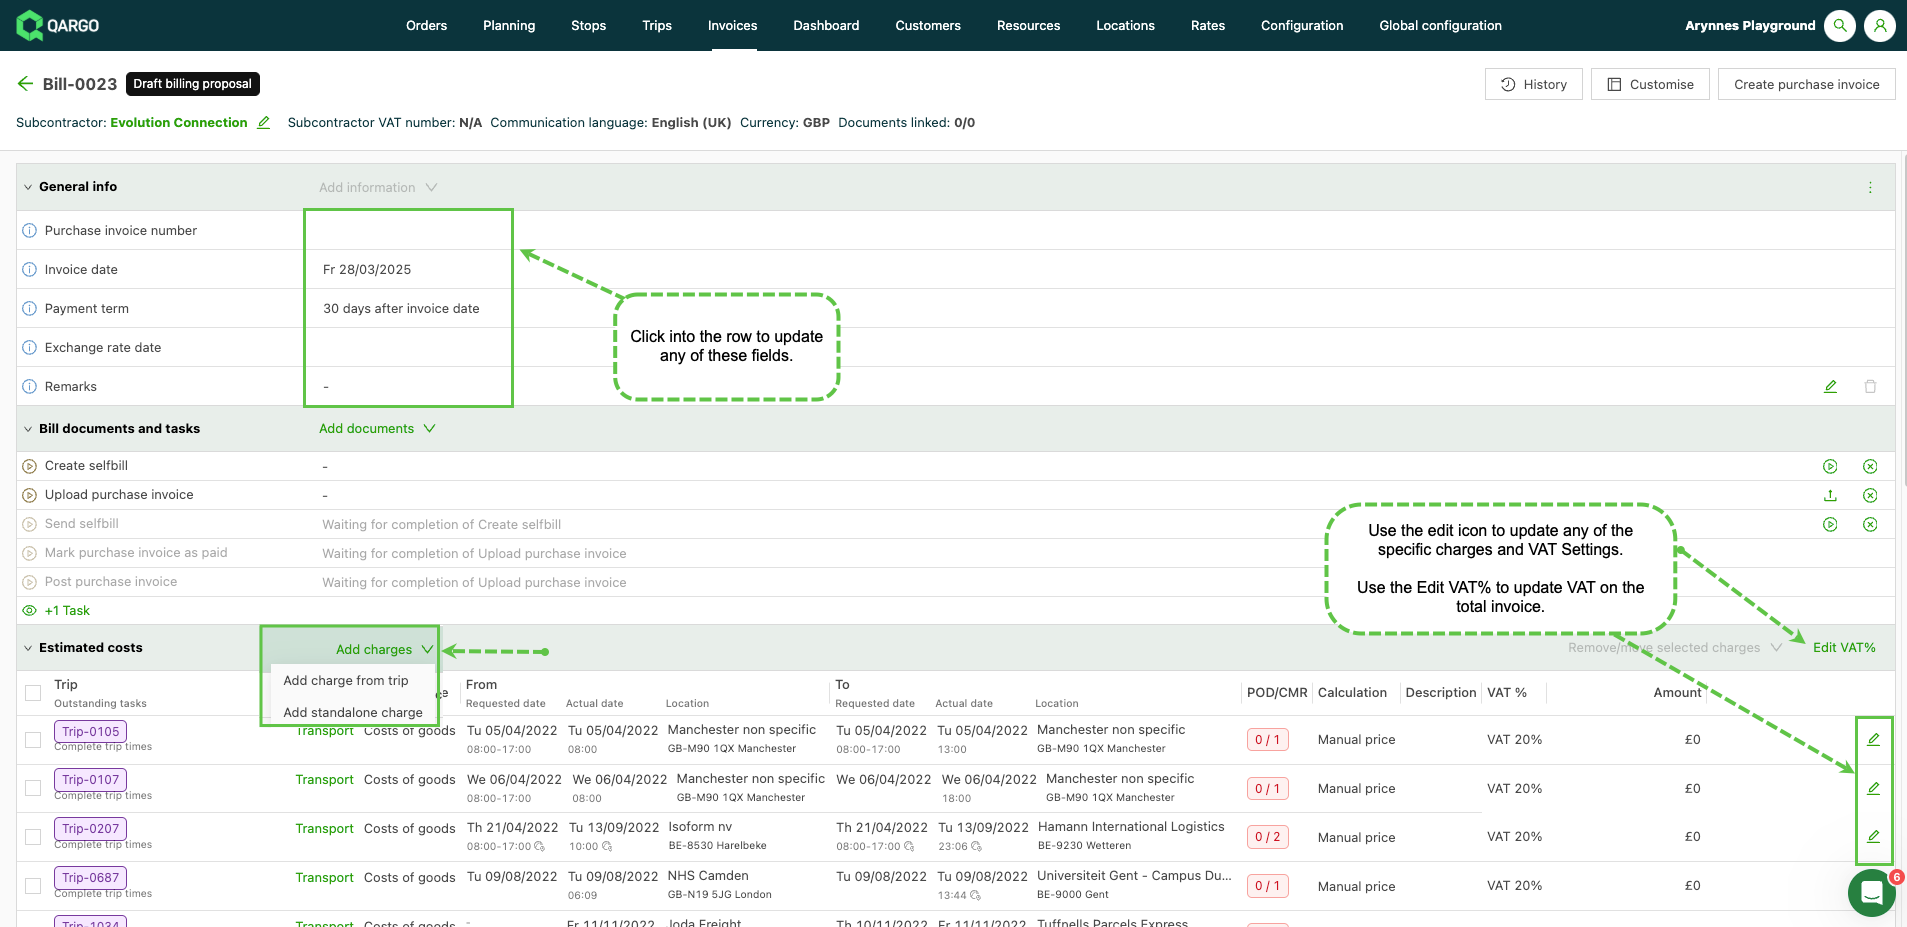
The fields under General info can be updated if needed. Click into the row and update the details. Click the Save icon.
-
Use the Edit icon to update estimated costs, including charges and tax settings.
-
Click Add charges if additional costs need to be added to the invoice.
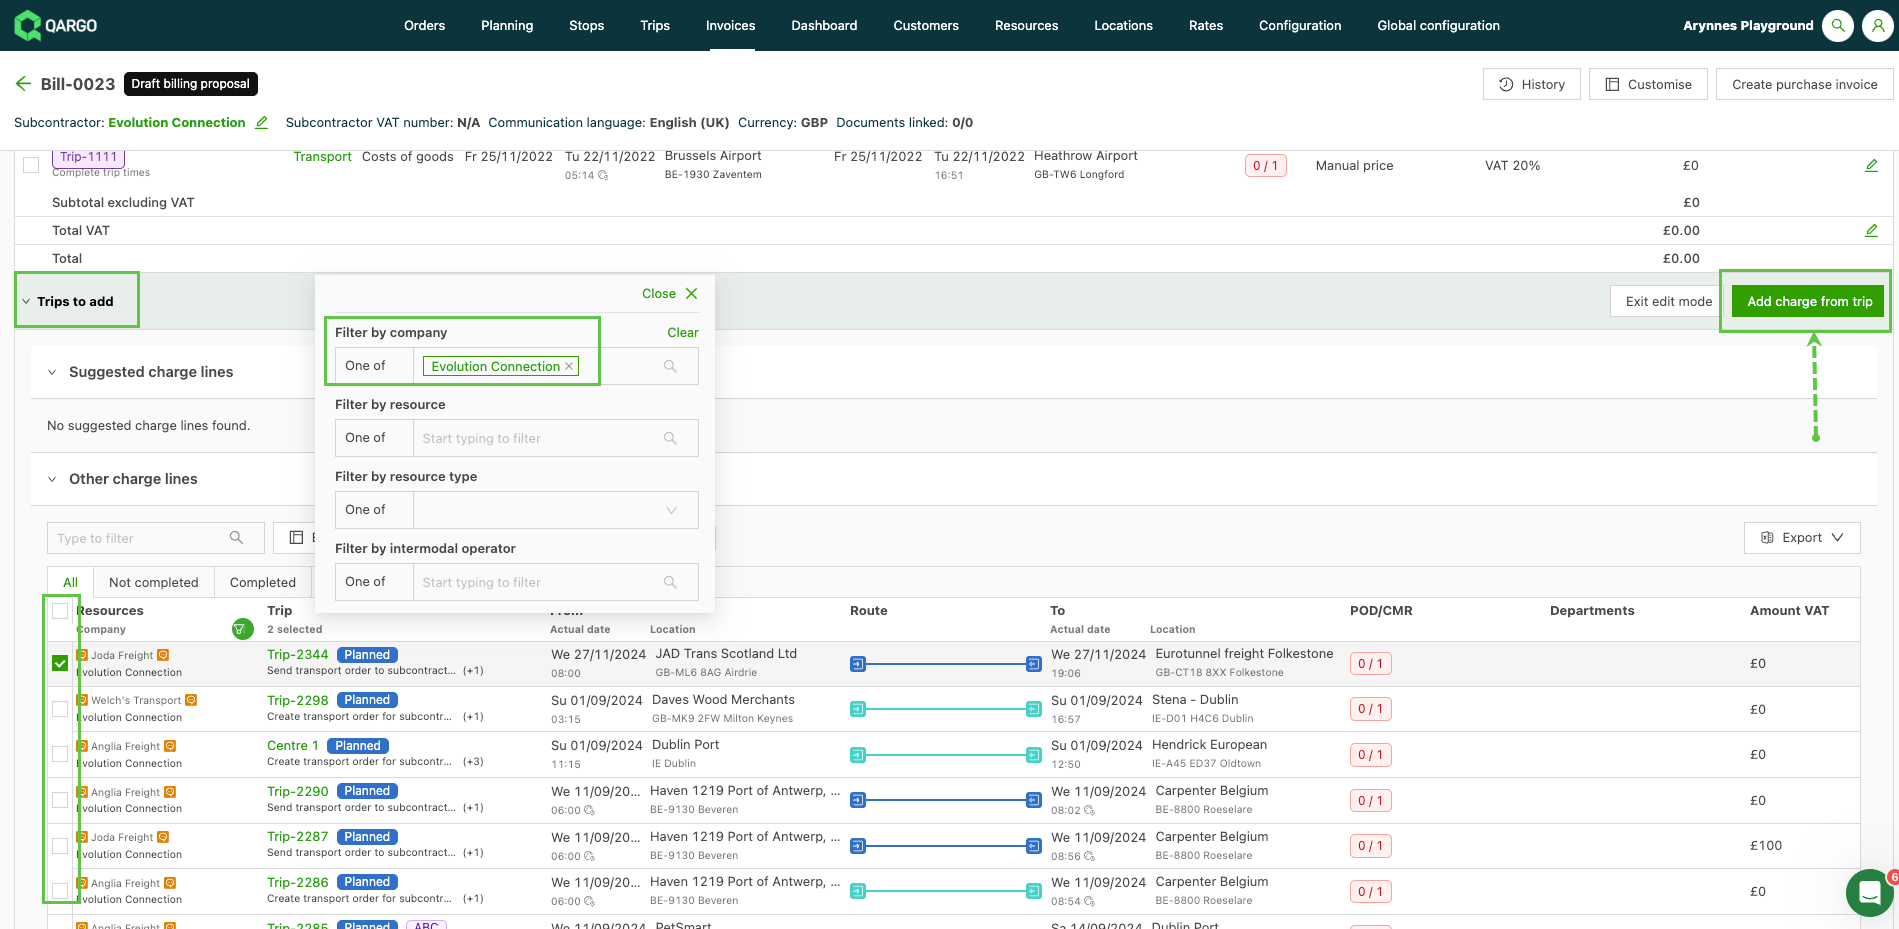
- Add charge from load: This opens the Loads to add panel, which includes loads that match the contract carrier. The loads are automatically filtered by the contract carrier. Check the box to select the load and click Add charge from load.
-
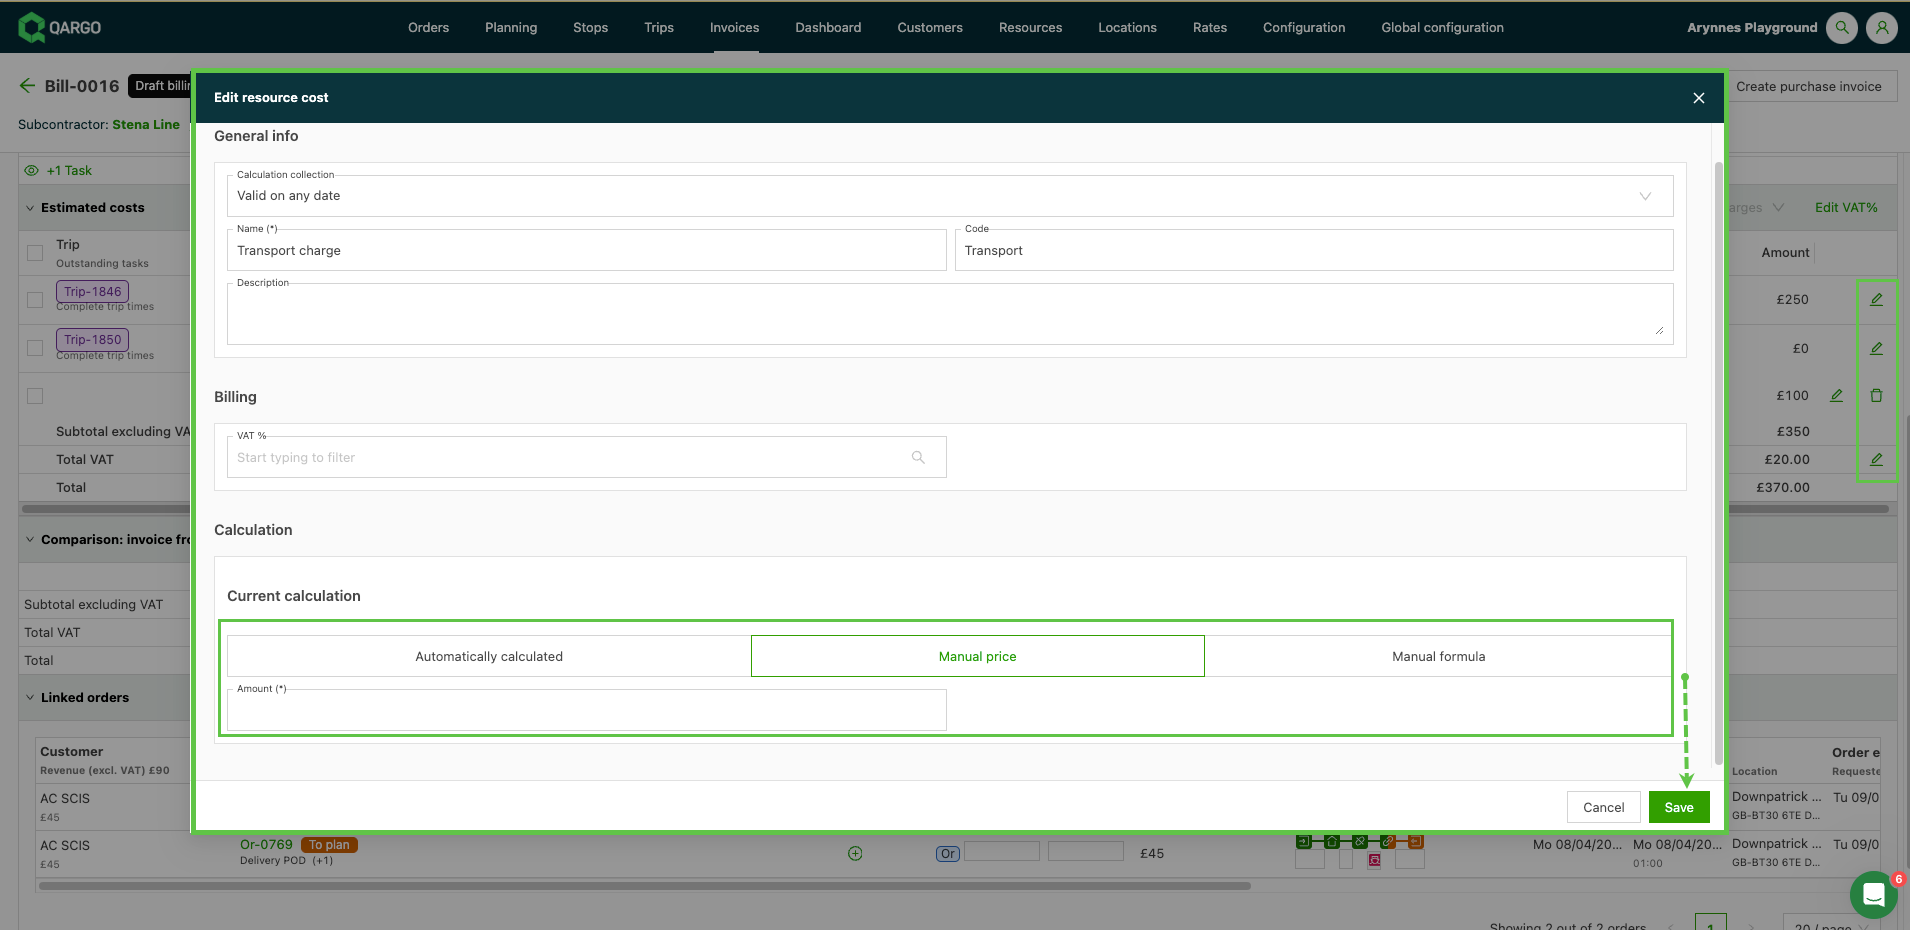
Add standalone charge: This opens the Add resource cost window. Under General info, click the Charge field to show the available charges.
- Select the appropriate charge to add to the invoice. Under the calculation, there are 2 manual options. Manual lets the user enter a specific value. Manual formula opens options to calculate a value based on selected variables, for instance a cost-over-distance calculation.
-
The charges can be updated manually if necessary. Click the Edit icon.
-
Enter the revised costs. Click Save.
-
Complete the remaining tasks. The task workflow can be configured based on business needs. Find more info in Tasks in configuration)
- Create self-bill: updates the status from draft to Billing proposal
- Send self-bill to contract carrier
- Mark as paid
- Post carrier invoice
Add document function:
There are 2 other options to add the carrier invoice to the billing proposal:
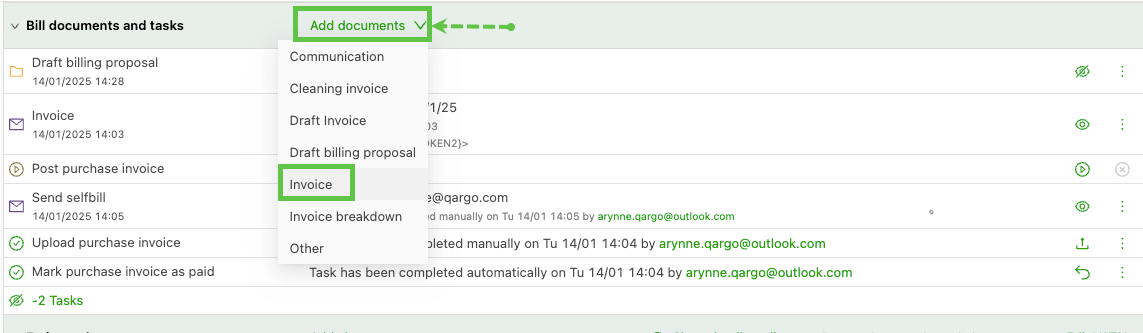
- Select the Invoice drop-down option.
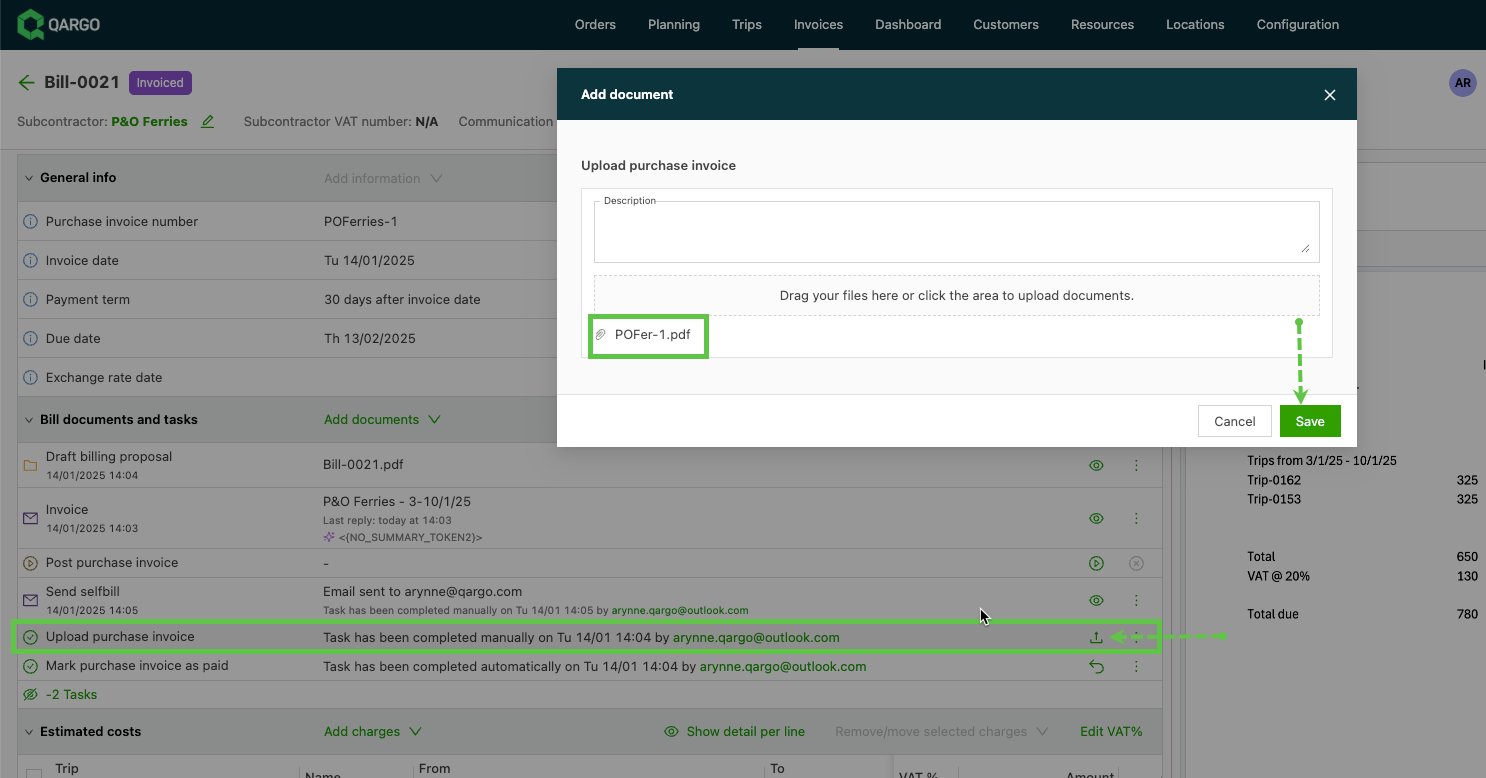
- The Add document window opens. Drag the file, or click to add the document to upload. Click Save.
-
Added from an email attachment, using the Outlook Qargo add-in:
- From the email, select the search option in the Qargo add-in panel. Enter the billing proposal number. Identify the correct billing proposal and click the Add button. Options appear to identify what is being added. Select Invoice to add it to the proposal.
Note: This is not the Scan carrier invoice function. Search via the add-in for the billing proposal reference, and manually add the Invoice option.
-
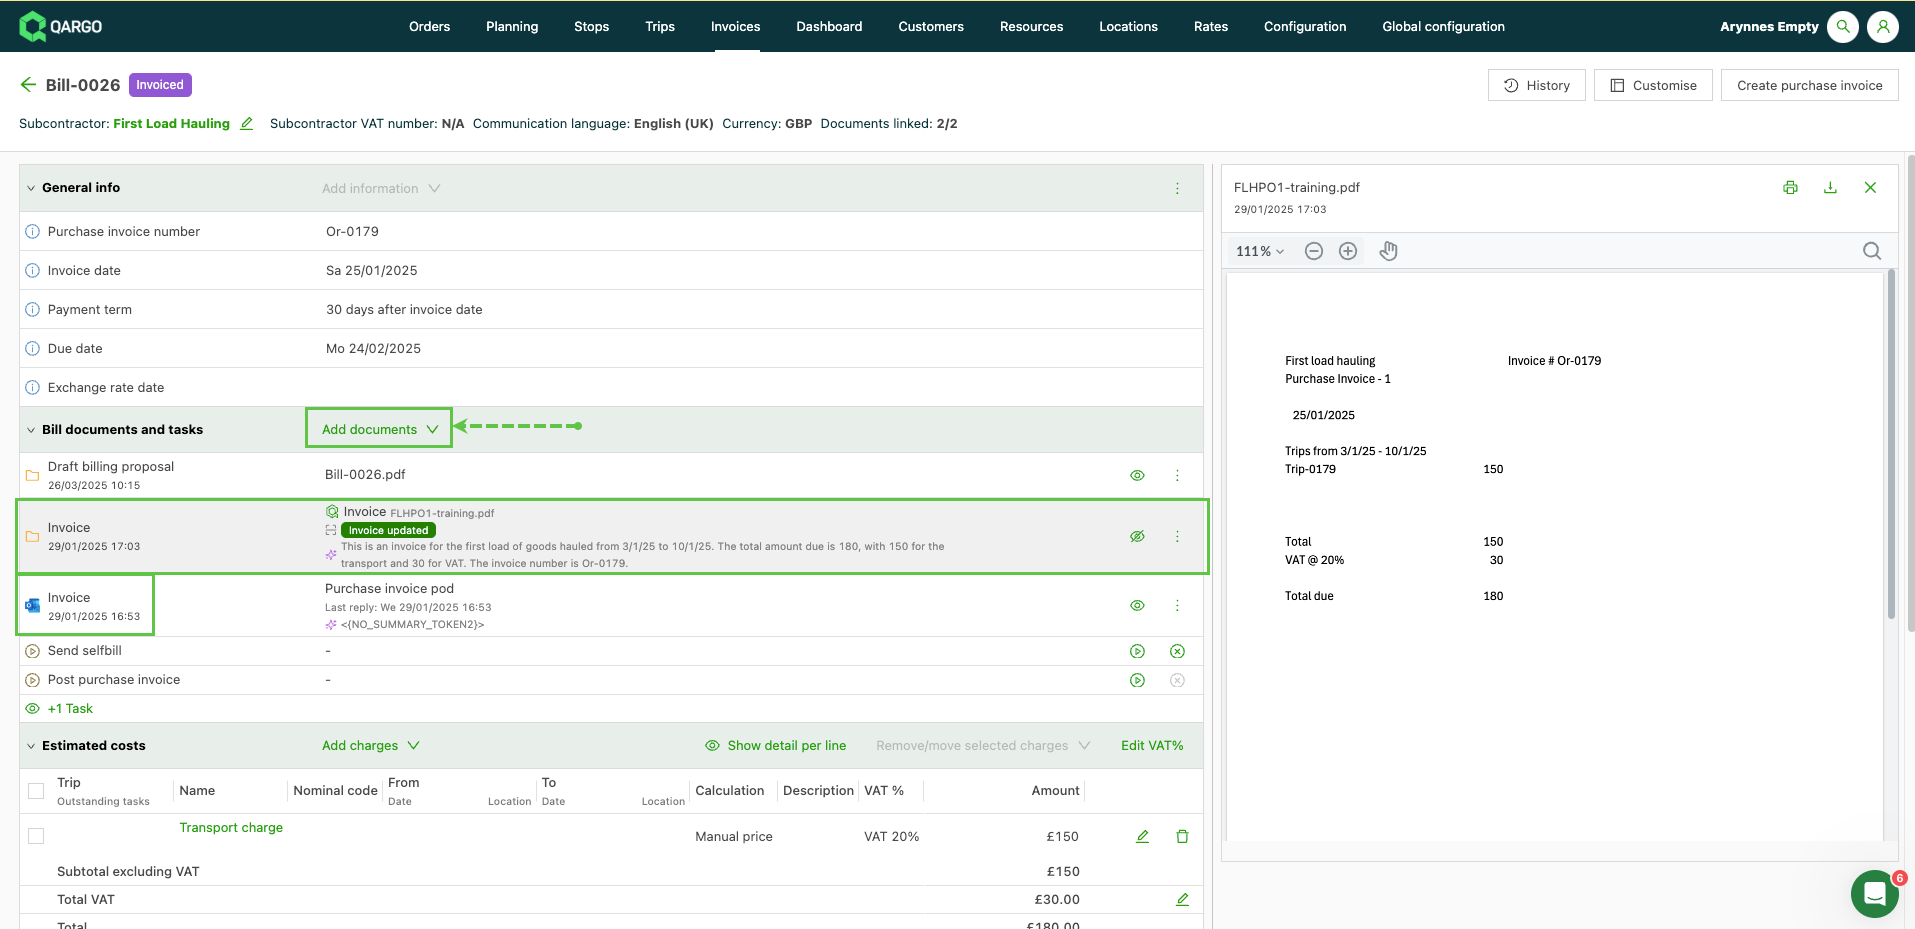
If additional documents are available, they can be added under the Bill documents and tasks panel. Click the Add documents option. A drop-down shows the available document types.
-
Qargo Intelligence adds an AI-generated summary and validation, where appropriate. Click the row to fully expand the summary.
-
Any linked emails are also available to view, along with any attachments included in the emails.
Click the link below to see what other features Qargo Intelligence offers.
Tasks such as generating the PDF, sending the email, marking the invoices as paid, and posting to accounting can be done in bulk via Quick actions. See also how to create these in bulk.
Troubleshooting
| Symptom | Likely cause | Action |
|---|---|---|
| Select all checkbox is not visible in the table header | The column layout may have been customized | Reset the column layout via the Edit columns icon |
| Fewer loads are selected than expected | The default 90-day load end date filter is active | Extend the date filter range to include older loads |
| Bulk action returns an error for some loads | Some loads may already be invoiced or have a non-eligible status | Review the load statuses and deselect ineligible loads before retrying |
| Selection is lost after navigating to another page | This should not occur; cross-page selections persist | Refresh the page and reapply the selection |
\
{#h_9e680dd8f0}