
Pallet networks: sending ETAs to Pall-Ex
Send ETAs to Pall-Ex automatically when a load goes to the driver mobile app, or manually from the load. Covers task setup, running the task and common errors.
Table of contents
Introduction
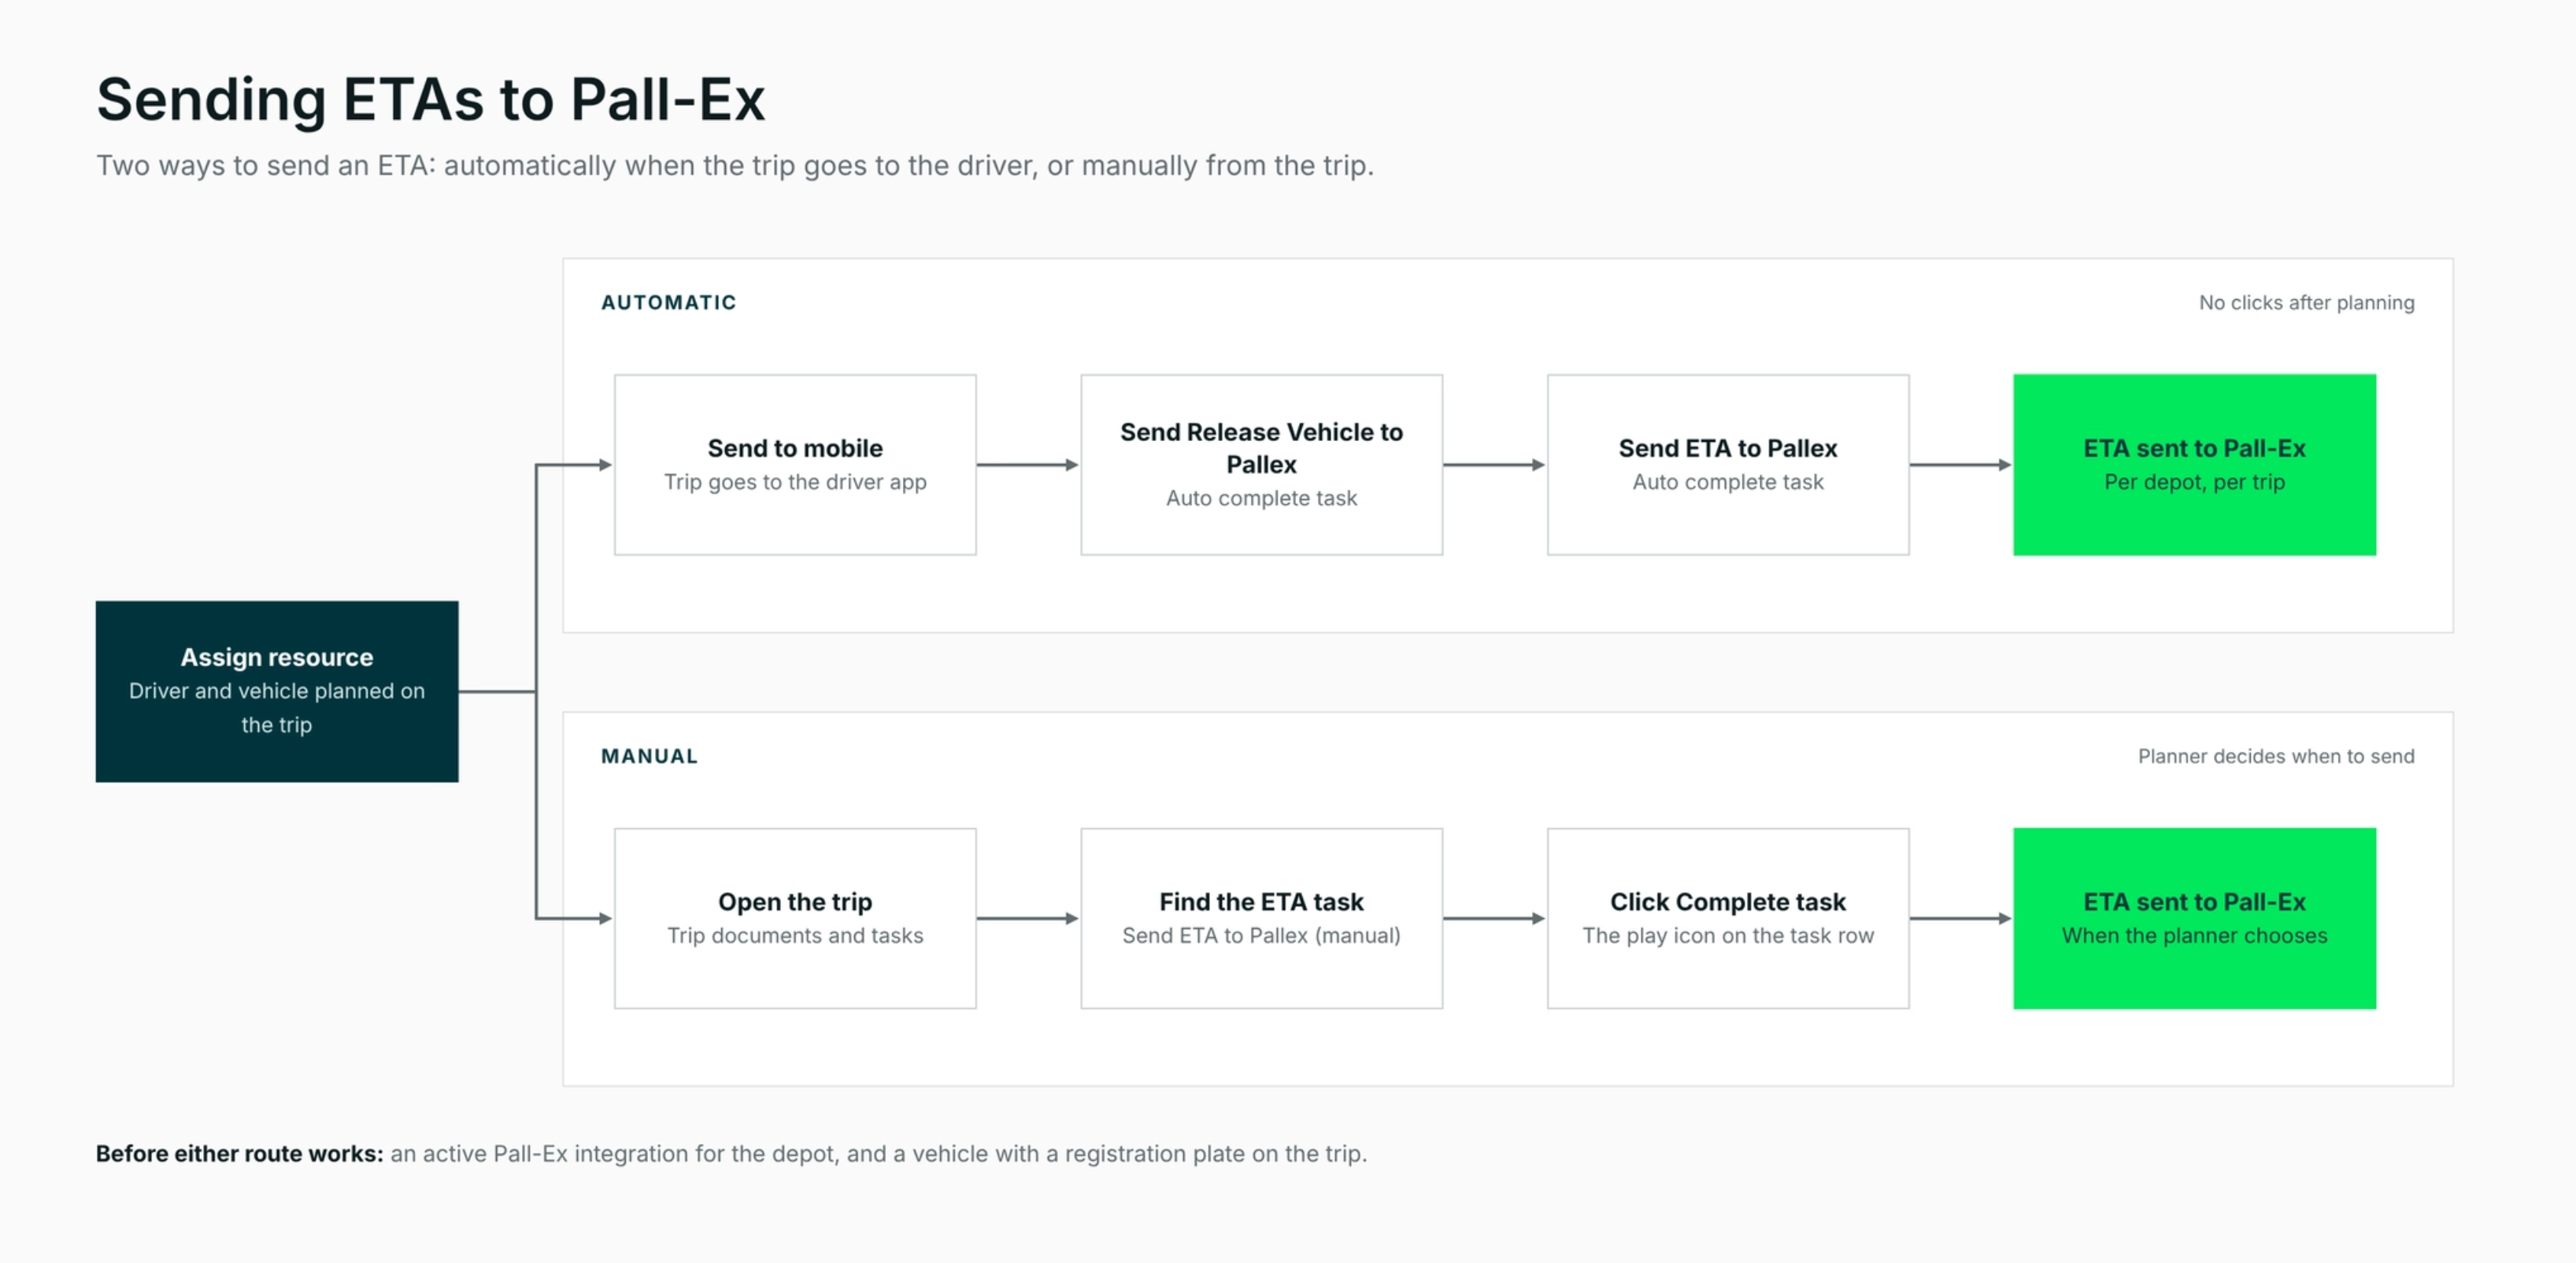
Pall-Ex members share delivery ETAs with the network for each load. Qargo sends these ETAs through the Pall-Ex integration. This article shows two ways to send them.
- Automatic: releases the vehicle and sends the ETA as soon as the load goes to the driver mobile app
- Manual: allows planners to release the vehicle and then send the ETA from the load at any time.
Terminology
| Term | Meaning |
|---|---|
| ETA | Estimated time of arrival for a delivery, shared with Pall-Ex. |
| Release vehicle | The message that tells Pall-Ex which vehicle runs the load. Pall-Ex needs it before it accepts an ETA. |
| Load task | A step Qargo runs on a load, such as Send to mobile or Send ETA to Pallex. |
| Terminal | The Pall-Ex terminal code linked to one Pall-Ex integration, for example PGD123. |
Prerequisites
- An active Pall-Ex integration for each terminal that sends ETAs.
- Admin access to Configuration > Tasks.
- A Send to mobile task on loads, for the automatic route.
- A license plate on the vehicle record of every vehicle that runs Pall-Ex loads. Pall-Ex matches the vehicle on its license plate to release it.
- A Pall-Ex driver ID on every driver who runs Pall-Ex loads. Pall-Ex needs it to release the vehicle and to accept ETAs.
Use case(s)
- Automatic ETAs: A terminal sends every load to the driver mobile app. ETAs reach Pall-Ex with no clicks.
- Manual ETAs: A planner sends the ETA only once the load is final, for example after late changes.
- Multiple terminals: A company with two Pall-Ex terminals sends ETAs for each terminal from one load.
Add the driver ID and vehicle license plate
Pall-Ex releases a vehicle only for a known driver and a known vehicle. Without the driver ID or the vehicle license plate, the release vehicle task fails and no ETA reaches Pall-Ex.
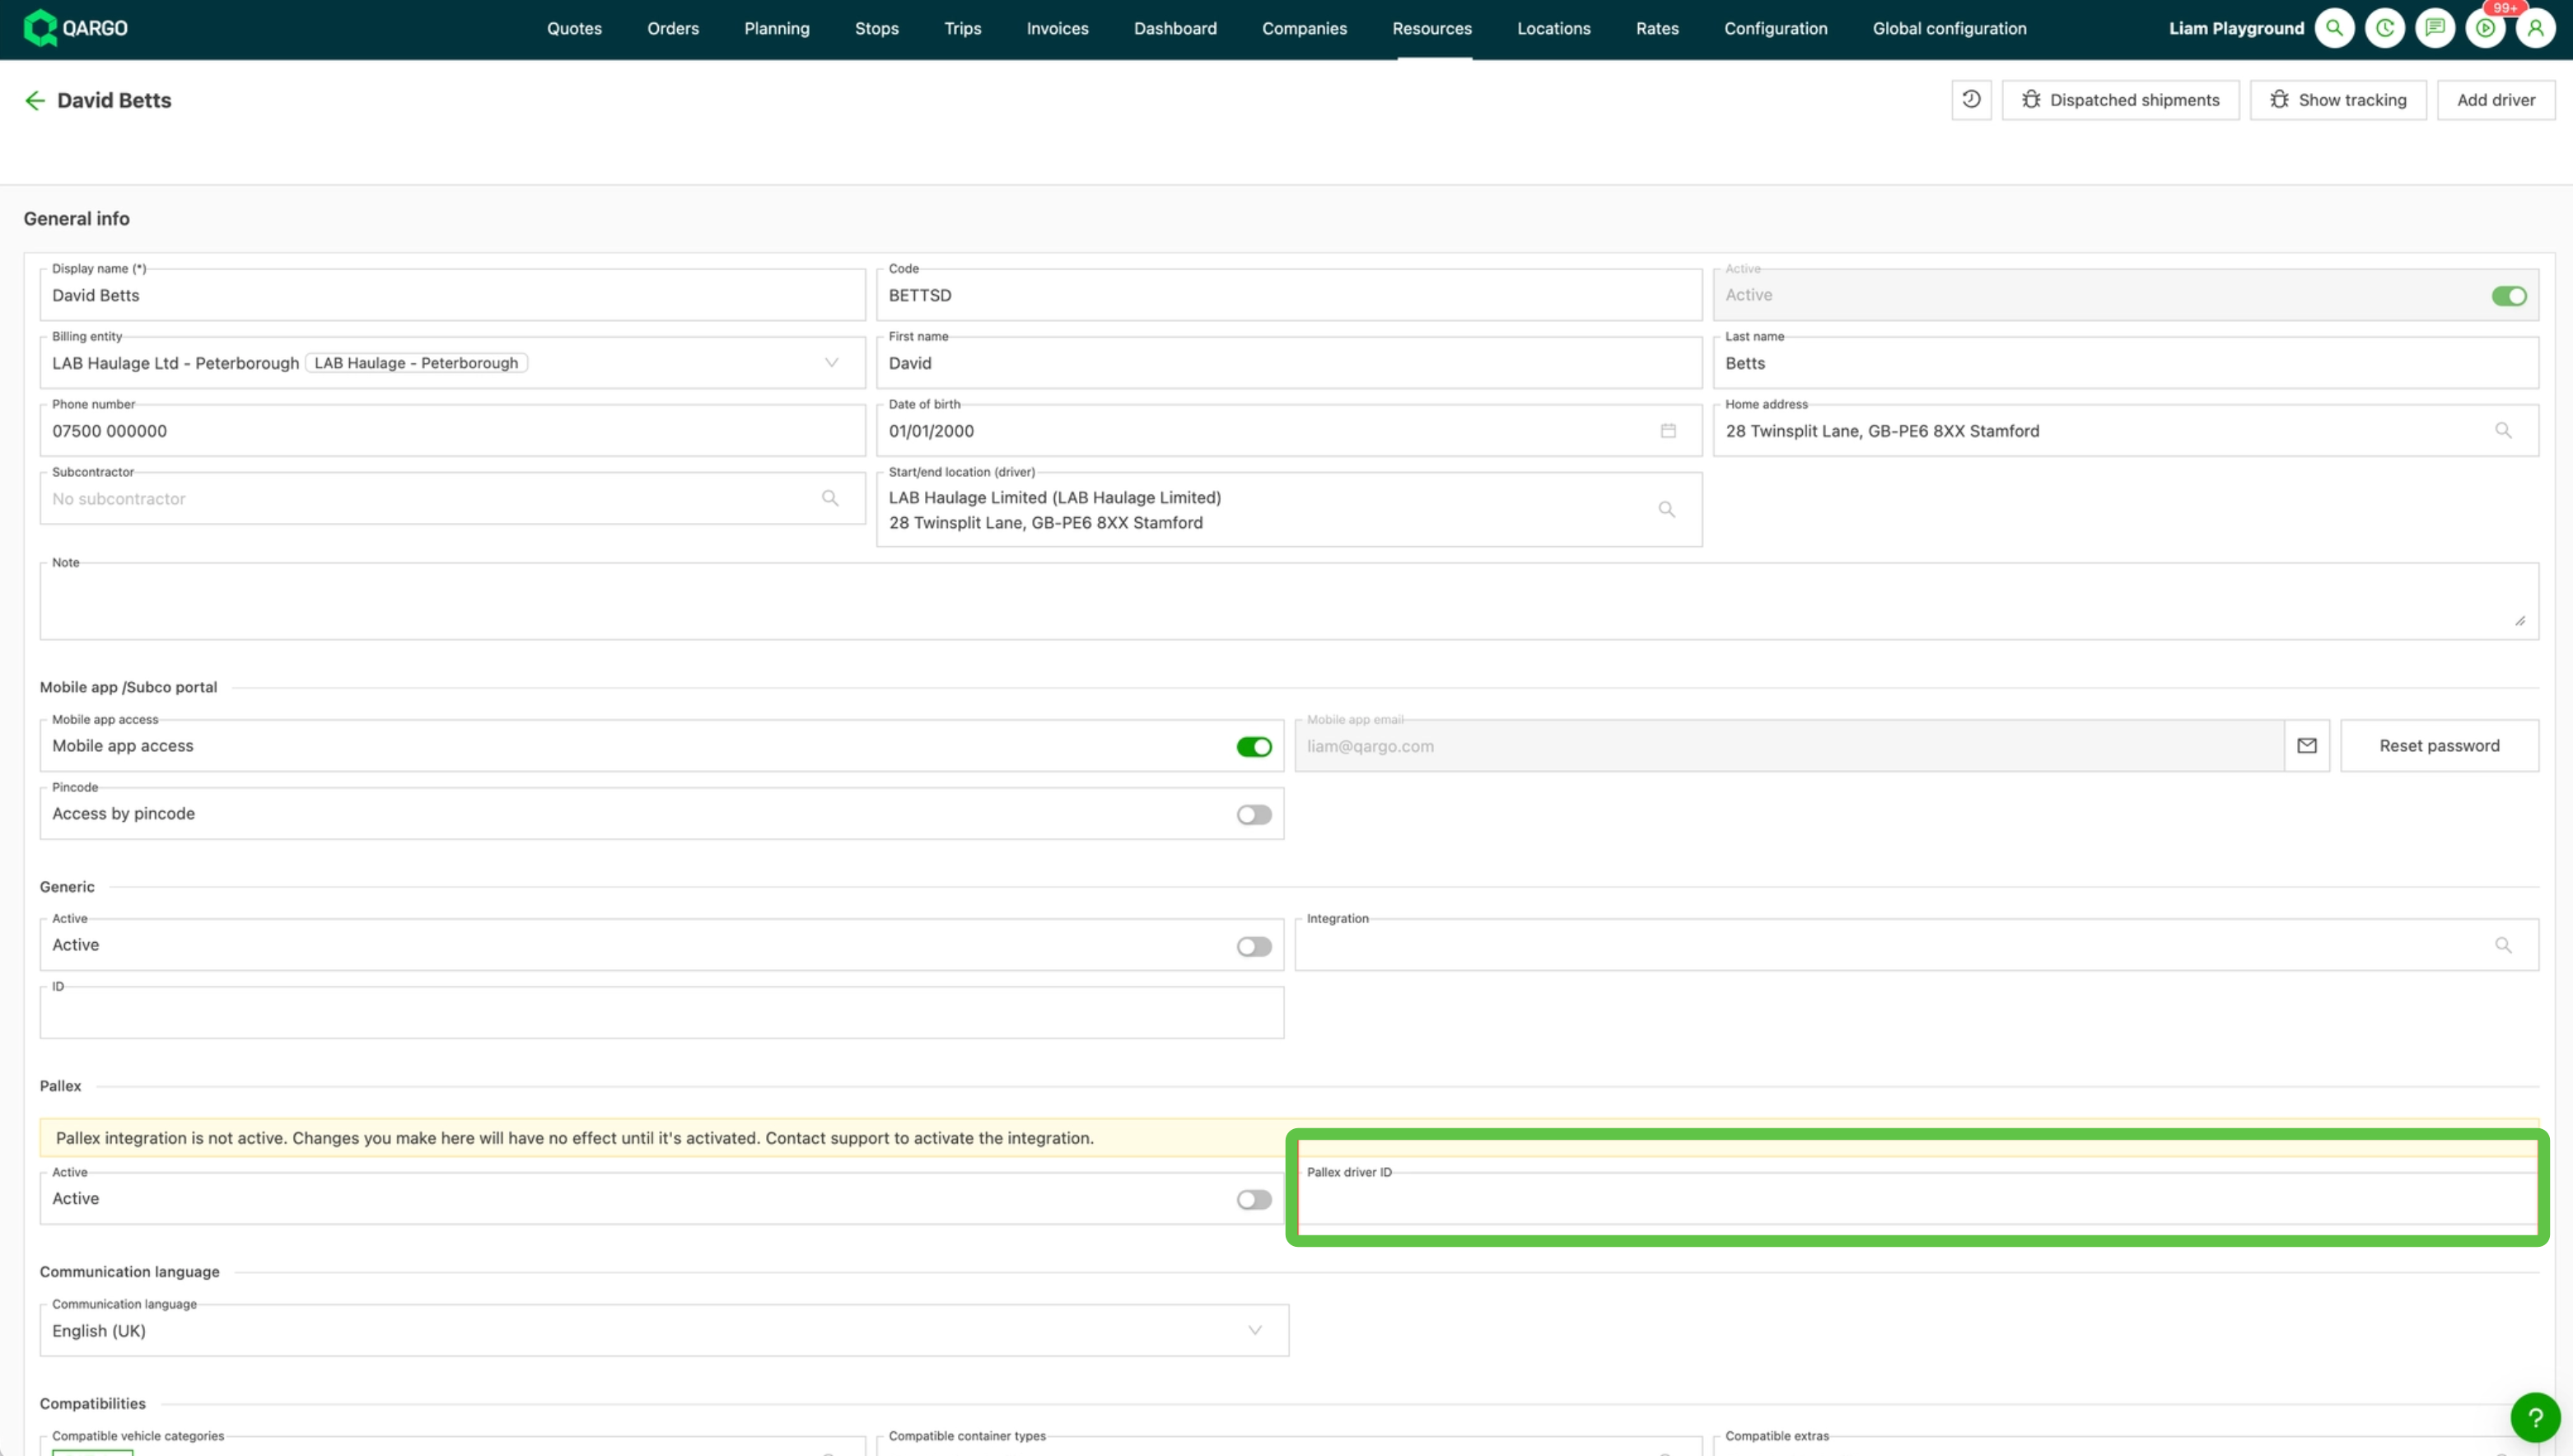
Add the Pall-Ex driver ID
- Go to Resources and open the driver.
- Scroll to the Pallex section.
- Enter the driver’s Pall-Ex ID in Pallex driver ID. Digits only.
- Click Save.
- Repeat for every driver who runs Pall-Ex loads.
Add the vehicle license plate
- Go to Resources and open the vehicle.
- Enter the license plate on the vehicle record.
- Click Save.
- Repeat for every vehicle that runs Pall-Ex loads.
Set up automatic release vehicle and ETAs
Add the release vehicle task
- Go to Configuration > Tasks > Loads.
- Click Add in the Assign resource group.
- Enter the name Send Release Vehicle to Pallex.
- Set Schedule task after to Send to mobile.
- Set Complete task to Auto complete task.
- Select Driver, Contract carrier driver, Truck, Tractor and Van under Resource types.
- Set Communication method to Integration action.
- Select the Pall-Ex integration for the terminal under Integration.
- Select pallet_network.pallex.release_vehicle as Action label.
- Click Save.
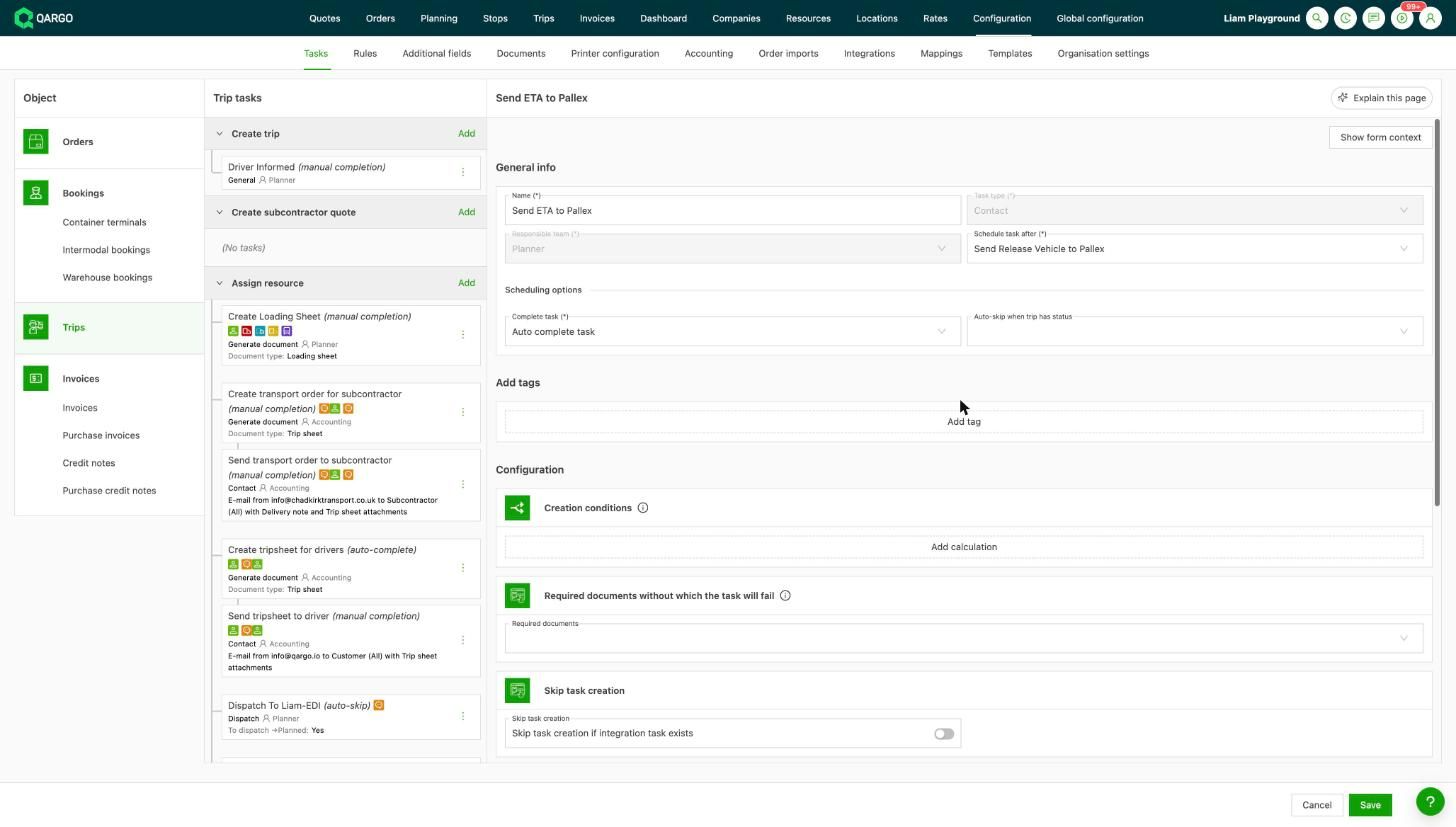
Add the ETA task
- Click Add in the Assign resource group.
- Enter the name Send ETA to Pallex.
- Set Schedule task after to Send Release Vehicle to Pallex.
- Set Complete task to Auto complete task.
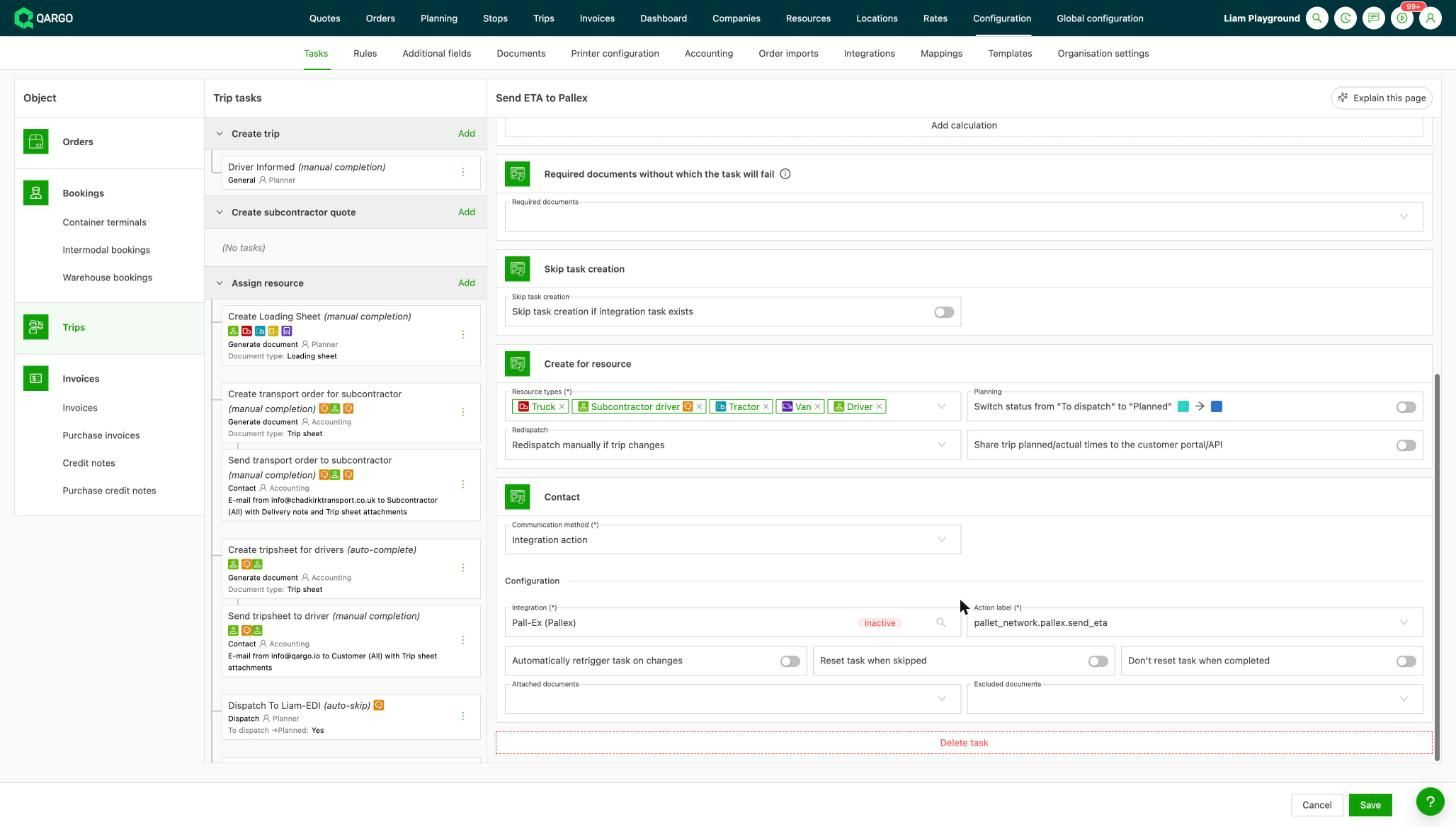
- Select the same five Resource types as the release vehicle task.
- Set Communication method to Integration action.
- Select the same Pall-Ex integration under Integration.
- Select pallet_network.pallex.send_eta as Action label.
- Click Save.
ETA task general settings: Schedule task after and Auto complete task
ETA task resource types, integration and action label
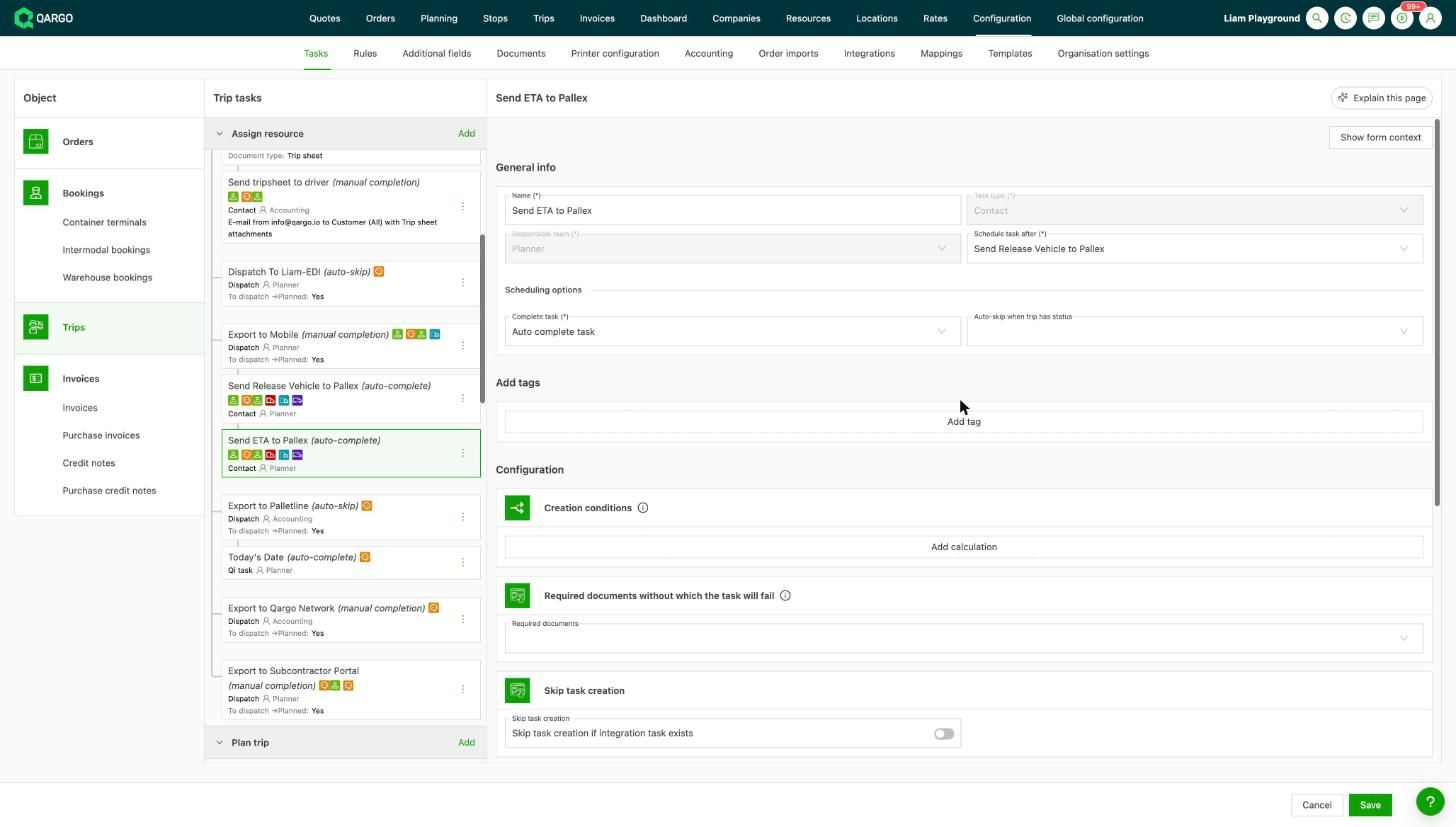
Check the task order
- Open the Assign resource group in Configuration > Tasks > Loads.
- Check the order: Send to mobile, then Send Release Vehicle to Pallex, then Send ETA to Pallex.
Load task list showing the three tasks in order
Release the vehicle and send ETAs manually
Add the manual release vehicle task
- Go to Configuration > Tasks > Loads.
- Click Add in the Assign resource group.
- Enter the name Send Release Vehicle to Pallex (manual).
- Set Schedule task after to Assign resource.
- Set Complete task to Manually complete.
- Select the resource types, integration and pallet_network.pallex.release_vehicle action label, as in the automatic setup.
- Click Save.
Add the manual ETA task
- Click Add in the Assign resource group.
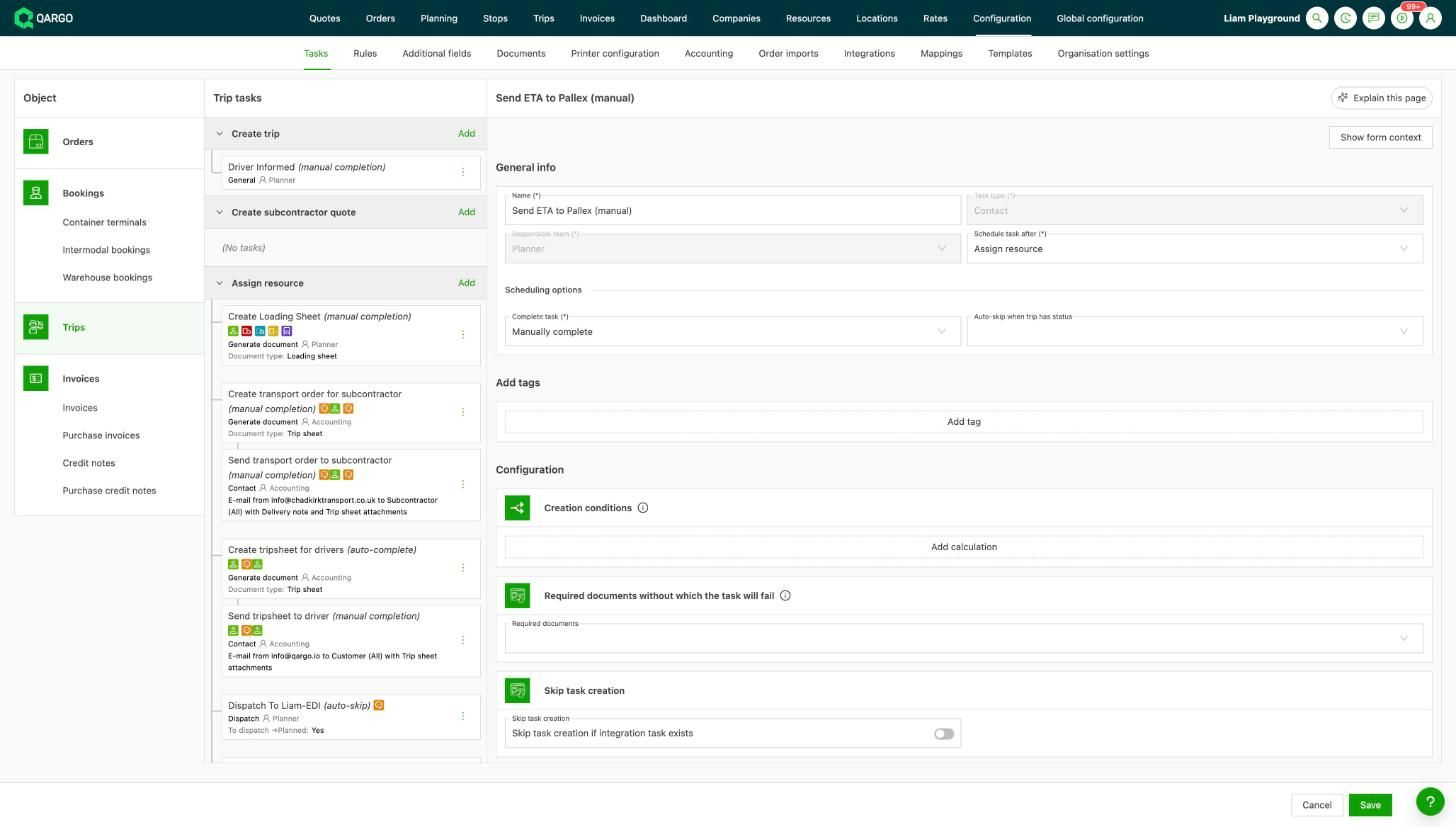
- Enter the name Send ETA to Pallex (manual).
- Set Schedule task after to Send Release Vehicle to Pallex (manual).
- Set Complete task to Manually complete.
- Select the resource types, integration and pallet_network.pallex.send_eta action label, as in the automatic setup.
- Click Save.
Manual ETA task with Manually complete and Schedule task after Assign resource
Run the tasks on a load
- Open the load.
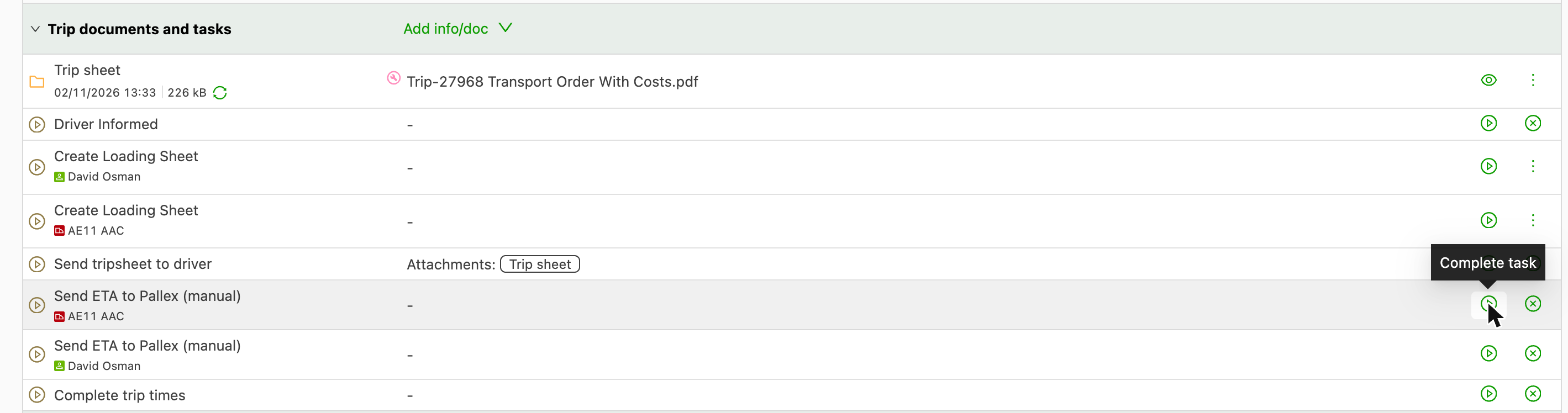
- Go to Load documents and tasks.
- Find the Send Release Vehicle to Pallex (manual) row.
- Click the play icon, Complete task.
- Find the Send ETA to Pallex (manual) row.
- Click the play icon, Complete task.
Load documents and tasks with the Complete task play icon
Troubleshooting
| Issue | Resolution |
|---|---|
| Release vehicle or ETA fails with no license plate | Add the license plate on the vehicle record in Resources, then run the task again. |
| ETA fails because of multiple delivery terminals | Set up a release vehicle task and an ETA task per terminal. |
| ETA fails with a timeout | Run the task again a few minutes later. |
| ETA fails with no Pall-Ex vehicle | Run Send Release Vehicle to Pallex first, then send the ETA. |
| Release vehicle fails for the driver | Add the Pallex driver ID on the driver, then run the task again. |
| Task shows “Consignment is not exported to Pallex” | No action needed. The order is not a Pall-Ex shipment, so Qargo skips it. |