
Qargo Intelligence (Qi): order scanning
Upload order confirmations in bulk and let Qargo Intelligence scan them in the background into ready-to-review orders, directly from Qargo or Outlook.
Table of contents
Summary
-
What is it?
- Qargo Intelligence users can turn order confirmations into orders. Documents are dropped into the Upload orders tab (or sent from Outlook) and scanned in the background.
- Qargo Intelligence identifies the customer and transportation service on its own, then fills in a proposal order ready for review.
- Many more fields are pre-filled than with the original scanning on the Create order page.
-
Why use it?
- No more waiting on the page while each document is read. Upload a whole batch, keep working, and come back to review.
- No need to download email attachments and upload them again.
- Orders written in the body of an email, with no attachment, can be scanned too.
- Rules written in plain language teach the scanner how each business and each customer works.
-
How does it work?
- Drop one or more files into Upload orders, drag in a saved email, or click New order in the Outlook plug-in.
- Each document becomes an import and is scanned in the background.
- Review the proposal order, correct the customer or transportation service if needed, and confirm.
🎥 This video shows the general settings and rules (more info on this below):
Prerequisites
- Qargo Intelligence (Qi) active on the account, with order scanning turned on by Qargo. Without it, the Upload orders tab does not appear.
- Access to rules: editing rules under Configuration > Rules is available to Super Admin and Operations users only.
- Qargo Outlook plug-in installed, if orders will be started from Outlook.
Use cases
- A batch of morning orders: A planner receives ten order confirmations overnight. All ten are dropped into Upload orders at once, and the planner reviews each proposal order as soon as it finishes scanning.
- Orders arriving by email: A customer emails a PDF order. The planner opens the email in Outlook and clicks New order, with no download or re-upload needed.
- Orders typed into the email itself: A customer writes the transport details directly in the email body. The email is sent to Qargo and the text is scanned into a proposal order.
- One email, several attachments: A customer emails three order PDFs. The email is saved, dropped into Upload orders, and all three attachments are selected for import.
- One document, several orders: A customer sends one file listing several container moves. The document is scanned once and split into one order row per transport.
- Extras added manually: Planners keep adding a liftgate or a booked time window to every order from a certain customer. A rule with a short instruction now does this automatically.
Terminology
| Term | Definition |
|---|---|
| Order confirmation | The document or email a customer sends to request a transport |
| Order scanning | Qargo Intelligence reading an order confirmation and turning it into a proposal order |
| Upload orders tab | The tab next to Orders where documents are dropped in and scanned imports are reviewed |
| Import | One scanned document (or one order found in a document) waiting to be reviewed and created |
| Proposal order | An order pre-filled from the document, ready for review before it is created |
| Drop zone | The area on the Upload orders tab where files can be dragged in |
| Rule | A setting that controls which order fields are read from documents and how |
| Instruction | Plain-language guidance in a rule that tells the scanner where to find a value and how to format it |
| Override | A rule that applies only to a specific customer, transportation service, or both |
| Qargo Outlook plug-in | The Qargo sidebar in Microsoft Outlook that sends emails into Qargo |
Uploading order confirmations
🎥 This video explains exactly how uploading orders works with Qi:
Upload from the Upload orders tab
-
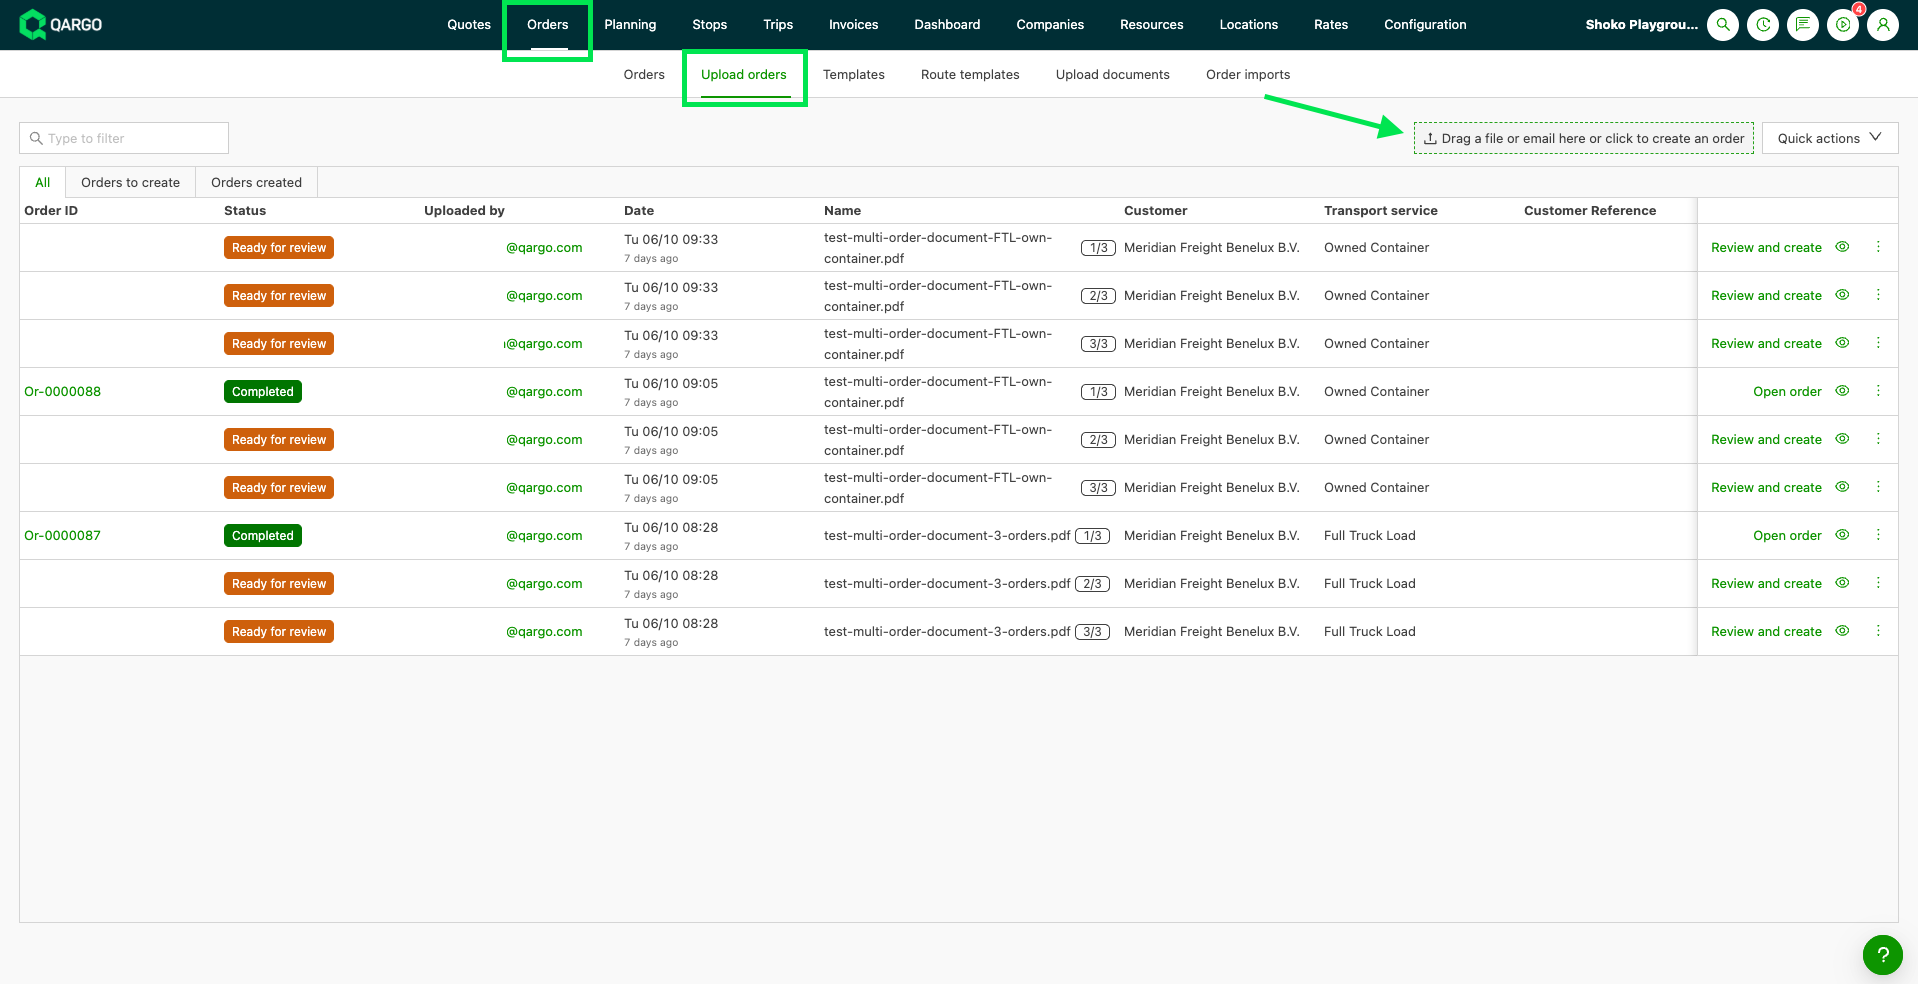
Open the Upload orders tab, next to Orders.
-
Drag files into the drop zone, or click the drop zone to browse. Several files can be added at once.
- Supported file types: PDF, PNG, JPEG, TIFF, Word (.doc / .docx), Excel (.xls / .xlsx), RTF and TXT.
- There is no need to select the customer or transportation service first. Qargo Intelligence identifies them.
-
Continue working. Each file becomes an import and is scanned in the background. The page does not need to stay open, and more files can be added at any time.

Upload a saved email (.eml / .msg)
-
Drag a saved email onto the drop zone, or anywhere on the Upload orders page.
-
Check the email preview shown in the panel. Click an attachment to read it before choosing.
-
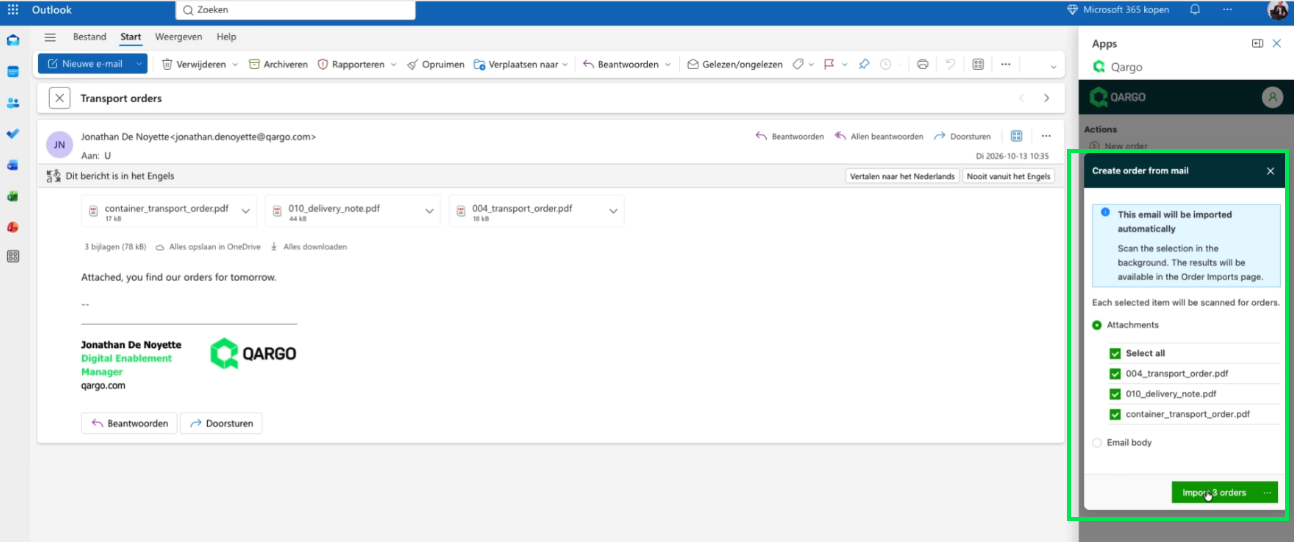
Select what to scan:
- Attachments: check as many as needed, or
- Email body: when the order is written in the email itself.
-
Confirm to start the scan.
🎥 It’s also possible to import orders from an email inbox. This video shows how:
Start from Outlook
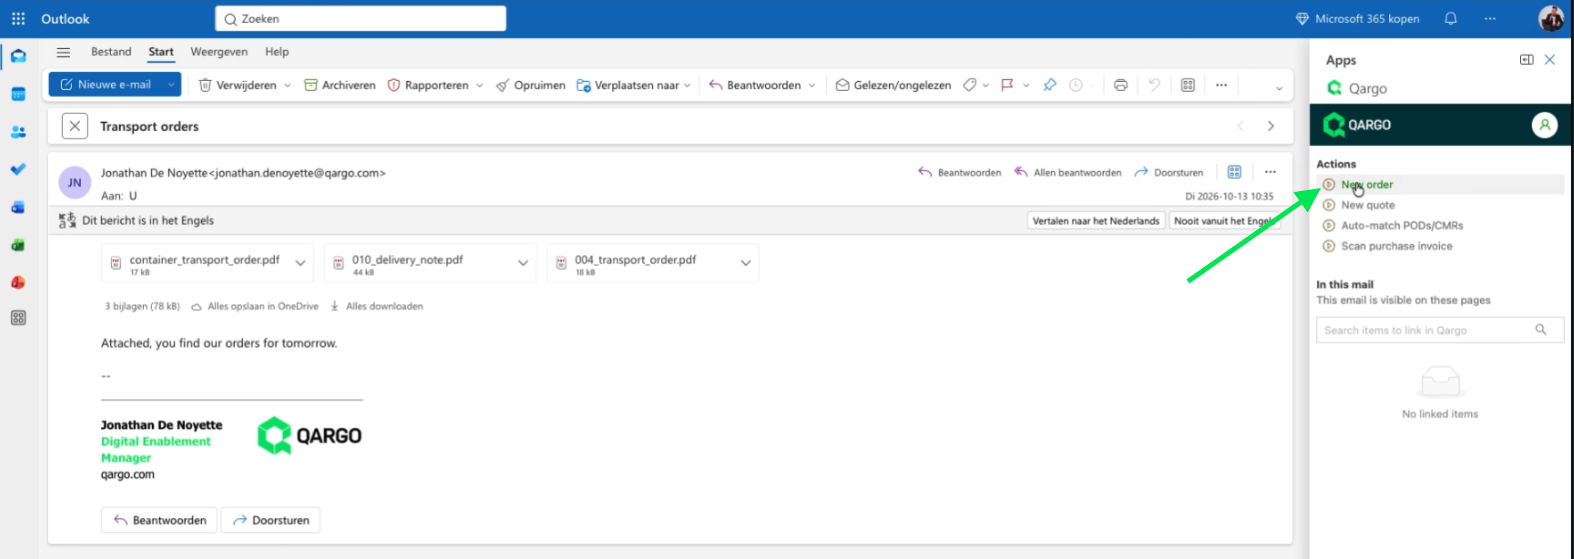
- Open the email containing the order confirmation. This can be an attachment or order details written in the email itself.
- Open the Qargo Outlook plug-in sidebar.
- Click New order under Actions.
- Continue working. The email joins the same background scanning, and the result appears in the Upload orders tab.
Reviewing and creating orders
Find scanned imports
-
Open the Upload orders tab.
-
Select a view:
- Orders to create: imports waiting for review
- Orders created: imports already turned into orders
- All: everything uploaded
-
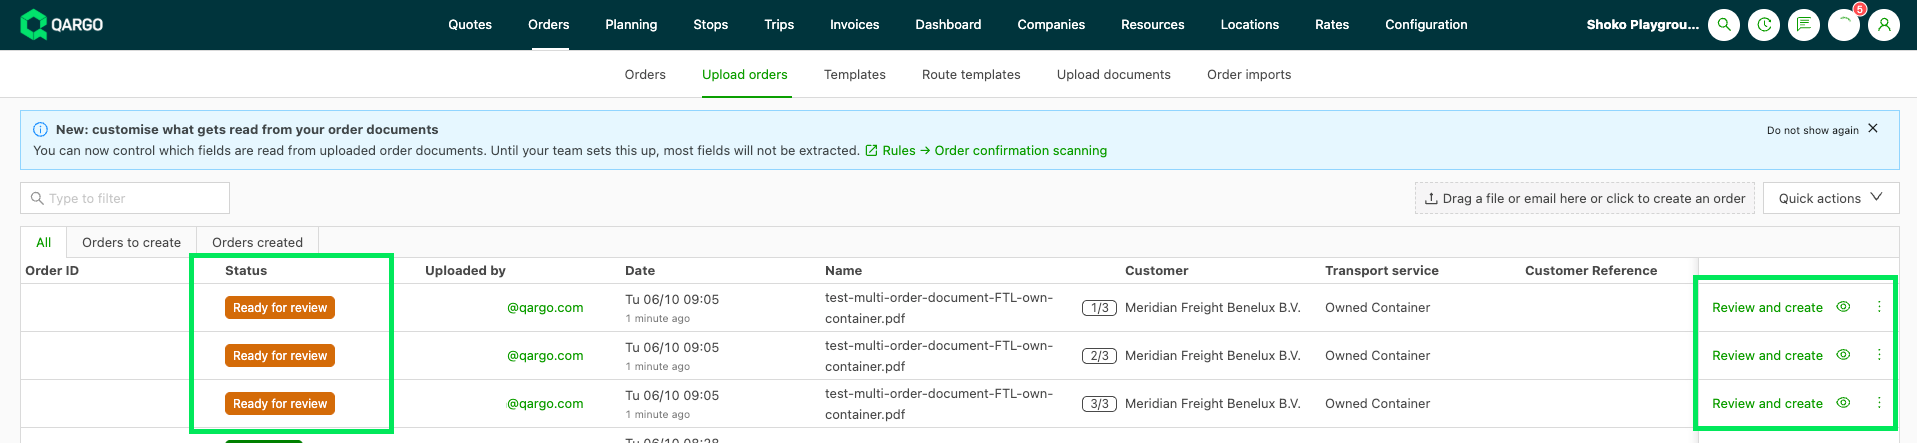
Check the label on each row to see what is needed:
- Select customer: the customer was not recognized
- Select transportation service: the transportation service was not recognized
- Ready for review: the proposal order is ready to check
-
Click the eye icon on a row to view the scanned document or email.

Set the customer or transportation service
- Select the correct customer or transportation service on the row and save.
Review and create the order
-
Click Review and create on the row.
-
Check the pre-filled details and complete any missing fields.
-
Save to confirm and create the order. The order is linked to the import and the import status changes to Completed.
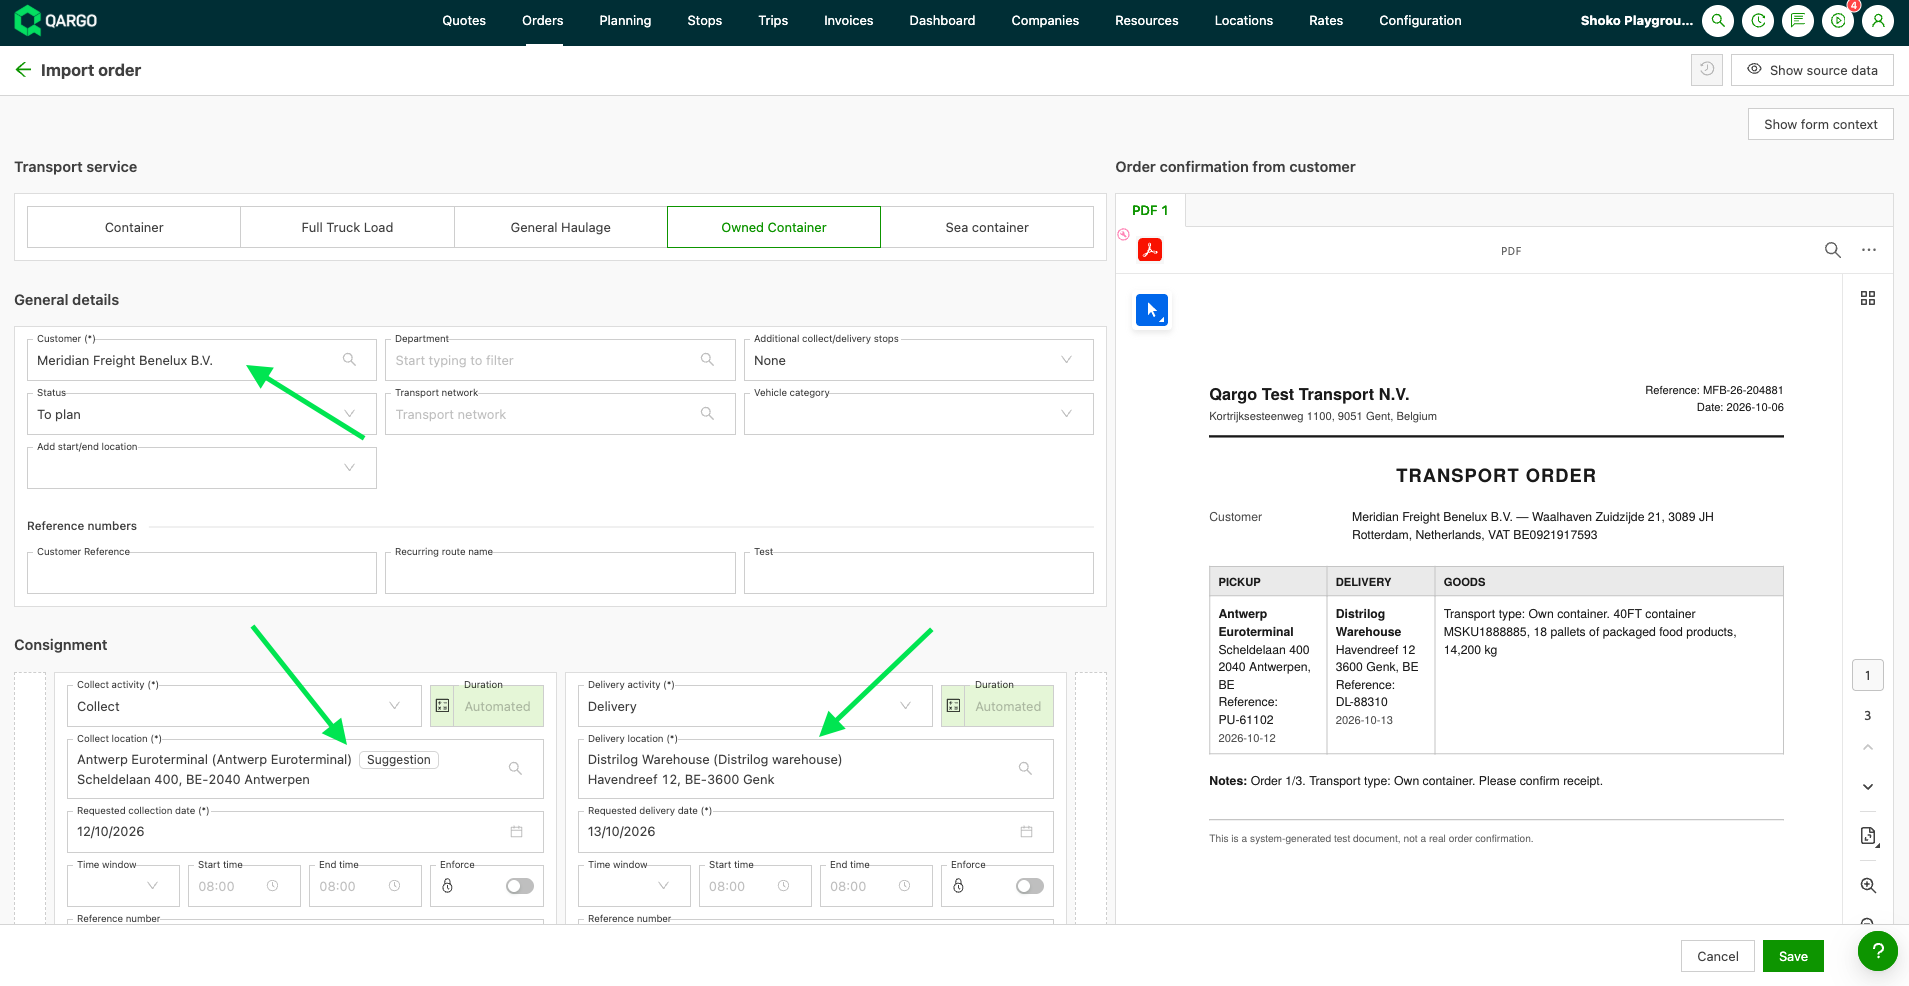
Documents with several orders
When one document contains several transport orders, it is scanned once and split into one row per order.
- Each row is labeled with its position in the document (for example 1/3, 2/3, 3/3).
- The customer and transportation service are identified once for the whole document, so every row starts with the same values.
- Each row has the source document attached and is reviewed and created individually.

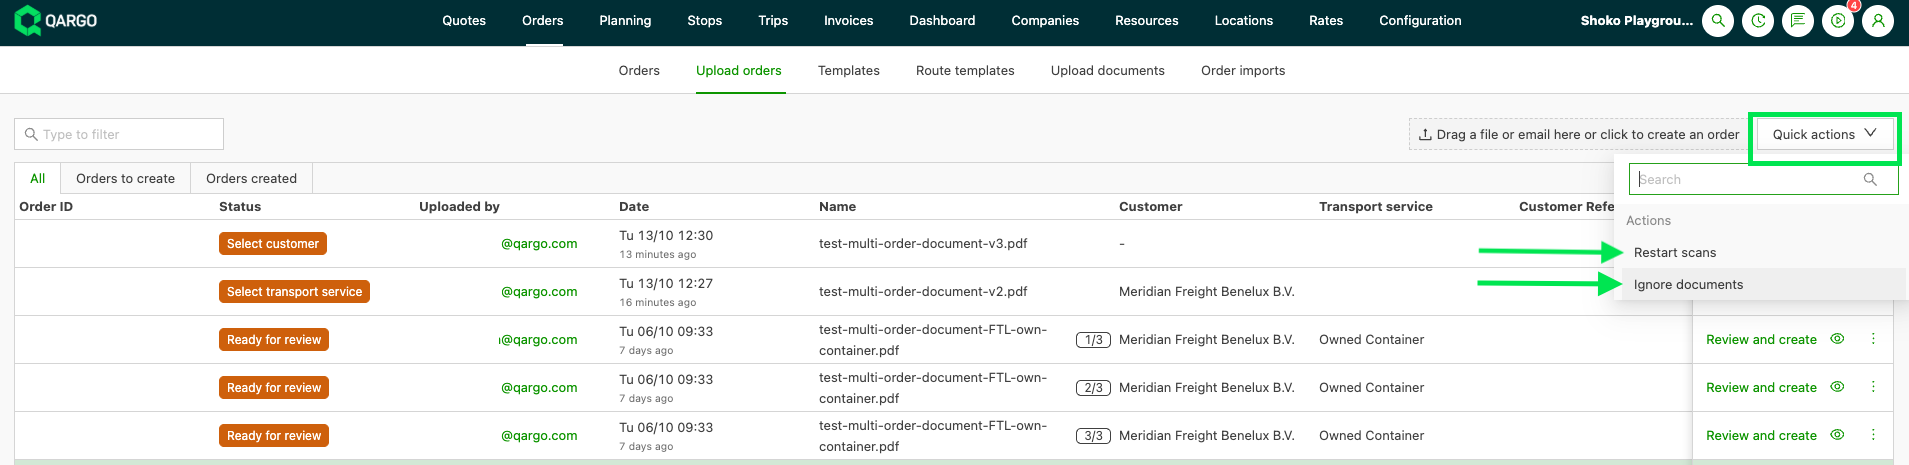
Fix mistakes with Quick actions
-
Select one or more rows.
-
Open Quick actions and choose:
-
Ignore documents: sets the status to Ignored, for example when the wrong file was uploaded
-
Restart scans: scans the documents again, for example after updating rules
-
Setting up rules
Choose which fields are read
Only the essential fields are read; more fields can be turned on. Default fields are:
- Customer
- Transportation service
- Locations
- Dates
- Go to Configuration > Rules > Auto-assign > Order confirmation scanning.
- Click the green button on the right of a field’s row to turn it on.
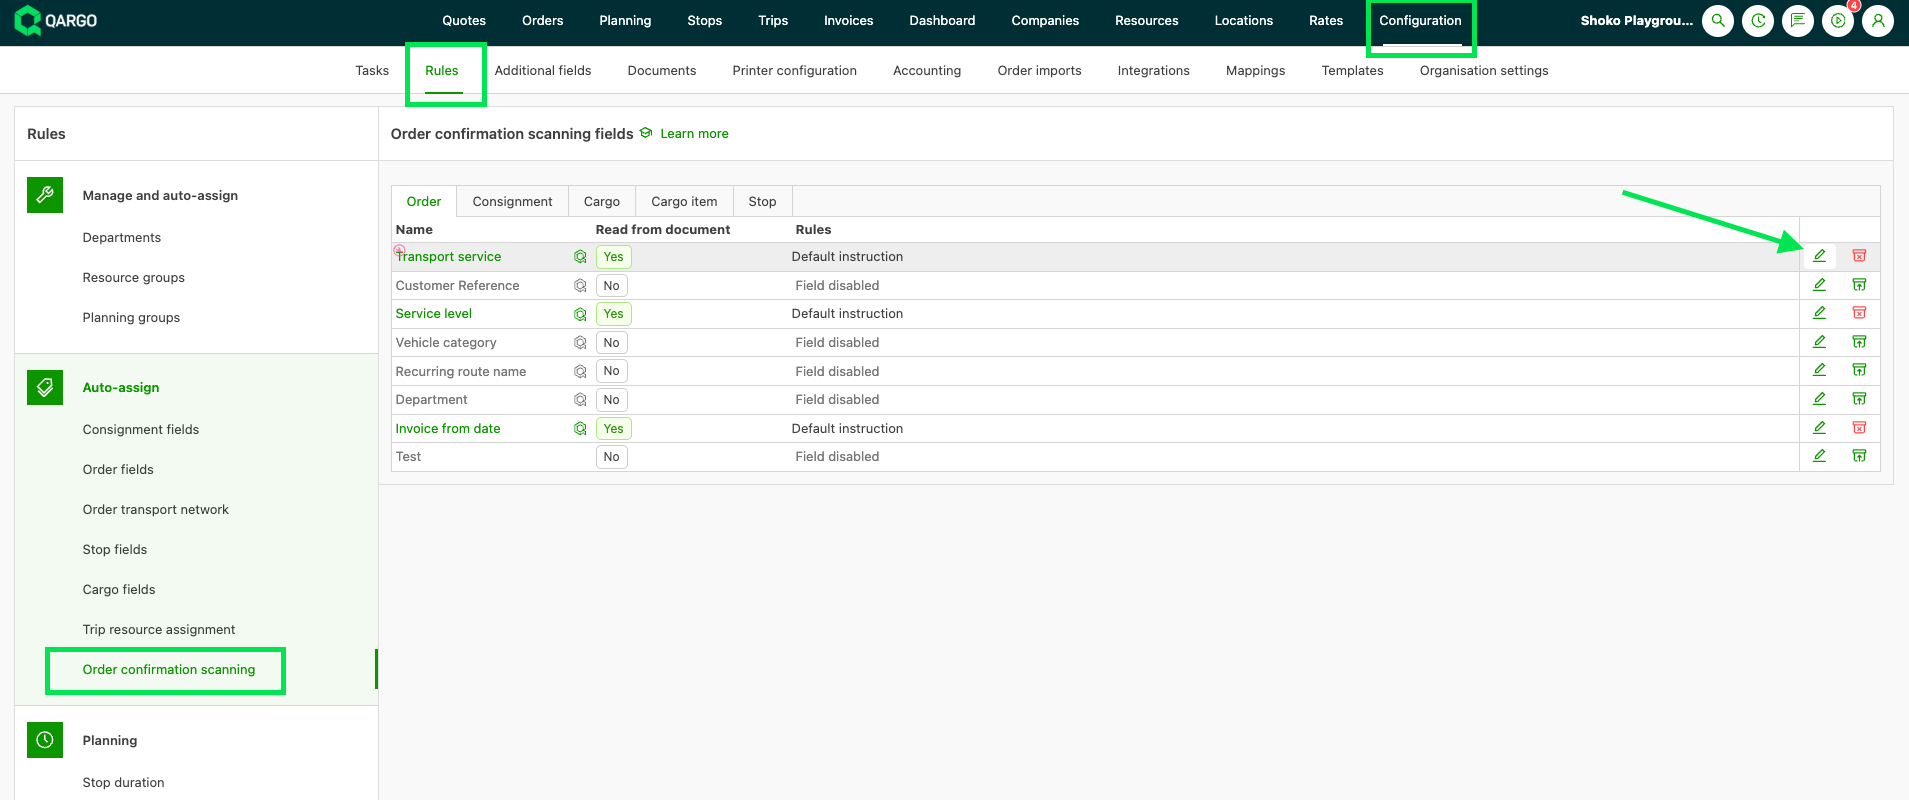
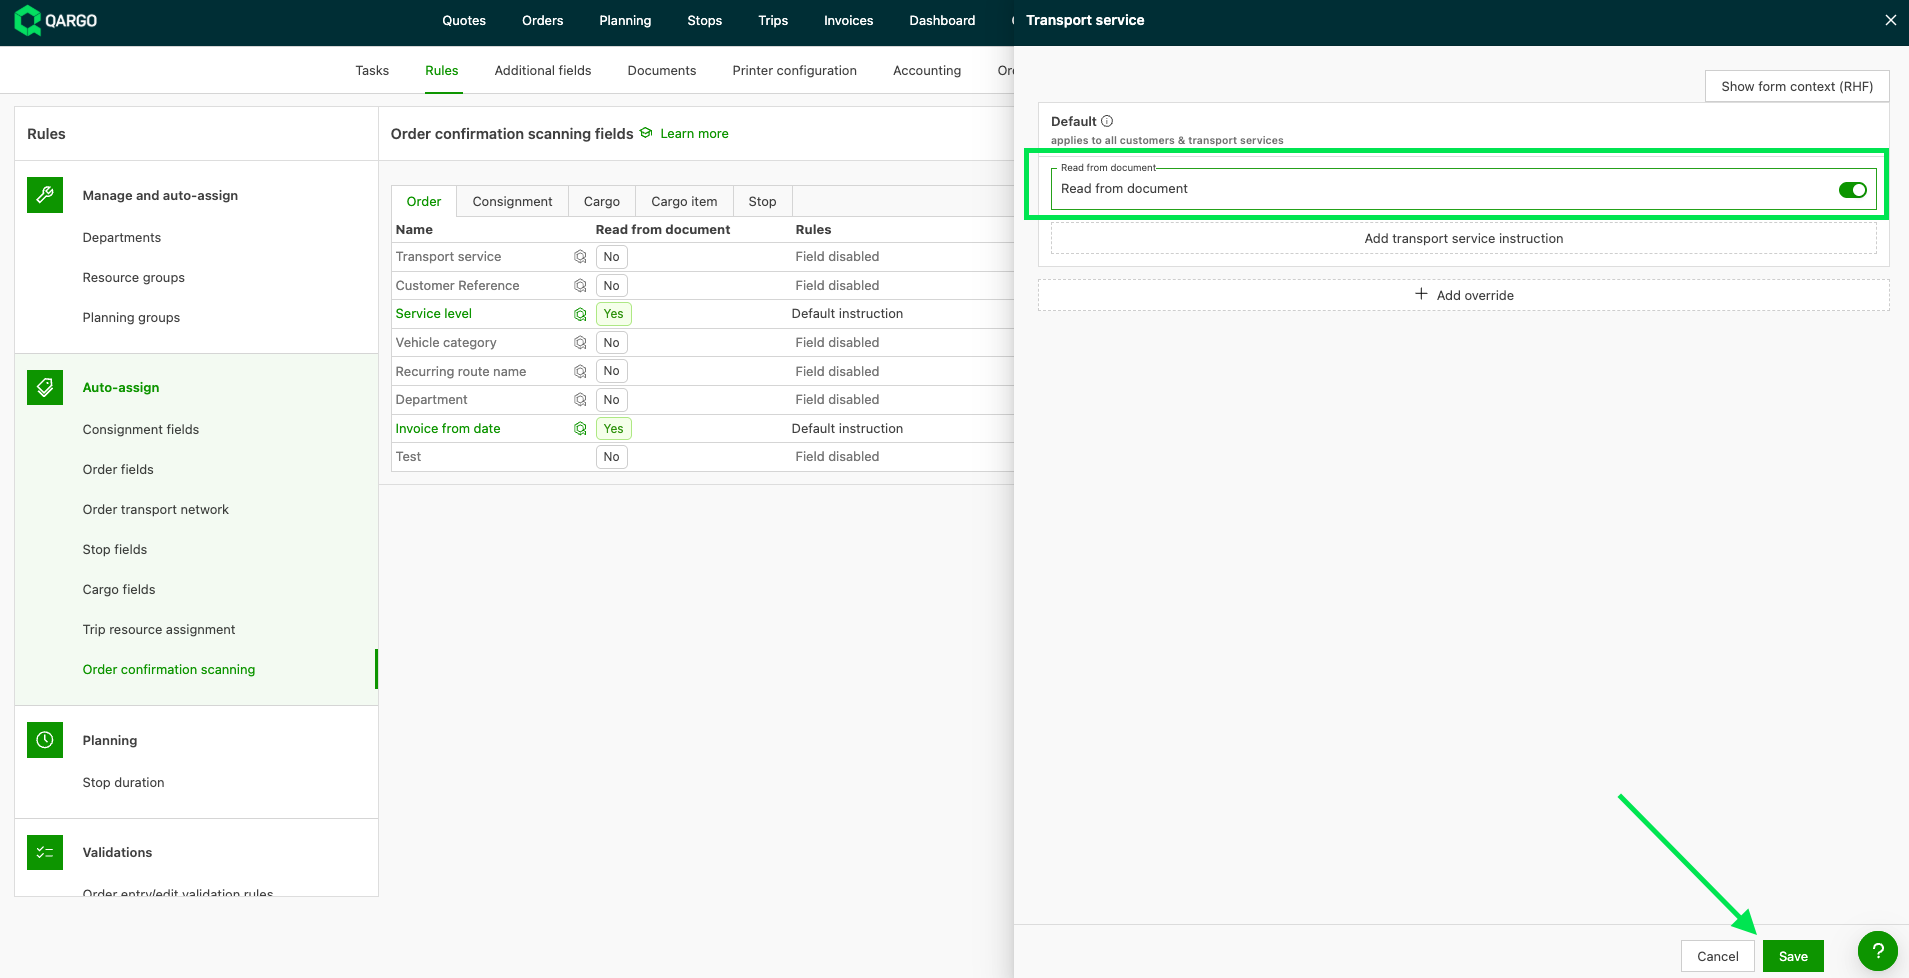
Fields are grouped by tab (for example Order, Stop, Freight). Custom fields can be turned on too.
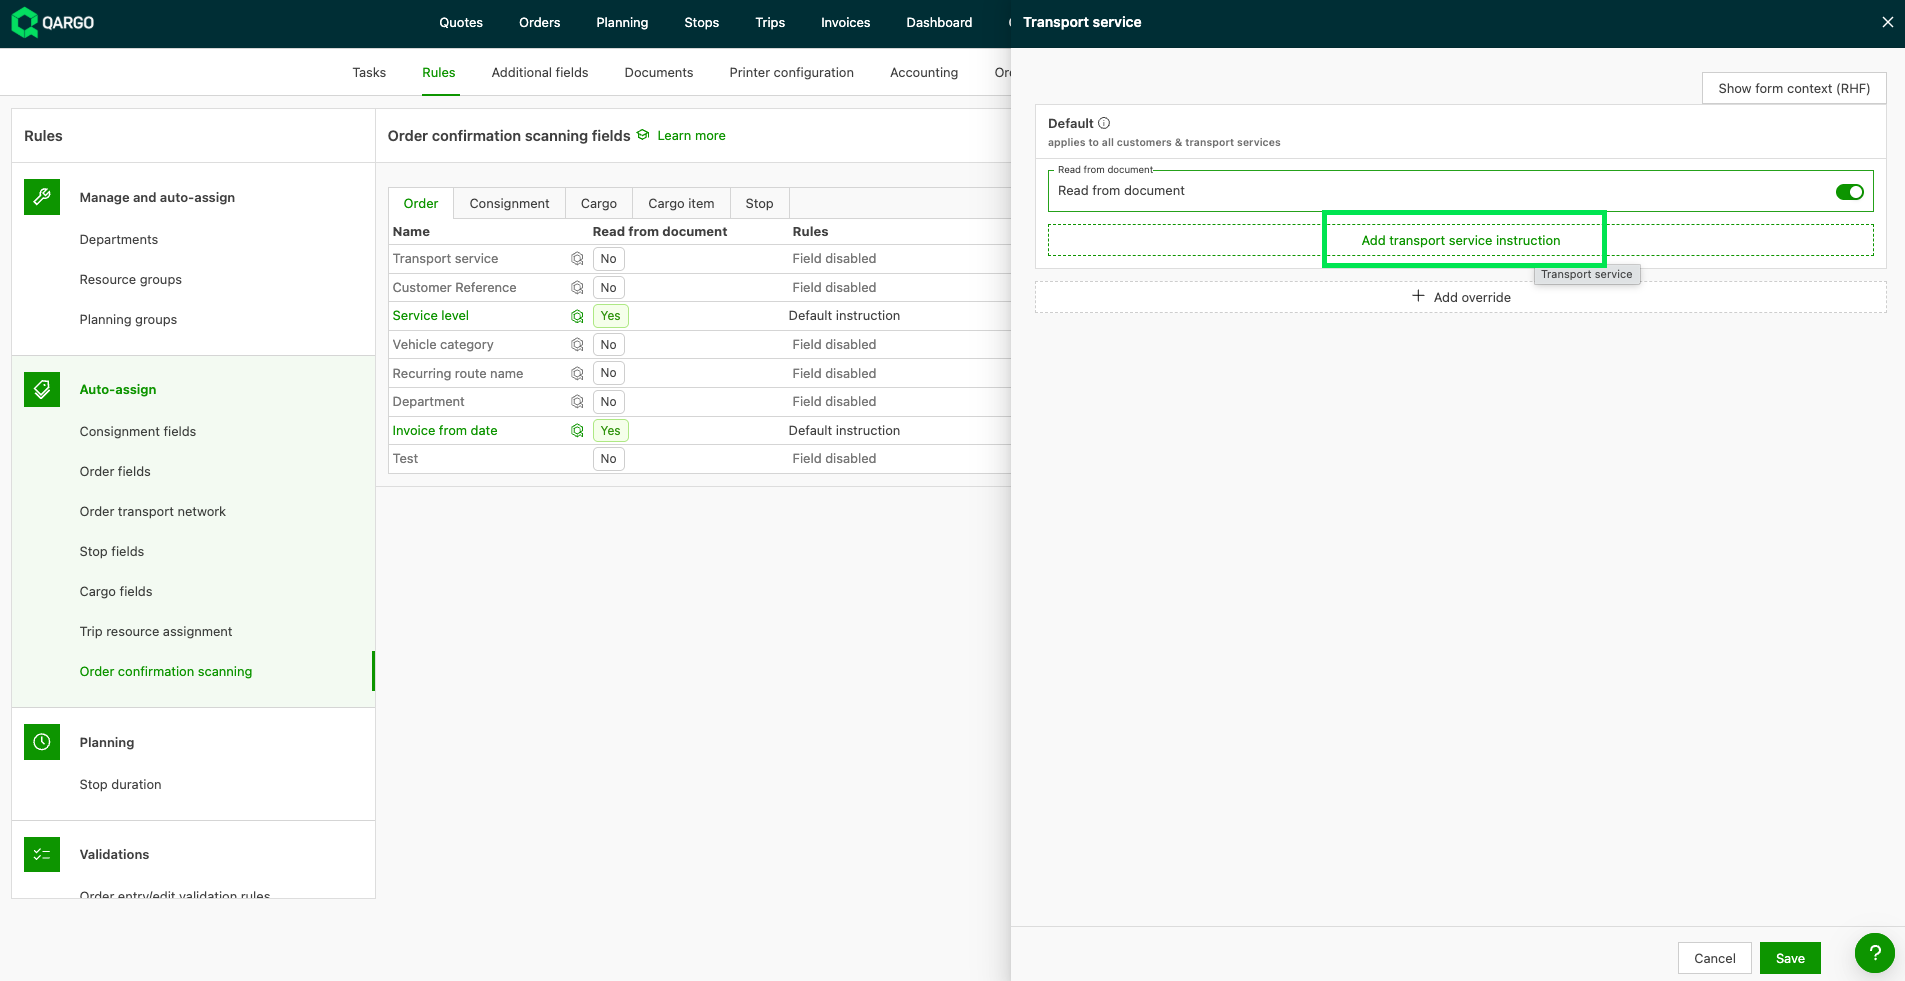
Write instructions
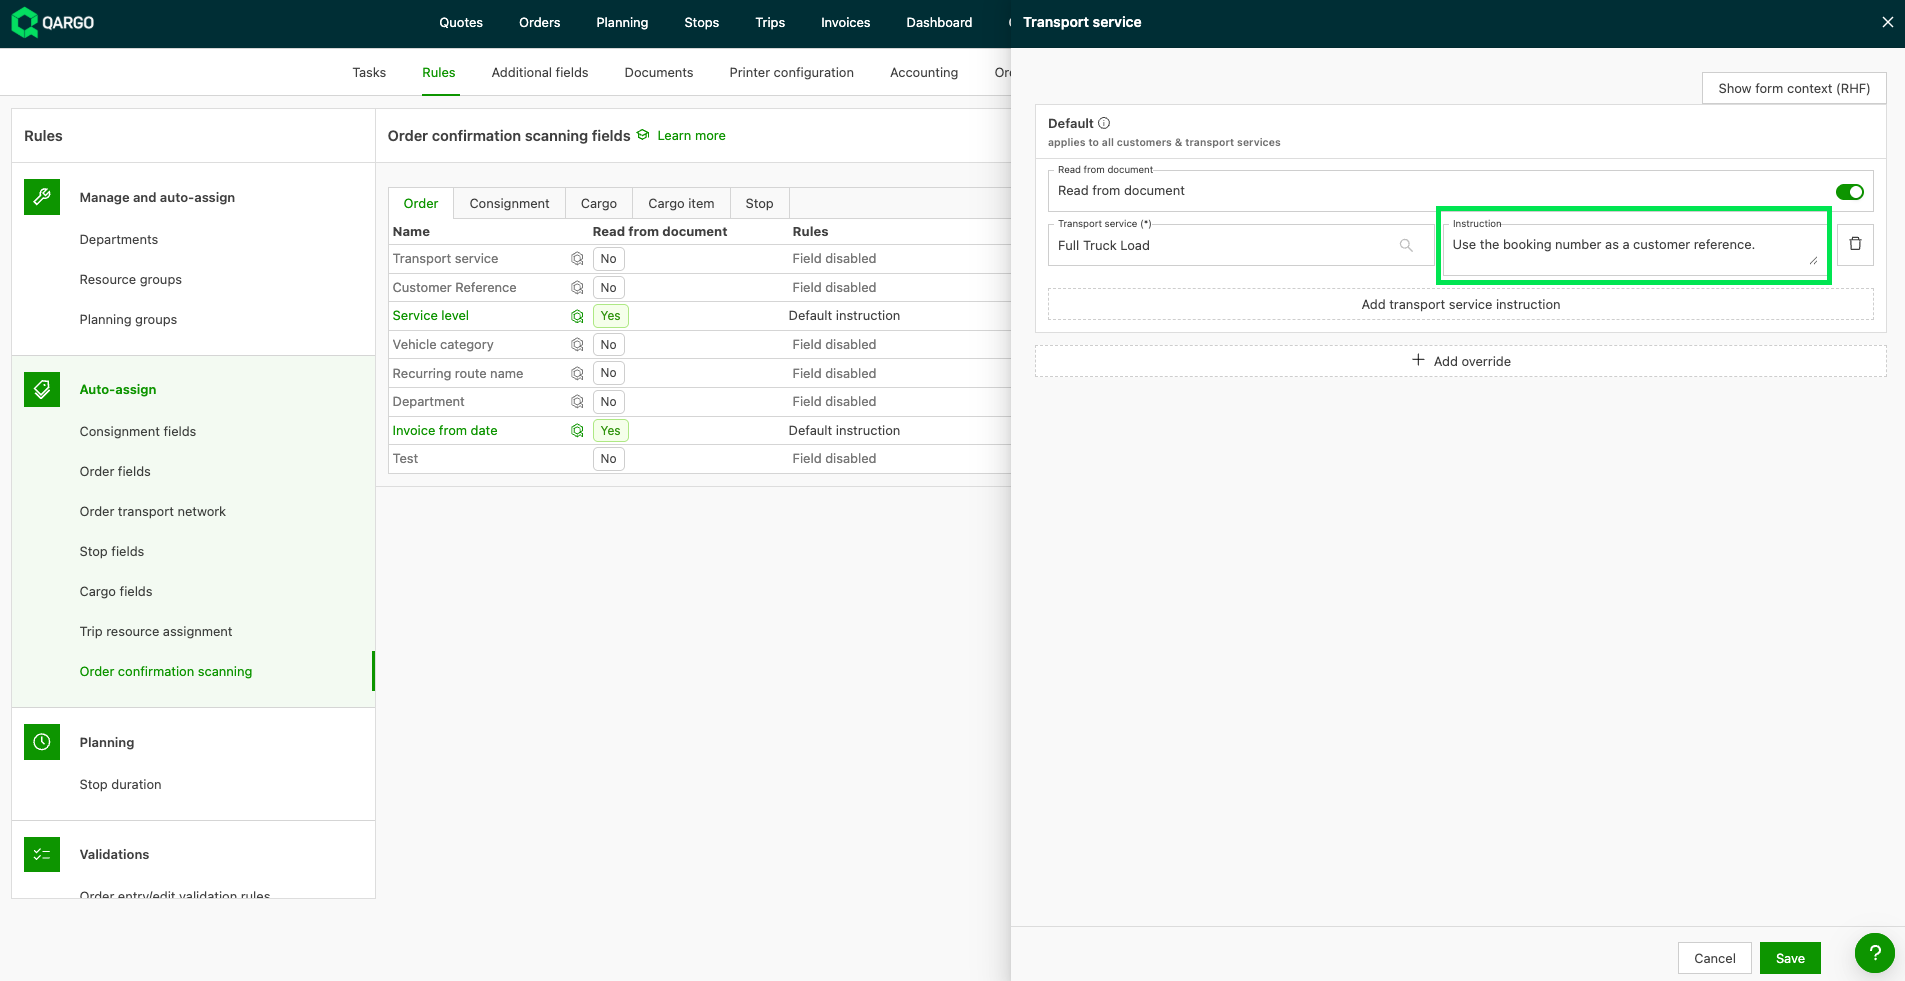
Every business sets up orders in its own way. Instructions explain, in plain language, how and when a value should be taken from the document. They are most helpful for customer references, stop notes and custom fields.
-
Click the green pen icon on the right of a field’s row.
-
Write the instruction and save.
Tips for a good instruction
- Say where to look. Use the labels as they appear on the document (“seal no.”, “your reference”).
- Describe the format and give an example.
- If a value is always the same for a customer or transportation service, set it as a default instead. See Customer default order prefill.
Example: seal number
Example: customer reference
Example: unloading stop note
Add overrides for a customer or transportation service
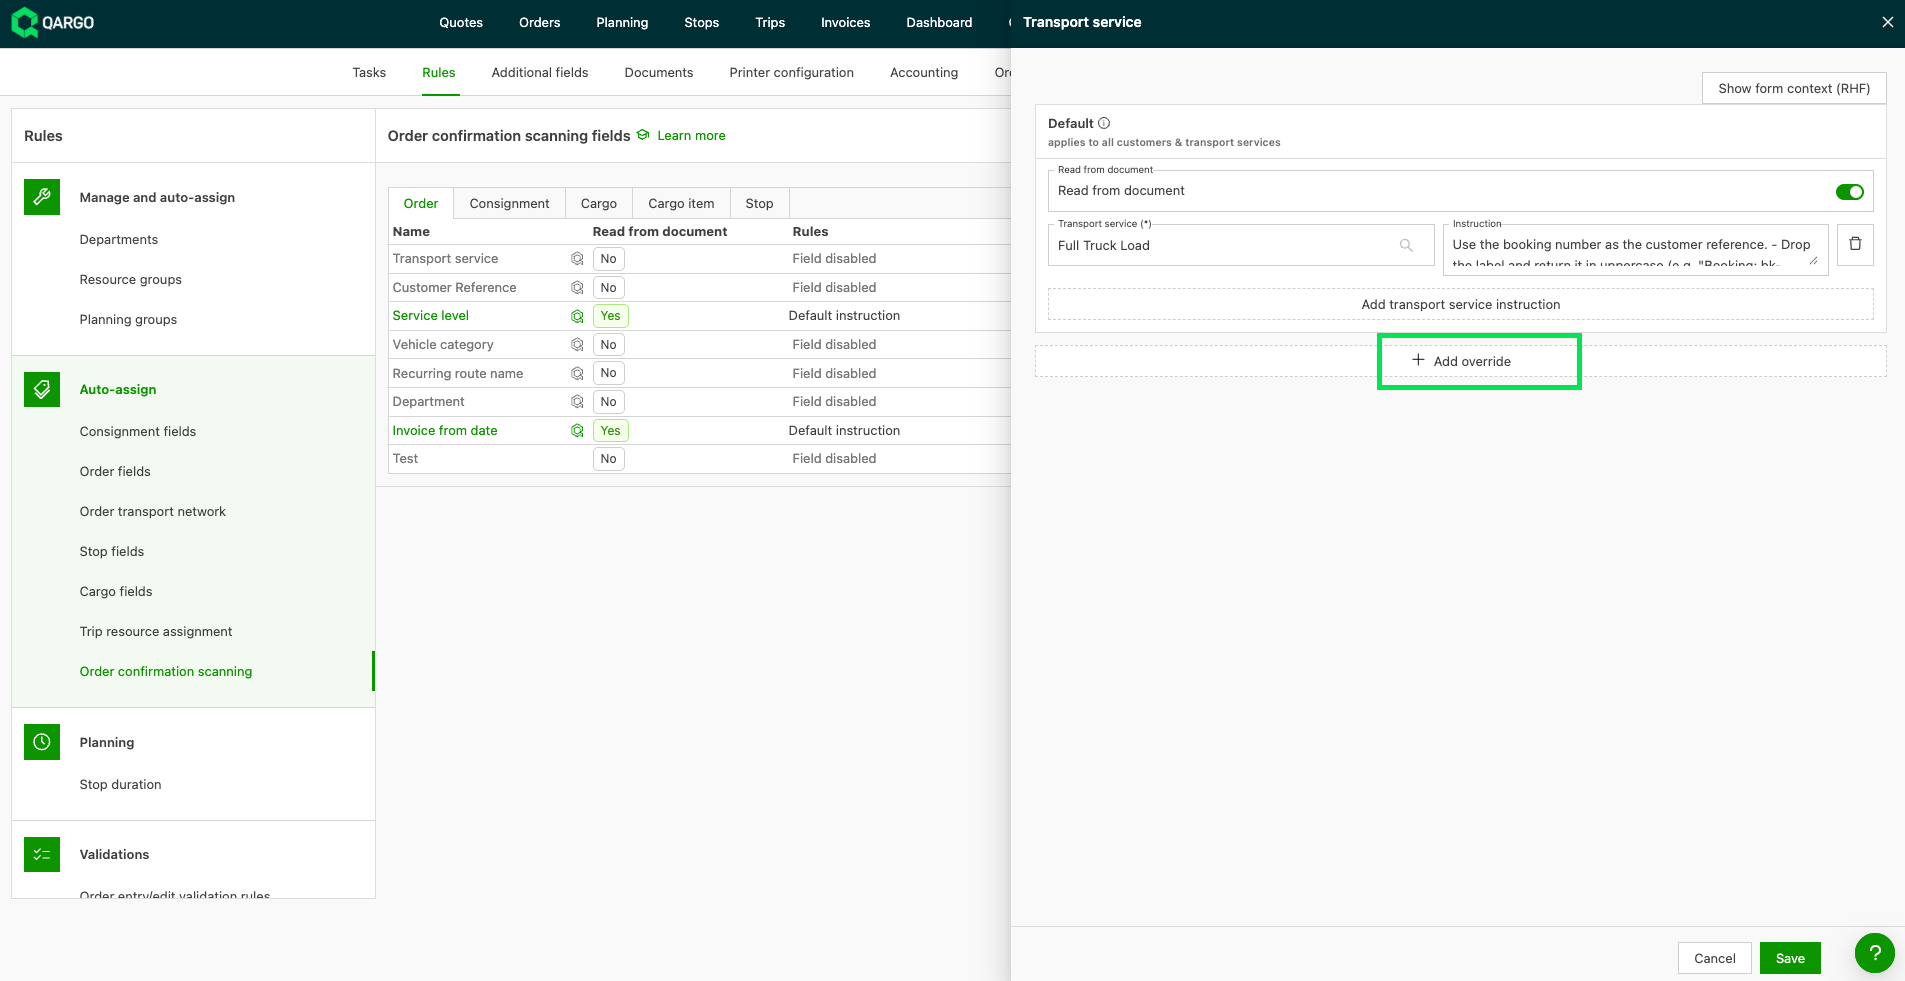
-
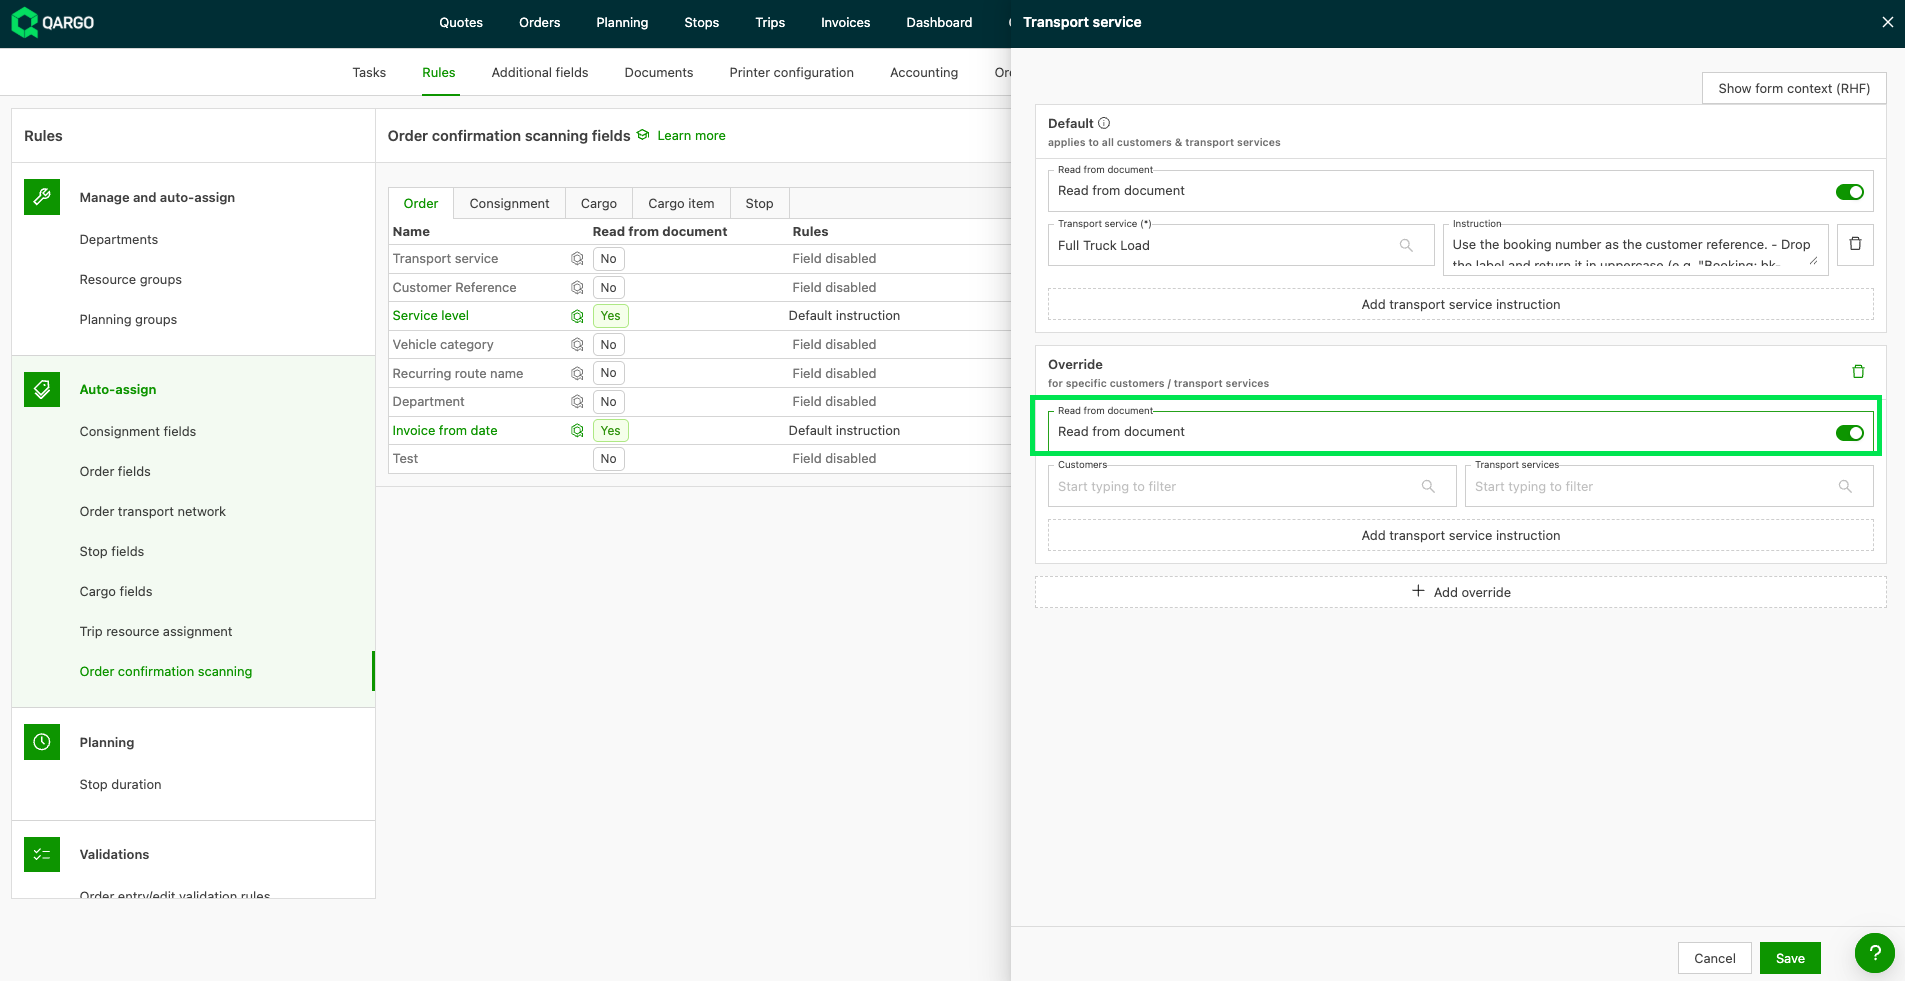
Add an override instruction when one customer, one transportation service, or a combination of both needs different handling.
-
Use the Read from document toggle on an override to stop a field from being filled in for that customer or transportation service.
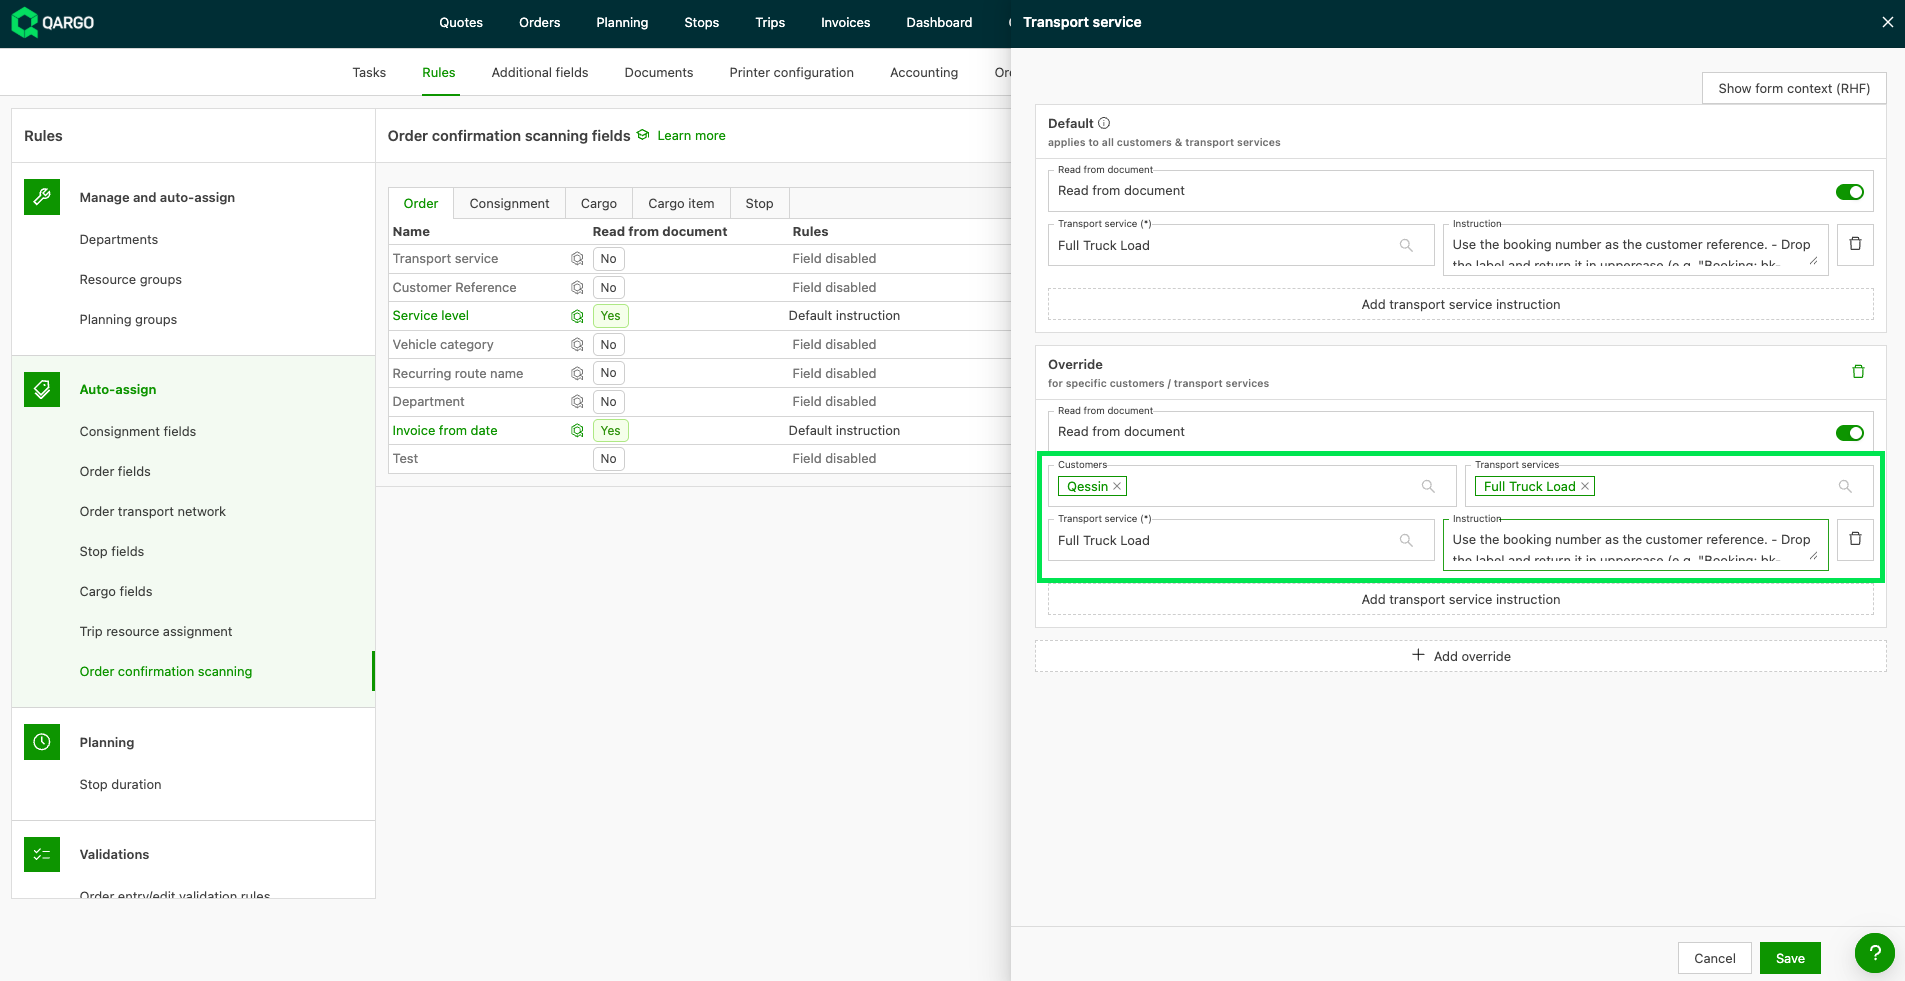
Stop extras, freight extras, time windows and vehicle category
These fields can also be detected from documents:
- Stop extras and Time window (Stop tab)
- Freight extras (Freight tab)
- Vehicle category (Order tab)
- Add each option that should be detected (for example Liftgate).
- Write when it applies (for example “apply for all deliveries to Amazon sites” or “apply when the document mentions a booking reference”). The instruction is required.
- Check the result in Review and create, where the option can still be changed or removed.
Known limitations
- Saved emails: one email at a time. Several emails, or an email together with separate files, must be uploaded separately.
- Updating existing orders: not supported yet. Each scan creates a new order.
- Fields not yet read from documents: service levels, HS codes, transport networks and order planning group.
- Extras: matched as options only. A quantity or price next to an extra is not read.
- Rule scope: rules can be set per customer and transportation service, not per document layout.
- Dropdown custom fields: only options with an instruction can be chosen.
- Master data fields (product, packaging, packaging type, container type): can be turned on or off, but do not accept instructions.
- Automatic mailbox import: pulling orders directly from a linked mailbox is planned for a later release.
Troubleshooting
| Problem | Possible cause | Solution |
|---|---|---|
| The Upload orders tab is not visible | Order scanning is not turned on | Contact the Qargo Account Manager |
| Row shows Select customer | The customer was not recognized on the document | Select the customer on the row, or use Quick actions > Set customer / transportation service |
| Row shows Select transportation service | The transportation service was not recognized | Review the transportation service rules to verify that rules are set. Add or update the rule and verify. |
| A field is always empty | The field is not turned on in the rules | Turn it on in Configuration > Rules > Auto-assign > Order confirmation scanning |
| A field is filled with the wrong value | The scanner needs more context | Add or improve the field’s instruction, then use Restart scans |
| One customer’s documents are read incorrectly | Their layout differs from others | Add an override instruction for that customer |
| An extra or time window is mentioned but not filled in | The option has not been added to the rule with an instruction | Add the option and an instruction under the matching field |
| A multi-order document creates one order | Shipment splitting is set to the default | Change it in Organization settings > Order confirmation scanning |
| Transportation service instructions seem to be missing | The setting has moved | Find them under Configuration > Rules > Auto-assign > Order confirmation scanning. Existing settings were moved automatically. |
| The wrong file was uploaded | - | Select the row and use Quick actions > Ignore documents |