
Customer portal: creating and planning orders shown in customer portal views
Set the order status in organization settings, on the transportation service or in the customer profile. Let portal customers edit and cancel orders with the customer portal order import feature.
Table of contents
- Introduction
- Configure order defaults
- Customer portal: hide excluded stops and the Empty option
- Enabling intermodal booking visibility
- What end customers see
- Limitations
- Troubleshooting
- Provision order import features (Qargo and Super Admin only)
- Share planned and actual load times via a task flag
- Prerequisites
- Use cases
- Enable time sharing on a load task
- Share times for a specific load
- What the customer sees in the portal
Introduction
The customer portal gives customers a seamless order capture experience for the orders they submit. However, customers can select only some of the order parameters.
To keep order capture consistent, default or pre-filled order details can be configured. The order status for newly submitted orders (Quote / To plan) can also be set.
-
The order status can be set in 3 locations:
- Organization settings: This is the default setting. It applies if no other settings are added. Set this as a minimum.
- Transportation service: This takes priority over the default setting.
- Customer profile: This is the primary setting if included.
-
Order status options:
-
Quote: When the customer submits the order through the portal, it is created and shown as a Quote until it is processed further.
- The customer sees the assigned quote number in the portal under the All tab.
- In the tenant, the quote appears in the Quote tab rather than under orders.
- Once the quote is accepted and sent to planning, a new order number is generated.
-
To plan: When the customer submits the order through the portal, it is created and shown as an order with the status ‘To plan’.
- The order number stays the same for the duration of the load.
-
The system uses fallback logic to decide which customer portal status field applies when an order is created in the customer portal:
- Status on customer: If the customer has a value, the system uses it.
- Status on transportation service: If the customer field is empty, the system falls back to the value on the transportation service.
- Status on tenant: If both the customer field and the transportation service field are empty, the system uses the value set for the tenant.
Configure order defaults
Organization settings
-
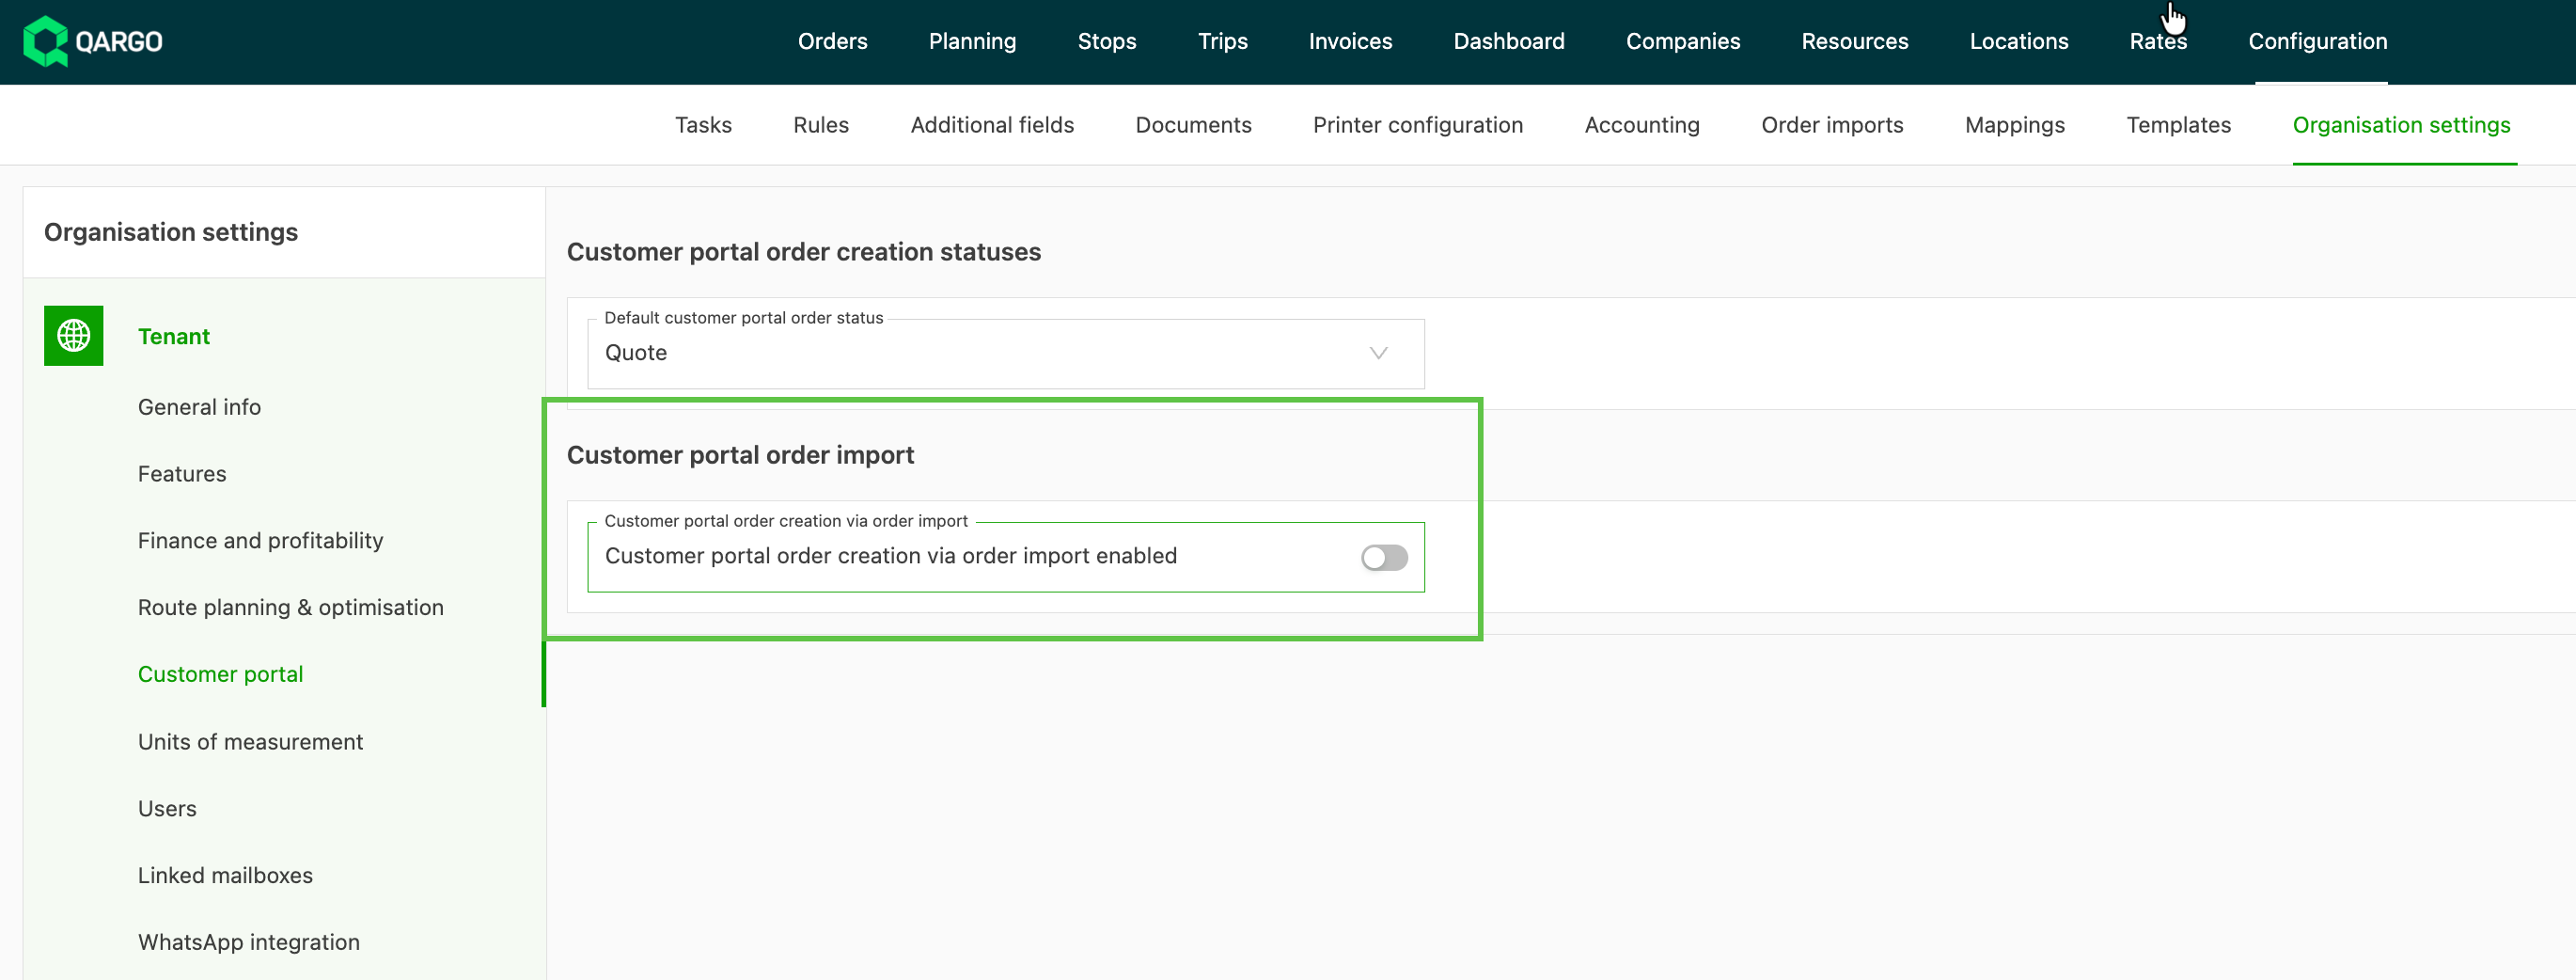
Navigate to Configuration > Organization settings > Customer portal
-
Under Customer portal order creation statuses, select how orders are created when a customer submits an order in the portal.
- Options: Quote / To plan, as described above.
Transportation service
- Navigate to Rates > Order input
- In the left-hand menu, select Transportation services. This shows all configured services.
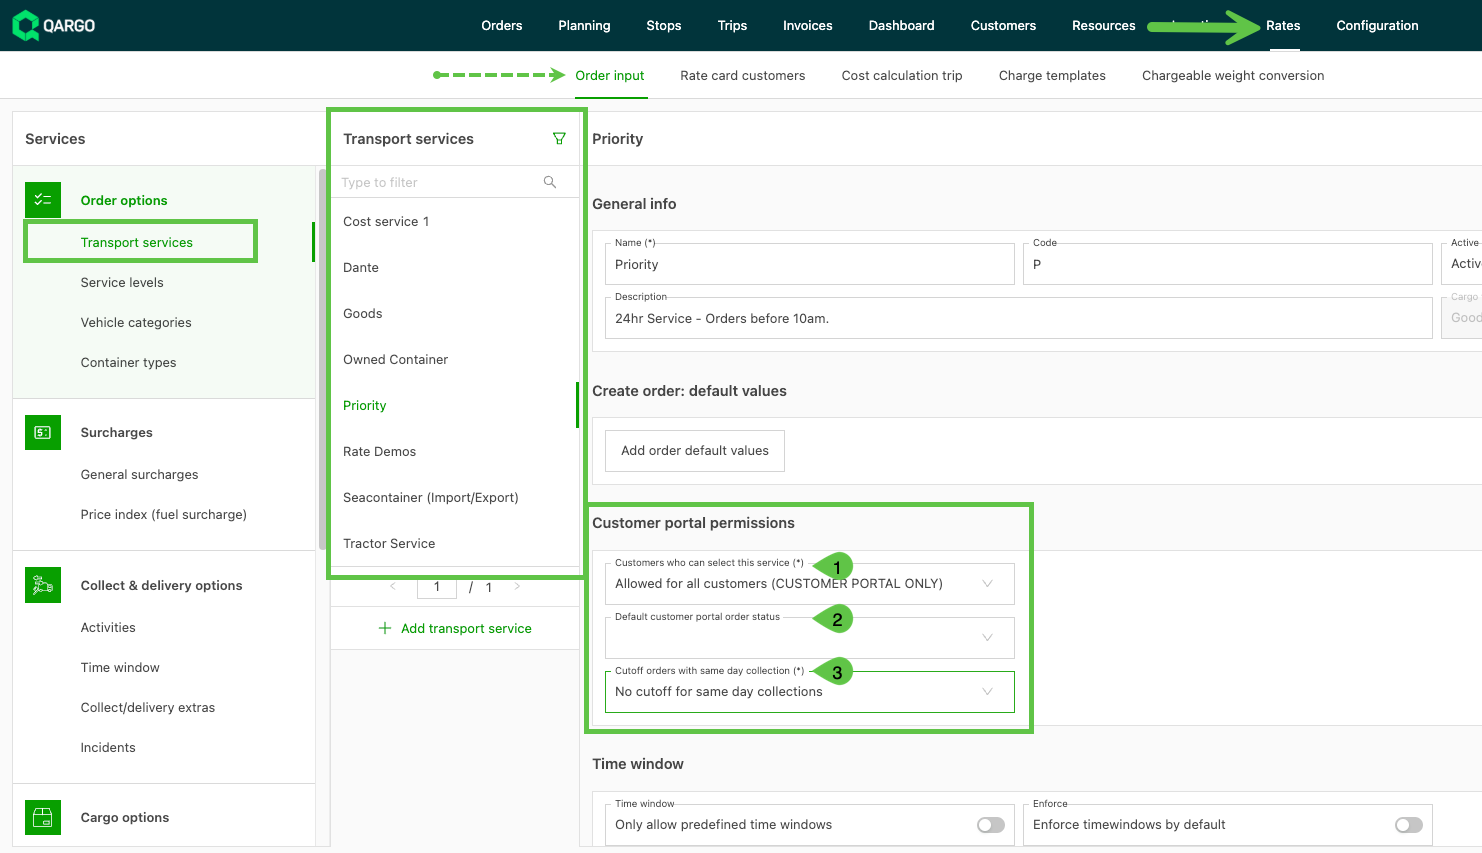
- Click the service. Navigate to Customer portal permissions.
-
Customers who can select this service. Make the service available to all customers with portal access, or to specific customers only.
-
Default customer portal order status. Select the default status for orders that customers submit through the portal: Quote or To plan.
-
Cutoff for orders with same-day pickup.
- No cutoff for same-day pickups. Customers can submit orders with any date and time for same-day pickup.
- Orders must be entered 1 day before pickup. A cutoff time must also be specified. Customers cannot submit an order for pickup on the same day.
- Define a cutoff time for same-day orders. A cutoff time must be specified. Customers can submit an order for same-day pickup, provided they submit it before the cutoff time.
Customer profile
- Navigate to Companies > Customers
- Click the customer name to open the profile. If the customer is not in the list, find the customer with the search box.
- In the customer profile, scroll to Create order: default values. Select the preferred status from the dropdown menu.
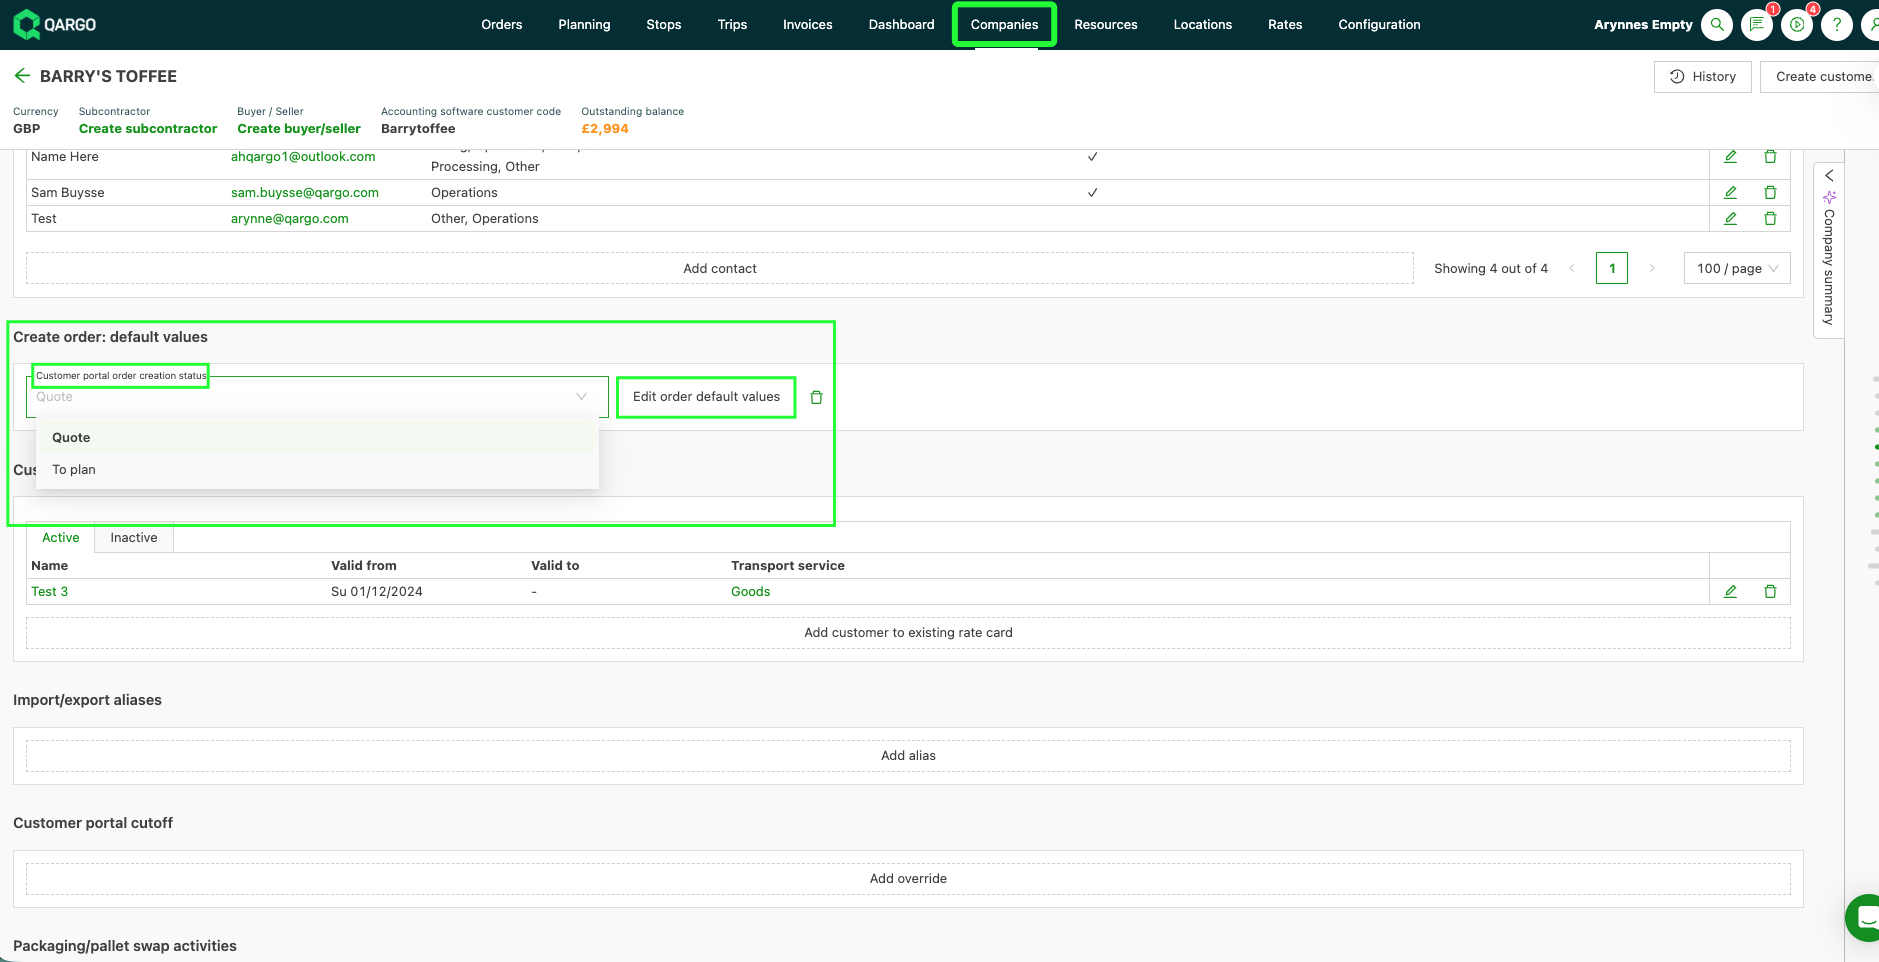
Set order default values
-
Default order values can also be added here.
- These can include order details that are the same every time an order is submitted.
- Once all the details are added, click Save.
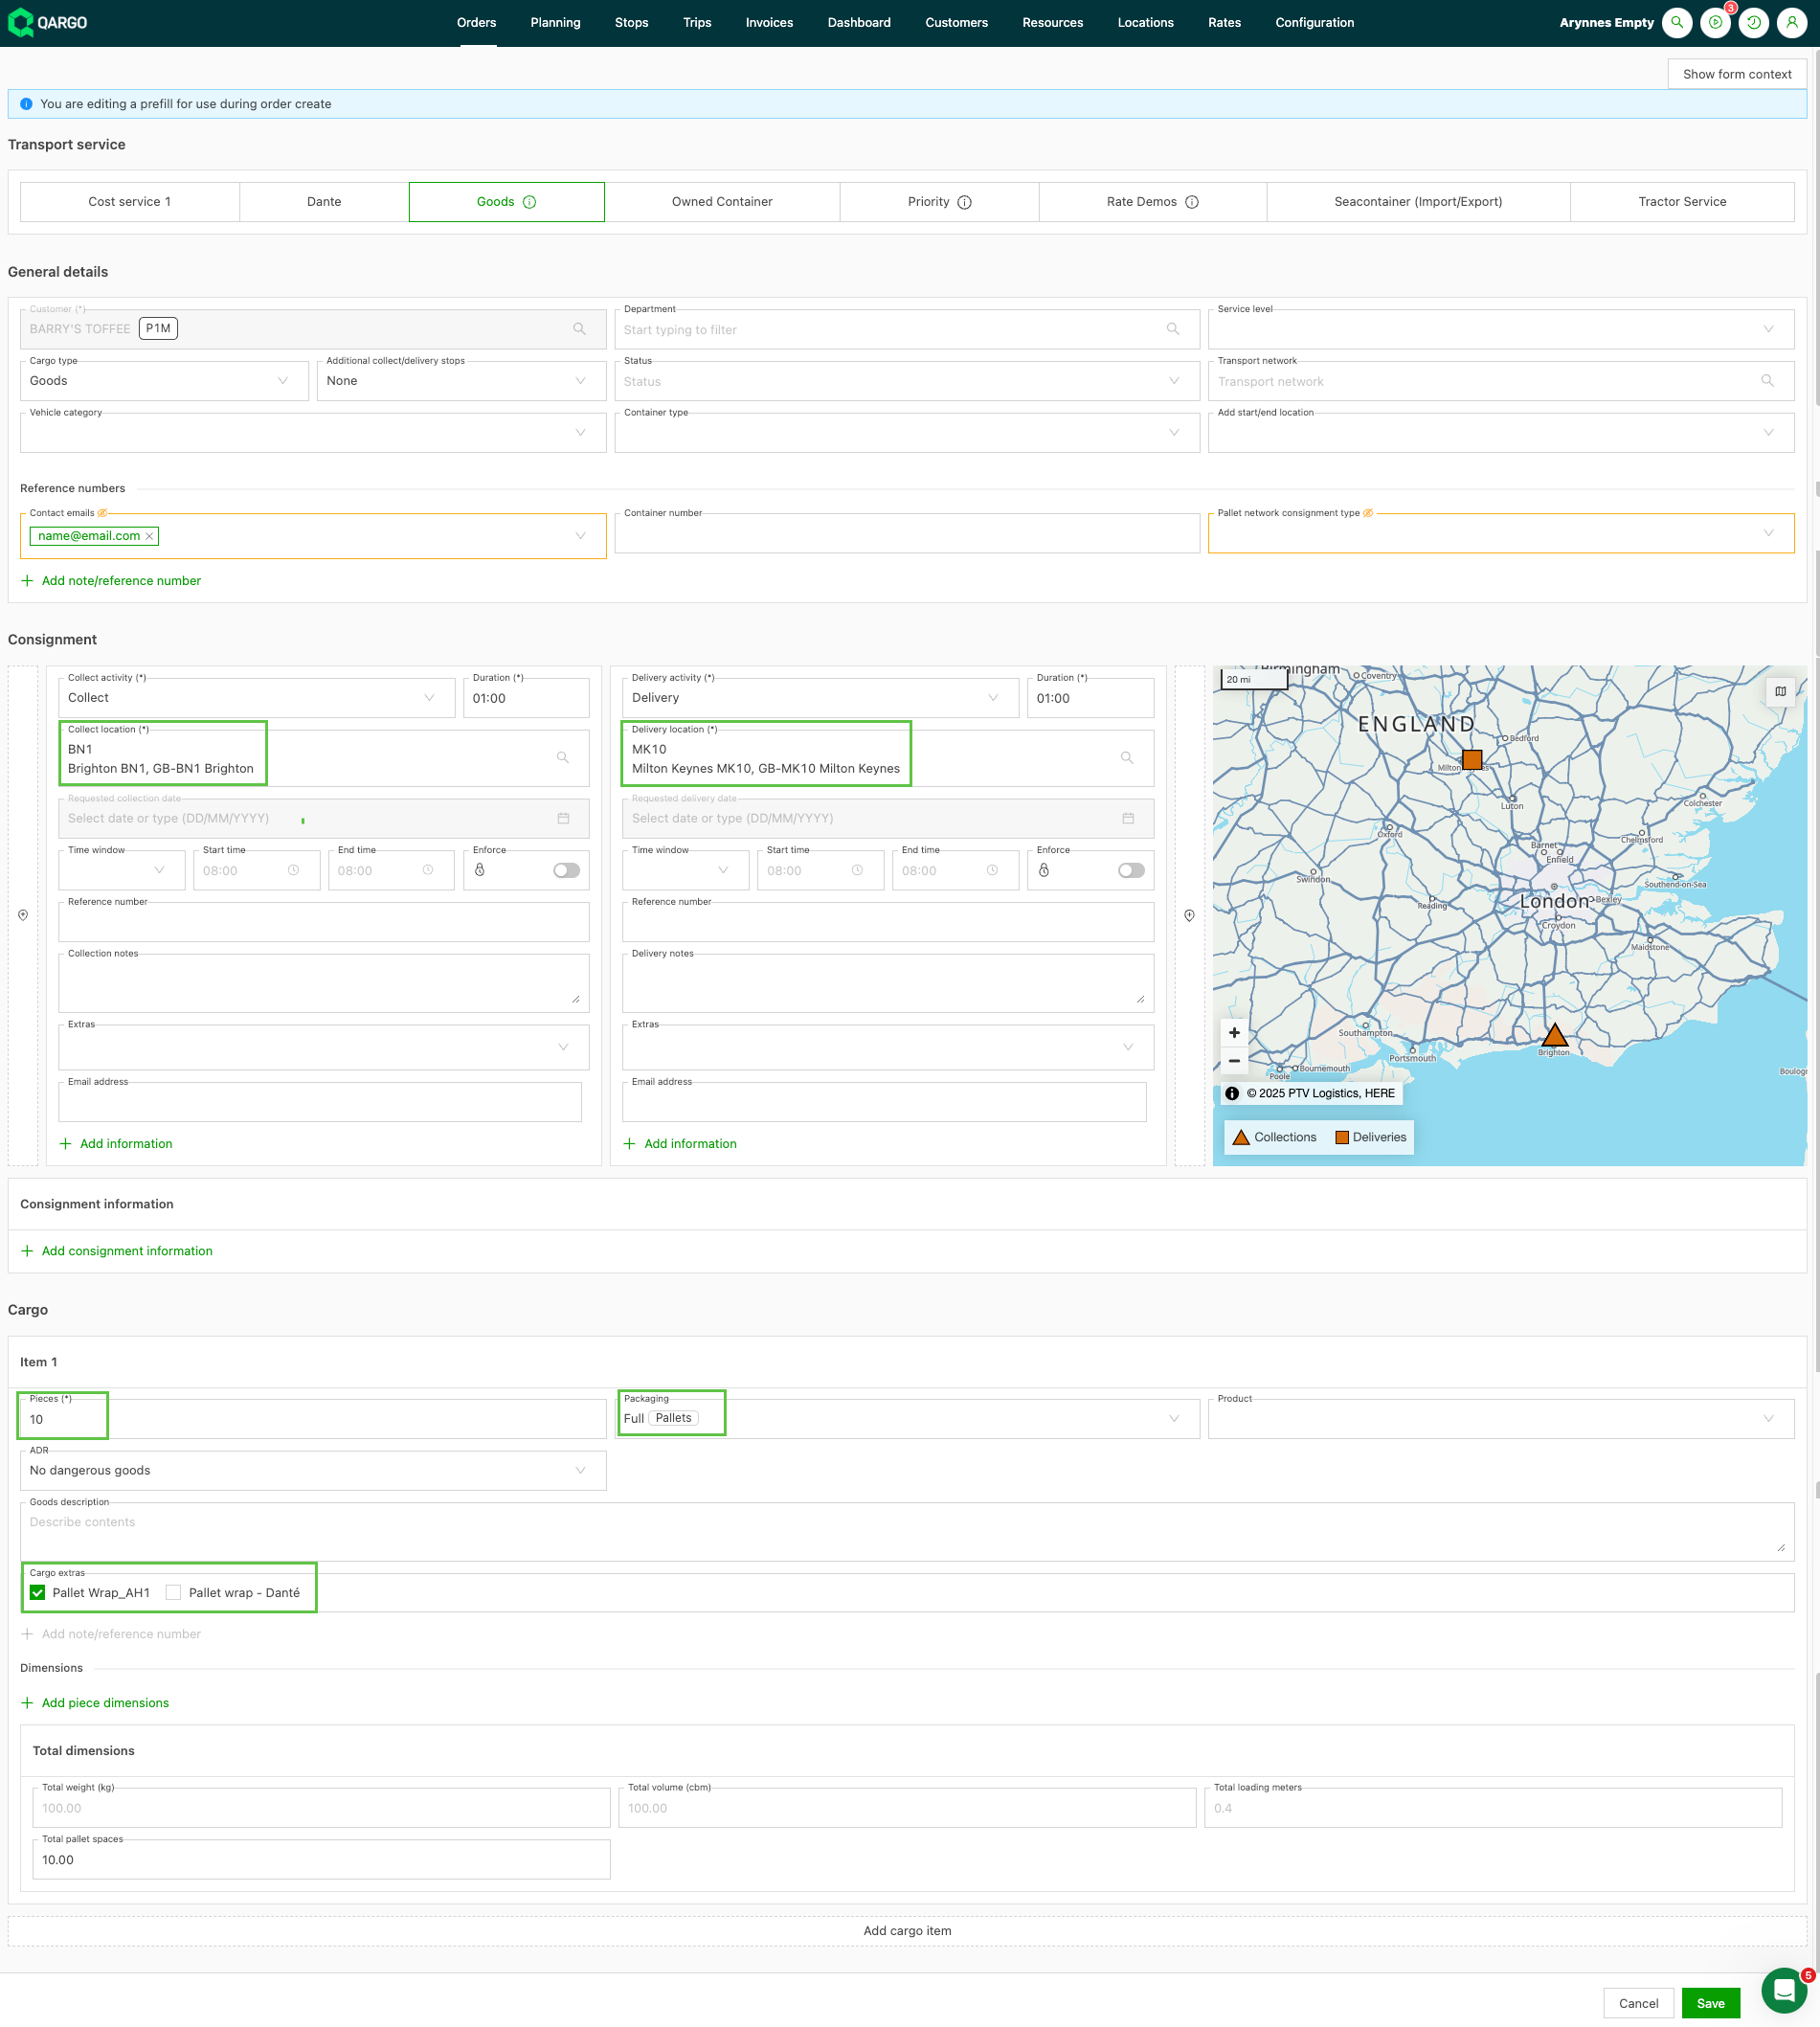
- When a customer creates an order in the portal, the order details are pre-filled. This further reduces the data entry the user has to do.
Carriers using Qargo’s customer portal for groupage orders can now make piece dimensions (length, width, height) mandatory when shippers place orders. This ensures complete data and accurate loading meter calculations.
Configure required freight details
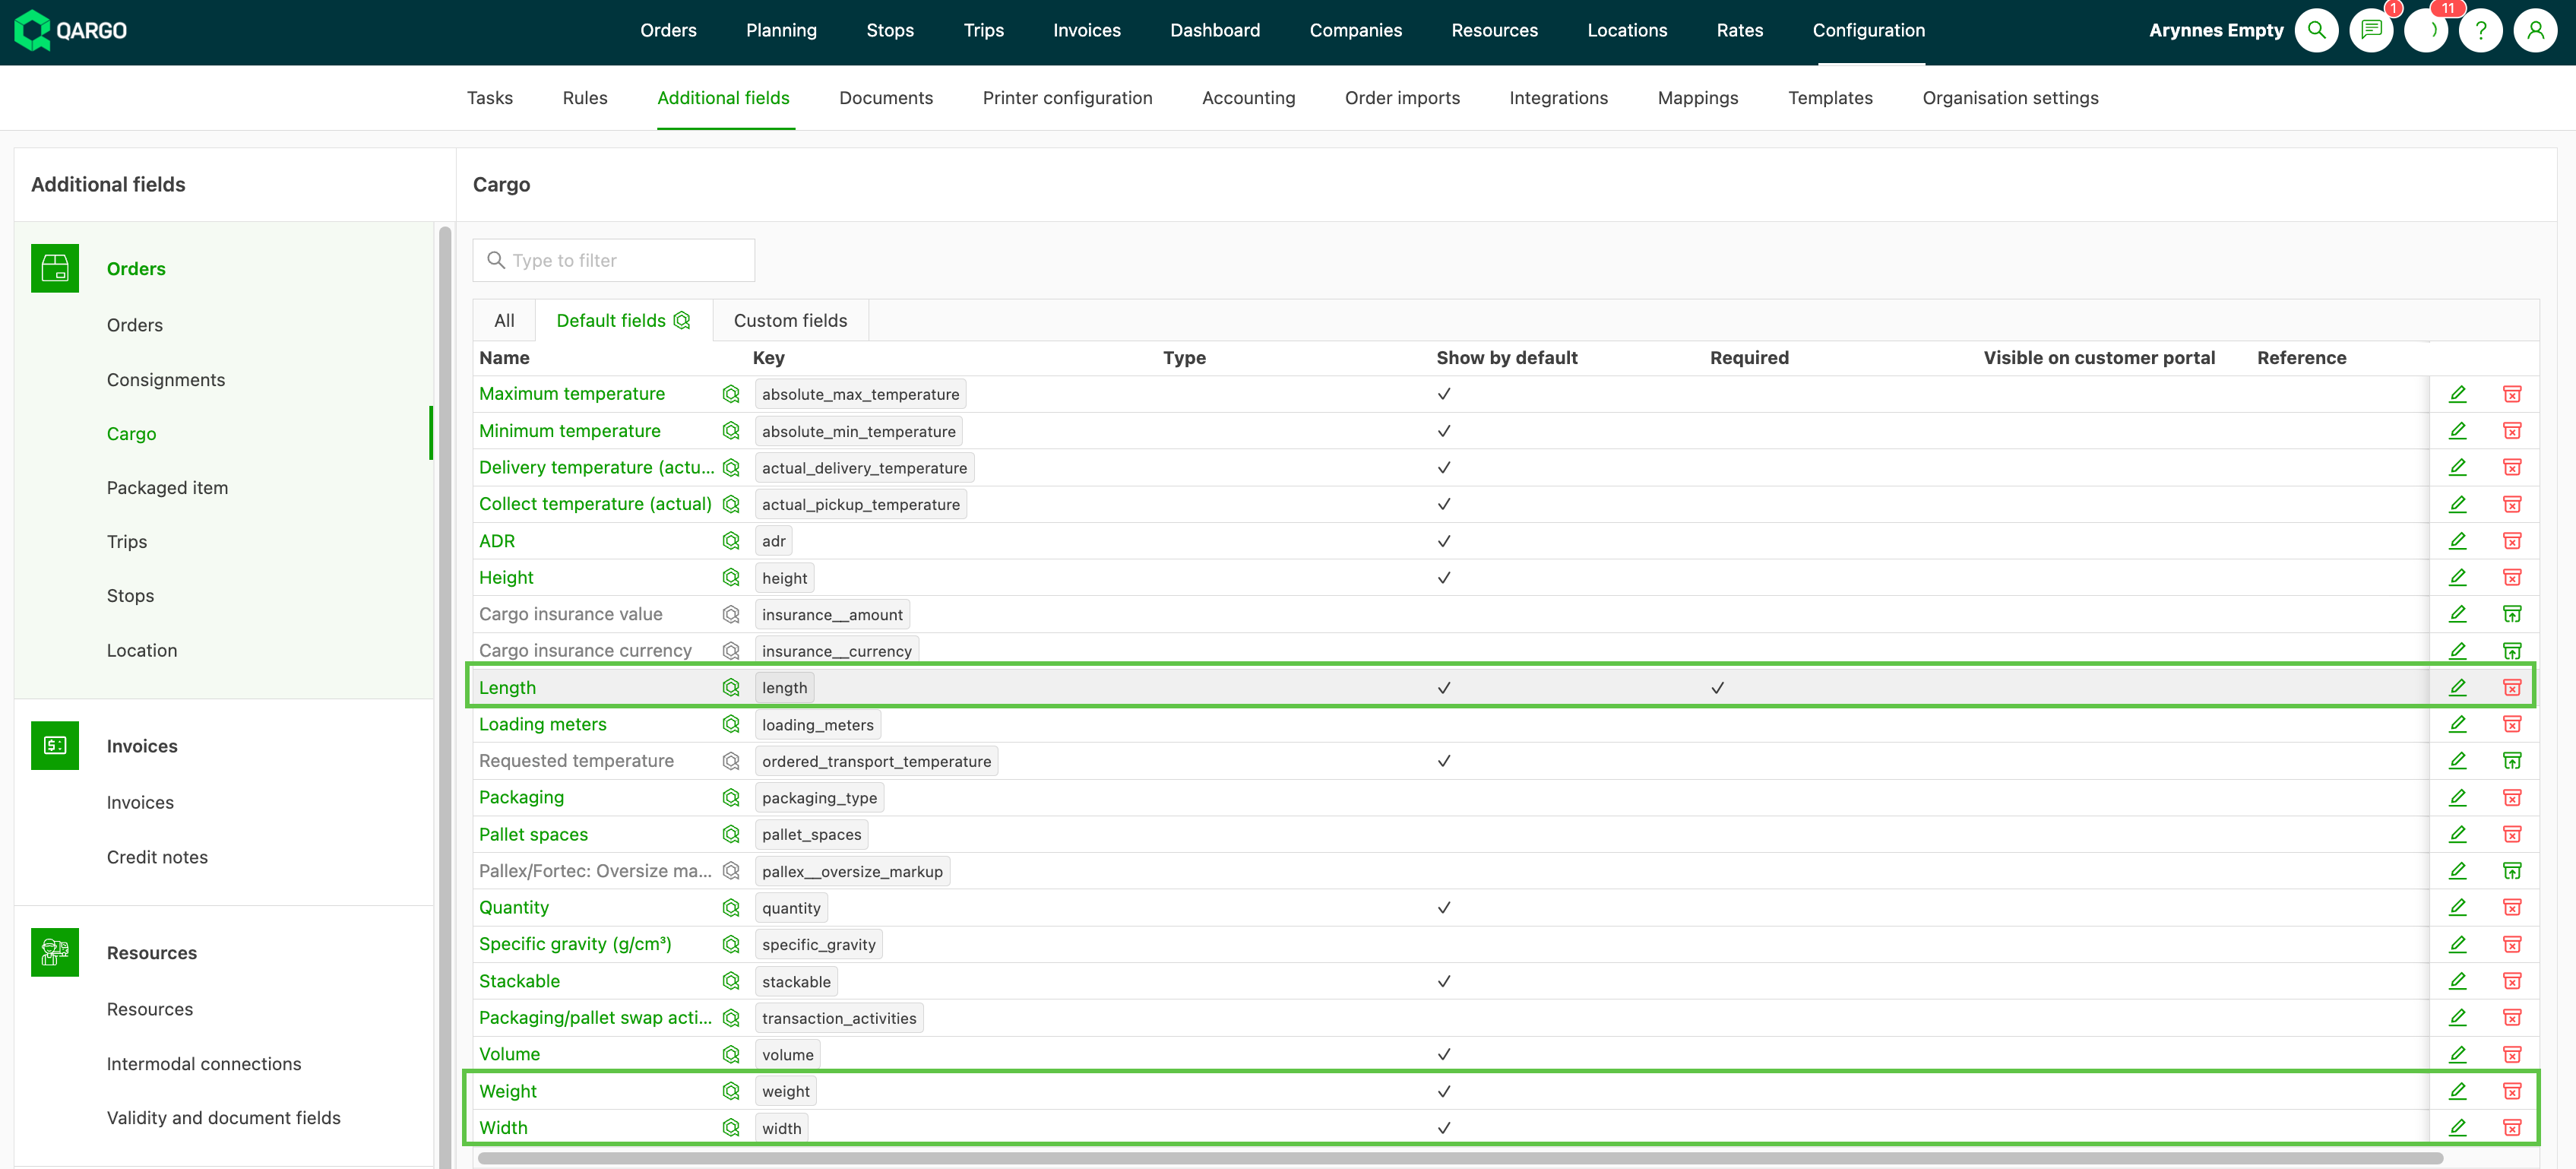
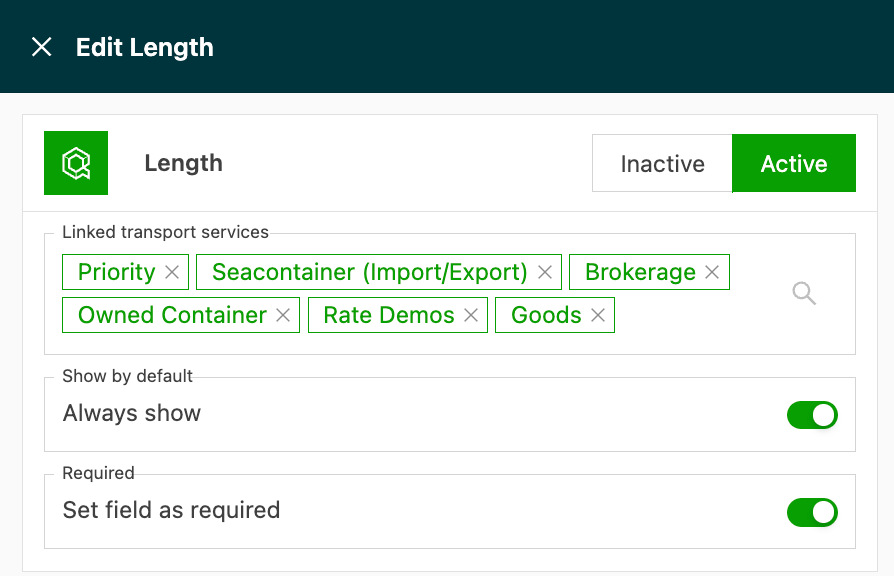
- In the Default fields section, locate the Width, Length, and Height fields.
- For each dimension to make mandatory, click the field and turn on the Required toggle.
How it works for customers
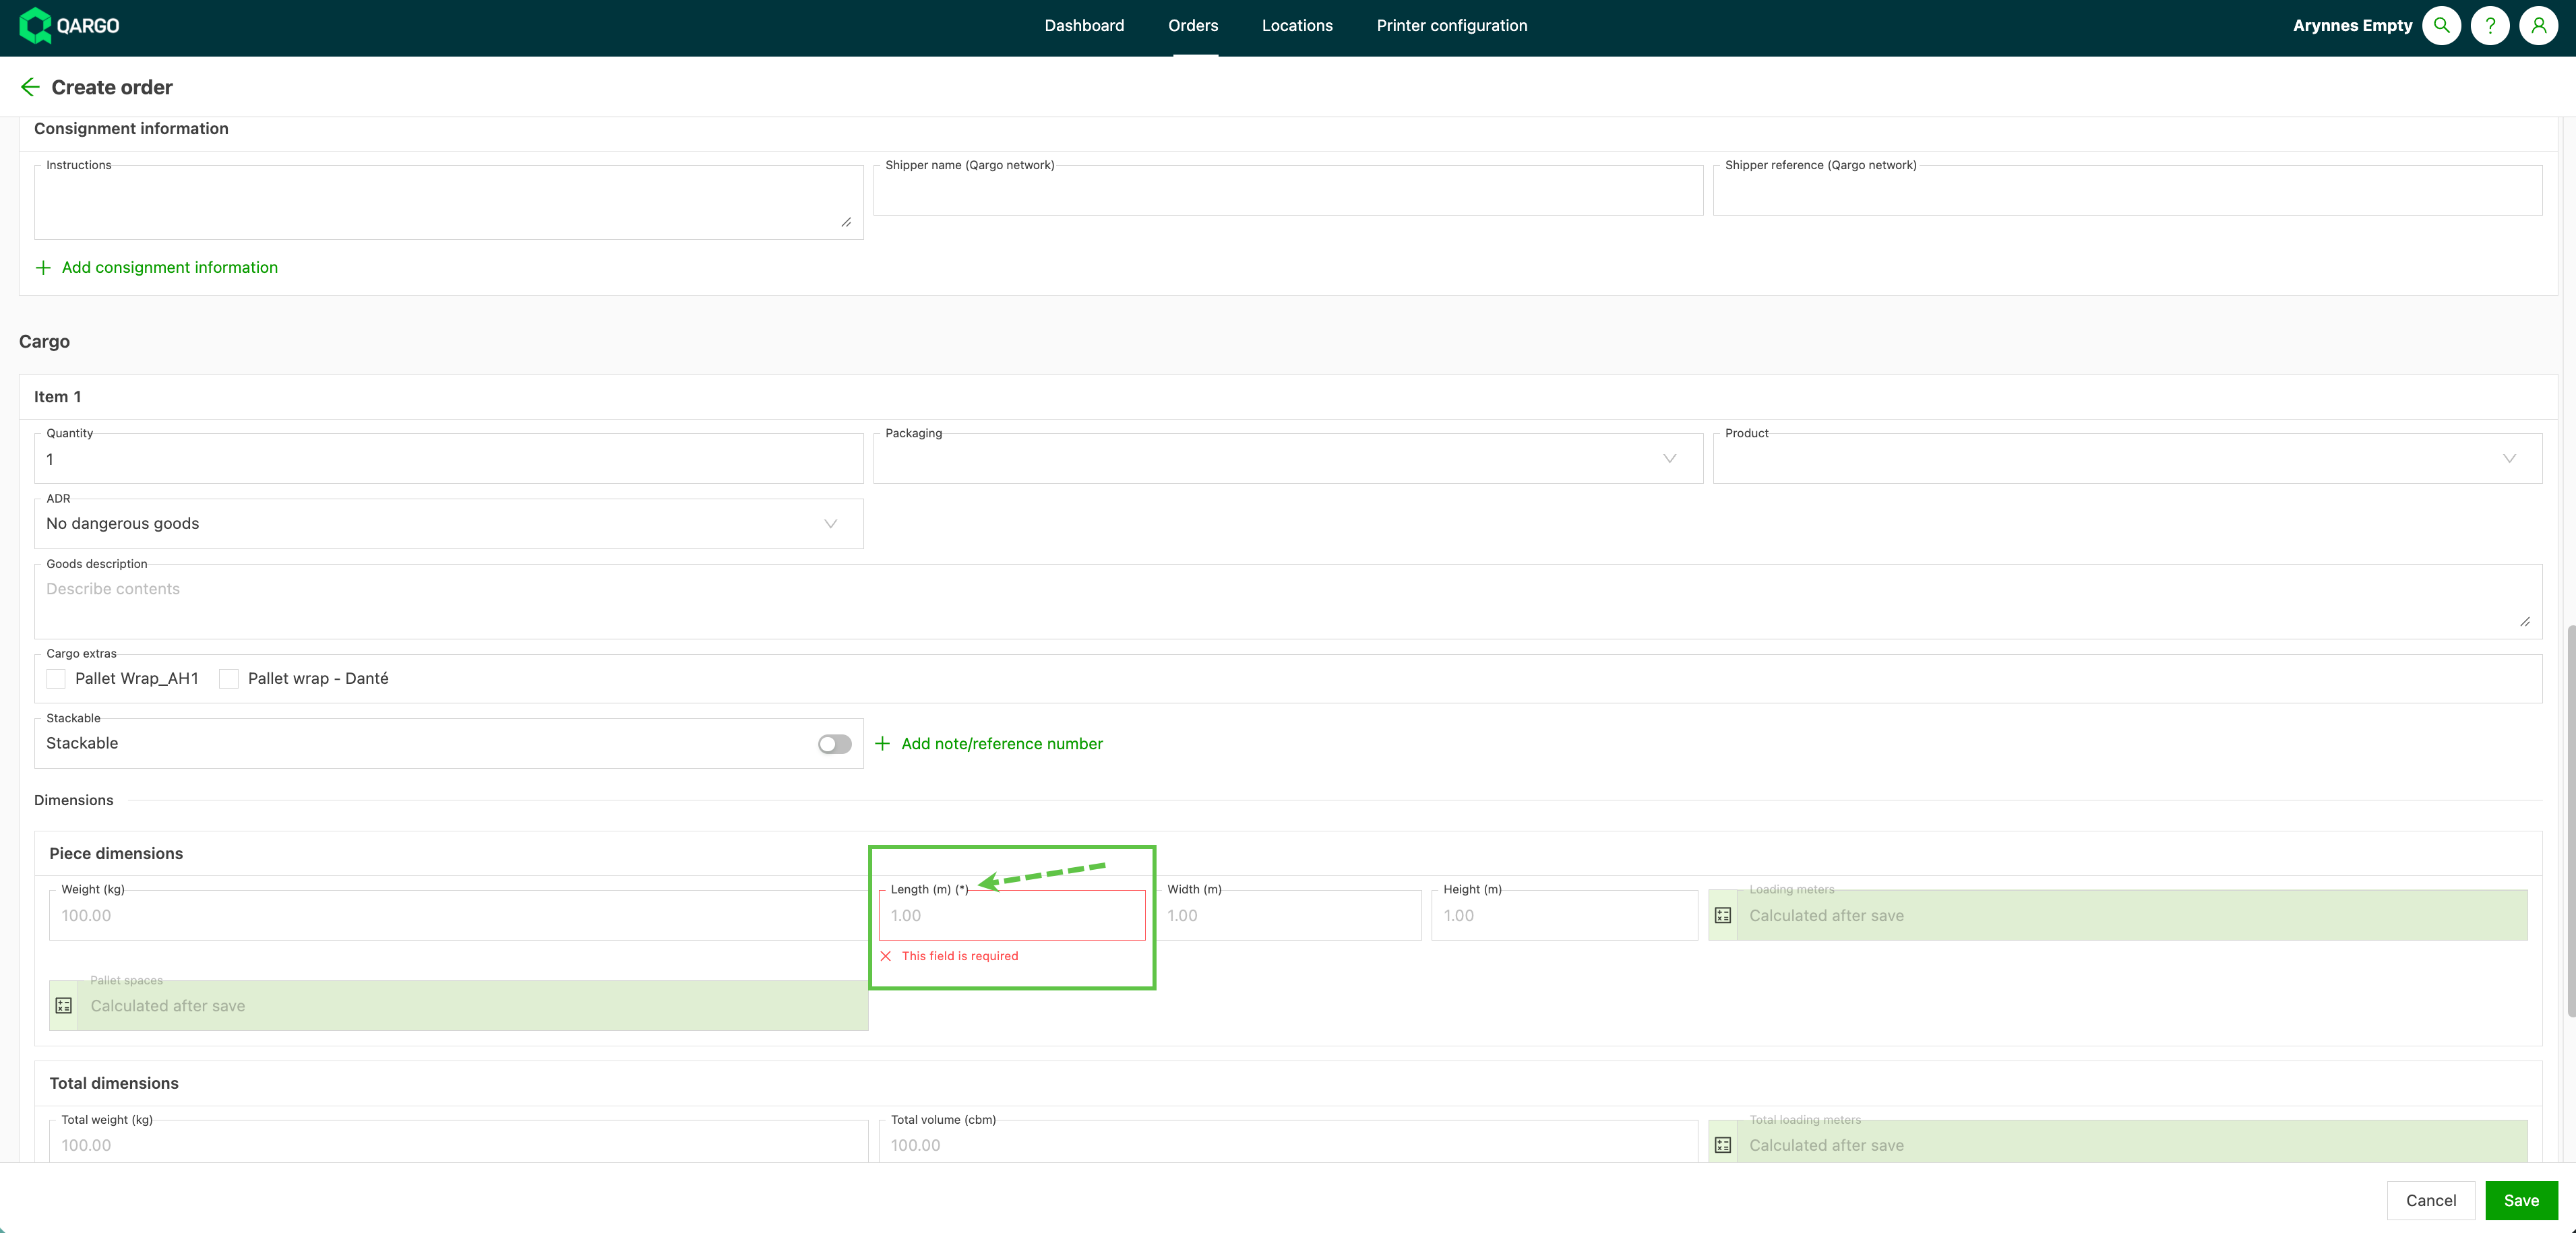
Once at least one dimension is marked as Required:
- The piece dimensions panel (with the Length, Width and Height fields) is automatically displayed to customers when they place an order in the portal, even if they would not normally see it.
- Customers cannot submit the order until they fill in the required dimension fields.
Limitations
-
Global configuration only. The required dimension settings apply to all customer portal users. Dimensions cannot be required for one customer and optional for another.
-
Customer portal only. This requirement applies to orders placed through the customer portal. It does not apply to:
- Orders created through the mobile app or carrier portal
- Orders imported through order import
- Orders created directly in the Qargo web interface
Disabling the fields
Besides being enabled or required, dimension fields can also be disabled entirely. A disabled dimension field does not appear in the portal and is not pre-filled on the order.
- Disabling a dimension field does not affect existing orders that already have dimensions entered.
Display charges
-
In the customer profile, scroll down to the Contacts panel.
-
Turn on the Show charges on customer portal option.
-
Navigate to the relevant price list and set the invoice process to Approval request sent to customer.
-
With this option turned on, the user can view the charges on the order in the portal.
-
Charges that require approval can also be handled in the portal.
-
Approved or rejectable charges are visible for all orders, not only during billing. This keeps every stage of the order process transparent.
-
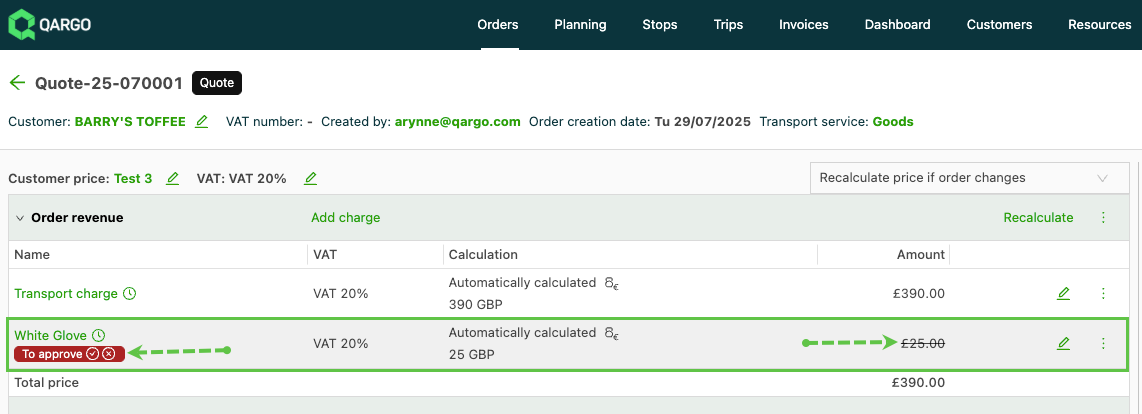
Where approval is required, a ‘To approve’ label is displayed.
-
Hovering over the label shows the option to approve or reject the charge.
-
Once handled, the charge updates in both the portal and the tenant.
Approve a charge:
Reject a charge:
Customer portal: hide excluded stops and the Empty option
The route planning and optimization settings already control which stops are excluded from the price calculation. This now extends to the customer portal: the selected stop types can also be hidden from the portal route timeline.
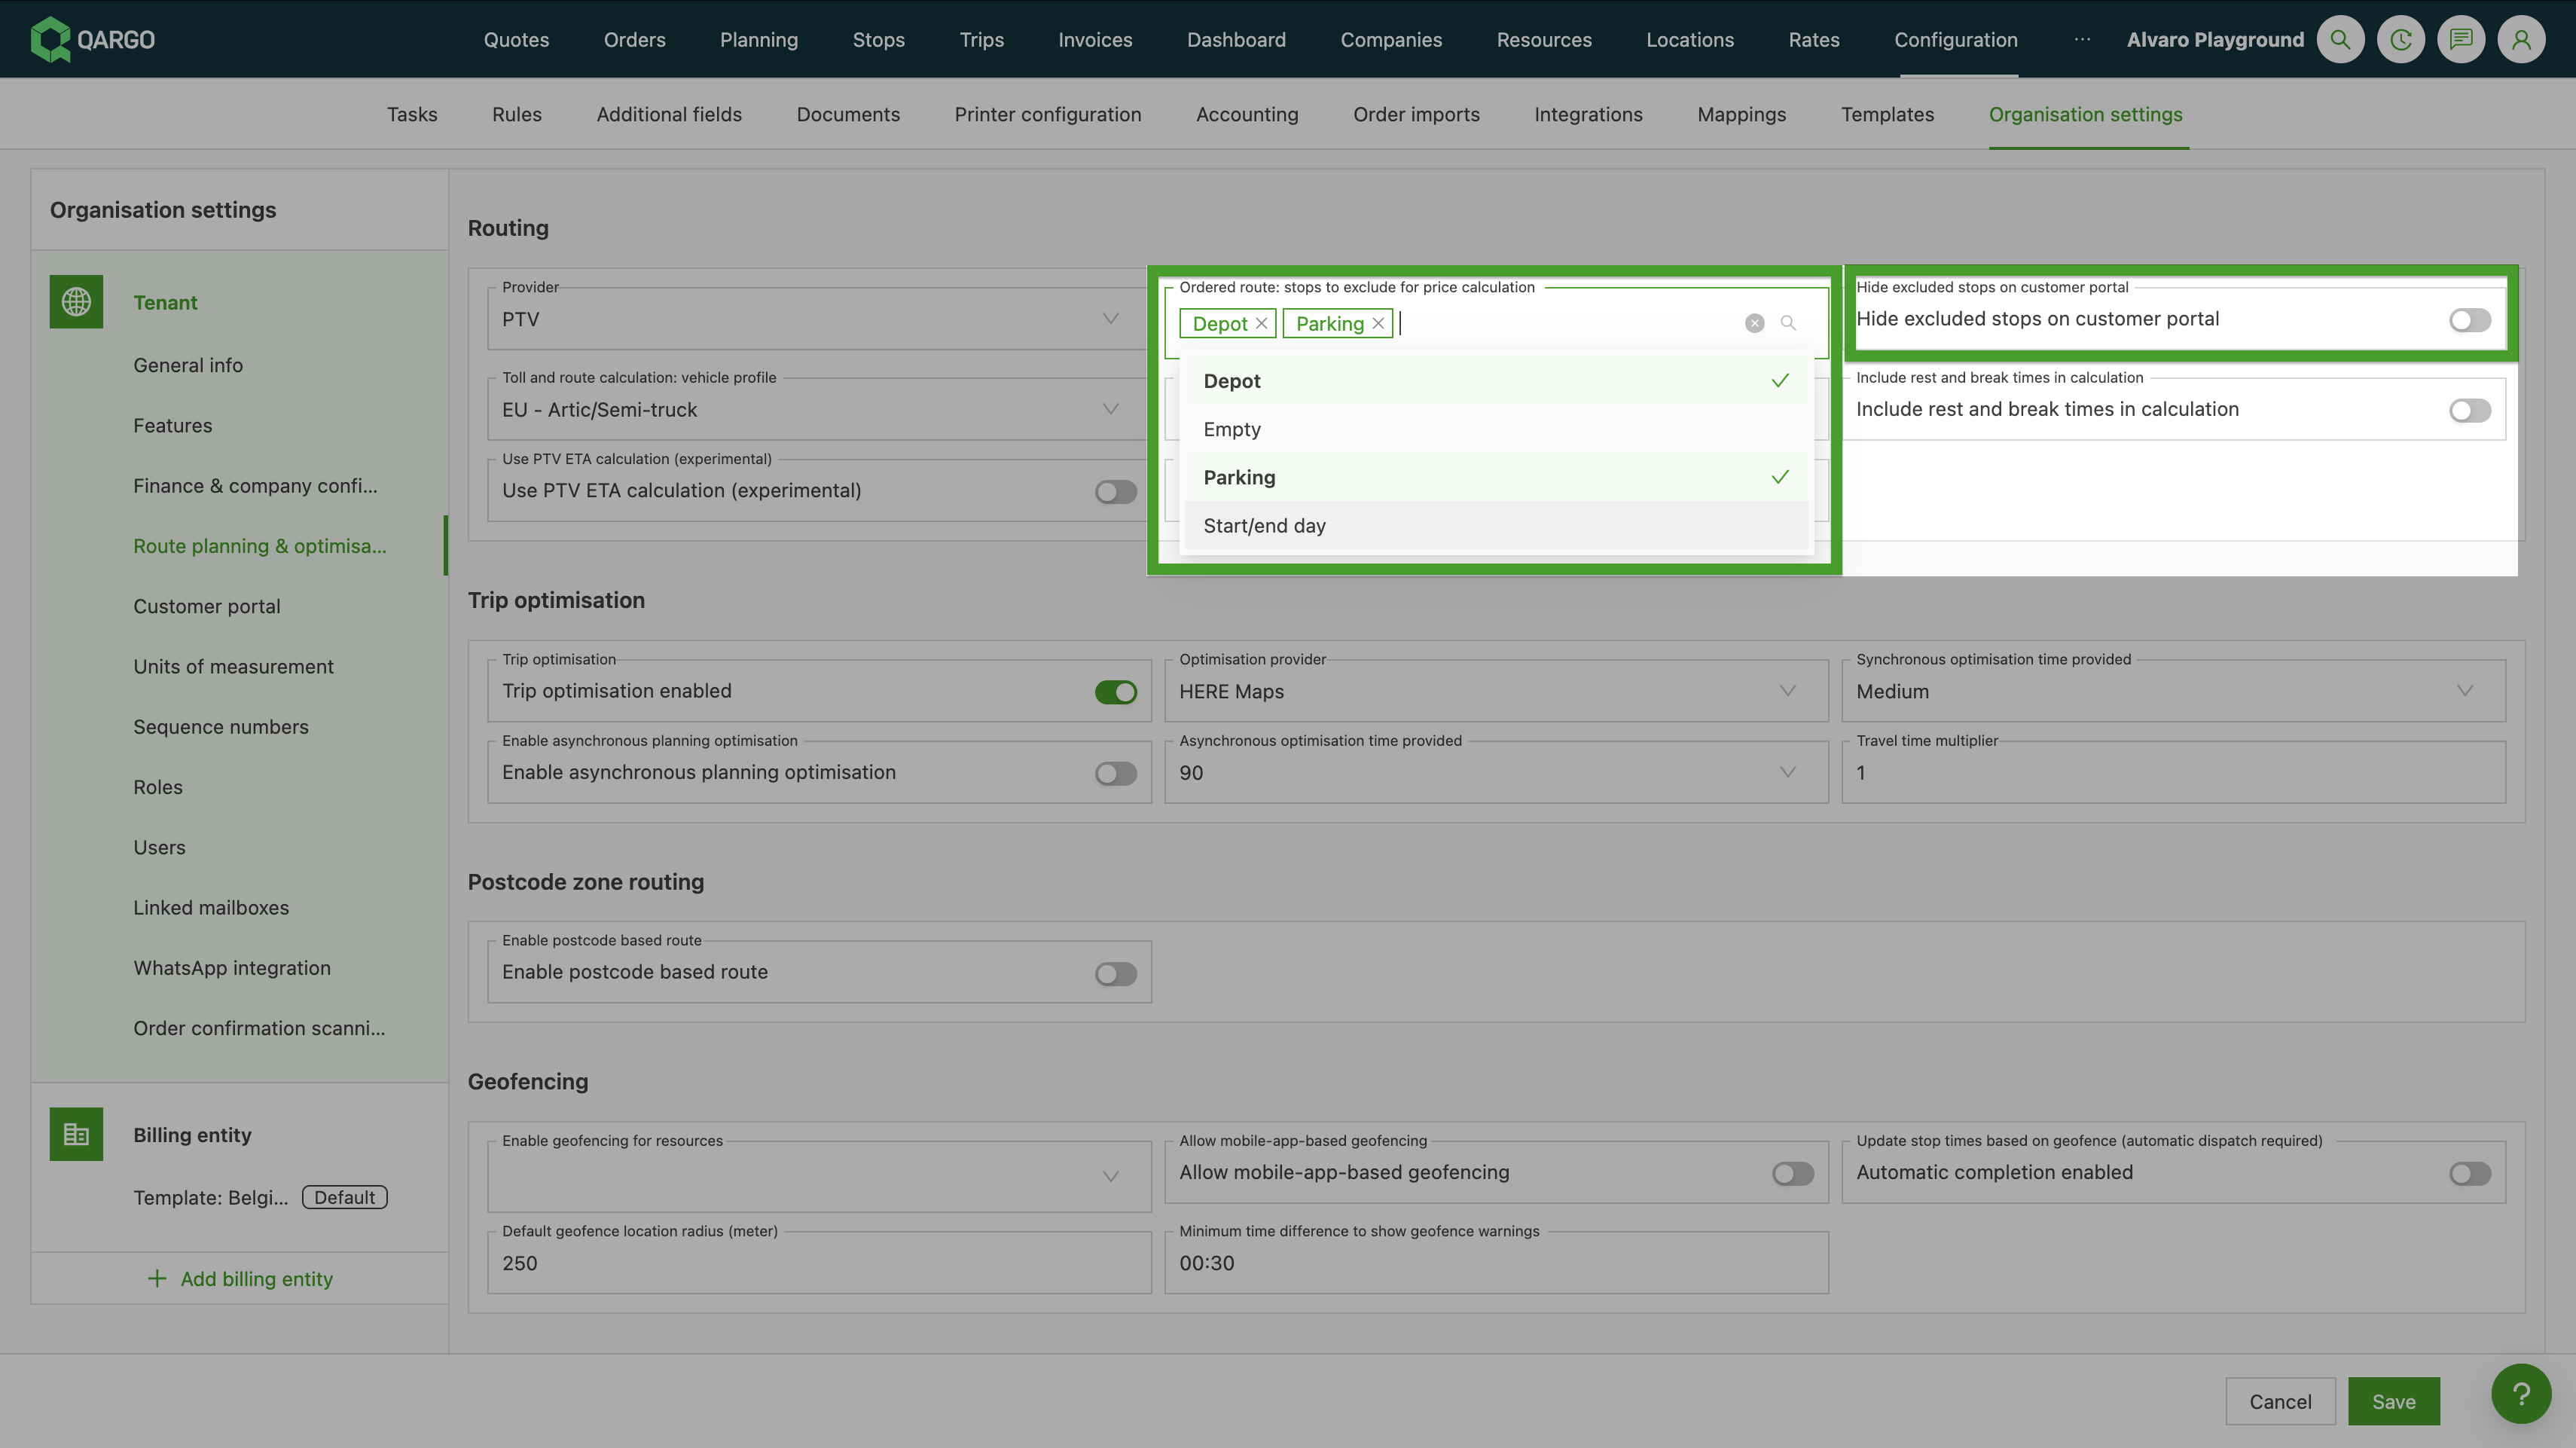
A new Empty option has been added to the Ordered route: stops to exclude dropdown. It covers stop activities marked as empty, such as hooking an empty trailer or picking up and dropping an empty container.
Previously, the customer portal showed end customers every operational stop. This included terminal stops, parking, hook and drop activities, empty container moves and day-boundary stops.
The new Hide excluded stops on customer portal toggle removes the selected stop types from the portal timeline entirely. The timeline then matches the visualized order route.
To configure the setting:
- Open Configuration > Organization settings > Route planning & optimization.
- Select the stop types to hide in Ordered route: stops to exclude for price calculation, including the new Empty option.
- Turn on the Hide excluded stops on customer portal toggle.
The toggle is off by default for existing tenants and on by default for new tenants. The setting applies during route calculation. It takes effect on new orders, or when an existing order route is updated.
Enabling intermodal booking visibility
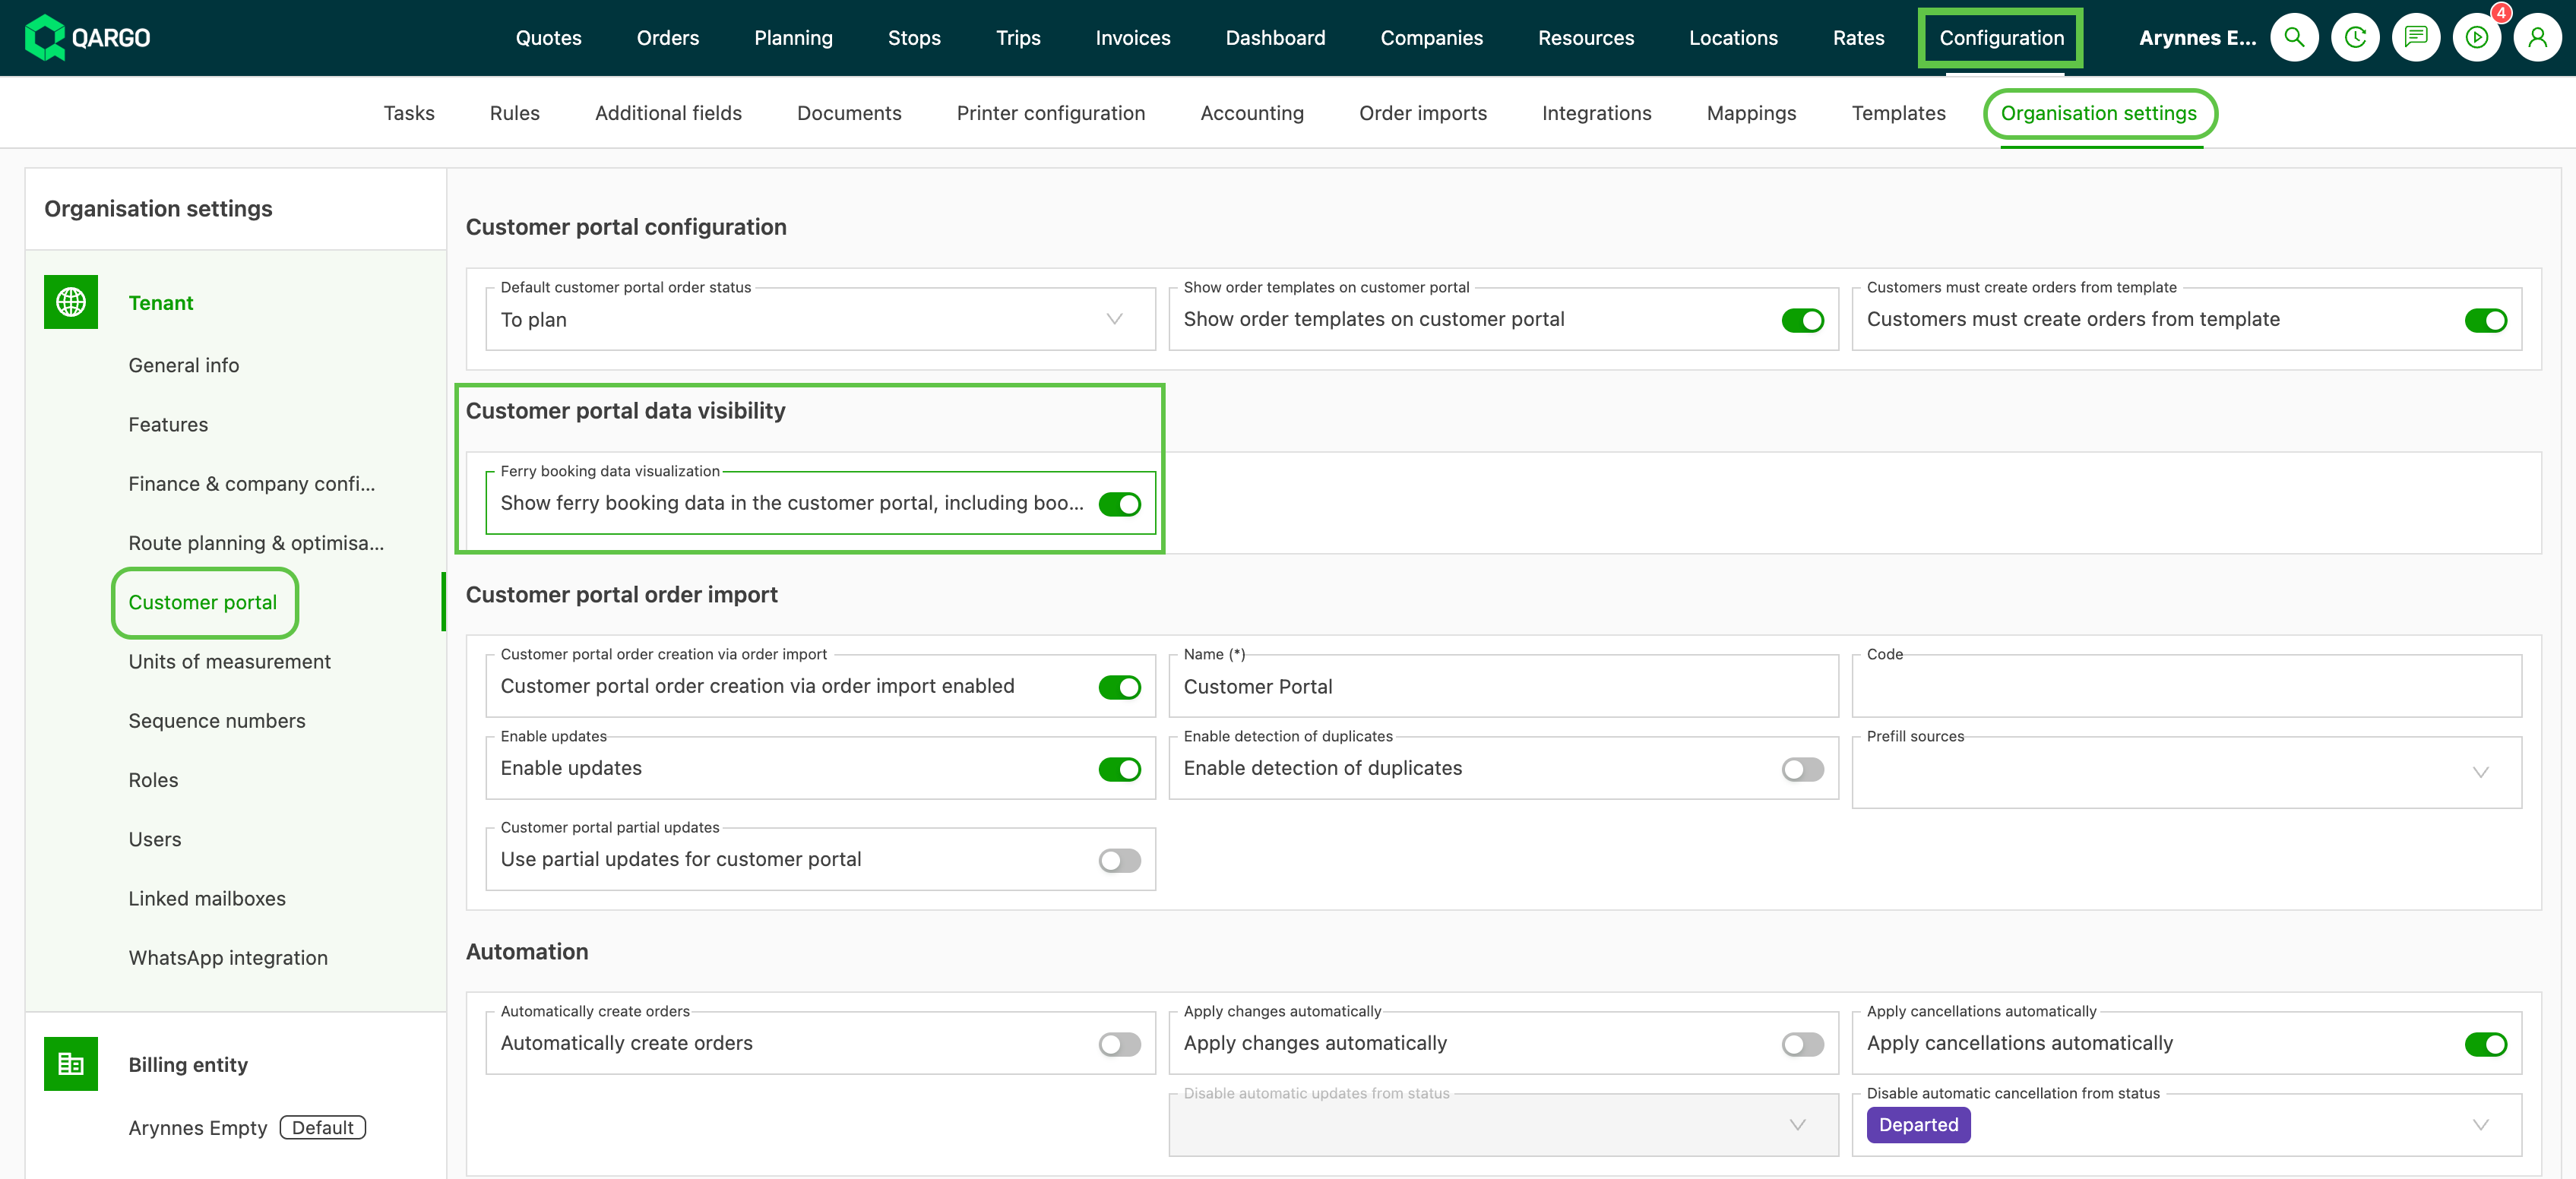
- Navigate to Configuration > Organization settings > Customer portal settings
- Turn on the Show ferry booking data toggle
- Save. The Booking section is now visible to all portal users on this tenant
What end customers see
When the toggle is on, a read-only Booking section appears on the order detail page in the customer portal. It appears for orders with an active intermodal booking. The section shows:
- Booking name
- Booking status (e.g., Requested, Booked)
- Booking reference: the reference number assigned by the carrier
- The from and to stop locations of the intermodal connection
The section is hidden automatically when:
- The toggle is off
- The order has no active intermodal booking
- The booking is canceled
End customers cannot edit any booking fields in the portal.
Limitations
- The operations status (e.g., Checked in, On board, Sailed) is not shown. Planners can view it in Planning > Intermodal
- Departure and arrival times are not shown, only the from and to stop locations
- The setting applies to the whole tenant and cannot be turned on or off for individual end customers
- Only intermodal bookings are visible. Warehouse bookings and customs pre-notifications are excluded
- The displayed fields cannot be configured
Troubleshooting
| Issue | Likely cause and resolution |
|---|---|
| Booking section not visible in the portal | The toggle is off.\ |
| Turn on the Show intermodal booking on customer portal toggle under Organization settings > Customer portal settings | |
| Booking section not visible although the toggle is on | The order has no active intermodal booking, or the booking is canceled.\ |
| Check in Planning > Intermodal that the order has an active intermodal booking that is not canceled | |
| Warehouse or customs pre-notification bookings not shown | Only intermodal bookings are shown.\ |
| Warehouse bookings and customs pre-notifications are excluded in this version |
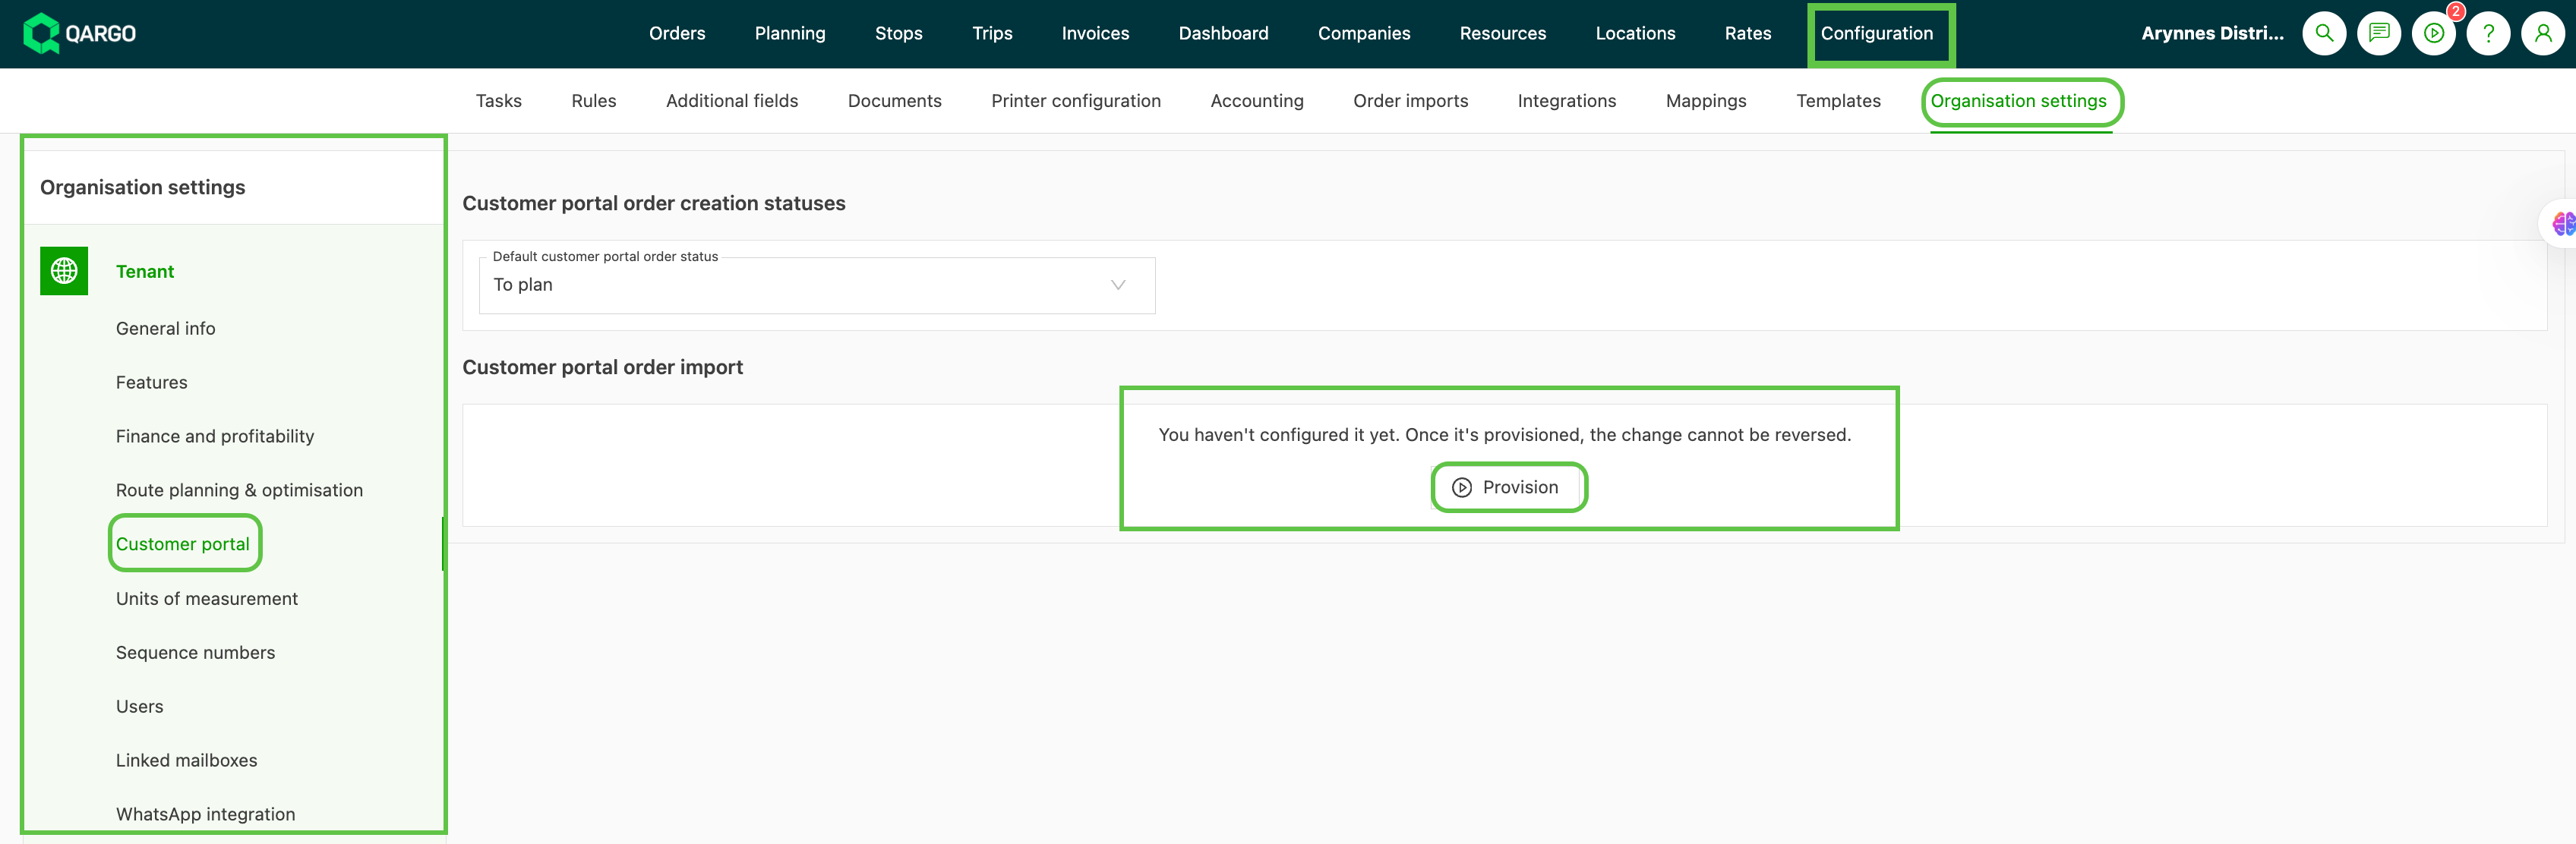
Provision order import features (Qargo and Super Admin only)
-
Select:
- Customer portal order import > Provision
Enabling order edit and cancel
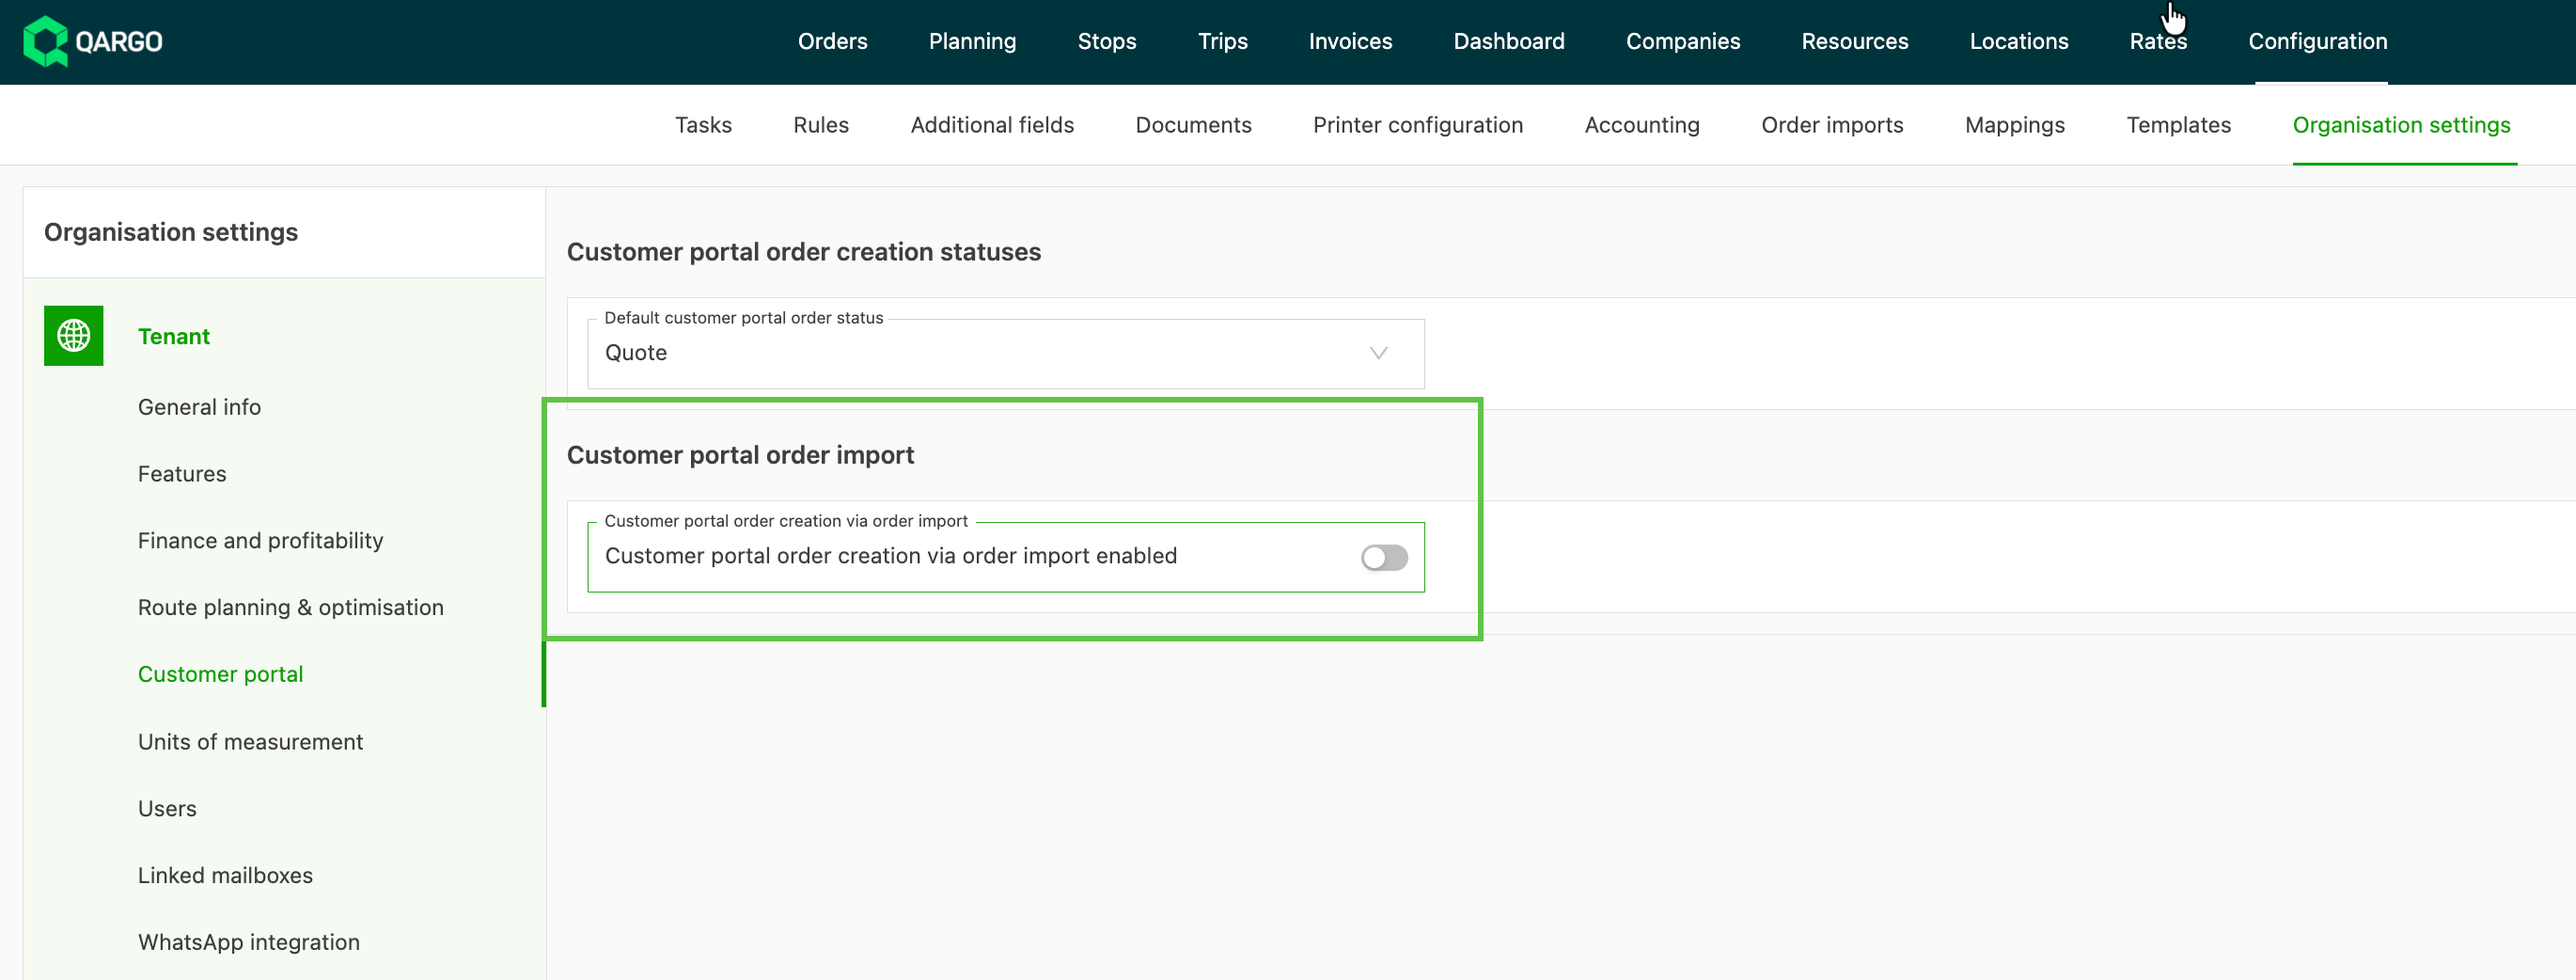
Once enabled, this feature gives portal customers the ability to edit or cancel orders they have already submitted.
-
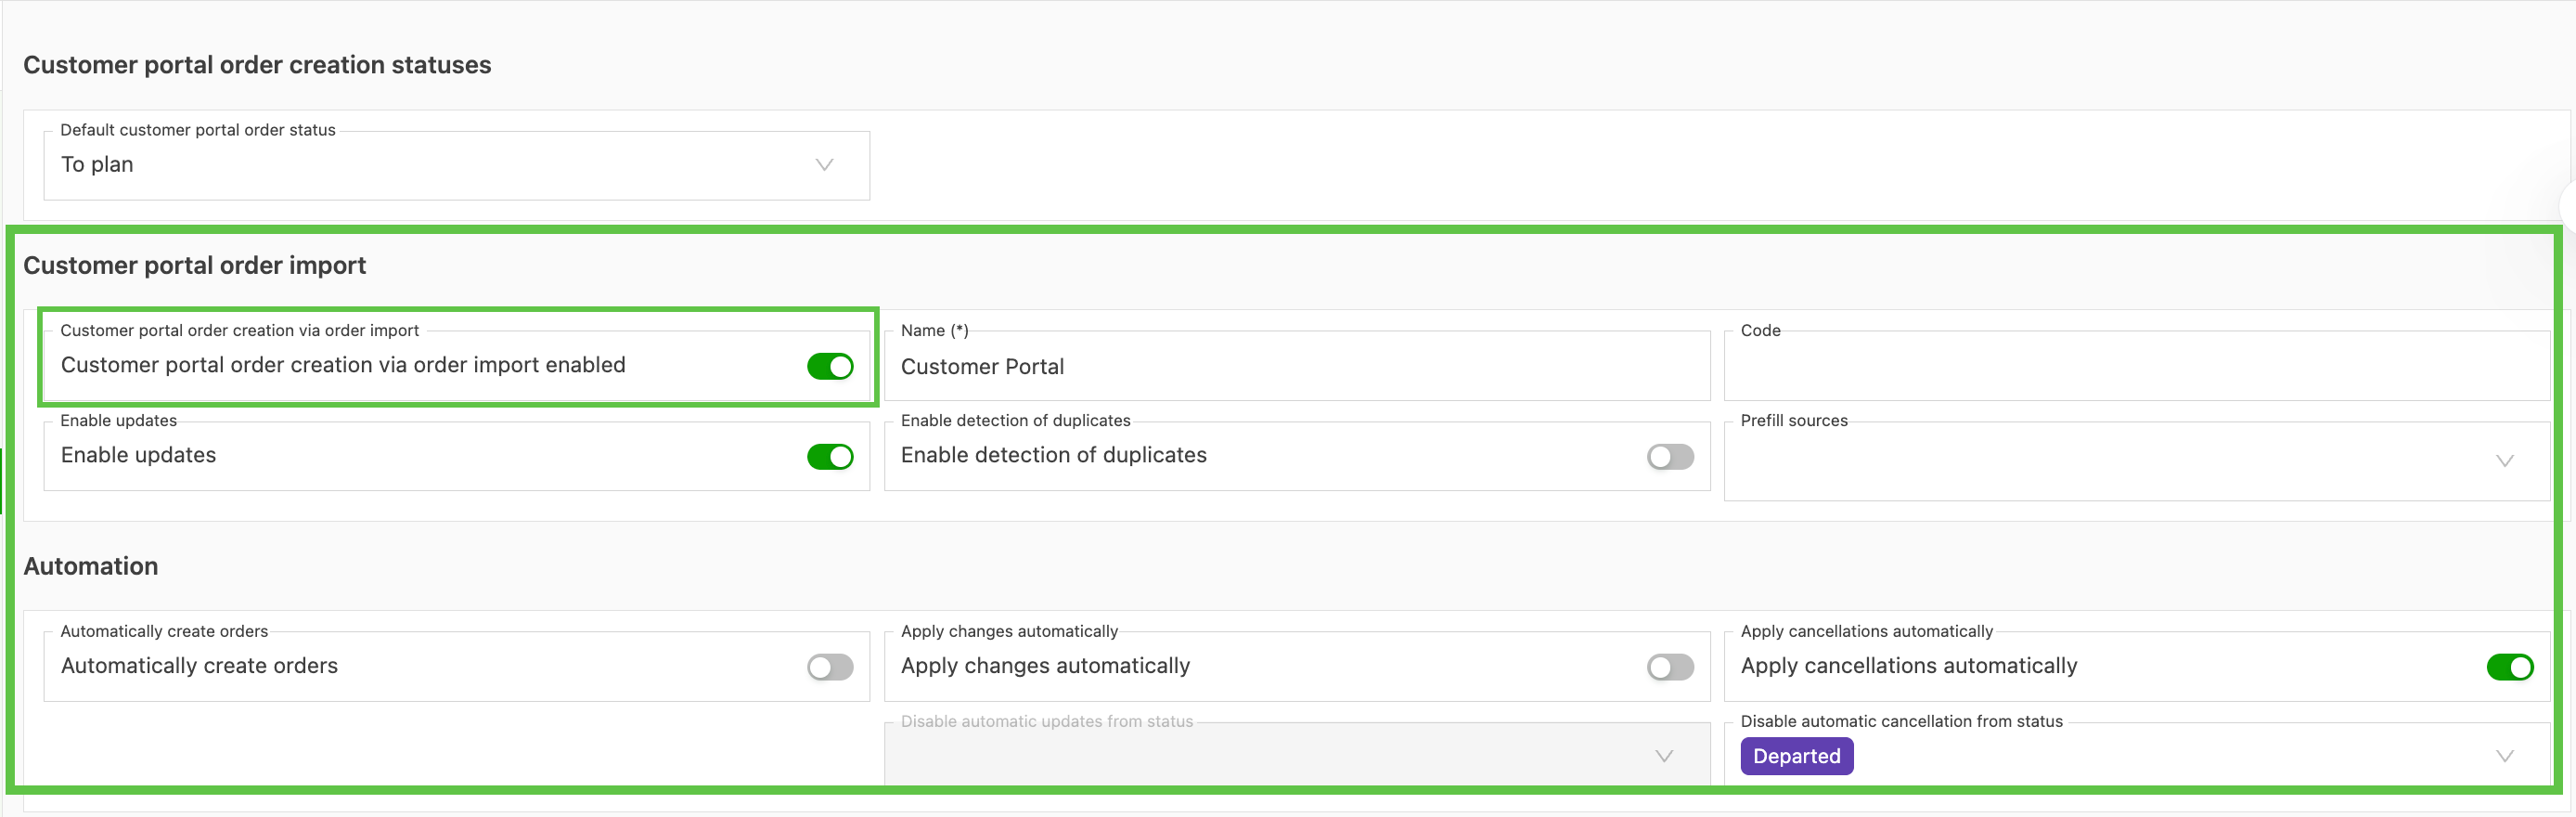
Under Customer portal order import, users can set the preferred order import workflow.
-
To let customers update submitted orders, turn the ‘Enable updates’ toggle on.
-
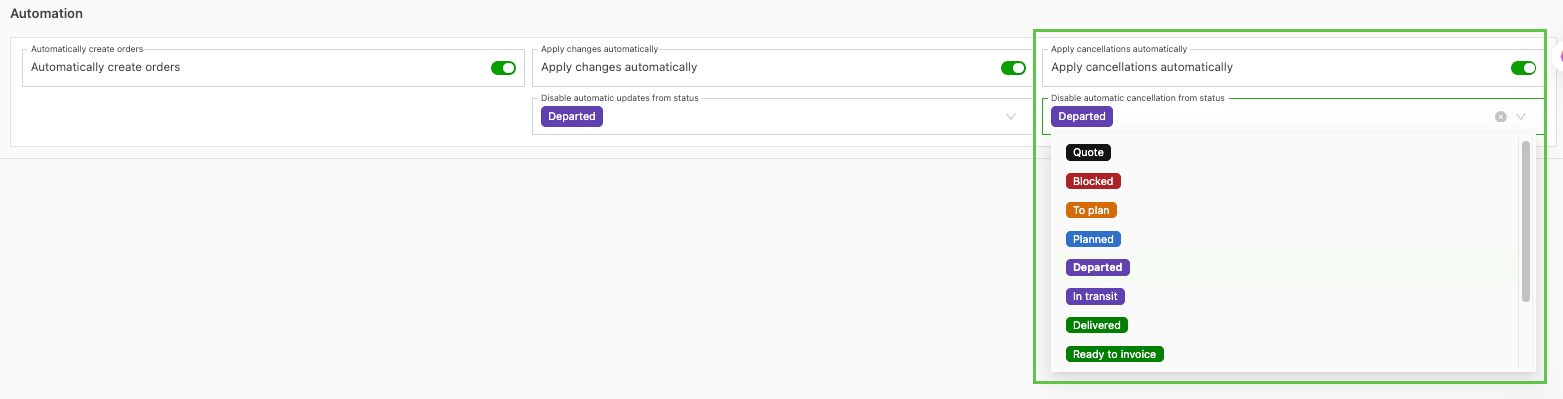
The Automation panel has three new toggles:
-
Automatically create orders: Portal orders are automatically created as transportation orders
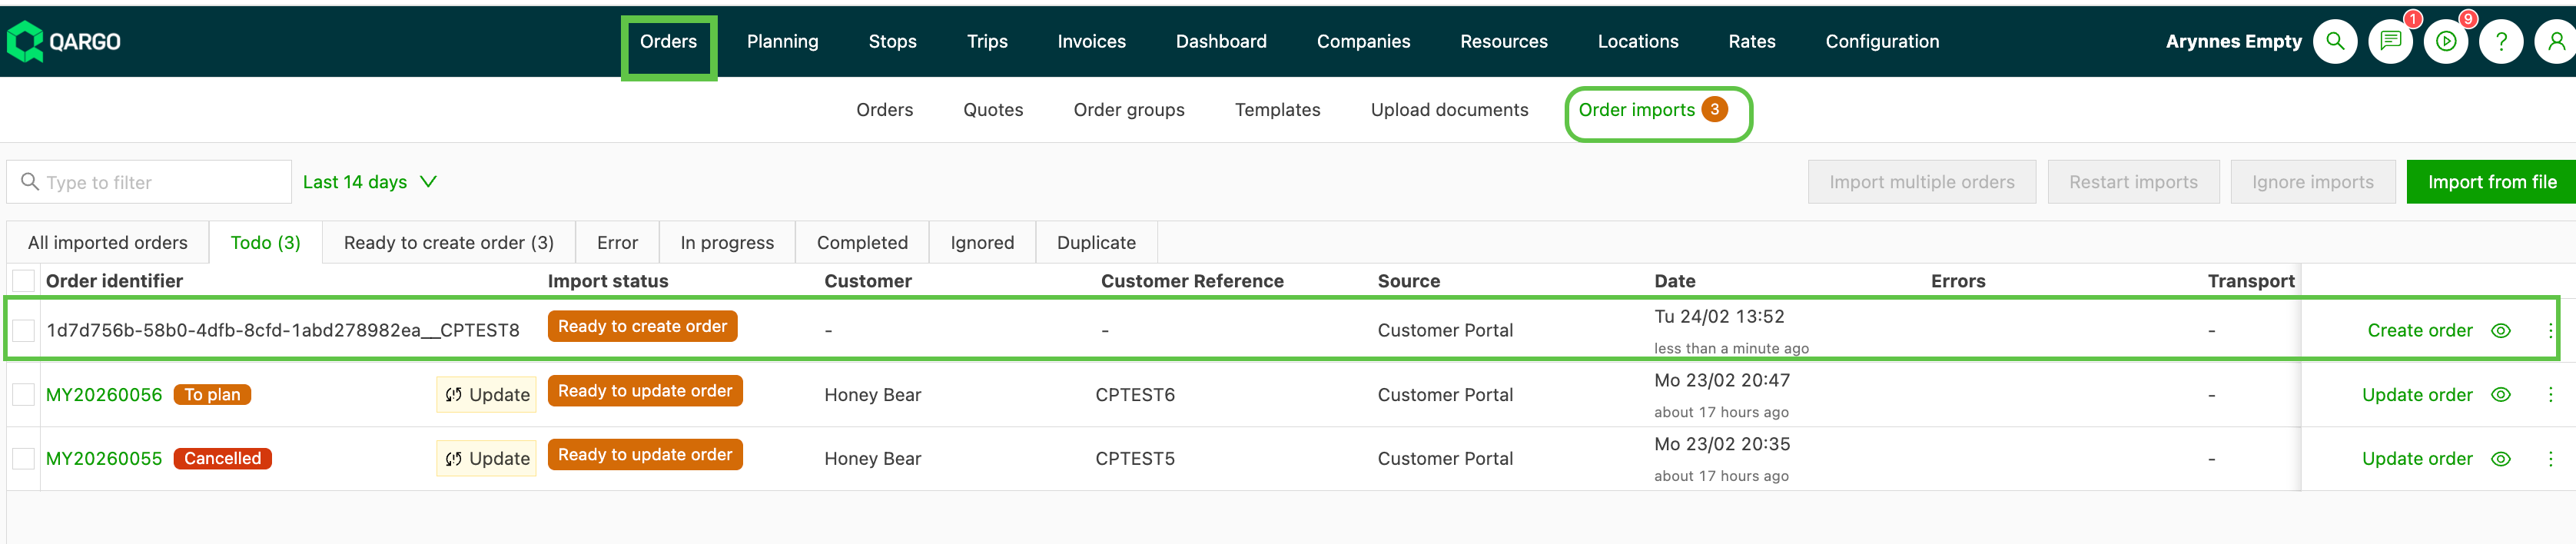
- When this is off, users must manually approve customer-submitted orders on the ‘Order imports’ page
- Click ‘Create order’ to verify and save the order
-
Apply changes automatically: Portal customers can edit the details of a submitted order, provided it has not been picked up yet
- Only available if ‘Enable updates’ is turned on.
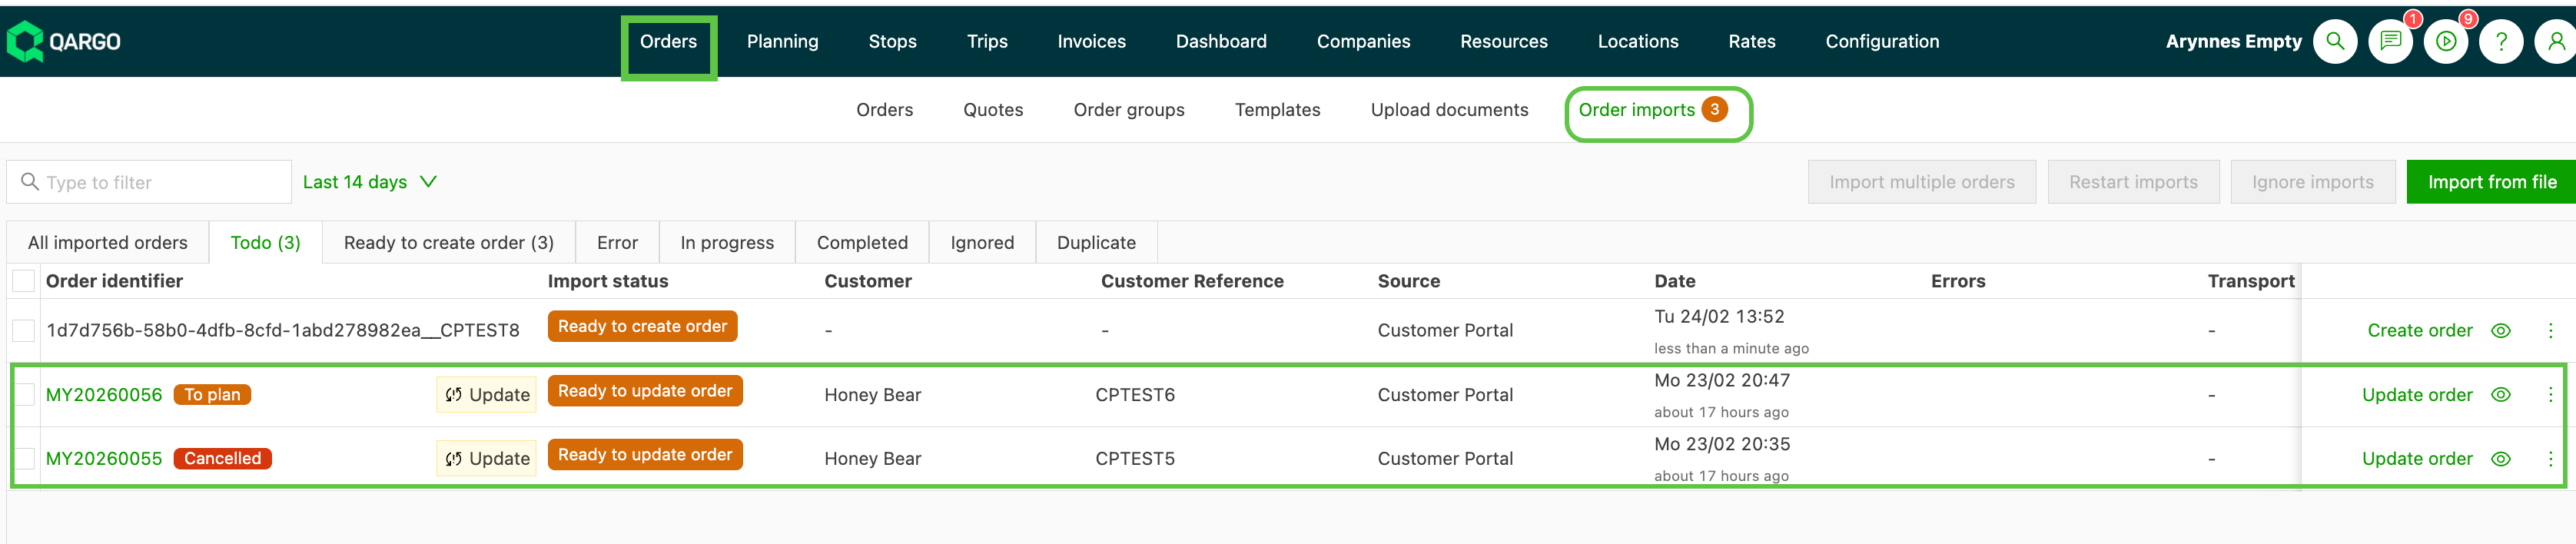
- Where updates are not accepted automatically, users must approve them on the ‘Order imports’ page
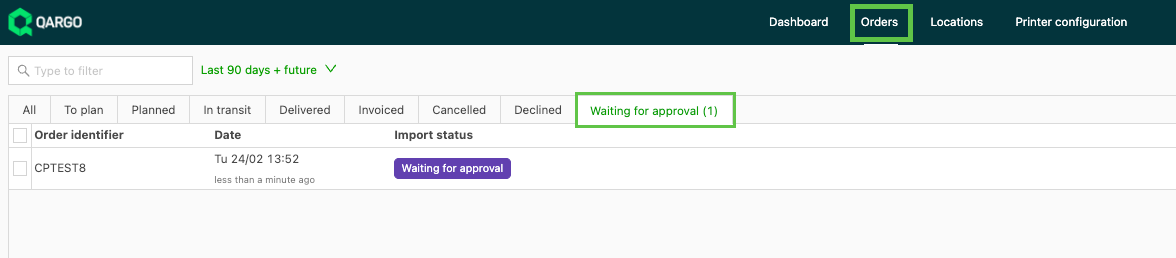
- Customer portal users see update requests as ‘Update awaiting approval’ and under the ‘Waiting for approval’ tab
-
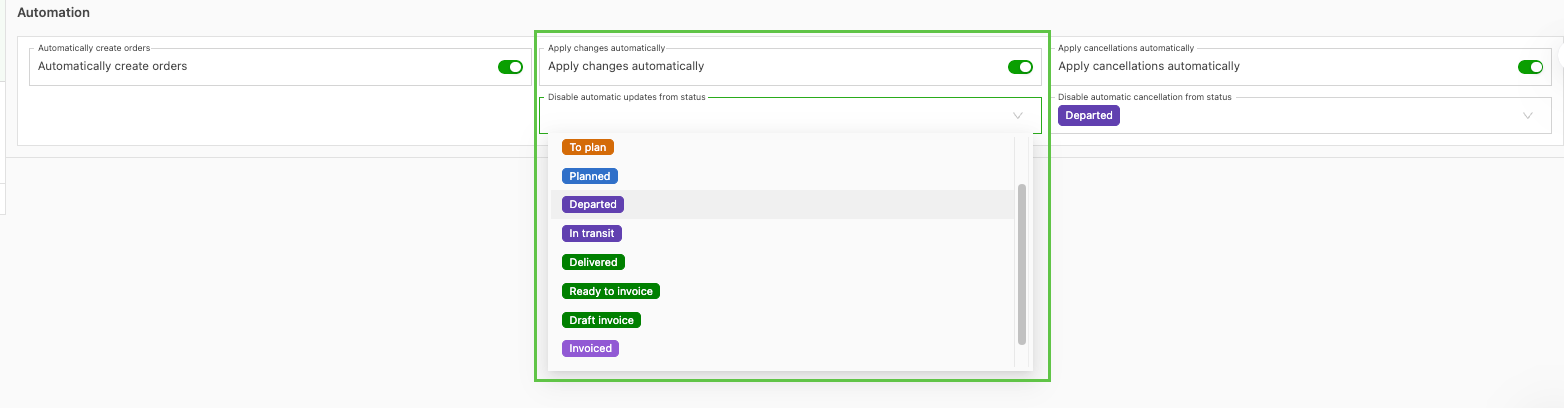
- Set a status to block updates beyond a specific point in the workflow:
-
Apply cancellations automatically: Portal customers can cancel a submitted order, provided it has not been picked up yet.
- Set a status to block updates beyond a specific point in the workflow:
How it works
-
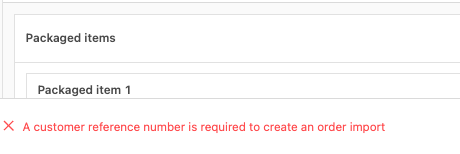
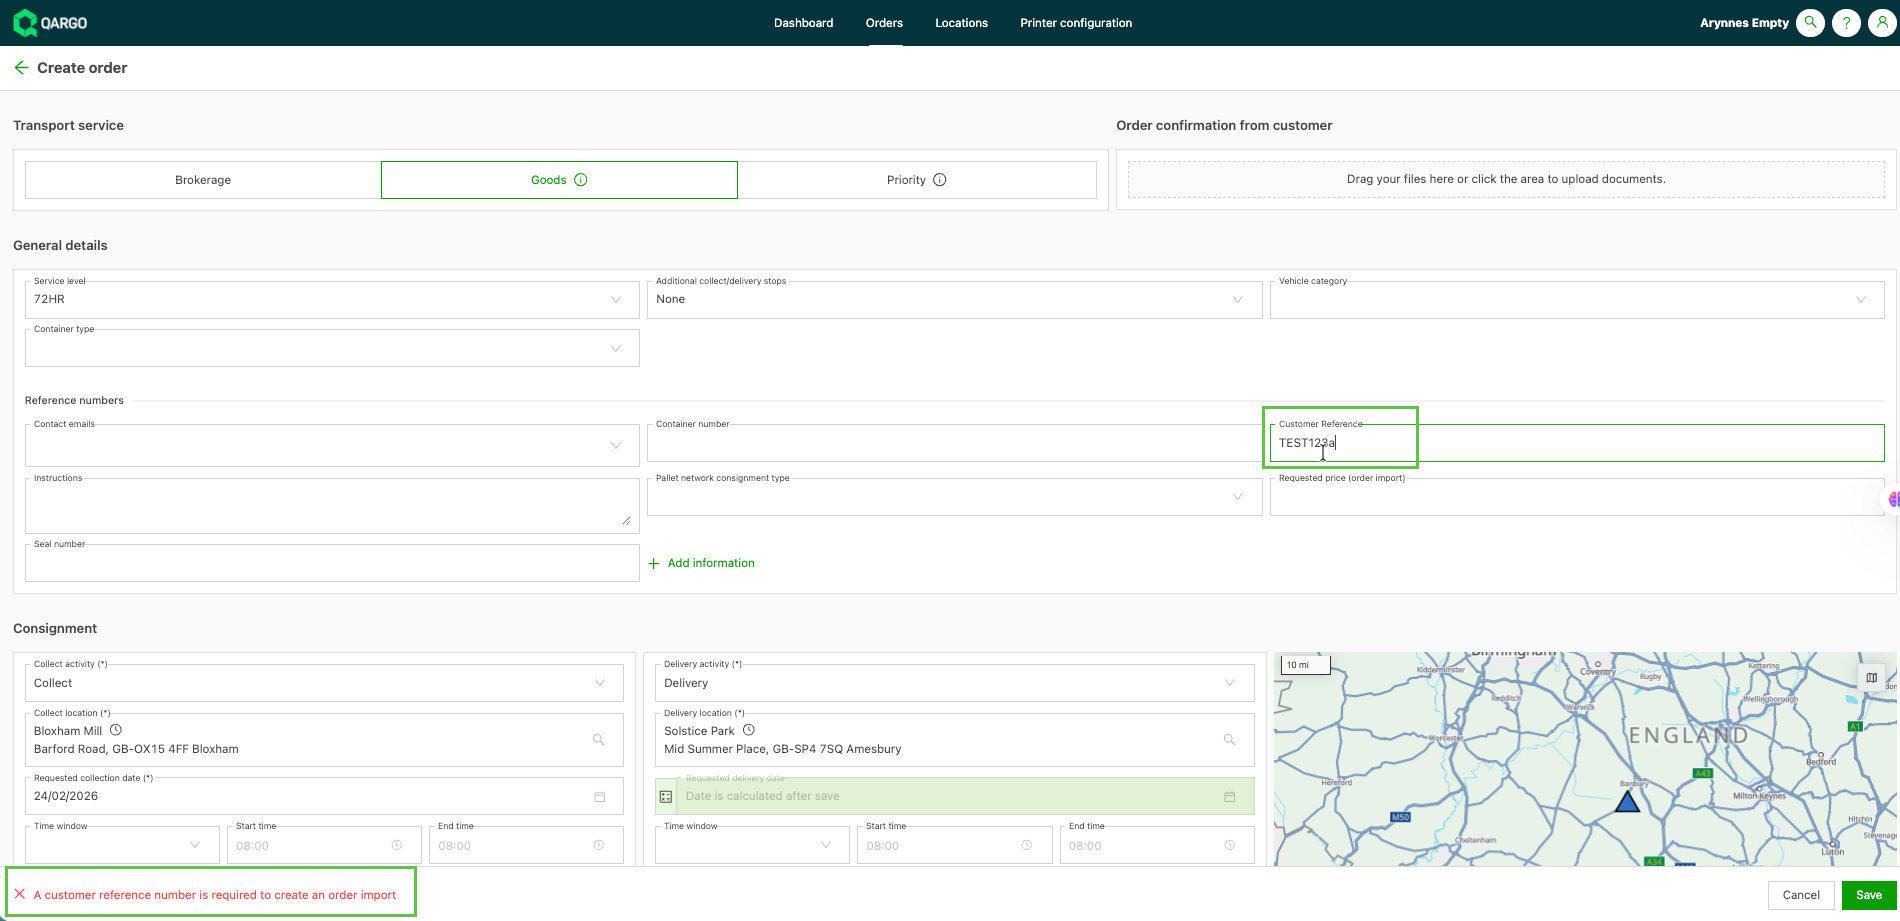
To submit a new order, portal customers must use a unique customer reference. Otherwise, the user sees an error
- This reference number links the portal order to the TMS order.
-
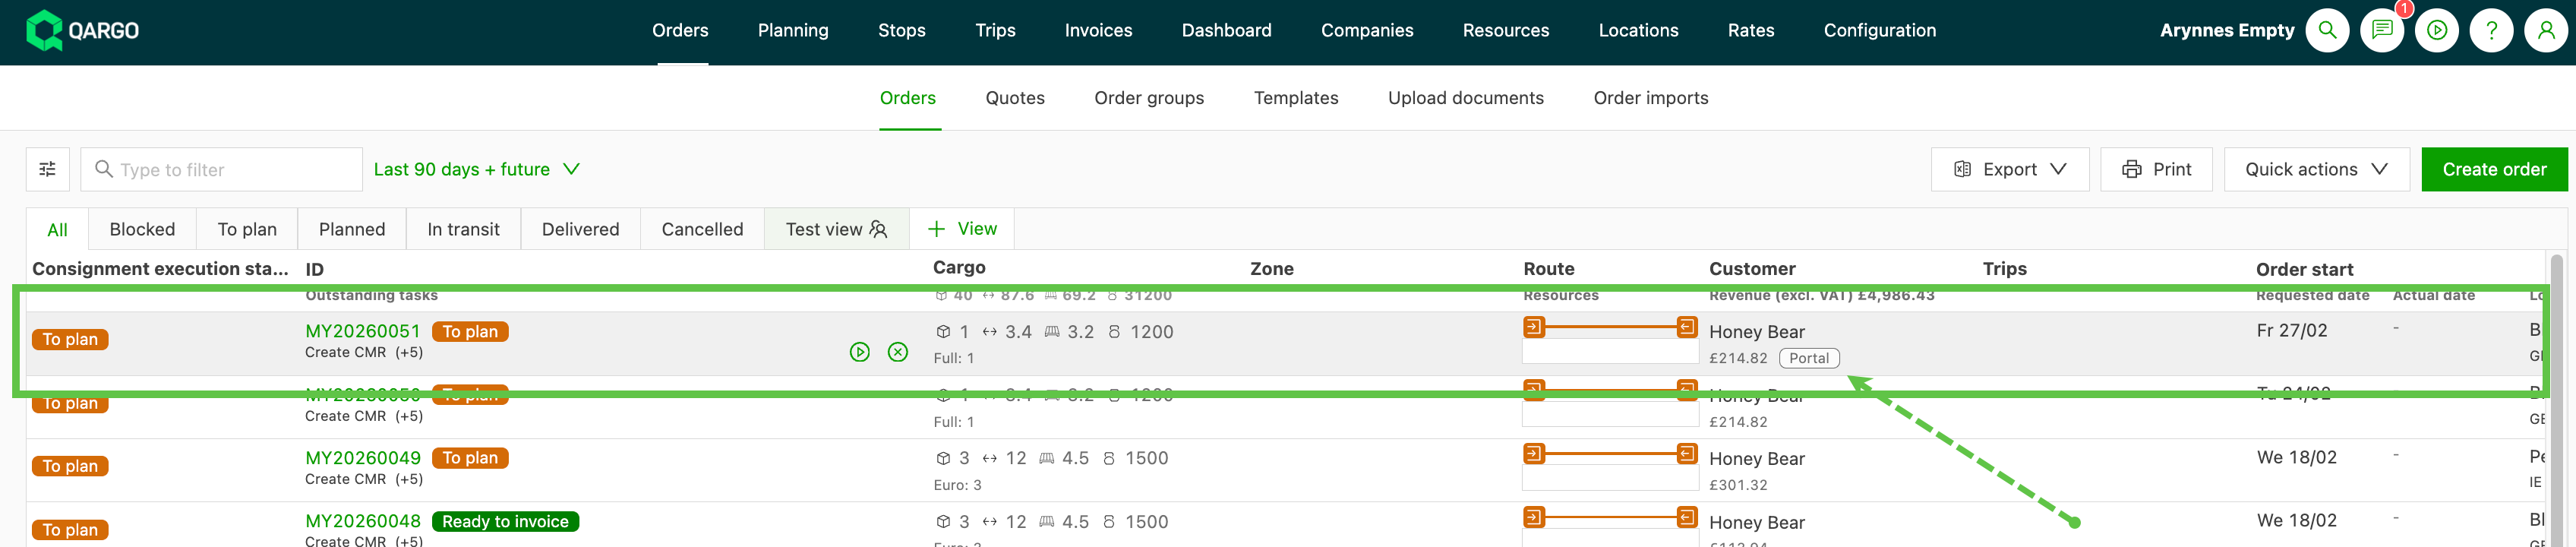
Once submitted successfully, the order appears in the order list view with the ‘Portal’ label.
- If ‘Automatically create orders’ is not set, all orders must be updated manually in the ‘Order import’ tab
- If orders submitted by customers generate a quote first, the quotes appear in the Quote tab with the ‘Portal’ label.

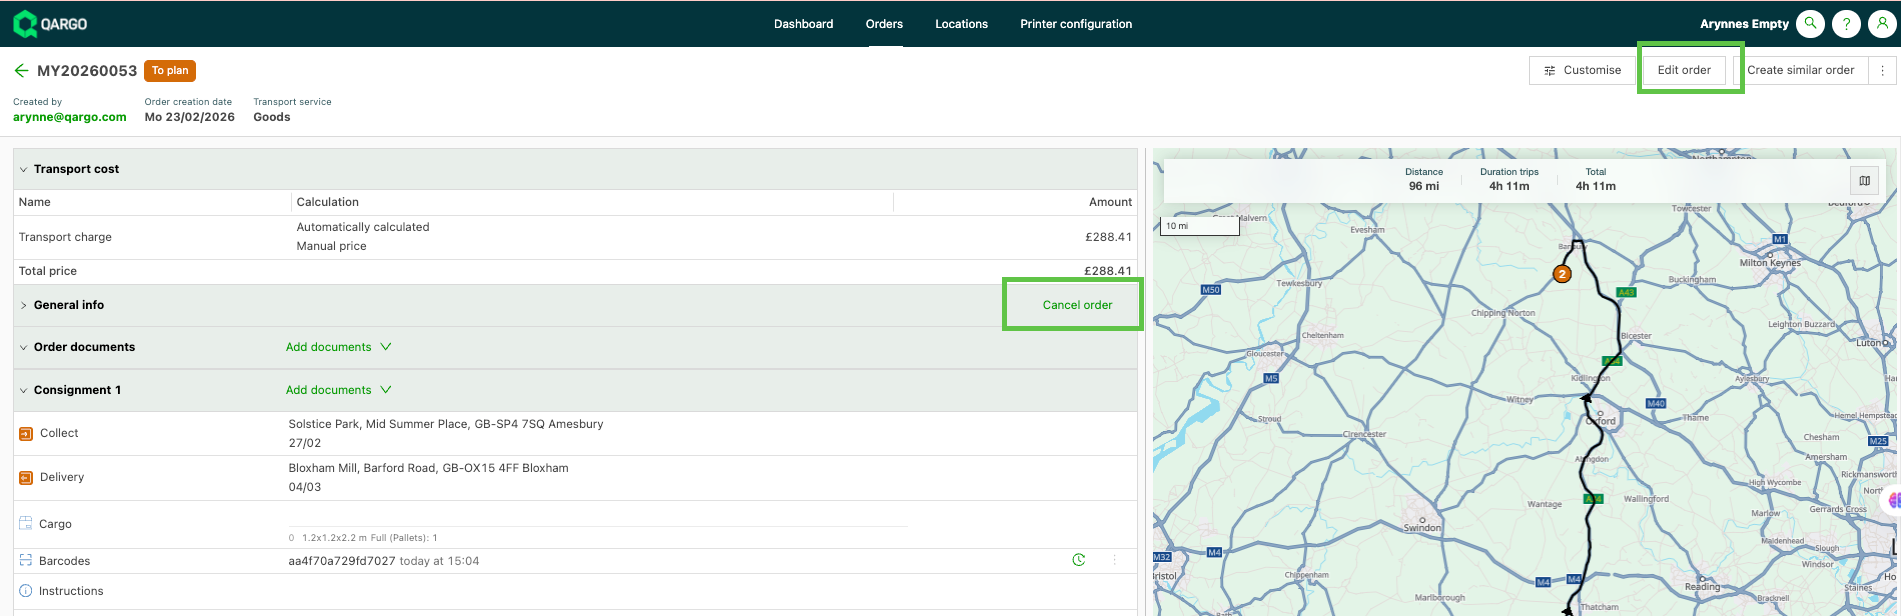
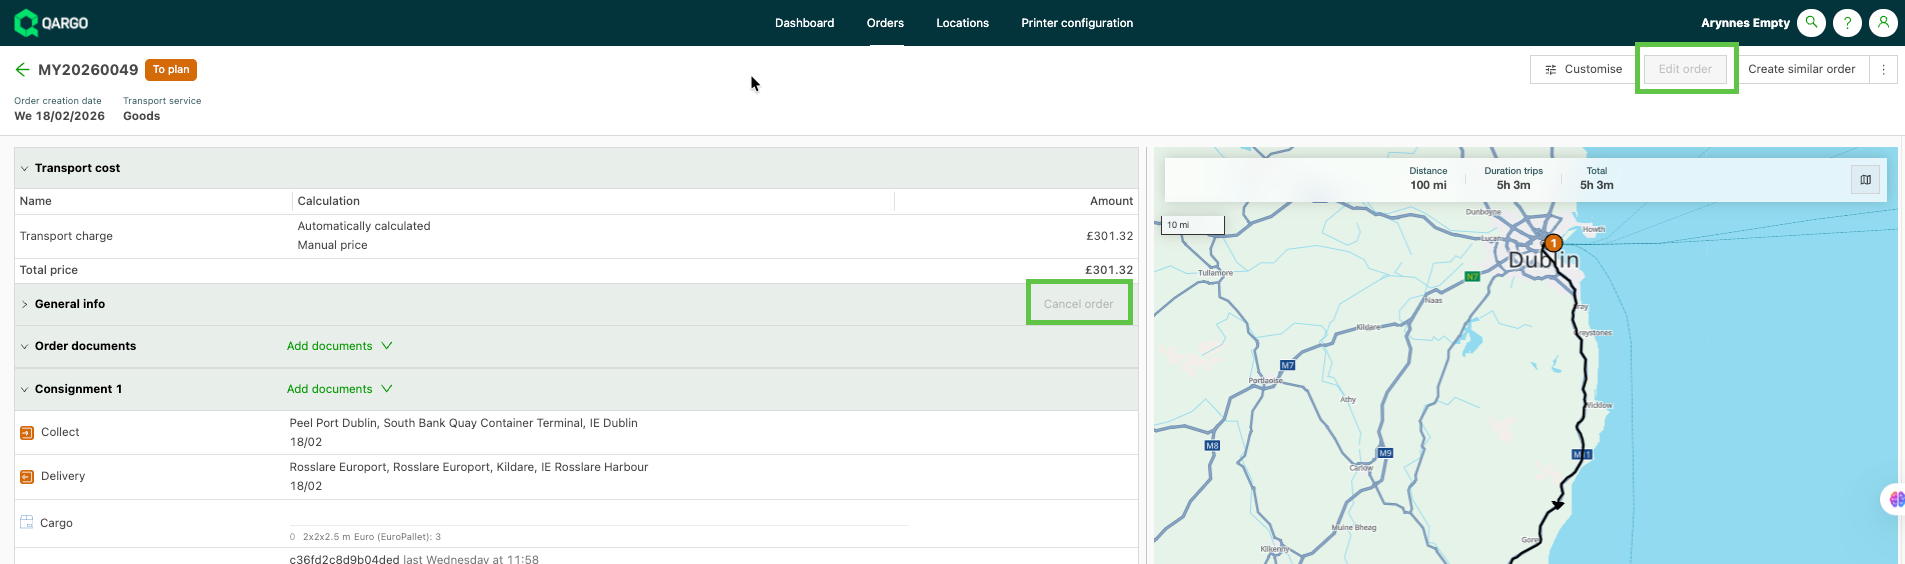
- Portal customers see ‘Edit’ and ‘Cancel’ options on eligible orders.
-
When automatic updates are enabled, changes submitted by the customer update the order in the TMS automatically.
- Portal users see the label ‘Update awaiting approval’ until the order is opened in the carrier account. Opening the order ‘approves’ the update.
-
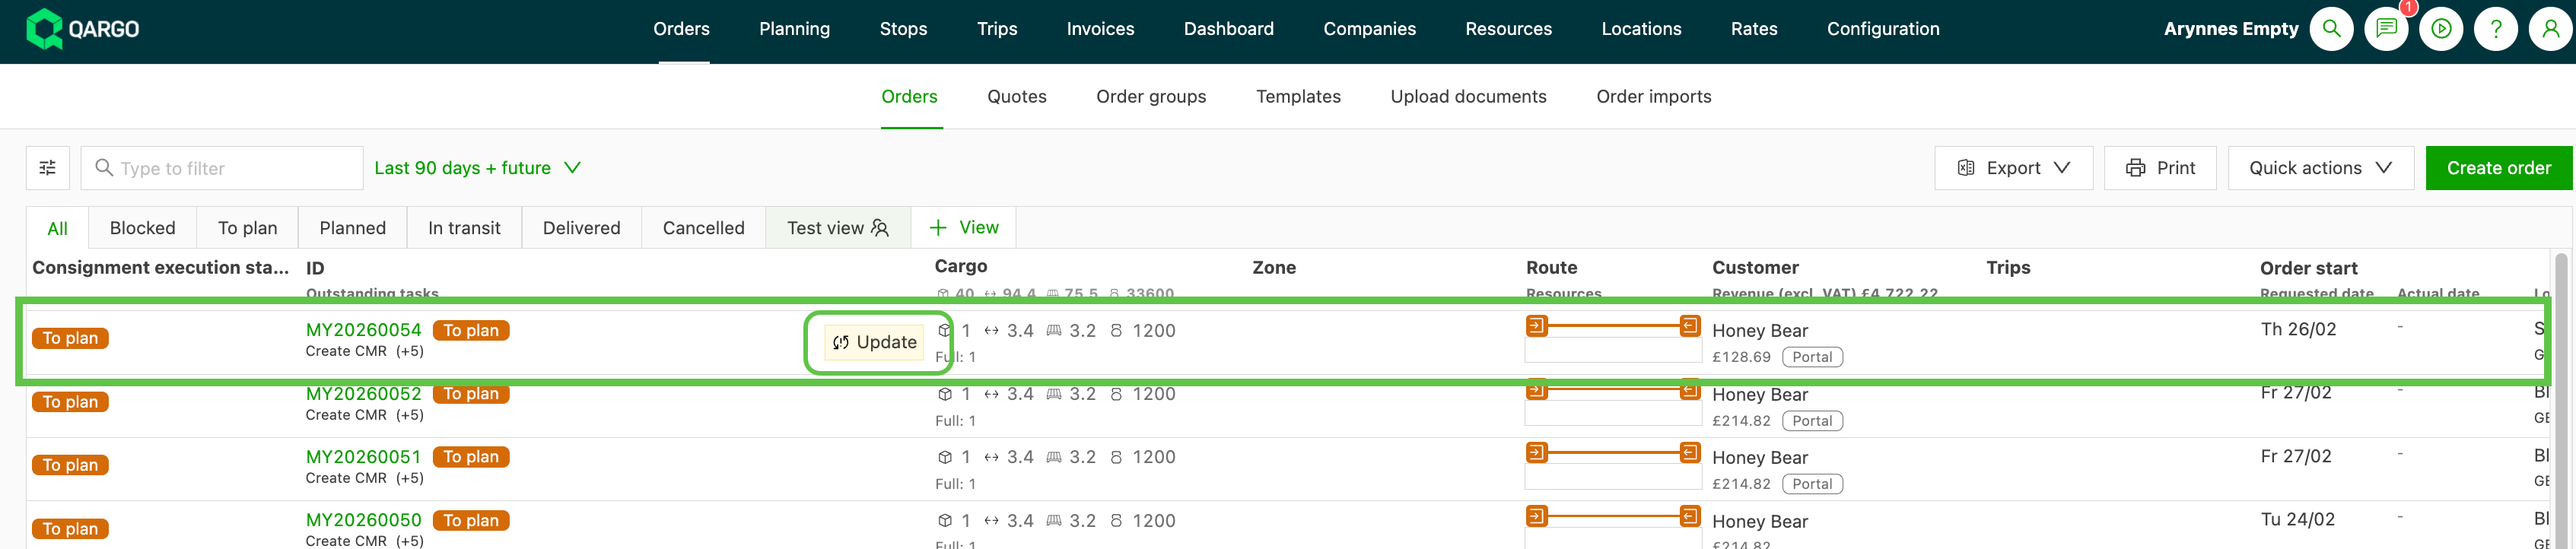
Where automatic updates are not enabled, customers can still edit the order. The carrier then sees an ‘Update’ label on the order
- Click the update to open the revised order.
- Validate and save the update.
Troubleshooting order import
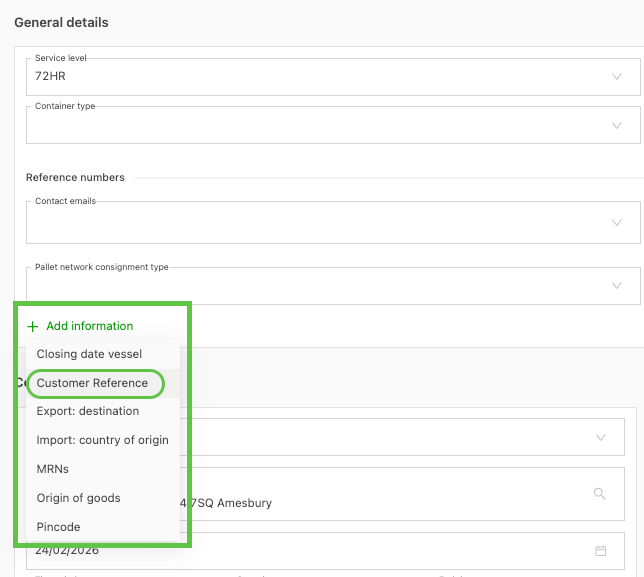
The customer reference error appears, but there is no visible place to enter the reference number.
Unless the field is set to ‘Always show’, the customer reference field is under the ’+ Add information’ link in General details on the order form. The recommendation is to set this field to ‘Always show’, so that it appears as a field on the order form.
Customers cannot autoprint labels after creating an order in the customer portal. This used to work. Why does it no longer work?
When the order import workflow is enabled and a customer submits an order in the portal, the order is not created in the customer portal immediately; this depends on approvals. The order import workflow includes approval automation for the order, which can cause a delay. Once the order is approved, the customer portal user can download the label manually. If this affects autoprinting and the customer wants to return to the previous behavior, turn off ‘Customer portal order creation via order import enabled’. This restores the previous order behavior, including autoprinting. However, the customer will not be able to edit or cancel orders.
Order import error showing ‘Not allowed to create or update the order after the cutoff time’. How can this be fixed?
This error appears because a lead time applies to the transportation service or service level selected on the order. The customer submitting the order does not see this error, so users can decide whether to override the lead time.
Click the ‘Fix the error’ option. This opens the order capture page so the user can correct the data and save the order.
A customer submitted an order, then made a change that needs manual approval. On review, the location was outside the delivery area, so the order cannot be accepted. The order was canceled, but how does the customer find out?
When the customer portal is not set up to accept automatic order creation, orders go to the Waiting for approval tab. If the carrier then decides not to carry out the order, it moves to the Canceled tab.
When the customer cancels an order that is in the Waiting for approval tab, it also appears in the Canceled tab.
Share planned and actual load times via a task flag
Control which loads share planned and actual times in the customer portal by turning on a task flag. Estimates and confirmed times then appear only when they are reliable.
🎥 This video explains how to share load times, and also how to grant access to the customer portal and enable exports for customer portal users:
Prerequisites
- A resource-allocation load task must exist under Configuration > Tasks > Loads.
- Super Admin rights are required to edit tasks in Configuration.
Use cases
- A carrier wants end customers to see a confirmed delivery time only after a planner has verified the load. This avoids calls triggered by rough planning estimates.
- A logistics team shares actual completion times for delivered loads. Customers get an accurate record without seeing unconfirmed estimates.
Enable time sharing on a load task
- Navigate to Configuration > Tasks > Loads.
- Open the resource-allocation task that runs when a load is planned, or create one.
- Turn on the Share load planned/actual times to the customer portal/API toggle, next to Re-dispatch automatically if load changes.
- Save the task configuration.
Share times for a specific load
- Plan the load and assign resources as usual.
- Complete the load task that carries the Share load planned/actual times to the customer portal/API flag. Completing this task starts sharing the load’s times with the customer.
- Check the customer portal order list. It now shows the planned date and time for the load.
What the customer sees in the portal
By default, the portal shows no estimated times: the customer sees only the requested time. Once a flagged load task is completed, the portal shows the shared times:
- The order list shows the planned date and time for the load.
- On the order detail, while the load is still planned and not yet confirmed, only the date is shown, with a ‘To confirm’ tag.
- If the flagged task has been completed but the load is not yet completed, the actual date and time are shown.
- Once a stop is completed, the exact completion time is shown. A completed load always shows the completion times, even if the flagged task was not run.