
Intermodal - Intermodal planning
Intermodal operations guide for adding intermodal stops mid-route. Choose accompanied or unaccompanied, select line, timetable, and dates.
Table of contents
Intermodal list view
The dedicated Intermodal list view in planning makes it much easier to manage intermodal departures and bookings at scale.
- The Departures panel shows an overview of all booked departures.
- Planners can manage multiple container bookings across different departures in one place
Key benefits
- Better visibility, faster assignments, and clear capacity control for operators booking multiple containers (one container per load, multiple loads per departure)
- Managing voyages or train schedules with limited allocations
- Detailed departure-level planning, manifests, and capacity checks
How it works
- The intermodal departures table provides a clear overview of all upcoming sailings and train departures.
- Clicking a departure highlights it and filters the booking table below, showing only the related bookings.
- Drag and drop makes it quick to assign bookings or move them between departures.
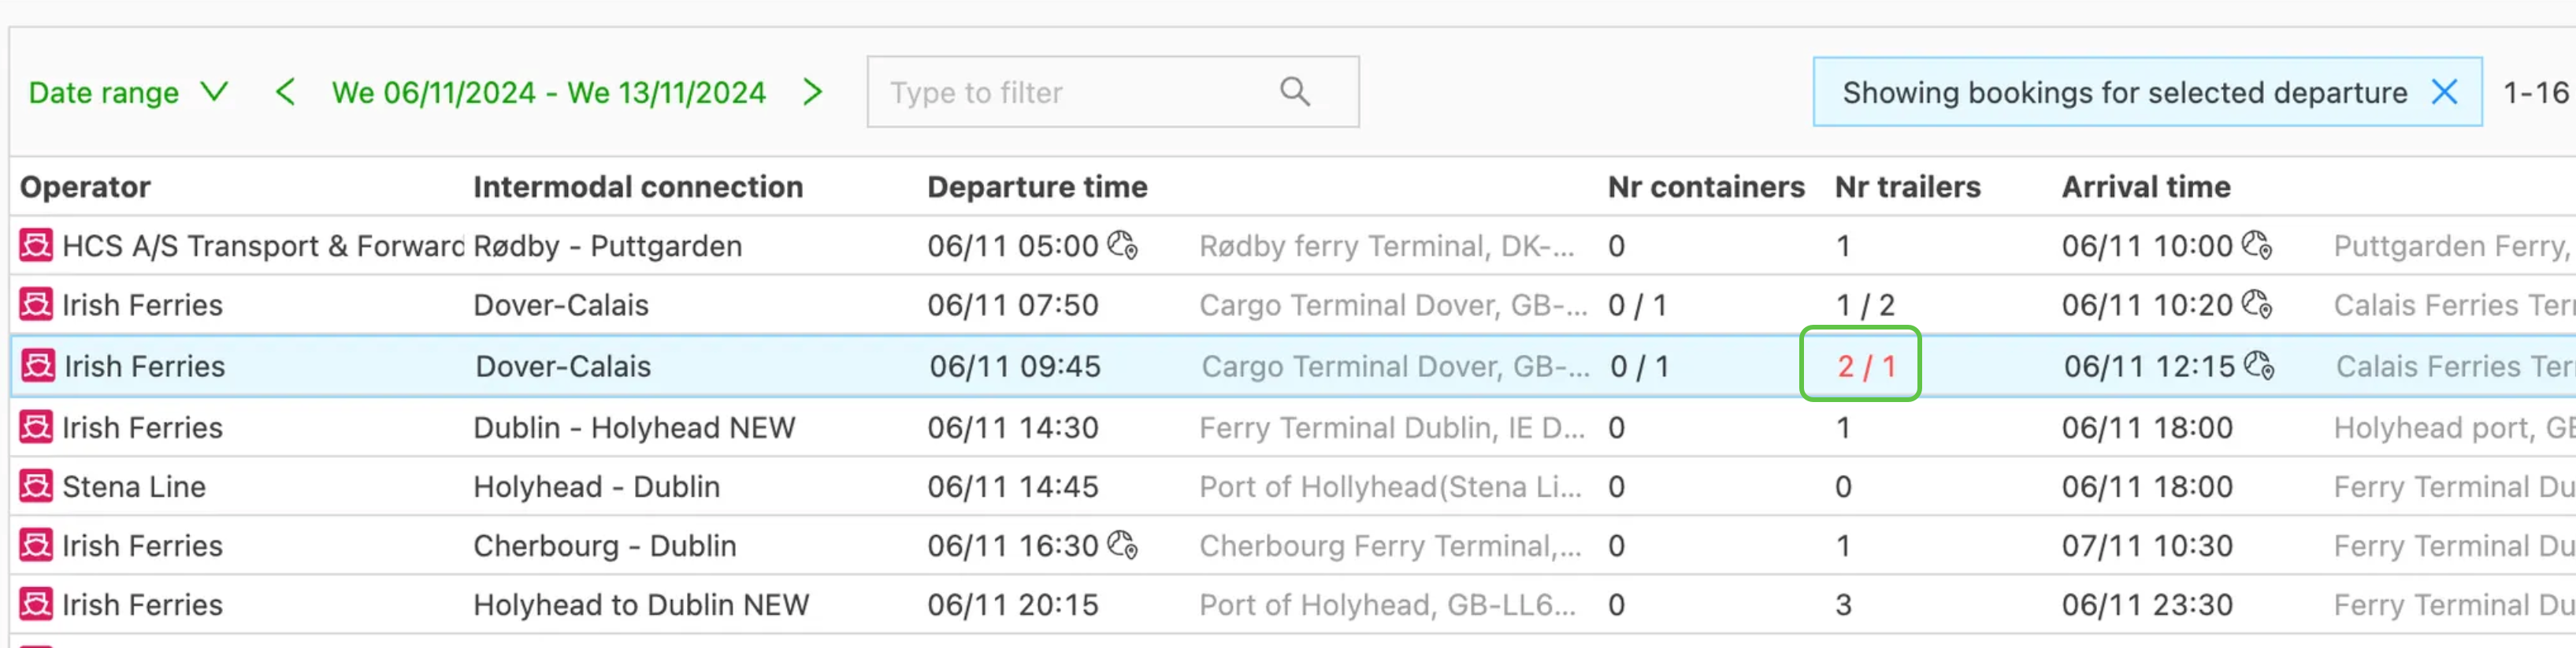
- Capacity controls show the maximum container and trailer allocations and display a warning when limits are exceeded.
Configuring list view options
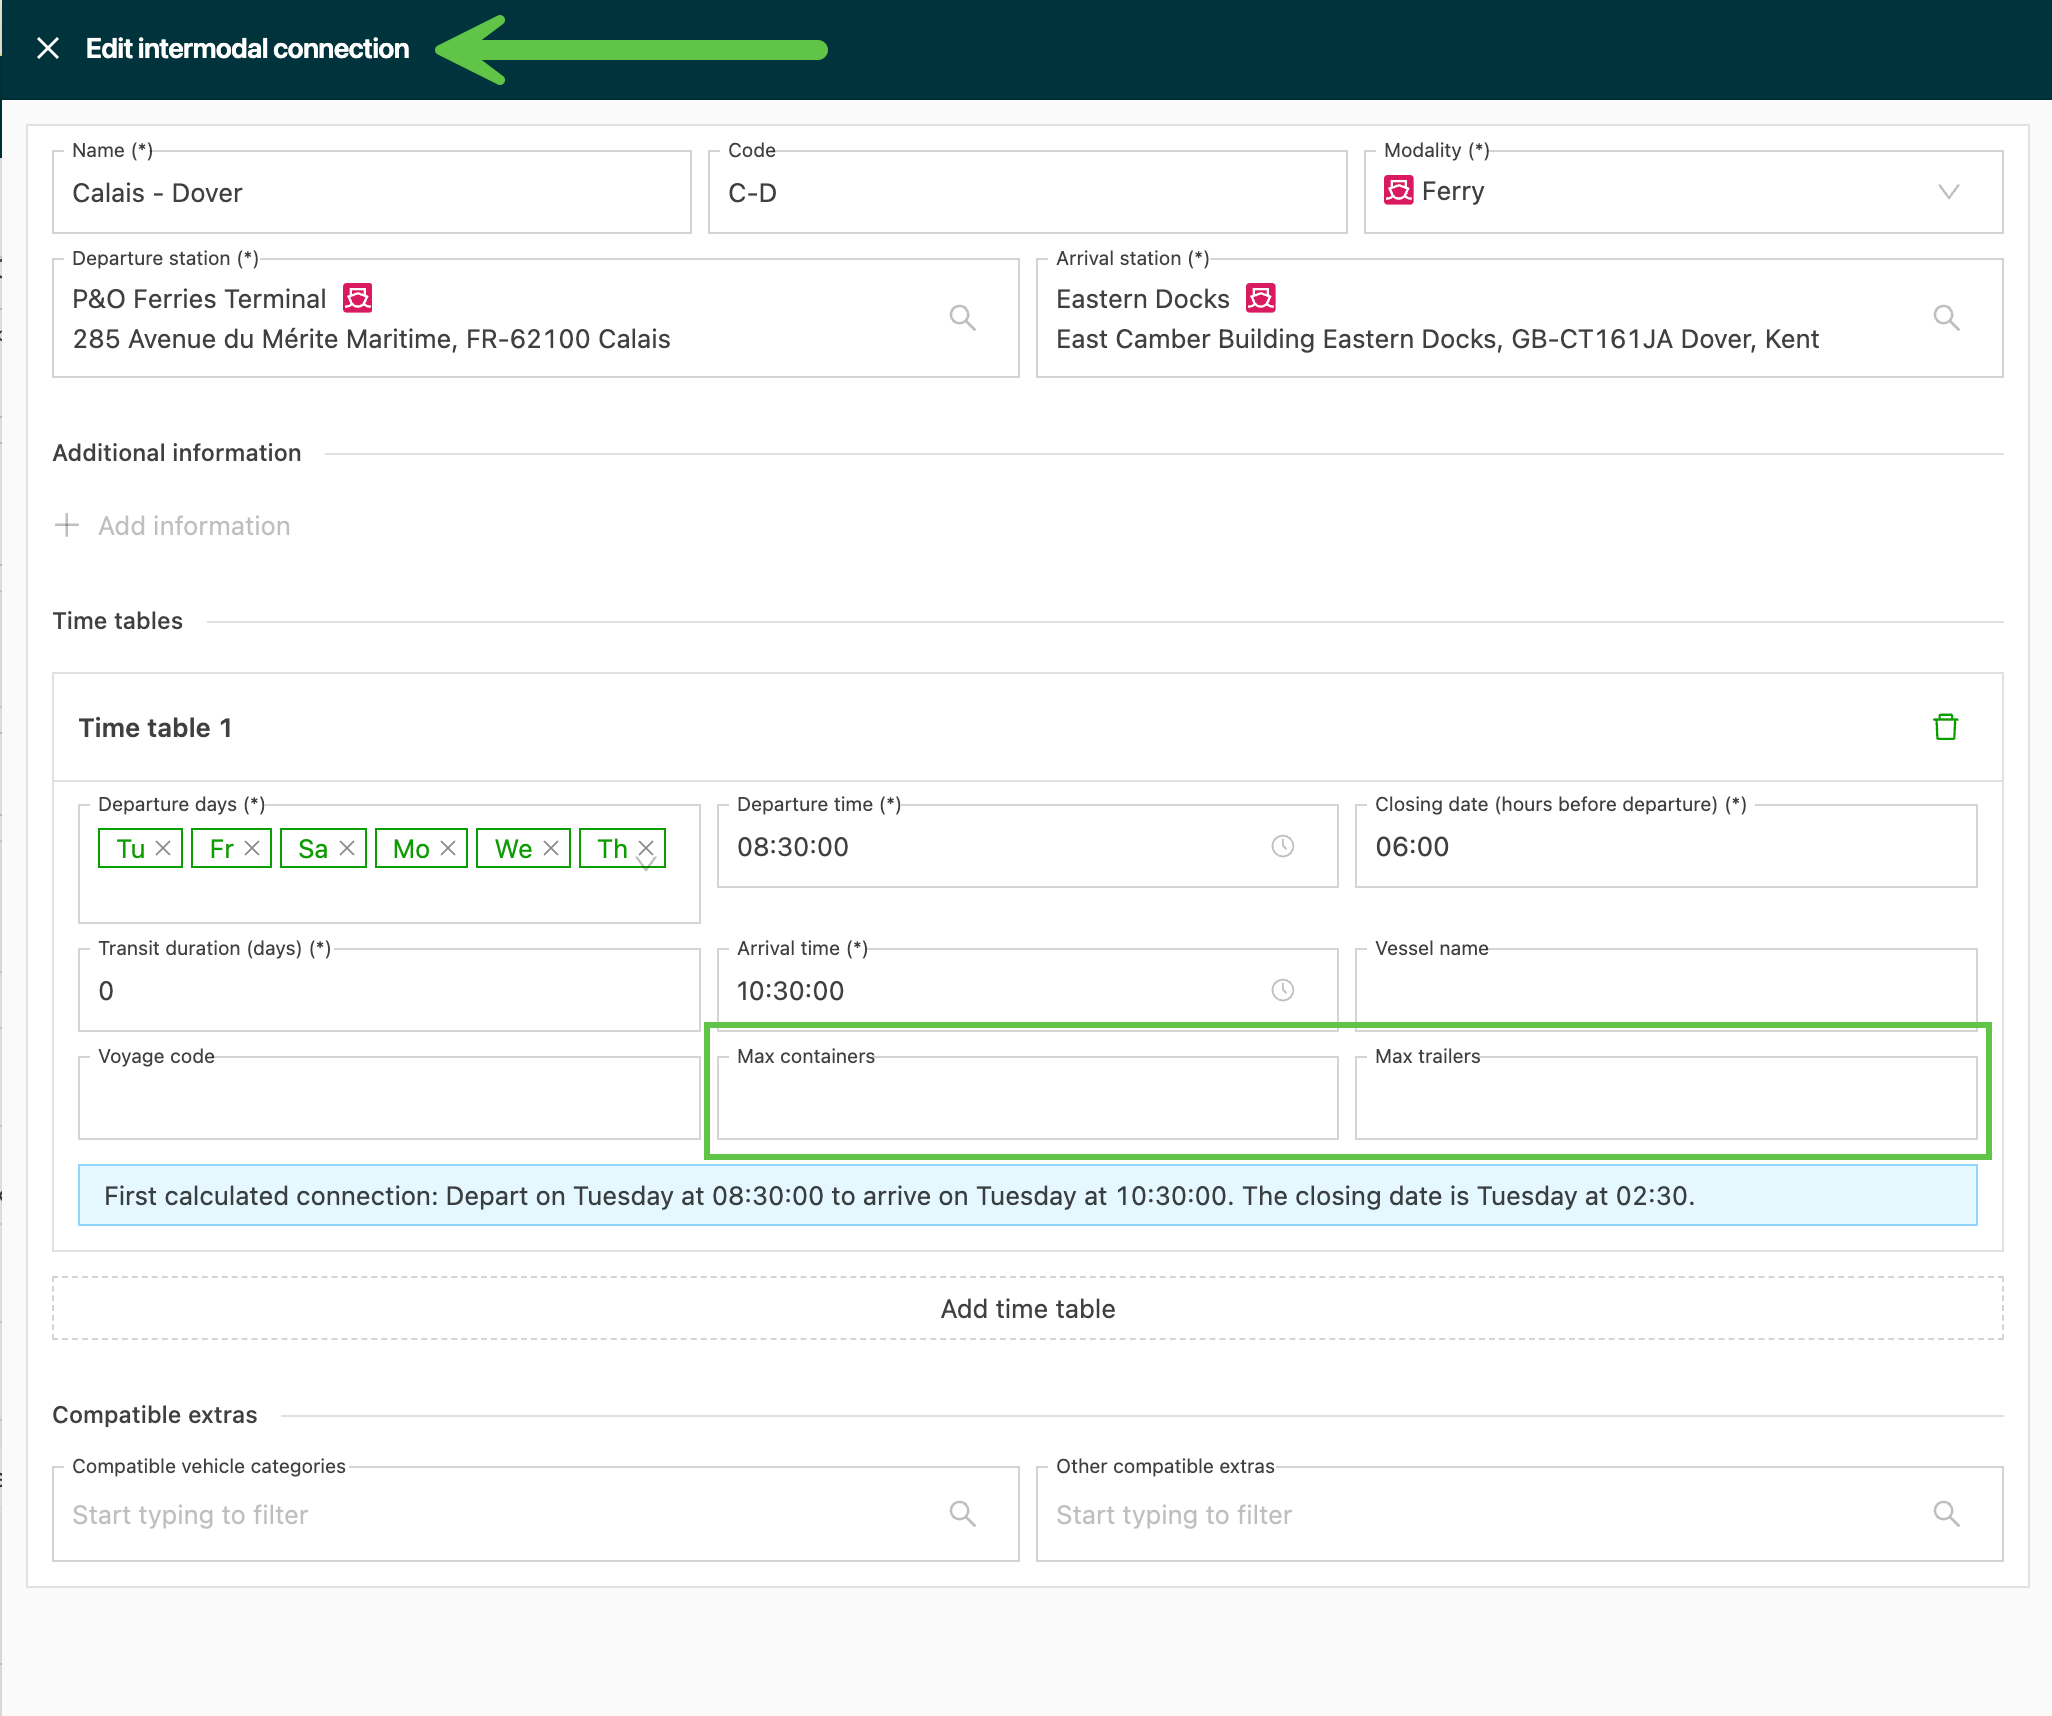
Configure the maximum number of containers and/or trailers that can be scheduled per sailing.
- Navigate to the Resources > Intermodal operators page
- Click the operator that needs the maximums added
- In the Intermodal connections panel, click the Edit icon for the specific timetable.
- In the Timetable panel, add the maximum number of containers and trailers
- Visual alert when capacity is exceeded
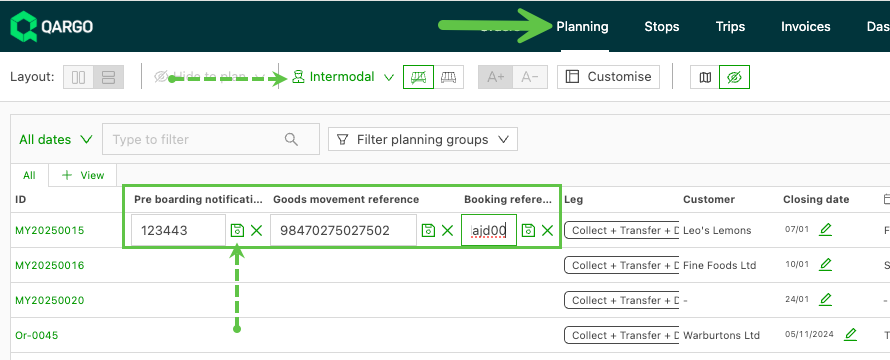
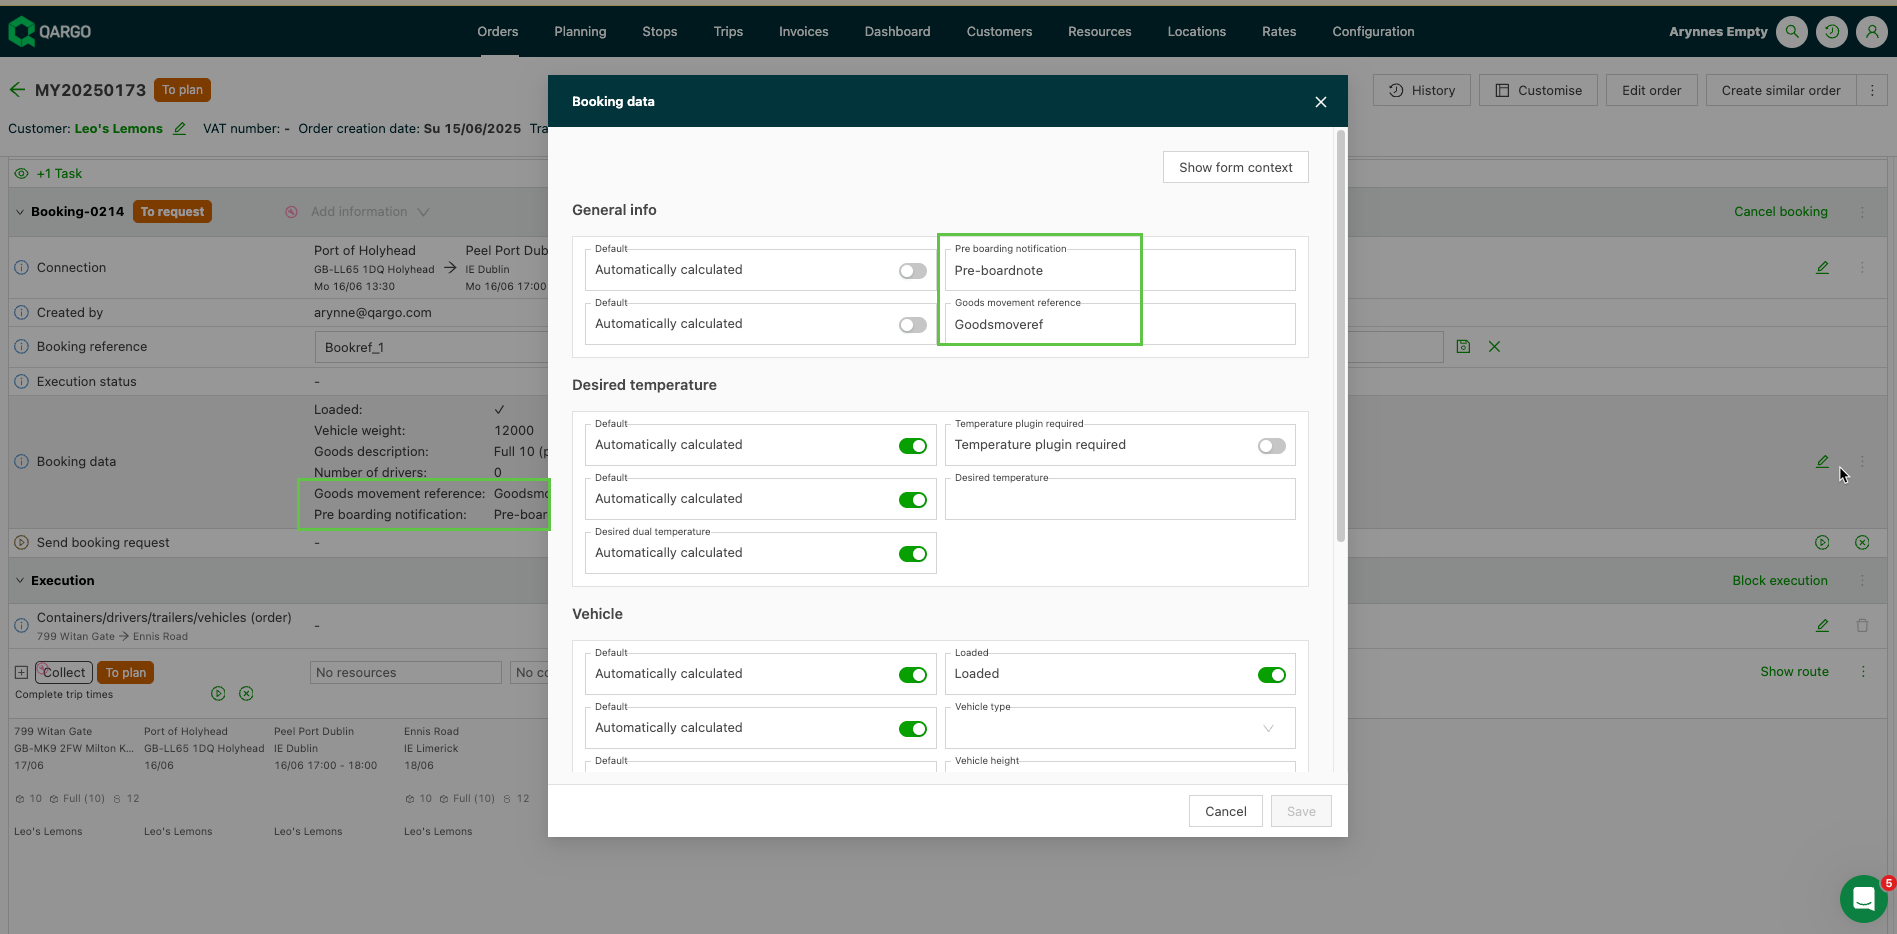
When viewing the list of loads, the Pre-boarding notification, Goods movement reference and Booking reference can be updated directly from the page.
- Click in the column for the order that needs the reference.
- A text box opens. Add the reference and click the Save icon.
-
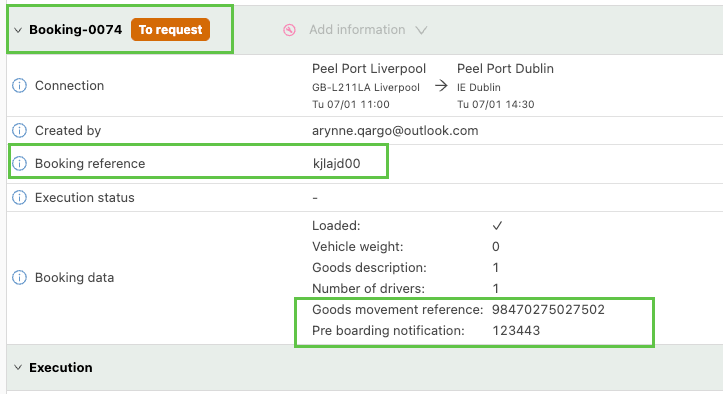
The references are automatically copied to the Booking details in the order.
Improved visibility for booked connections
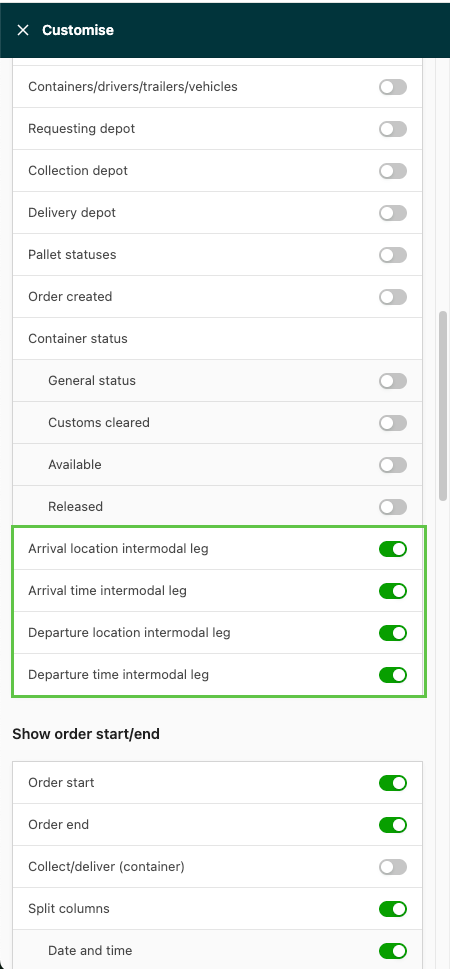
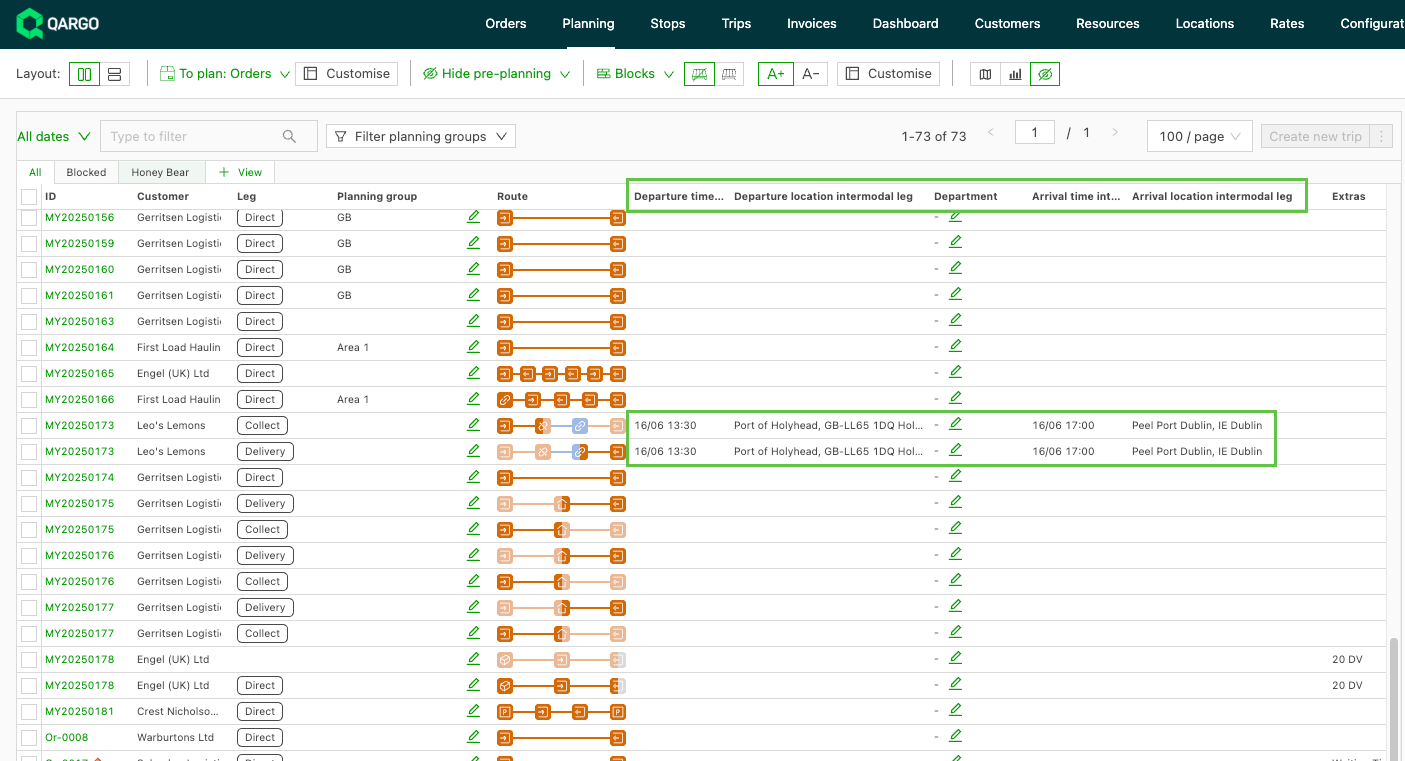
Connection details for arriving or departing connections are now visible in Planning. Under To plan: Orders and Resources, there are 4 new columns with information on the intermodal arrival and departure locations and dates:
- Departure time intermodal leg
- Departure location intermodal leg
- Arrival time intermodal leg
- Arrival location intermodal leg
Click ‘Edit columns’ and turn the columns on.
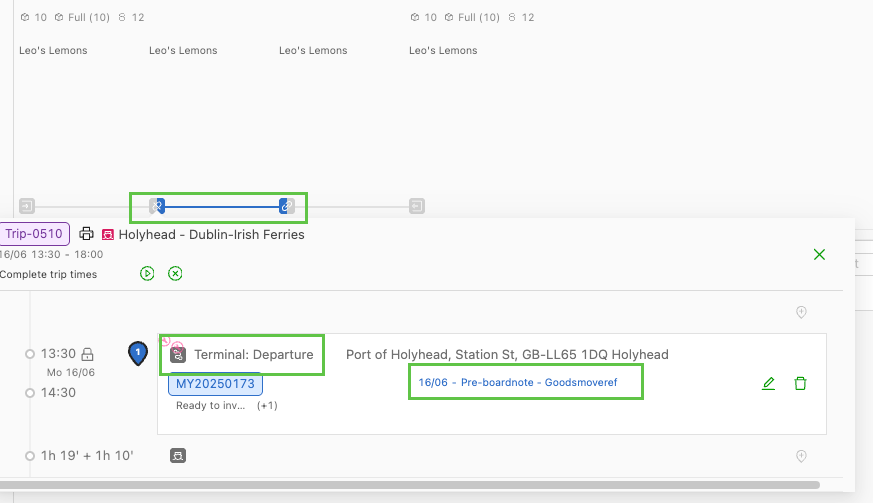
- Booking-related references are now visible on the terminal stop as well. These can be added to the booking data and are shown when the terminal stop is expanded.
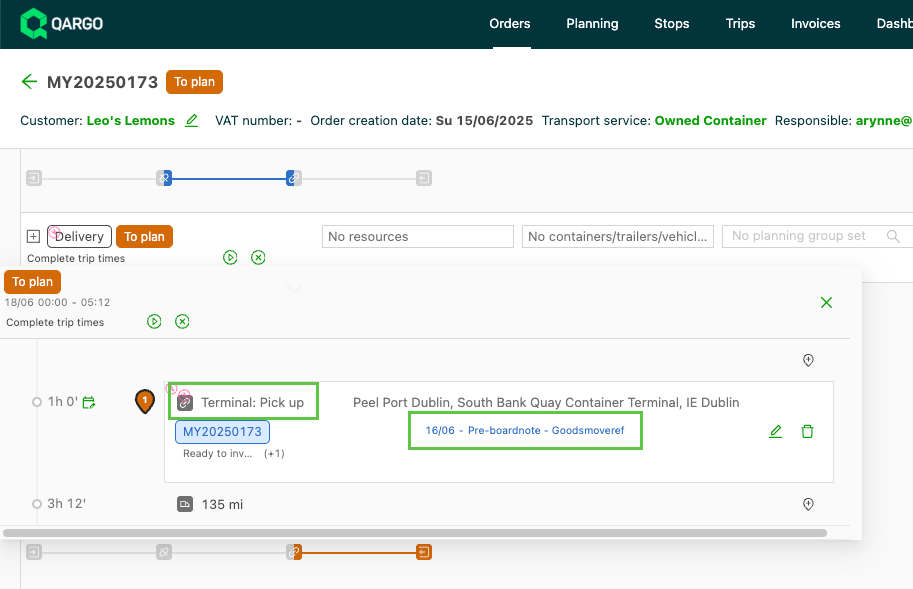
Customer impact
- Better overview of intermodal information on orders and loads
- Easier planning, with intermodal arrival and departure information readily available
Improved container visibility (sea container / owned container only)
-
For containers, the Import/Export status is shown in the movement details of the planning block.
-
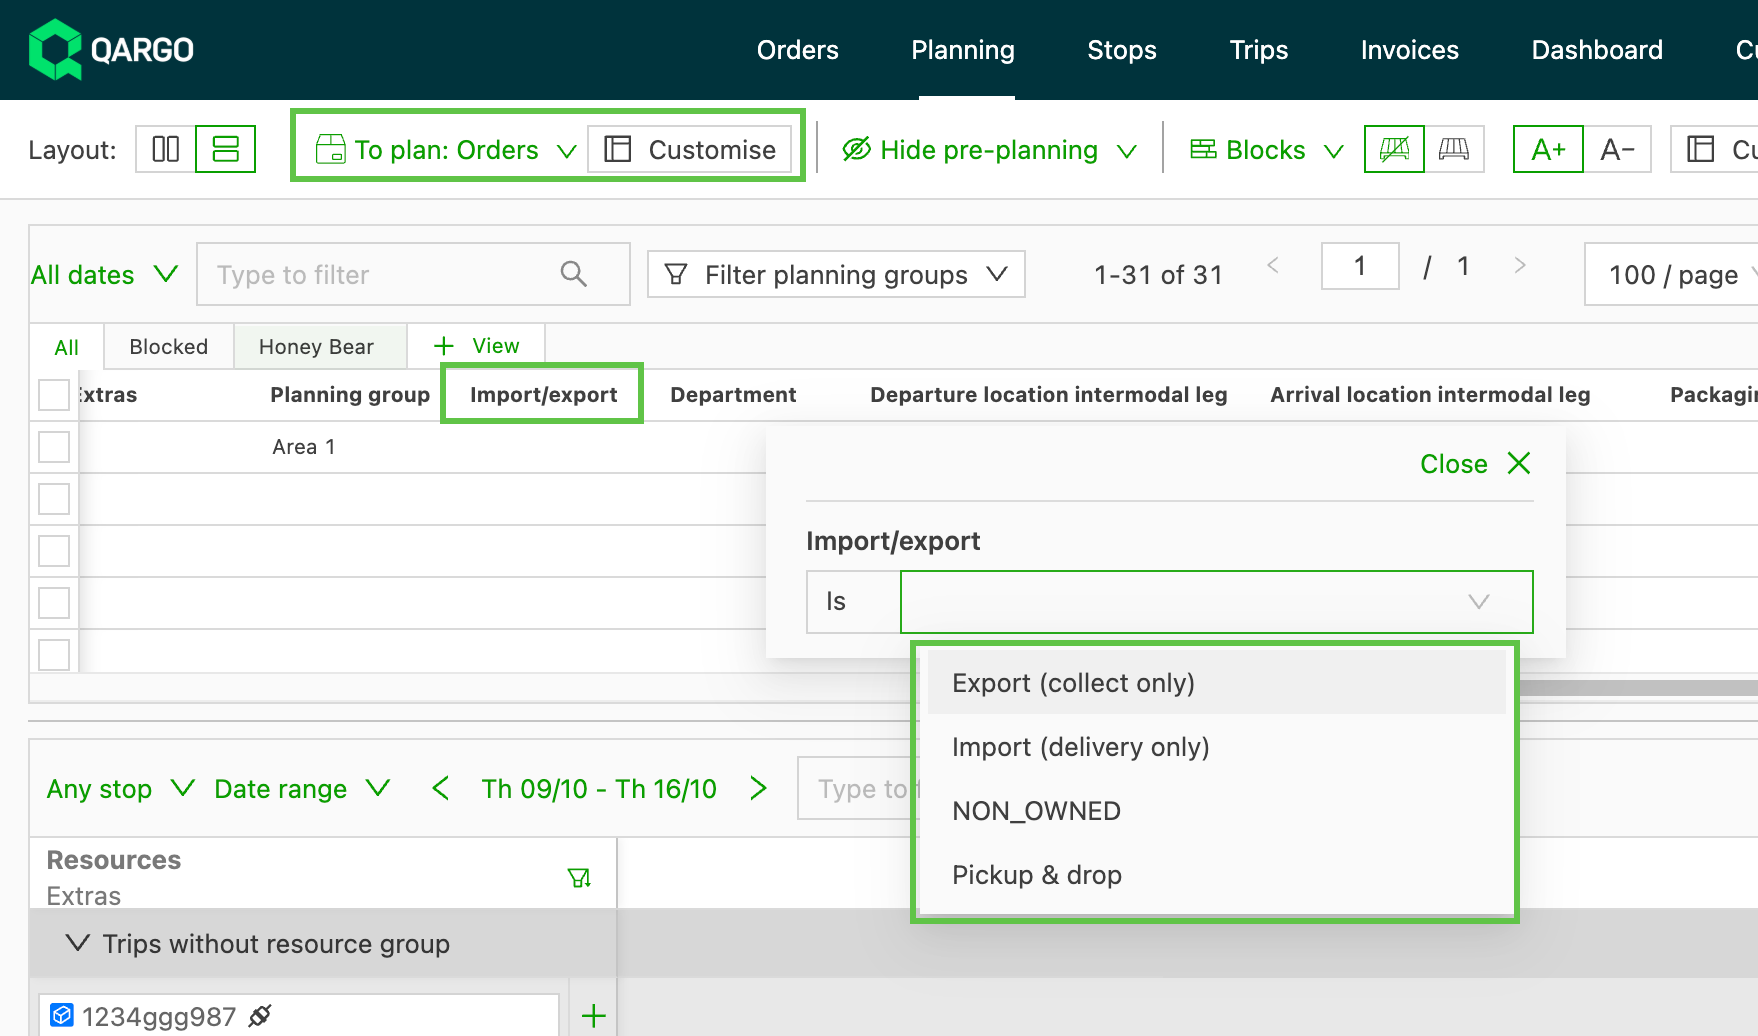
Available as a column option in the Planning table view
- Use the ‘Customize’ button to turn on the ‘Import/Export’ column
- The column header can be filtered.
-
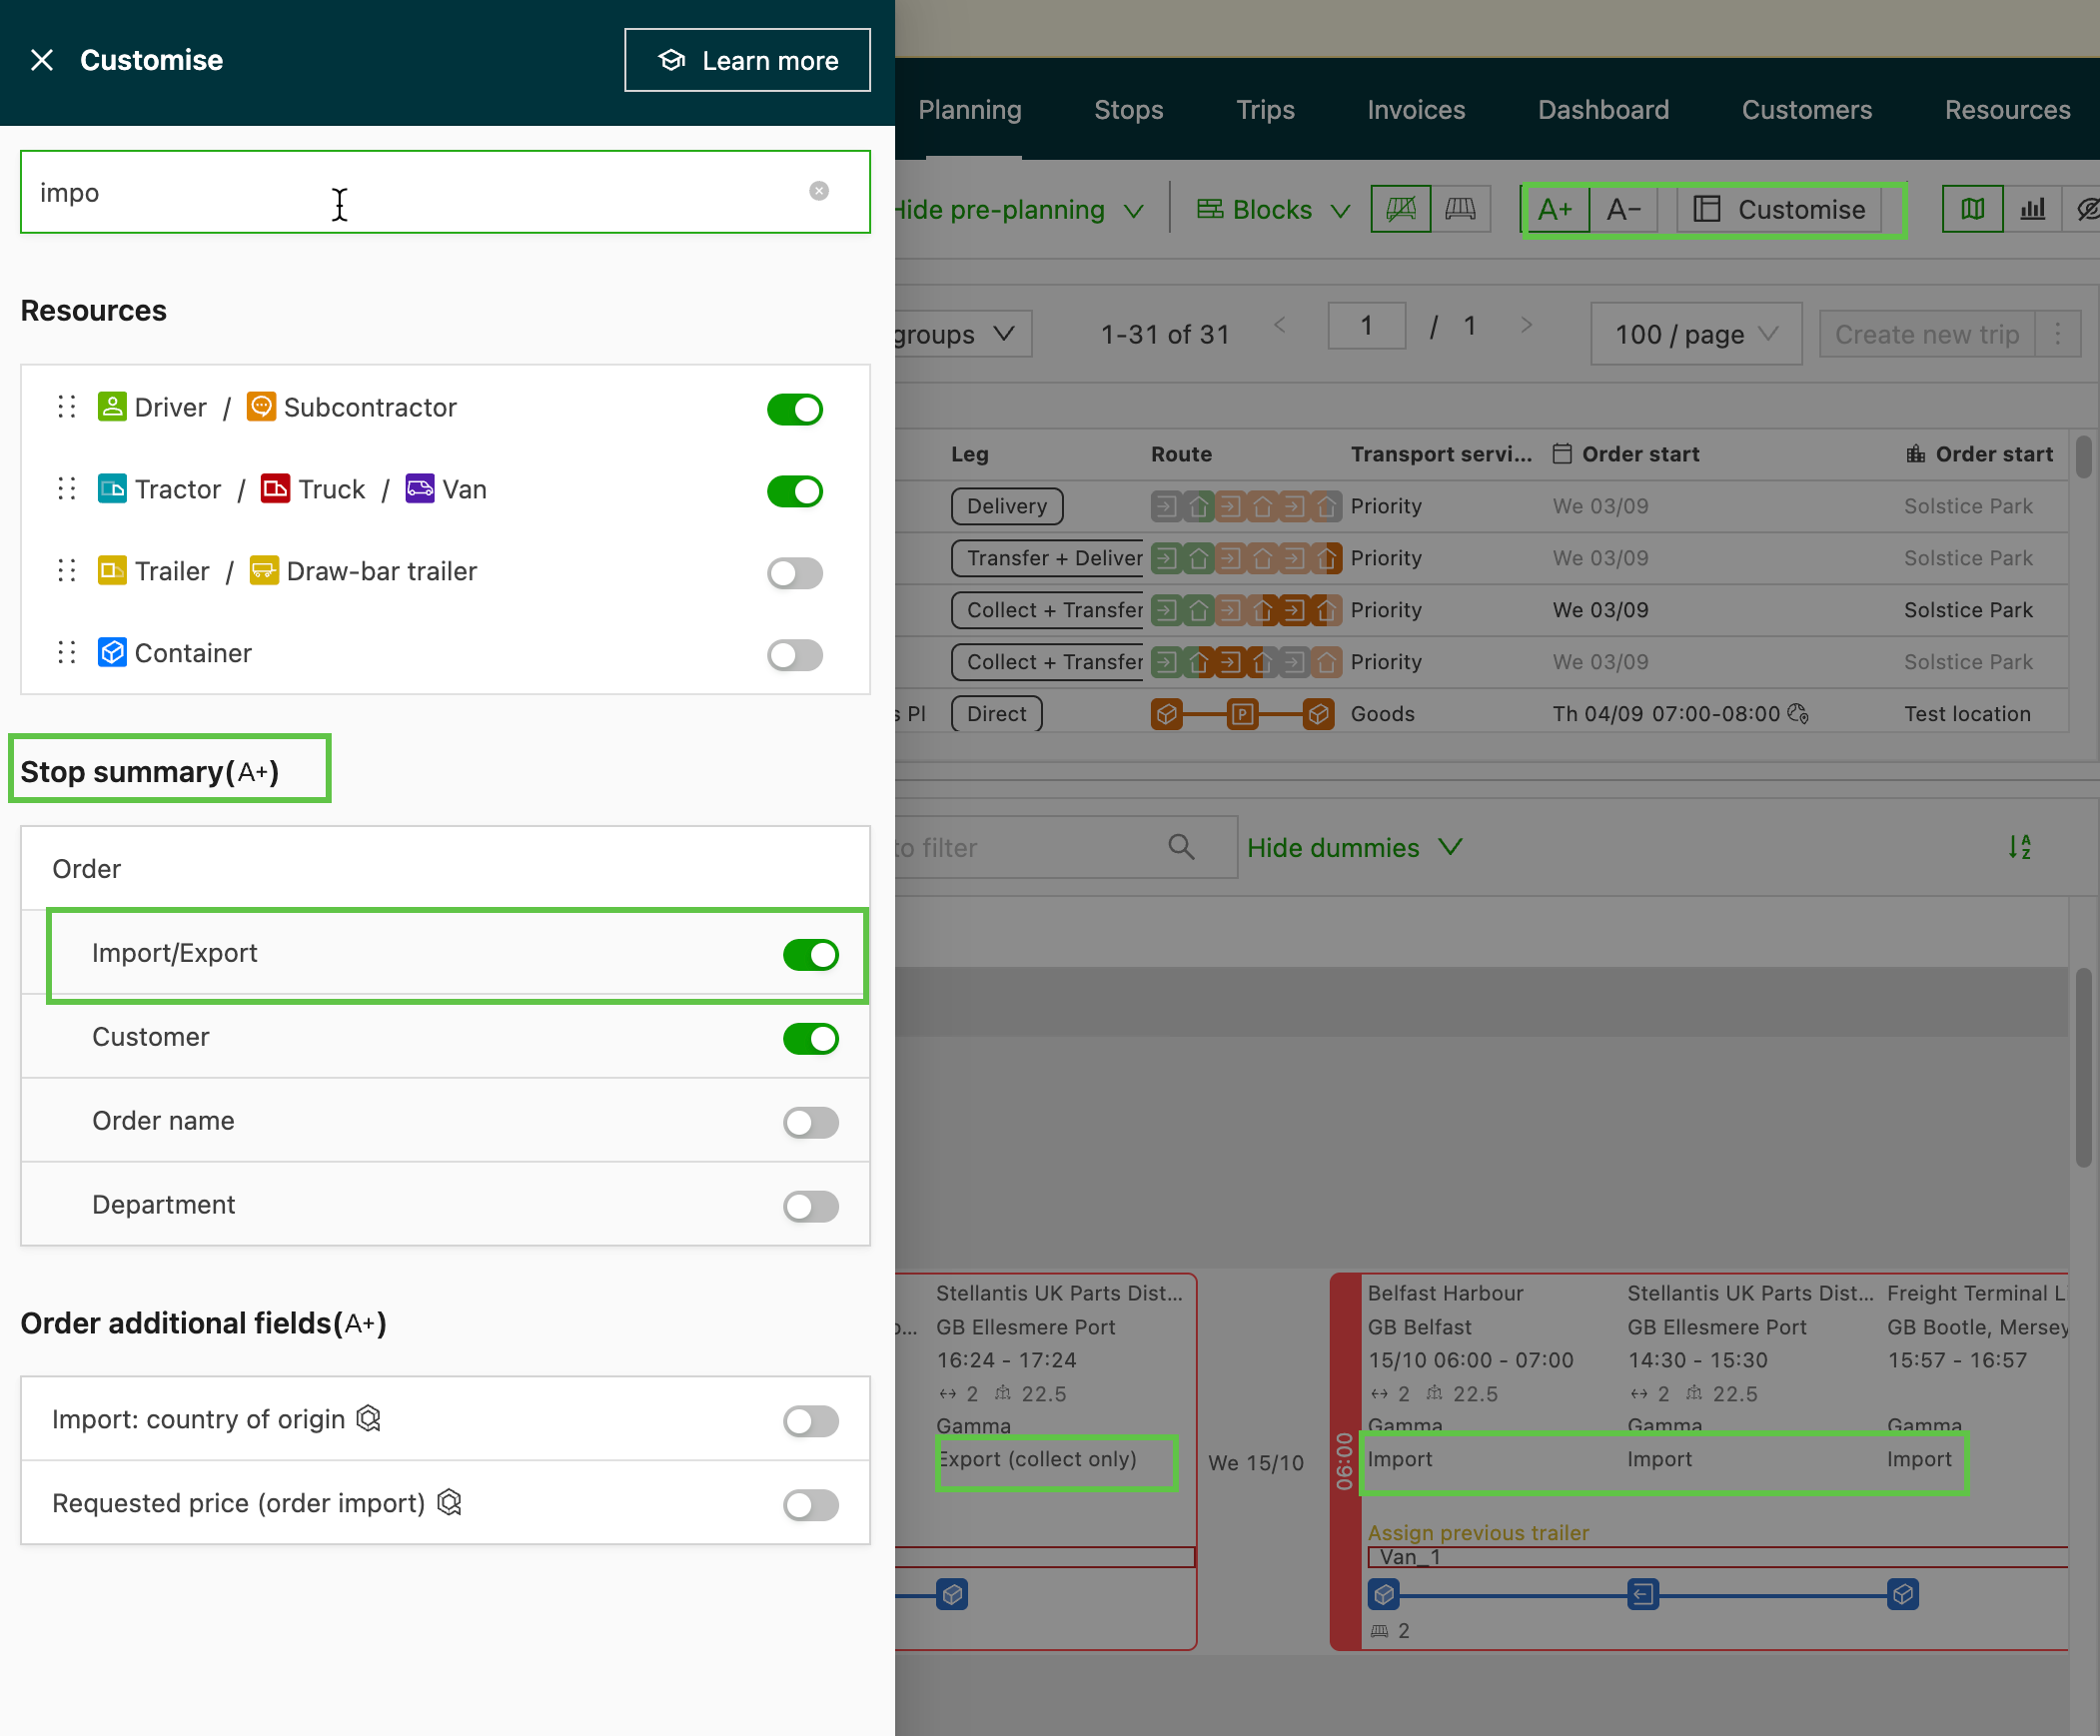
Available in both the Minor (A-) and Major (A+) views.
- Use the ‘Customize’ button to turn on the ‘Import/Export’ details in the load
- The load block displays the import/export details from the order
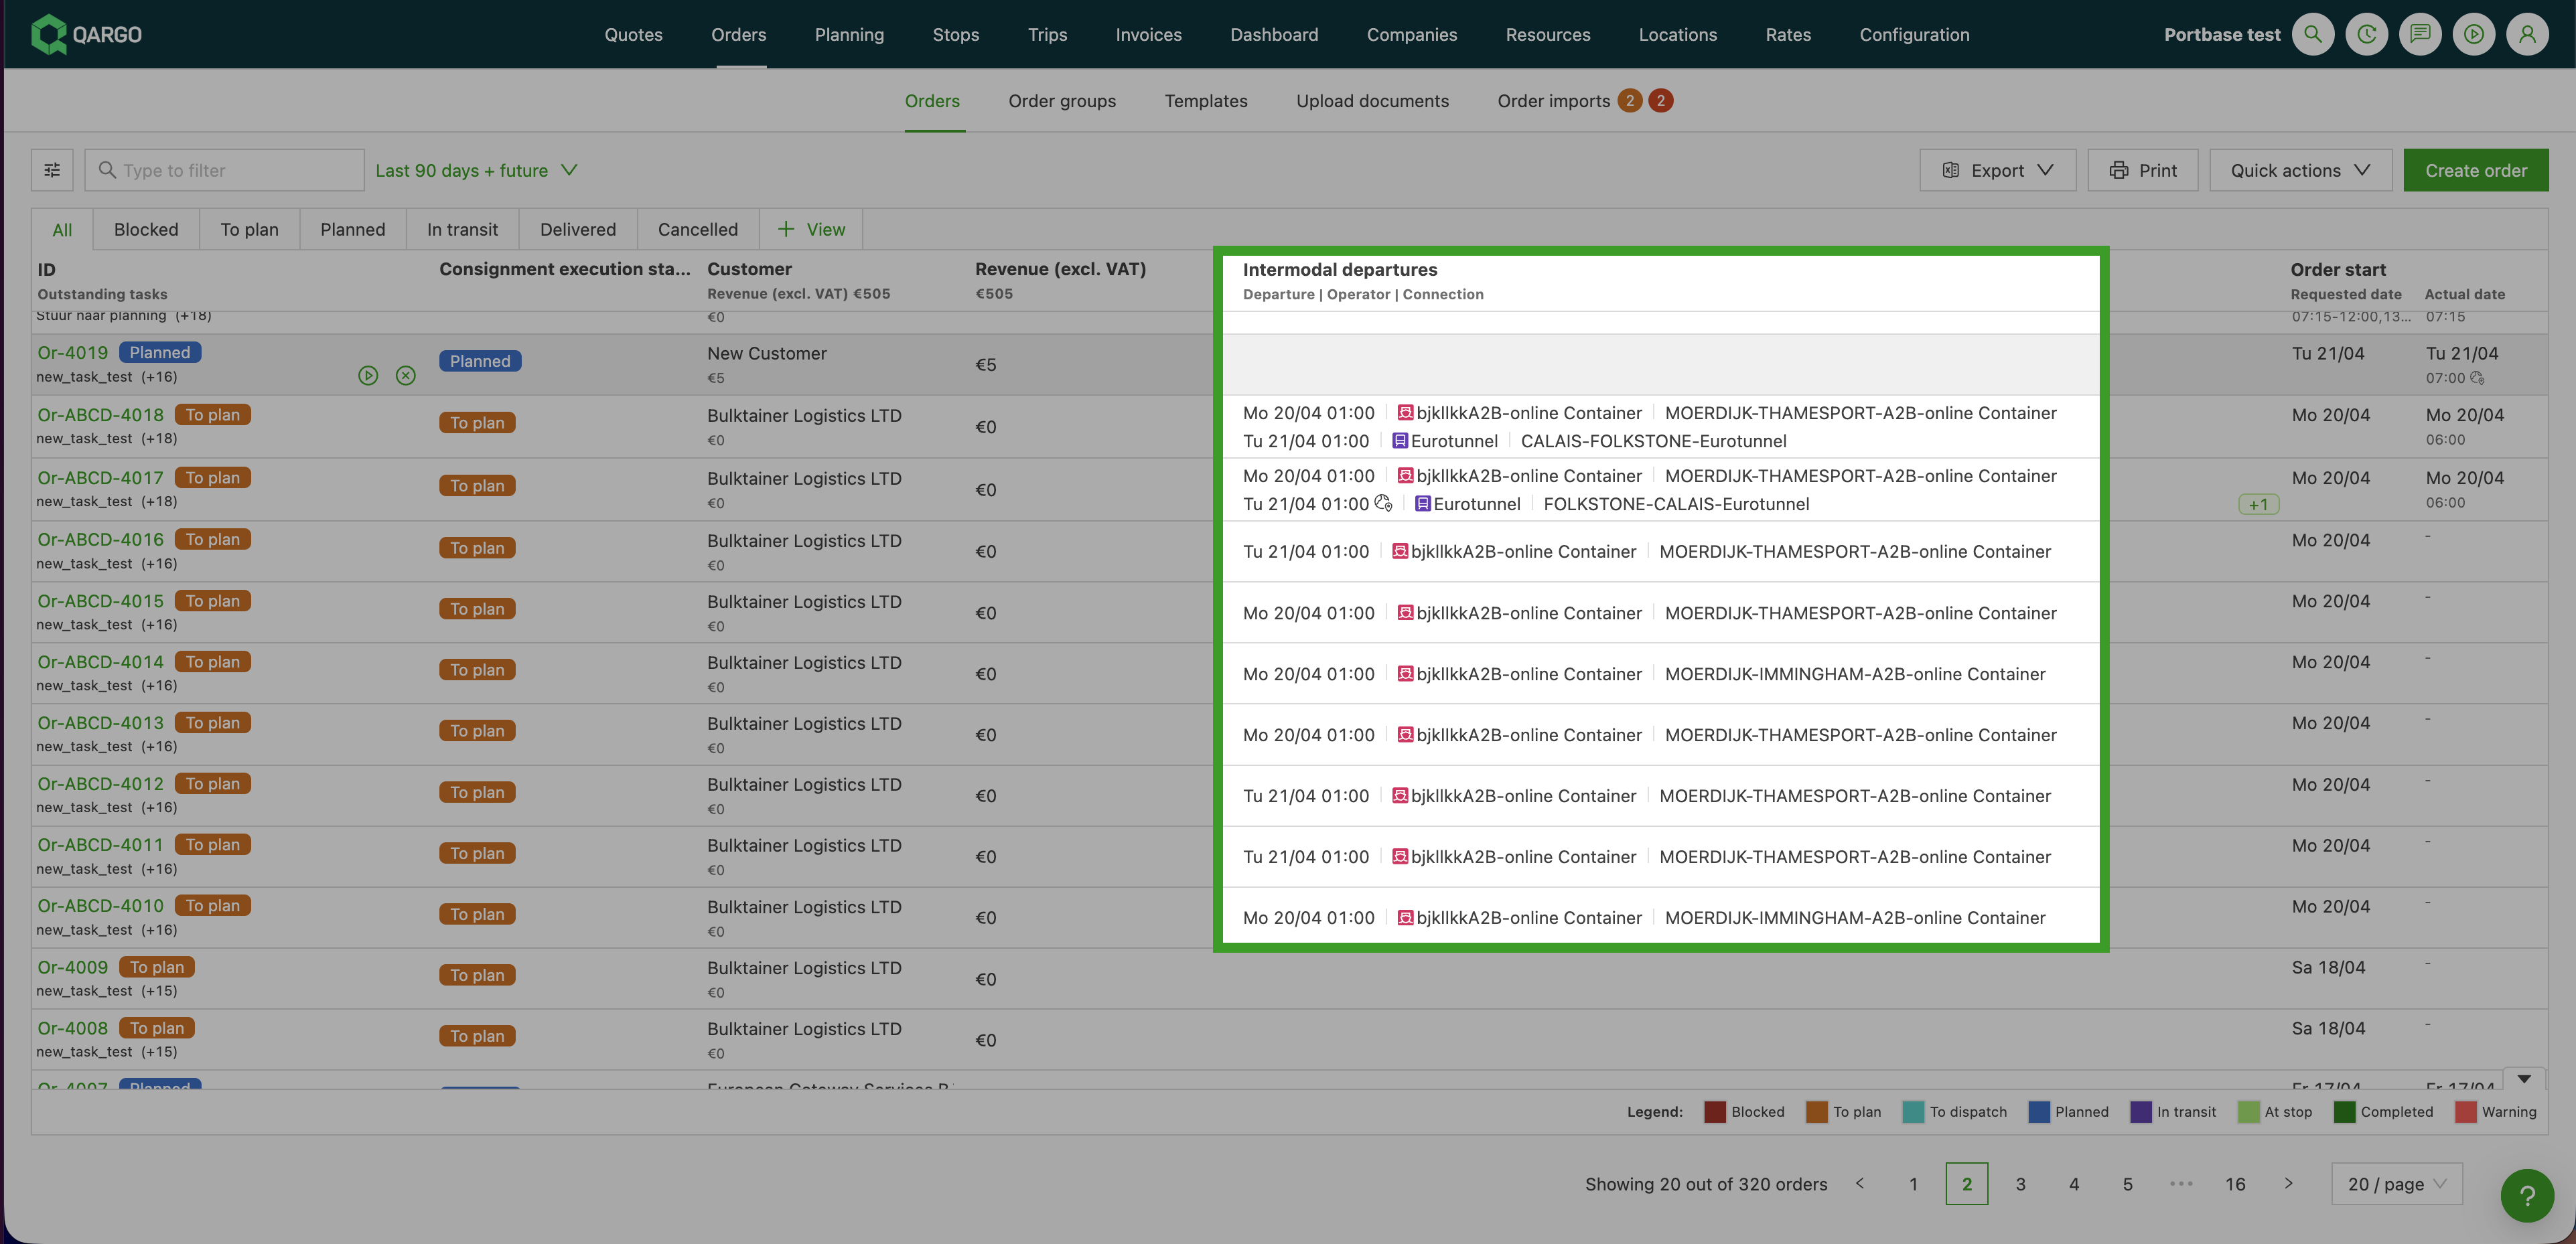
Intermodal departures column in the orders list view
- A new Intermodal departures column is available on the Orders list (enable it via the Edit columns icon).
- Each row displays up to two ferry legs inline: planned departure time, operator, and connection.
- A +X indicator appears when an order has more than two legs.
- Hovering over a row in the column opens a booking details popover for each leg: departure and arrival times, operator, booking reference, booking status, vessel name, voyage code, pre-boarding notification, and GMR (goods movement reference).
How to enable and use the Intermodal departures column
Enabling the column
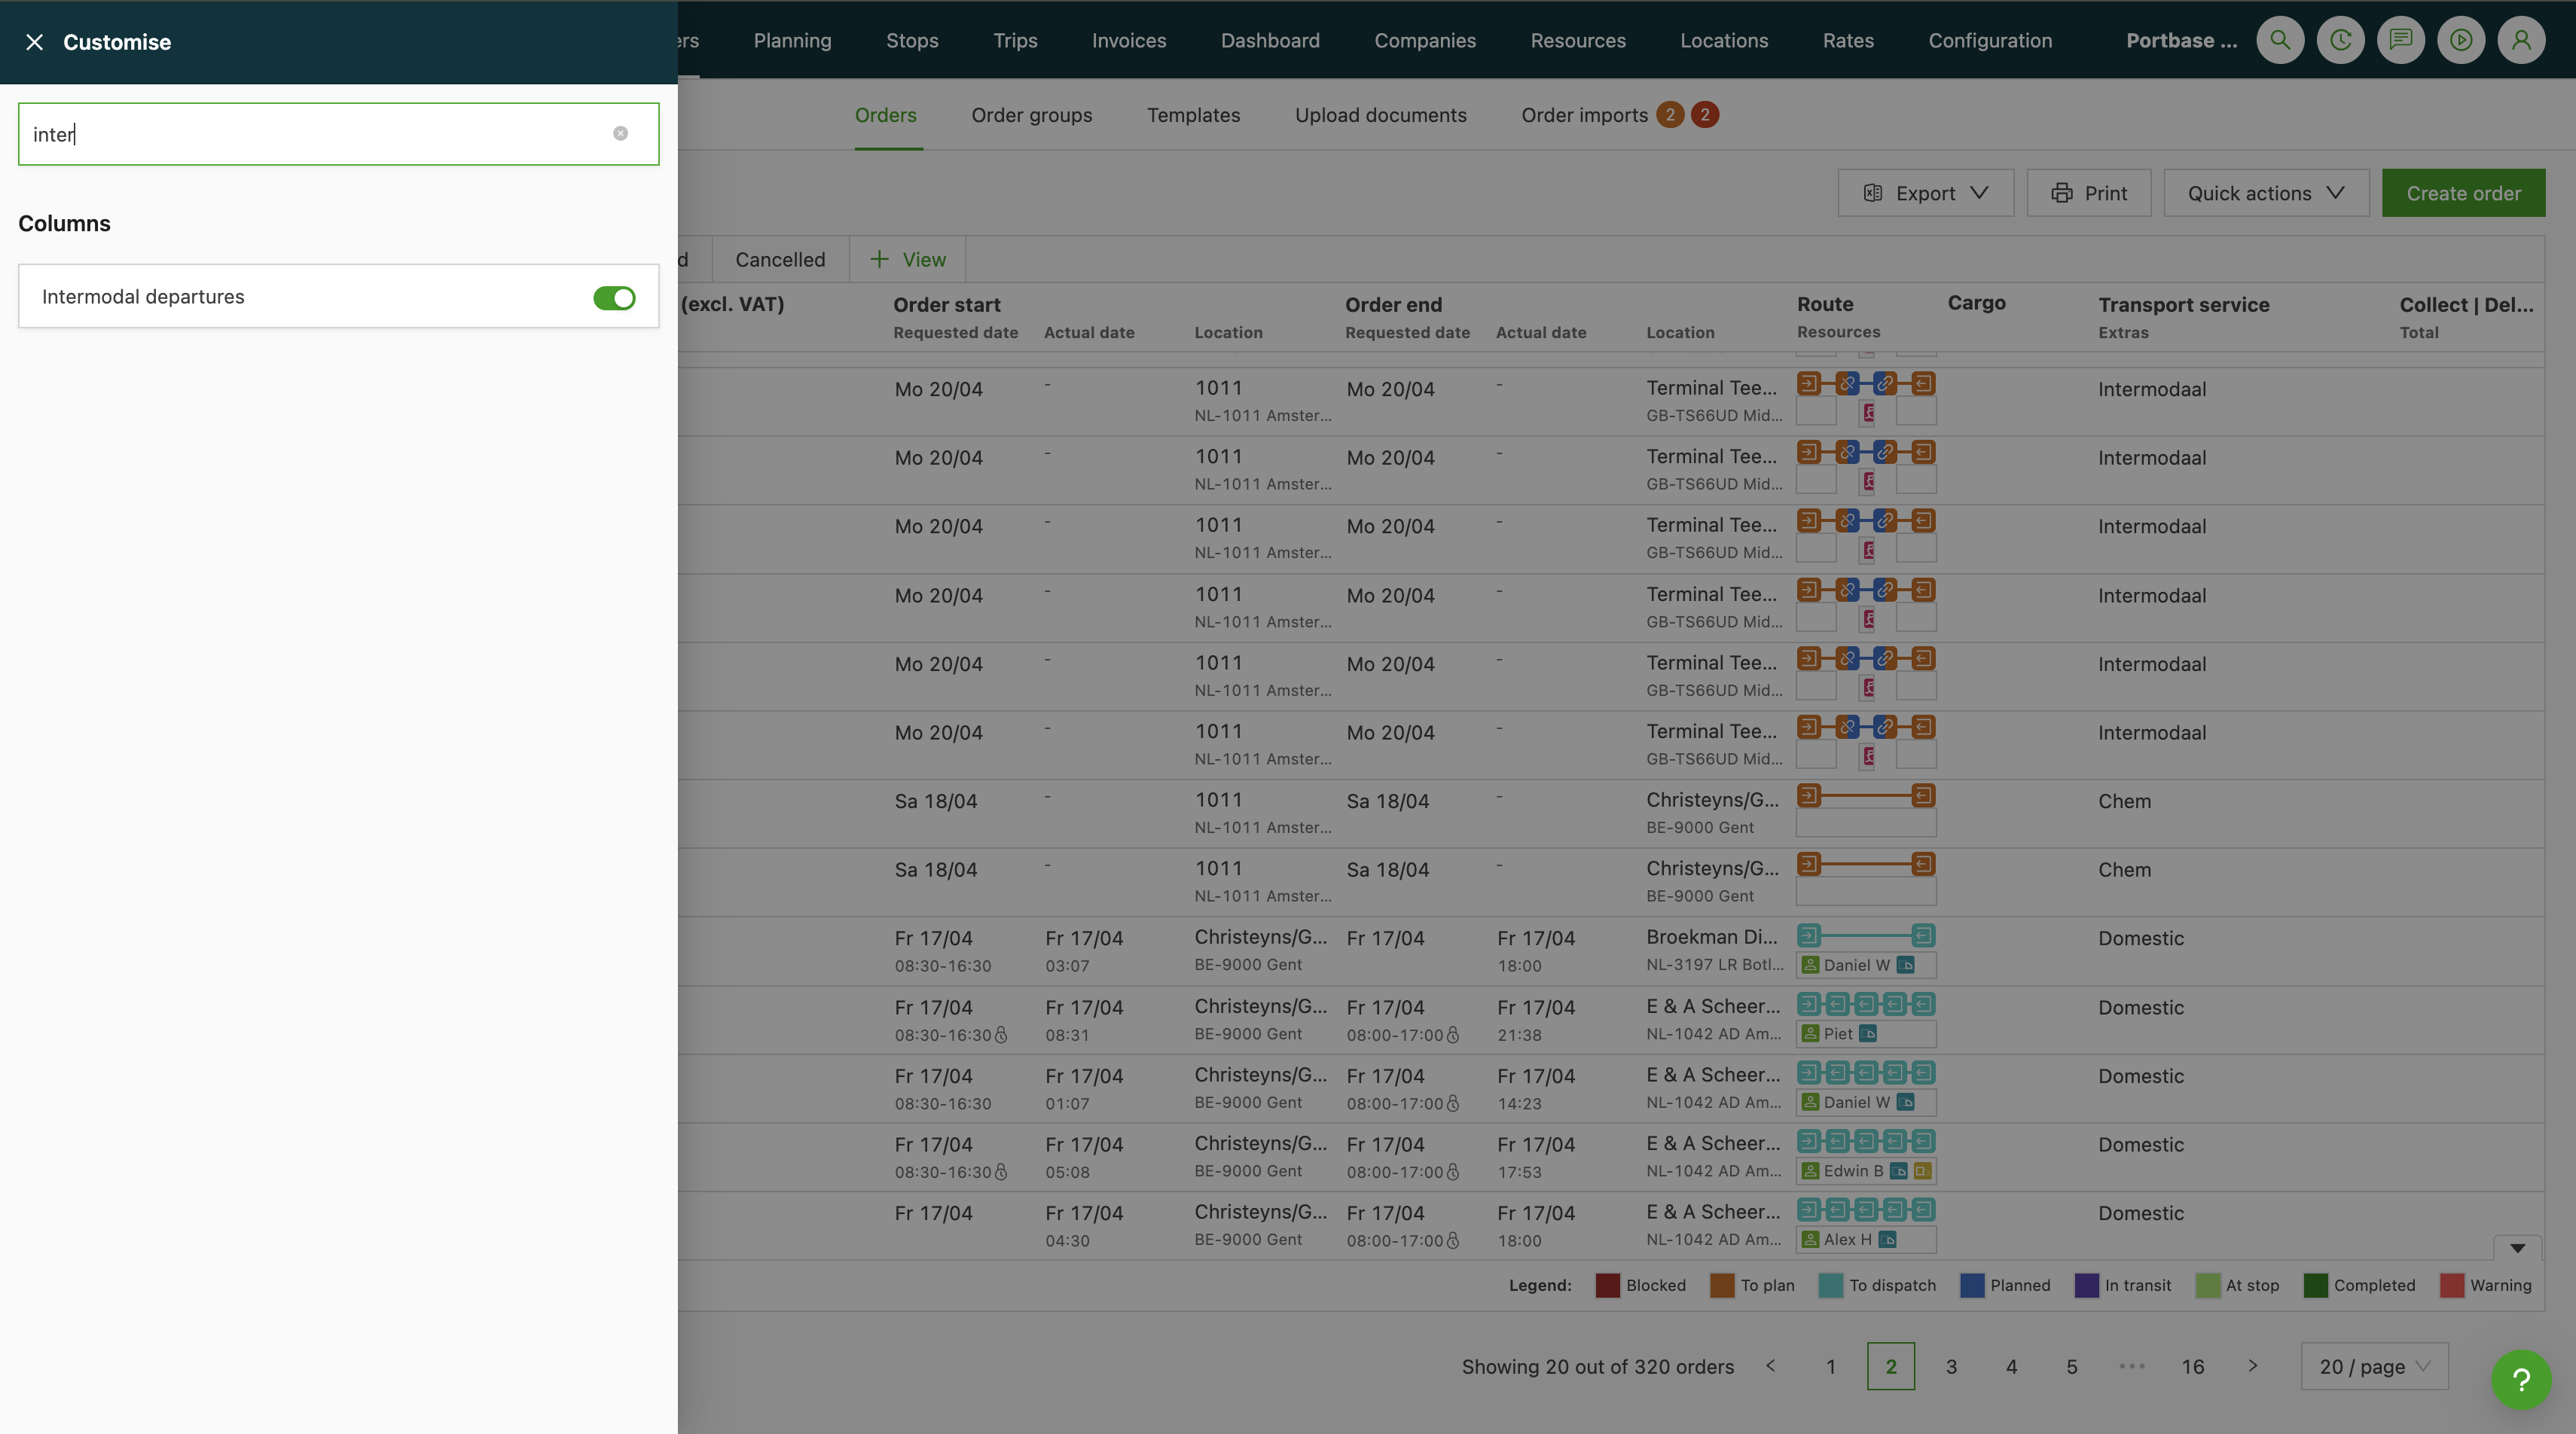
- Navigate to Orders > Orders.
- Click the Edit columns icon (customize icon, top right of the table).
- Locate Intermodal departures in the column list.
- Enable the toggle to add the column to the table.
- Save the column configuration. The column now appears in the Orders table.
Reading the column
- Each row shows the planned departure time, the intermodal operator, and the connection name for up to two ferry legs.
- When an order has more than two legs, a +X label indicates the remaining count.
- Hover over any row in the column to open the booking details popover. It shows departure and arrival times, operator, booking reference, booking status, vessel name, voyage code, pre-boarding notification, and GMR.
Using the column with saved views
The Intermodal departures column can be saved as part of a named view via Edit columns > Save view. This allows teams to create a dedicated intermodal planning view with the column permanently visible.
Troubleshooting
| Symptom | Likely cause | Action |
|---|---|---|
| Intermodal departures is not listed in Edit columns | The column is only available on the Orders list | Confirm that the correct view is open: Orders > Orders |
| The column shows no data for an order | The order has no intermodal booking assigned | Assign a ferry departure to the order in the intermodal planning view |
| Only 2 legs are shown, but the order has more | The column displays a maximum of 2 legs inline | Hover over the column to see all legs in the popover |
| The arrival time is not shown inline | The arrival time is only shown in the hover popover | Hover over the row in the column to see departure and arrival times |
Previous & next connection columns
What is it?
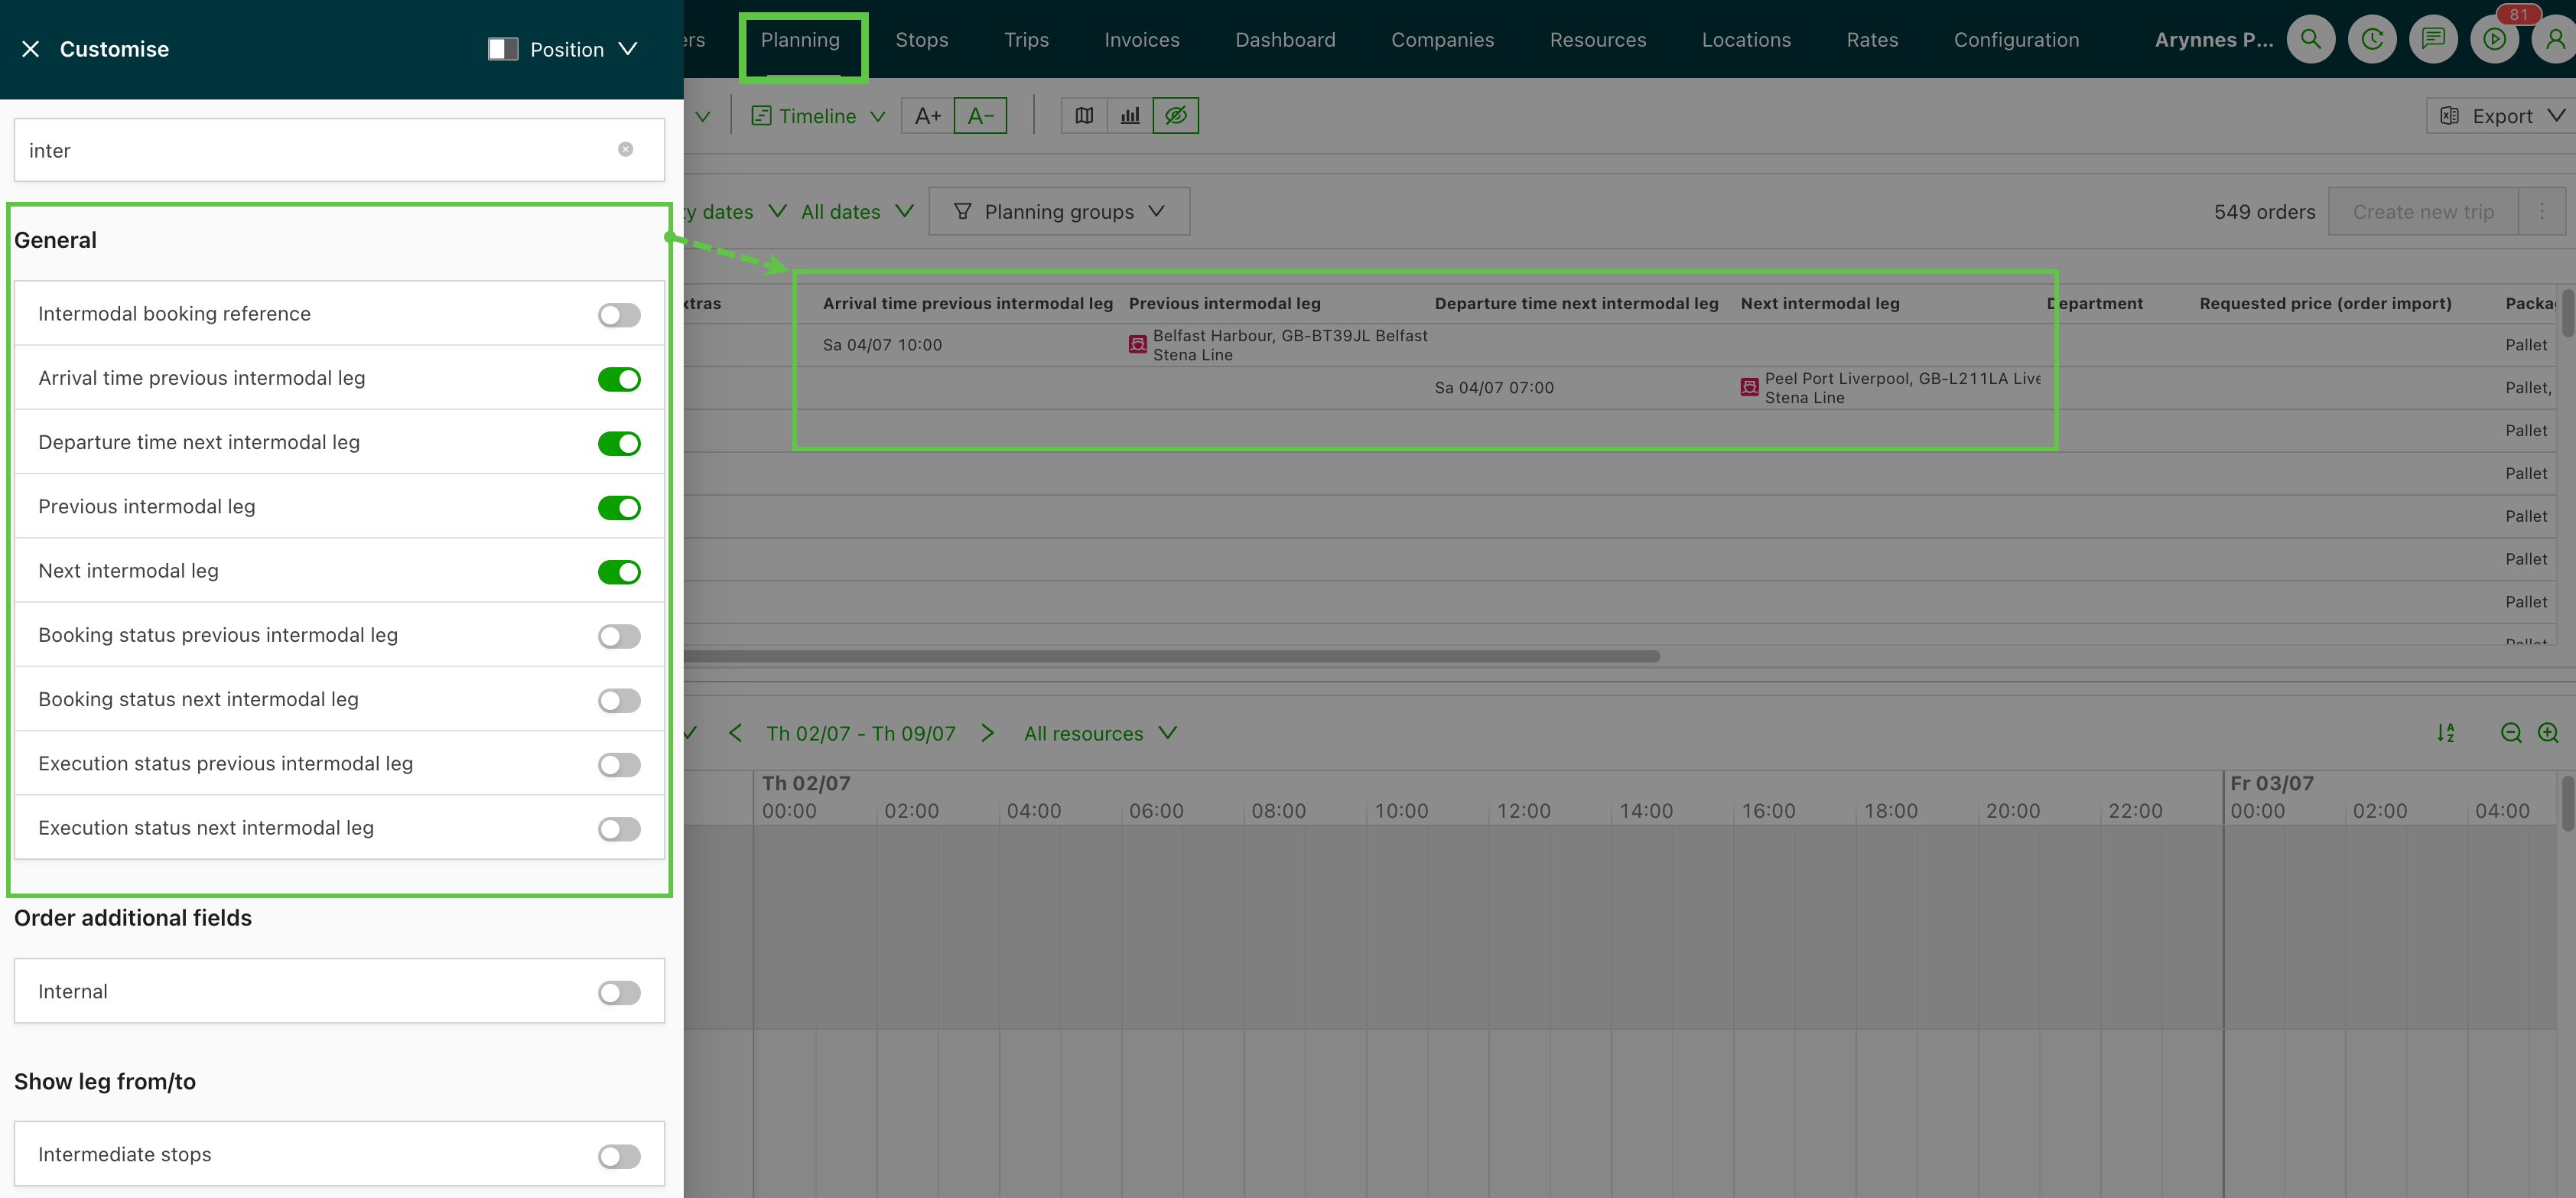
The previous and next intermodal connection columns are available in the ‘Edit columns’ option in Planning > To plan: Orders. These columns show the timing, location, booking status, and operations status of the intermodal legs immediately before and after each order stop, directly in the general planning view.
All columns below come in two directions: Previous intermodal leg (the connection just before this part of the load) and Next intermodal leg (the connection immediately after).
| Column | Description |
|---|---|
| Arrival time previous intermodal leg | Arrival timestamp of the preceding intermodal connection |
| Departure time next intermodal leg | Departure timestamp of the upcoming intermodal connection |
| Previous intermodal leg | Location and operator of the preceding connection, in one cell |
| Next intermodal leg | Location and operator of the upcoming connection, in one cell |
| Booking status previous intermodal leg | Booking status of the preceding connection |
| Booking status next intermodal leg | Booking status of the upcoming connection |
| Operations status previous intermodal leg | Operations status synced from the intermodal operator (e.g., Checked-in, Confirmed, Shipped) |
| Operations status next intermodal leg | Operations status of the upcoming connection |
How to add the new columns
- Navigate to Planning > To plan: Orders.
- Click Edit columns in the top-right area of the planning view.
- Search for or scroll to the required intermodal columns (e.g., Departure time next intermodal leg).
- Enable each column to add it to the view.
- Close the column picker. The columns appear in the planning grid.
Load number, contract carrier and customs columns on the Intermodal list view
A further set of opt-in columns is available on the Intermodal list view (Planning > Resources > Intermodal). Planners and customer service can show load, last-leg contract carrier and customs details directly on that view, without opening each order.
🎥 This video explains how to activate and interpret these intermodal columns:
Use cases
- Cross-check shipping confirmations against the load number without opening the order. The load number acts as a second anchor when a trailer number is entered incorrectly.
- Answer “who is handling the last leg?” on a customer call by reading the last-leg contract carrier straight from the table, instead of drilling into each order.
- Keep customs references such as MRN visible on the planning view, so declarations can be prepared in one place rather than by switching screens or maintaining a parallel spreadsheet.
Add the columns
The new columns are opt-in and are turned on through the existing Customize control on the Intermodal list view.
-
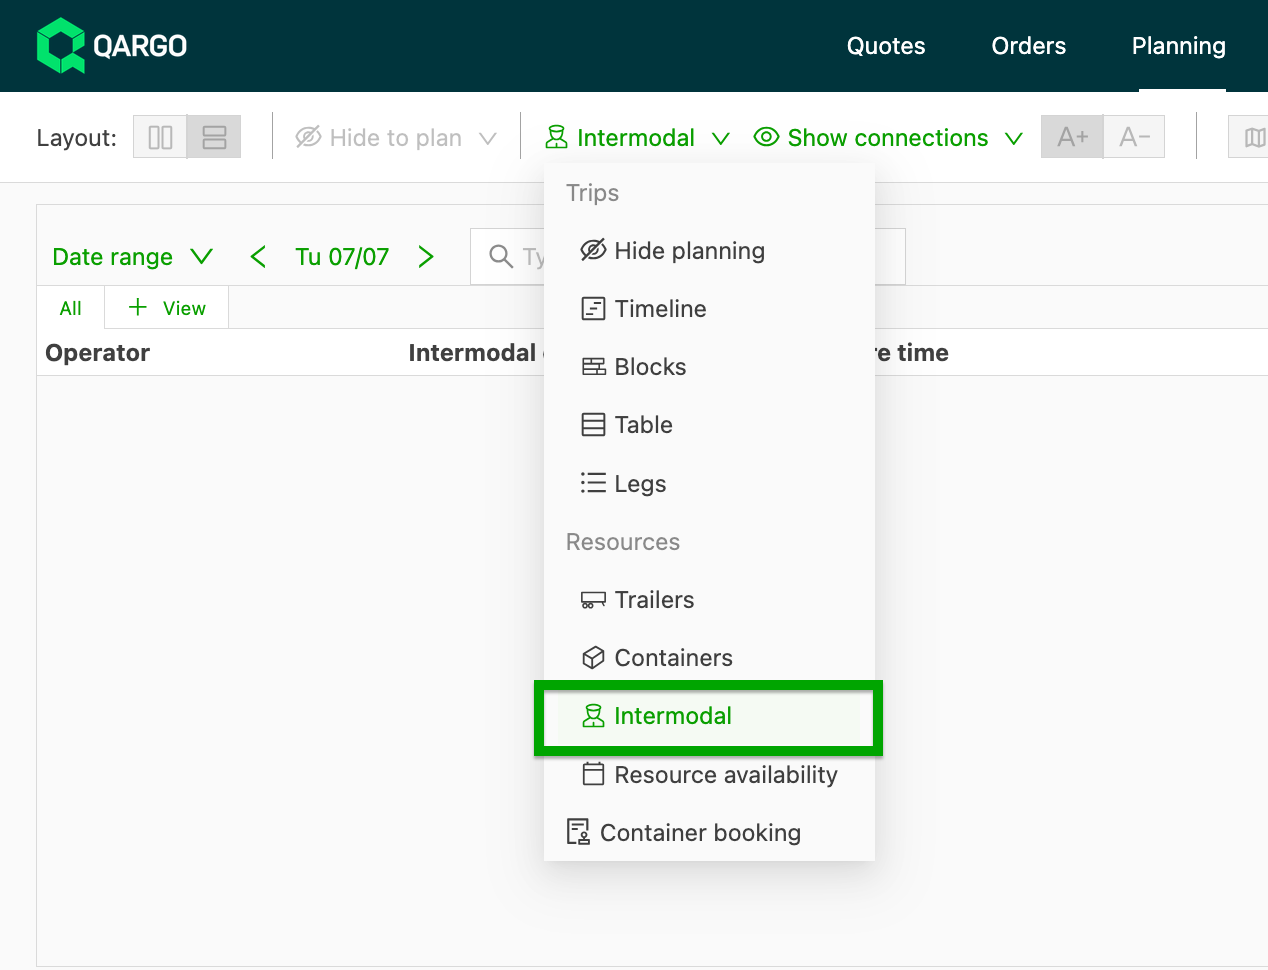
Navigate to Planning and open the Intermodal view.
-
Click the Customize control on the view.
-
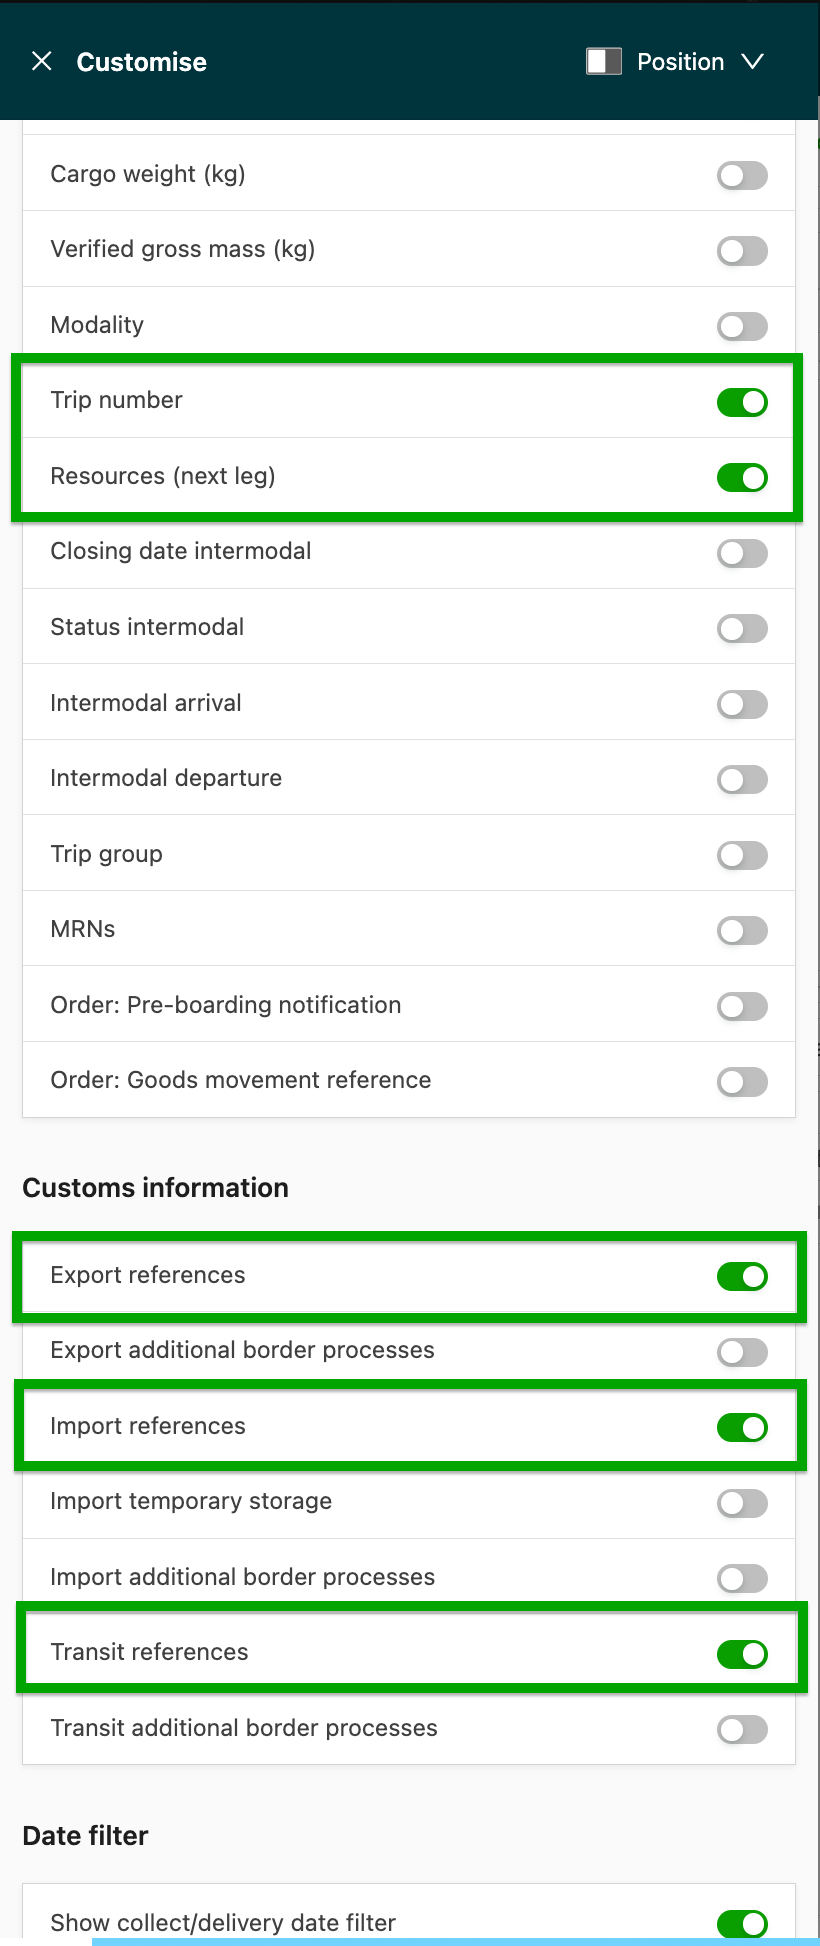
Turn on the required intermodal columns. The available additions are:
- Load number: the load ID linked to the intermodal row, shown as a clickable link.
- Resources (next leg): the name of the carrier handling the last intermodal leg of the shipment.
- Customs information: the customs reference columns (such as export, import and transit references) that already appear in the order overview, now available on the Intermodal view.
-
Close the Customize panel. The selected columns appear in the table.
Sorting and filtering
- All new columns are sortable, except the customs information columns.
- Filtering on the new columns follows the existing filter availability of the view.
Limitations
- The Resources (next leg) column shows the carrier on the last intermodal leg only. There is no multi-leg contract carrier breakdown.
- The customs information columns are not sortable or filterable.
- There are no changes to the customer portal or the contract carrier and mobile portals.
- The new fields are not exported to BigQuery or the external API in this release.
Create an intermodal order
-
An intermodal order can be created manually (via the ‘Create order’ function) or automatically by uploading an order confirmation.
-
When an order is created by uploading an order confirmation, suggestions can be added for the following container fields when these default fields are enabled:
- Container no.
- Seal number
- Container PIN code
- Destination of goods
- Origin of goods
- Port of loading
- Port of unloading
- Ocean carrier name (shipping company)
- Ship name
Adding an intermodal stop to an order
- Locate the order that needs the intermodal connection and open the order page.
- Locate the route where the intermodal connection should be added.
-
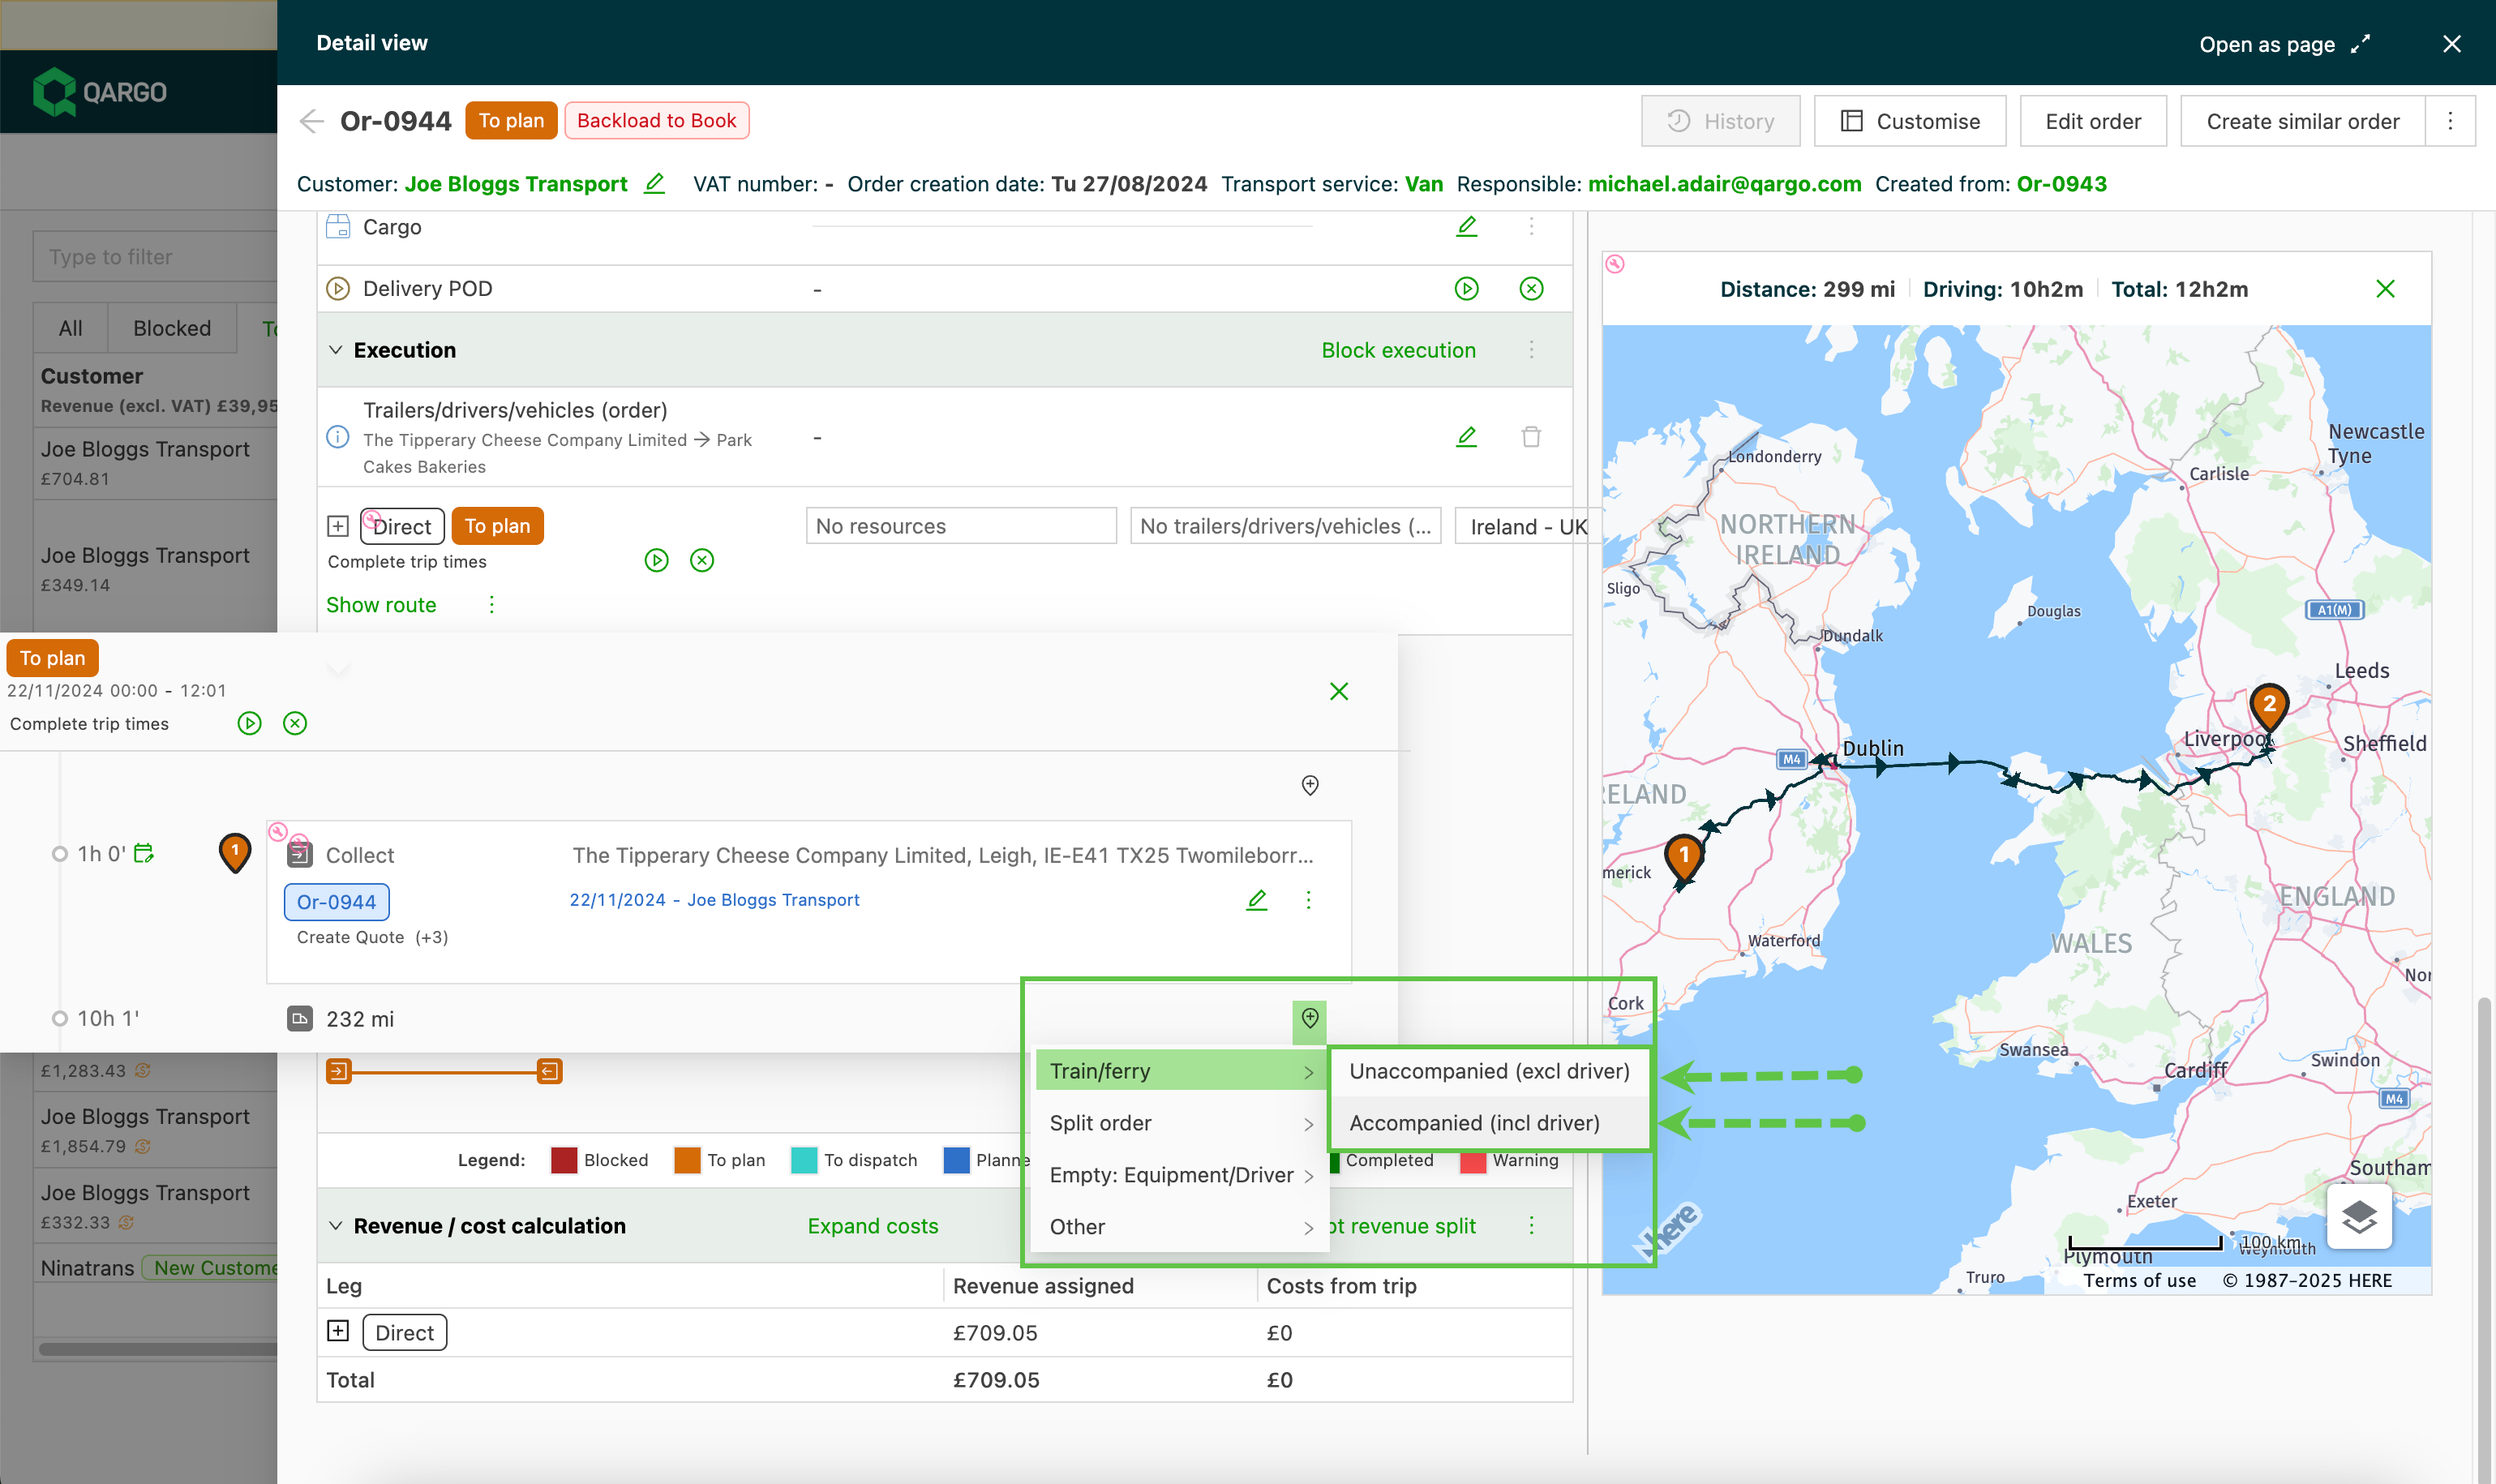
Click the plus icon to add the intermodal connection
-
Select the type of intermodal connection:
*Accompanied: connections where the driver is included in the route
*Unaccompanied: connections where the driver is not included in the route
- Add the line to use in the order.
- Select the applicable timetable and the departure date
- Set the dates and times of the vessel/train and any other required information, such as references, and save.
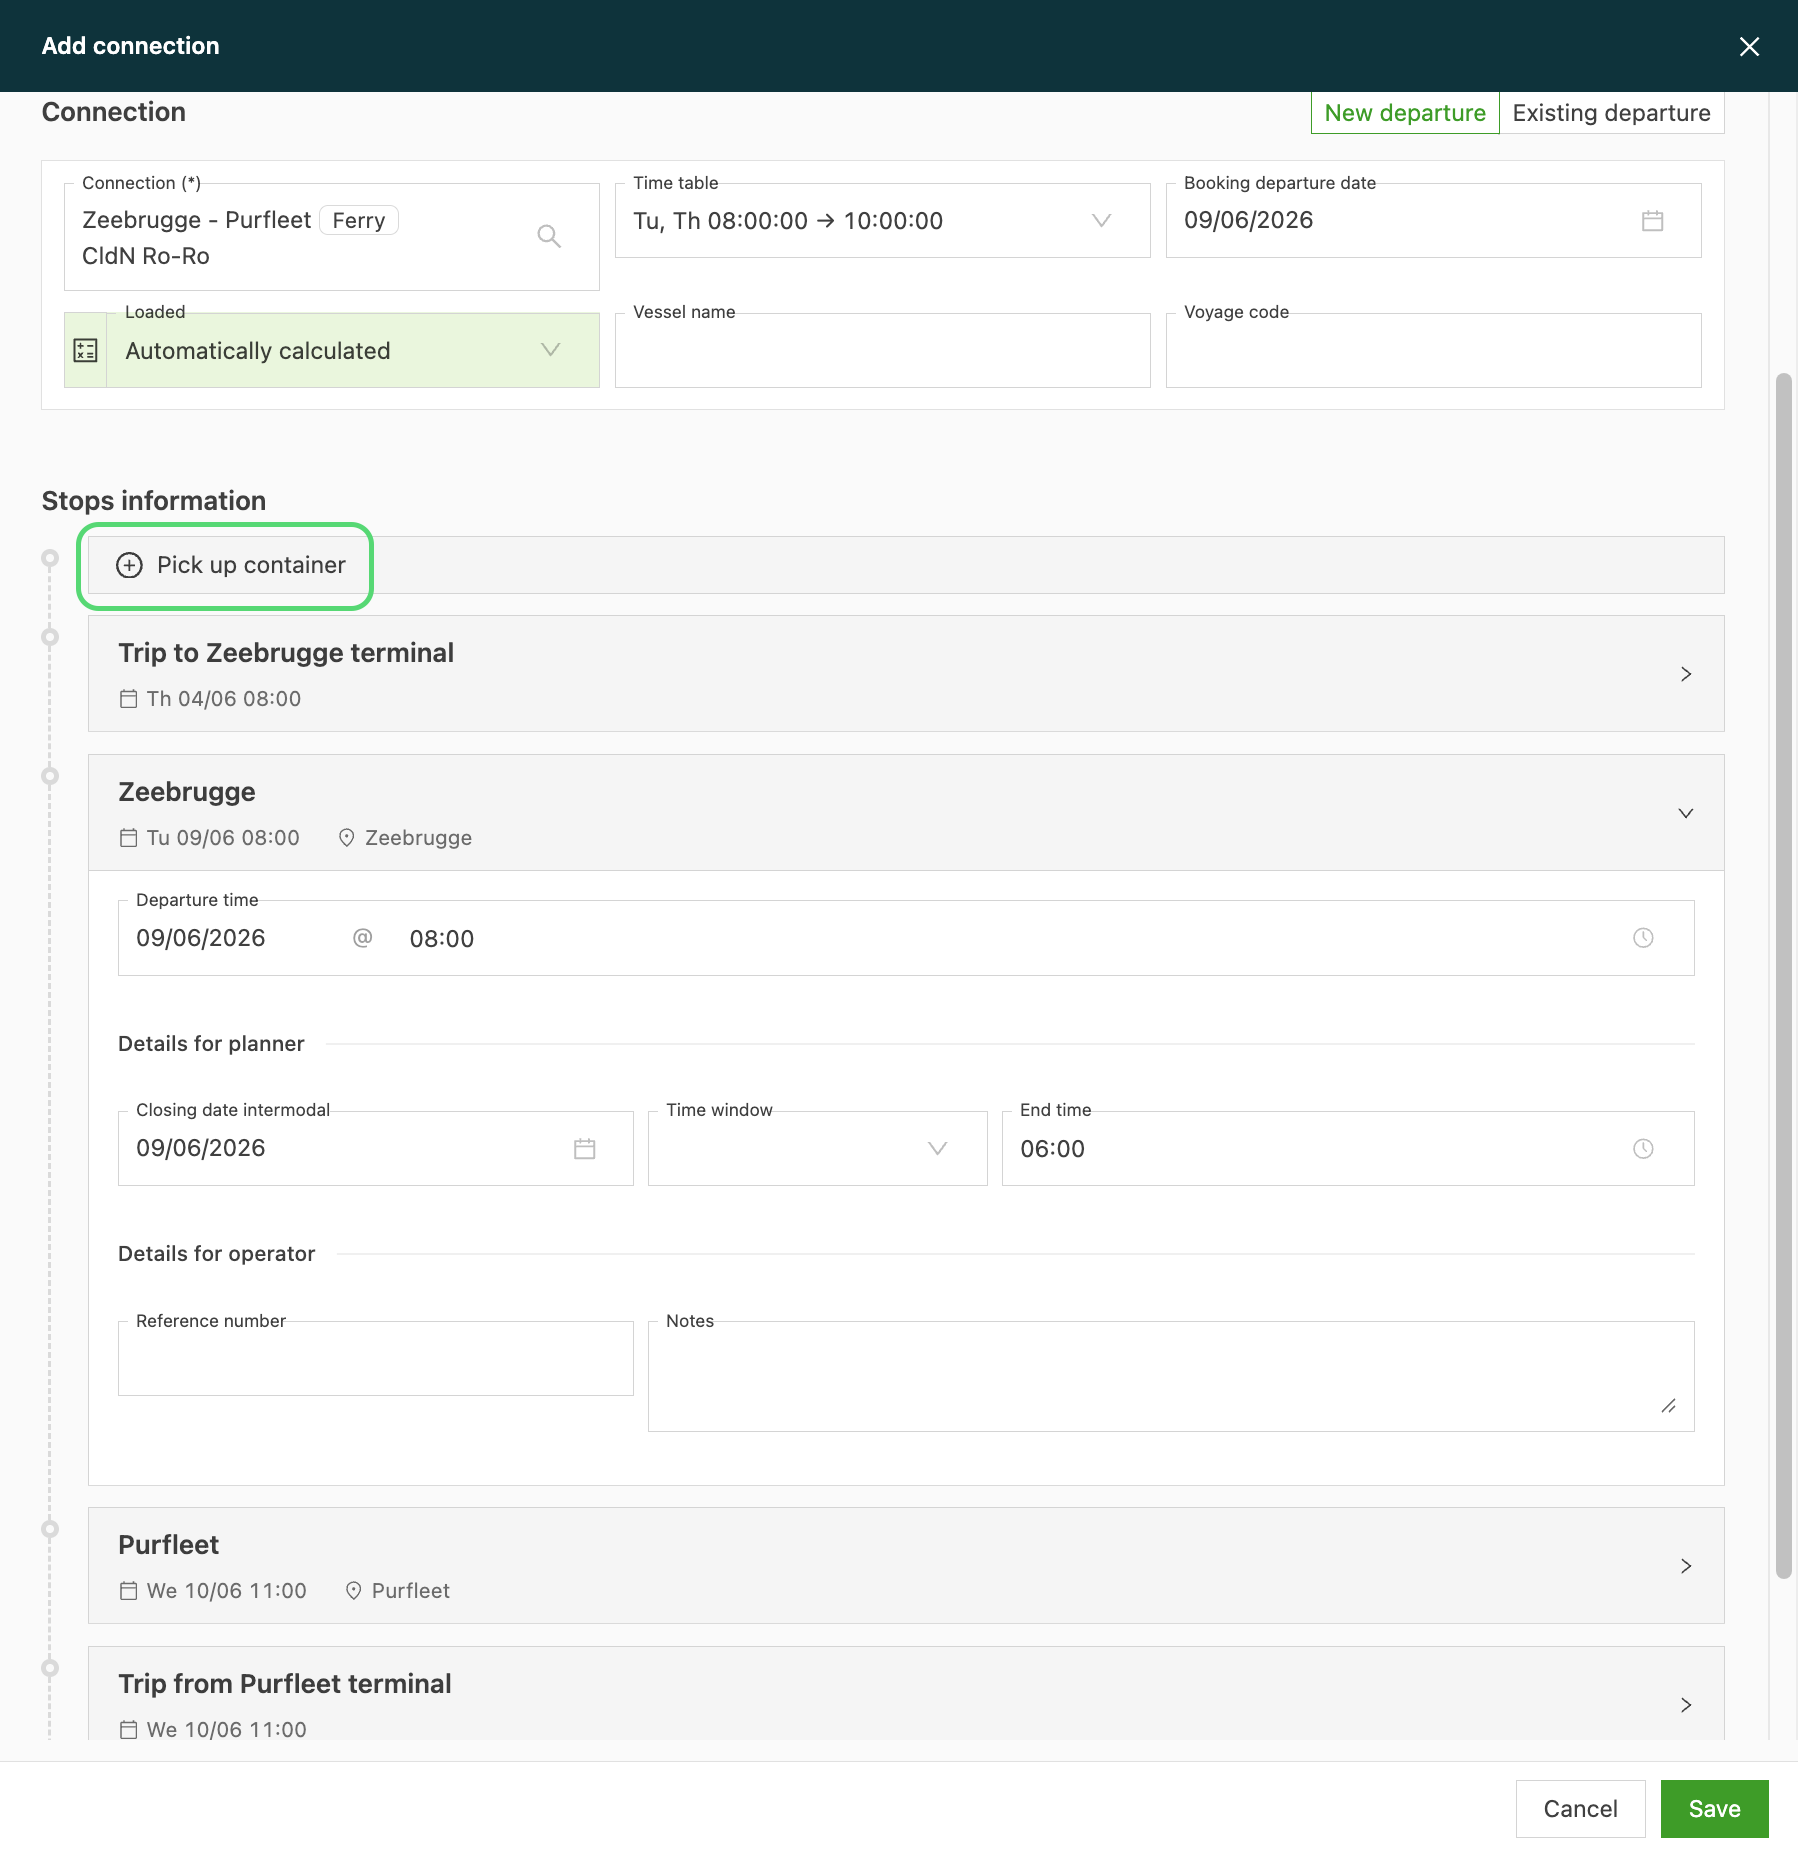
When a ferry or rail intermodal connection is added, the connection modal includes optional Pickup and Drop-off sections. Enabling either section adds an empty container stop at the corresponding terminal directly to the load. No separate manual step is required.
- Pickup container: the location is prefilled with the intermodal departure terminal
- Drop-off container: the location is prefilled with the intermodal arrival terminal
Empty stops are added at load level. On loads with multiple orders, a single stop is created per load; the stop is not duplicated for each order.
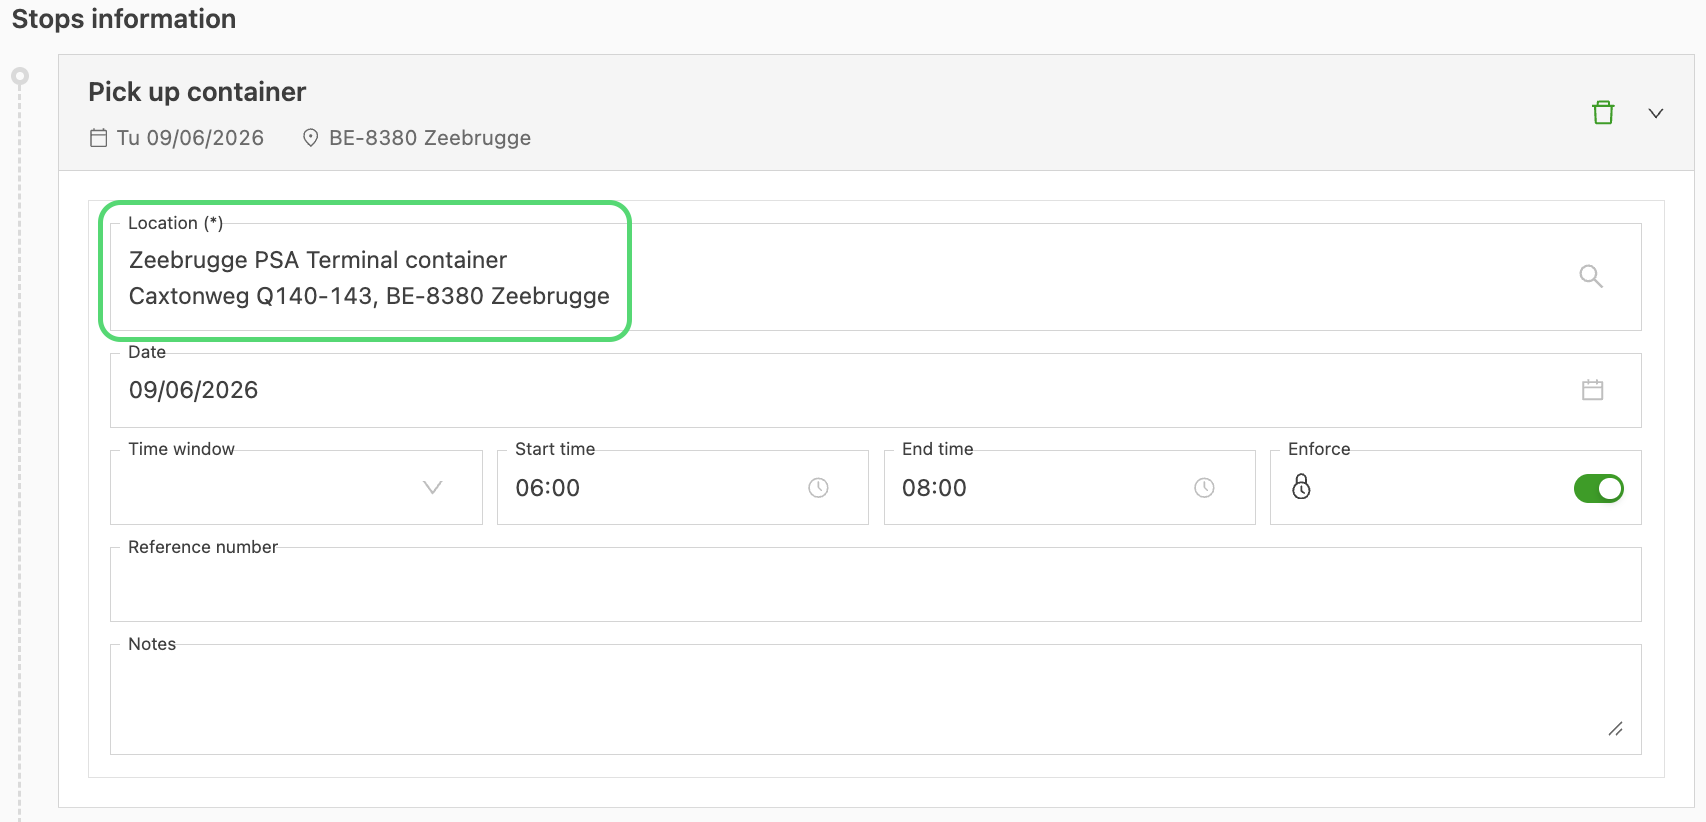
- Enable the pickup toggle. The terminal location is automatically prefilled with the departure terminal from the connection.
- Verify the prefilled location and adjust it if needed.
- Save the connection. The empty pickup stop is added to the load.
To remove the pickup stop, click the trash icon next to the Pickup section header before saving. The same process applies to the drop-off stop.
-
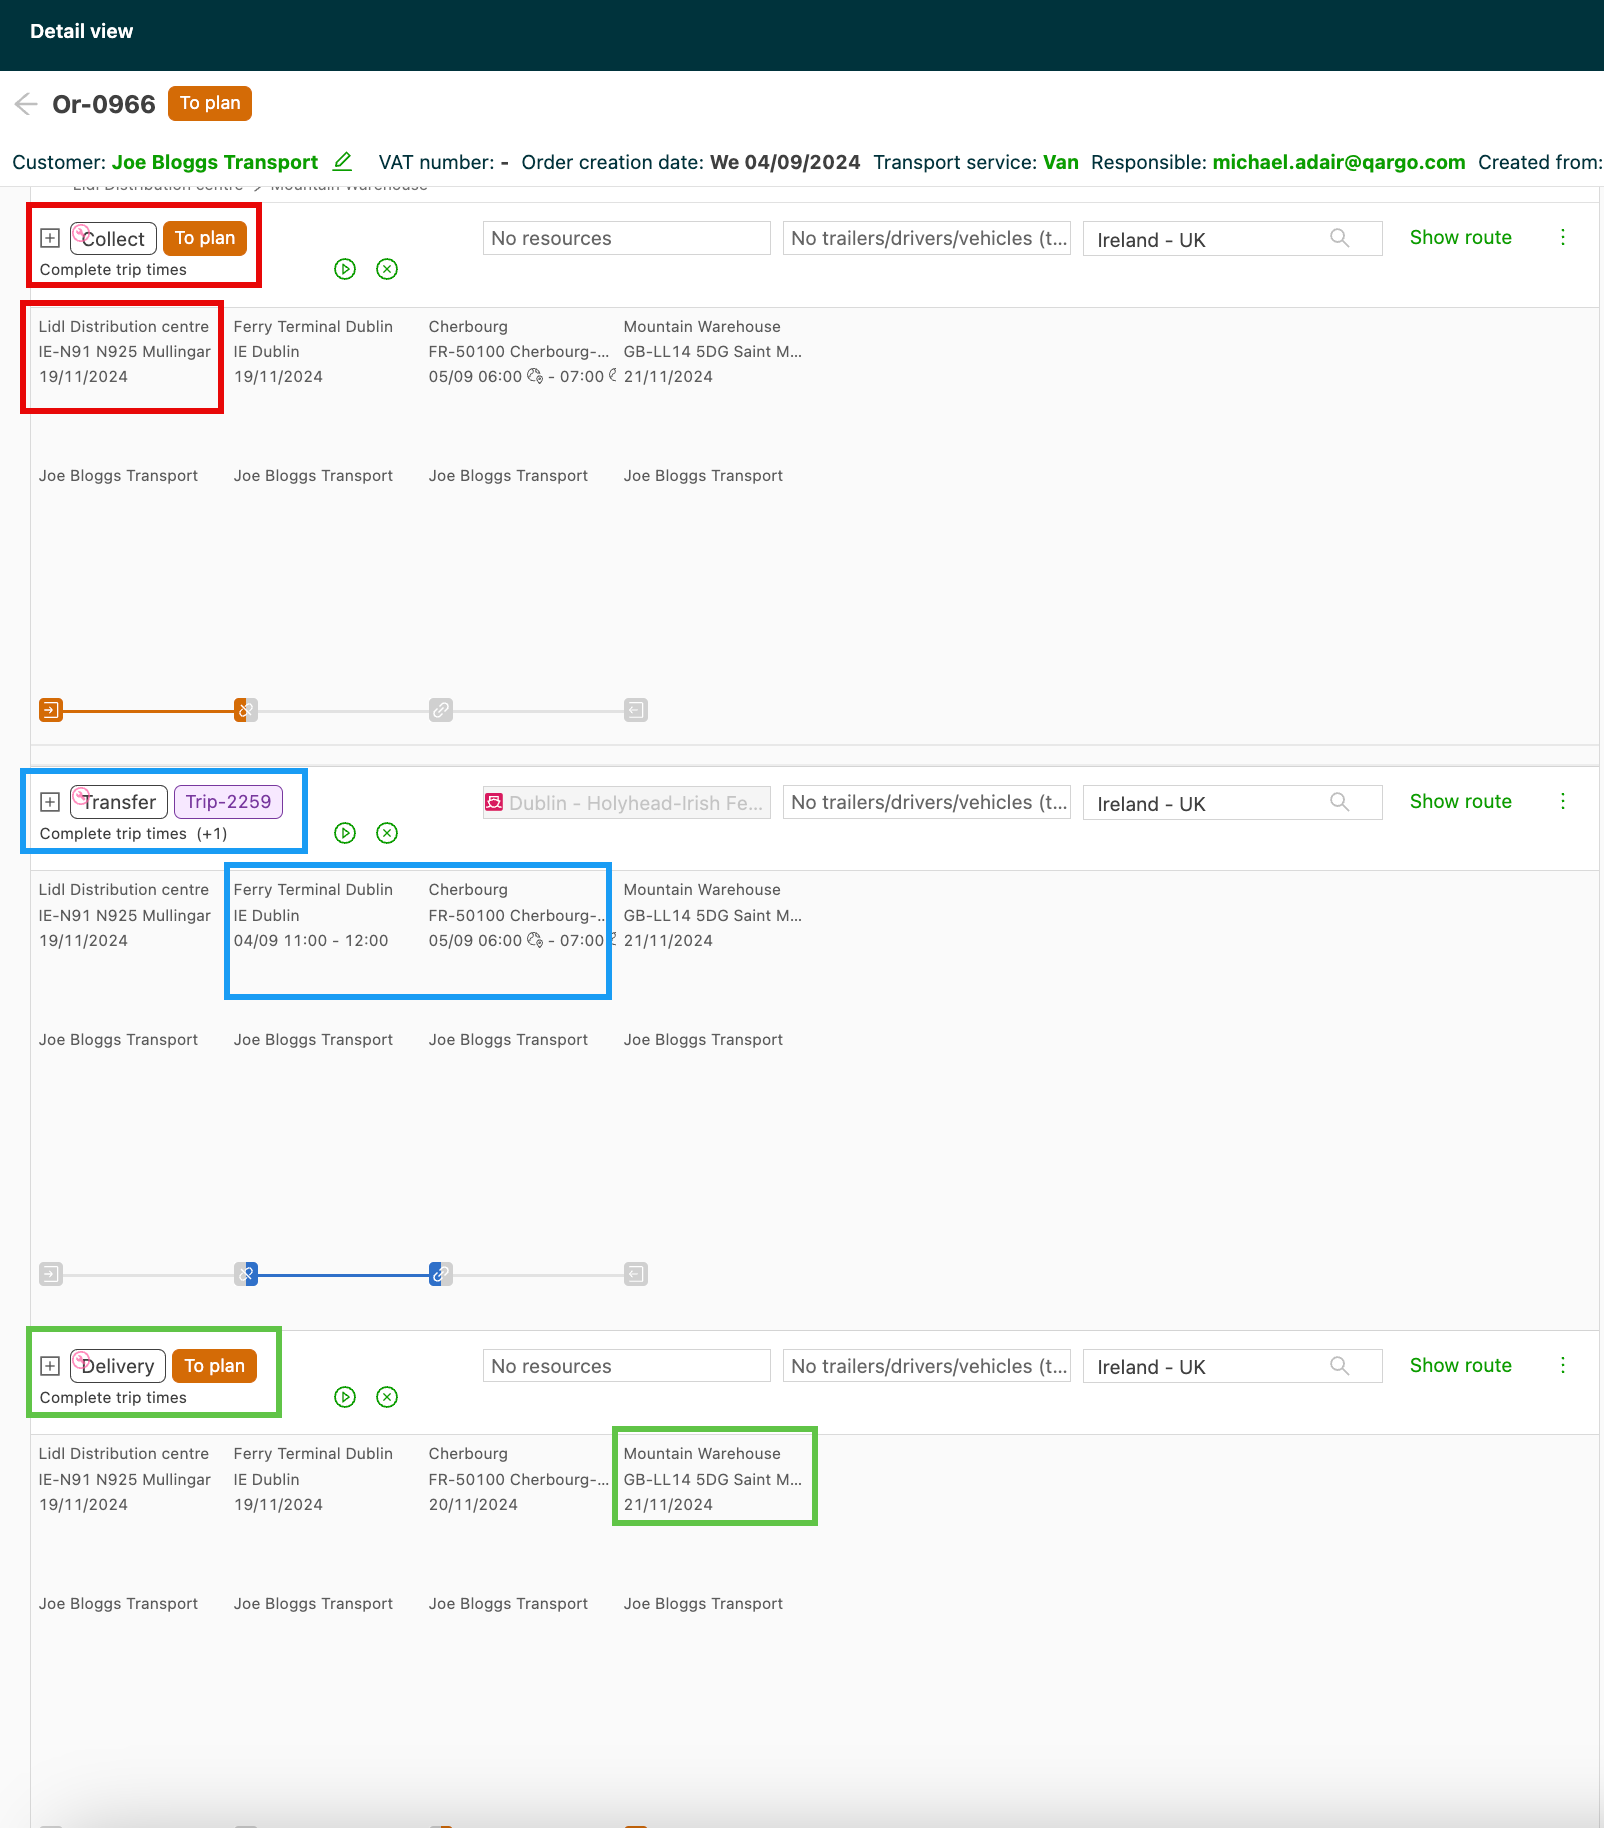
If the connection is unaccompanied, the order is split into legs as shown below:
-
If the connection is accompanied, there is 1 load/1 shipment for this route:
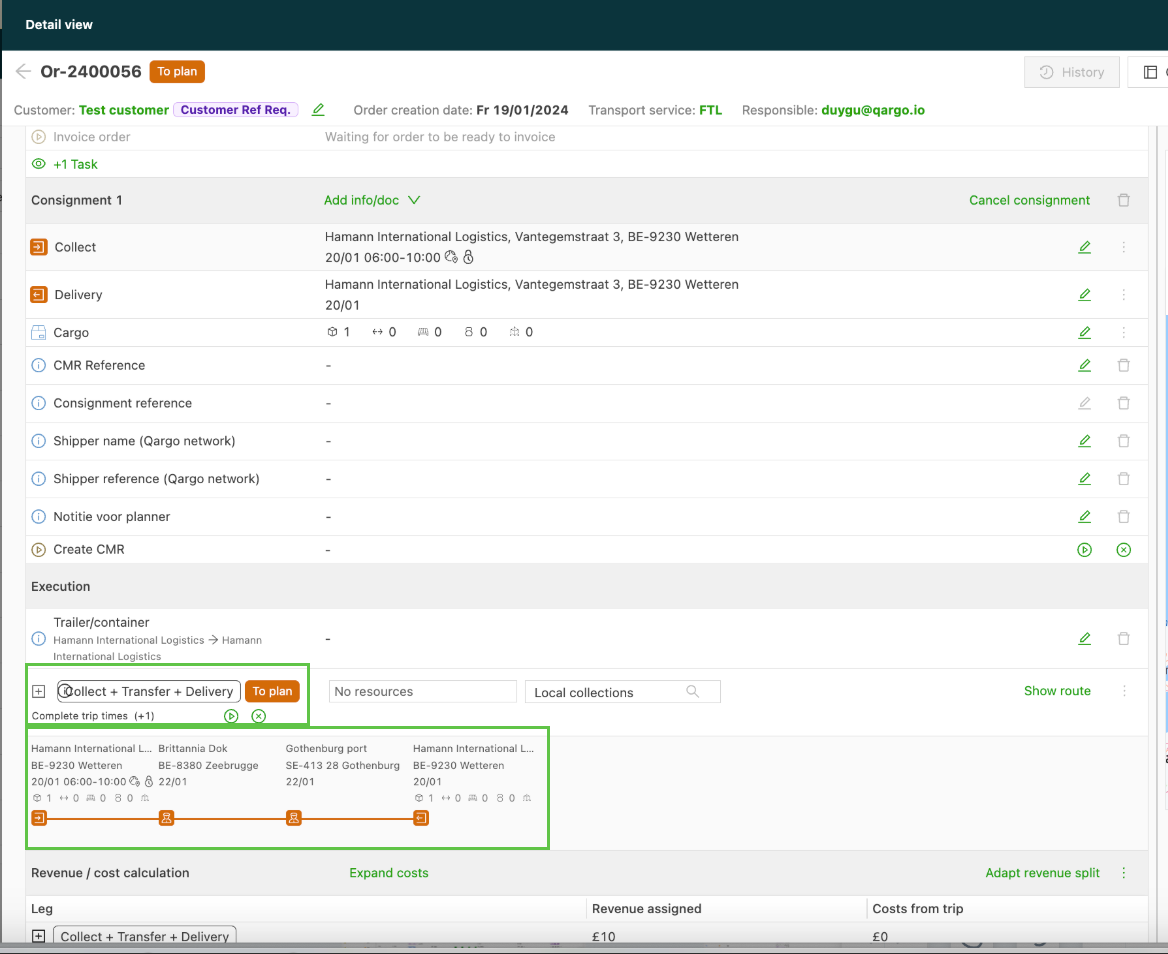
Timing violation indicators on the intermodal table
The intermodal table (Planning > Resources > Intermodal) is the main place for assigning shipments to intermodal bookings. It now flags connected legs with impossible timing, using the same detection logic as the planning timeline. A conflicting row shows a red violation indicator at the start of the row.
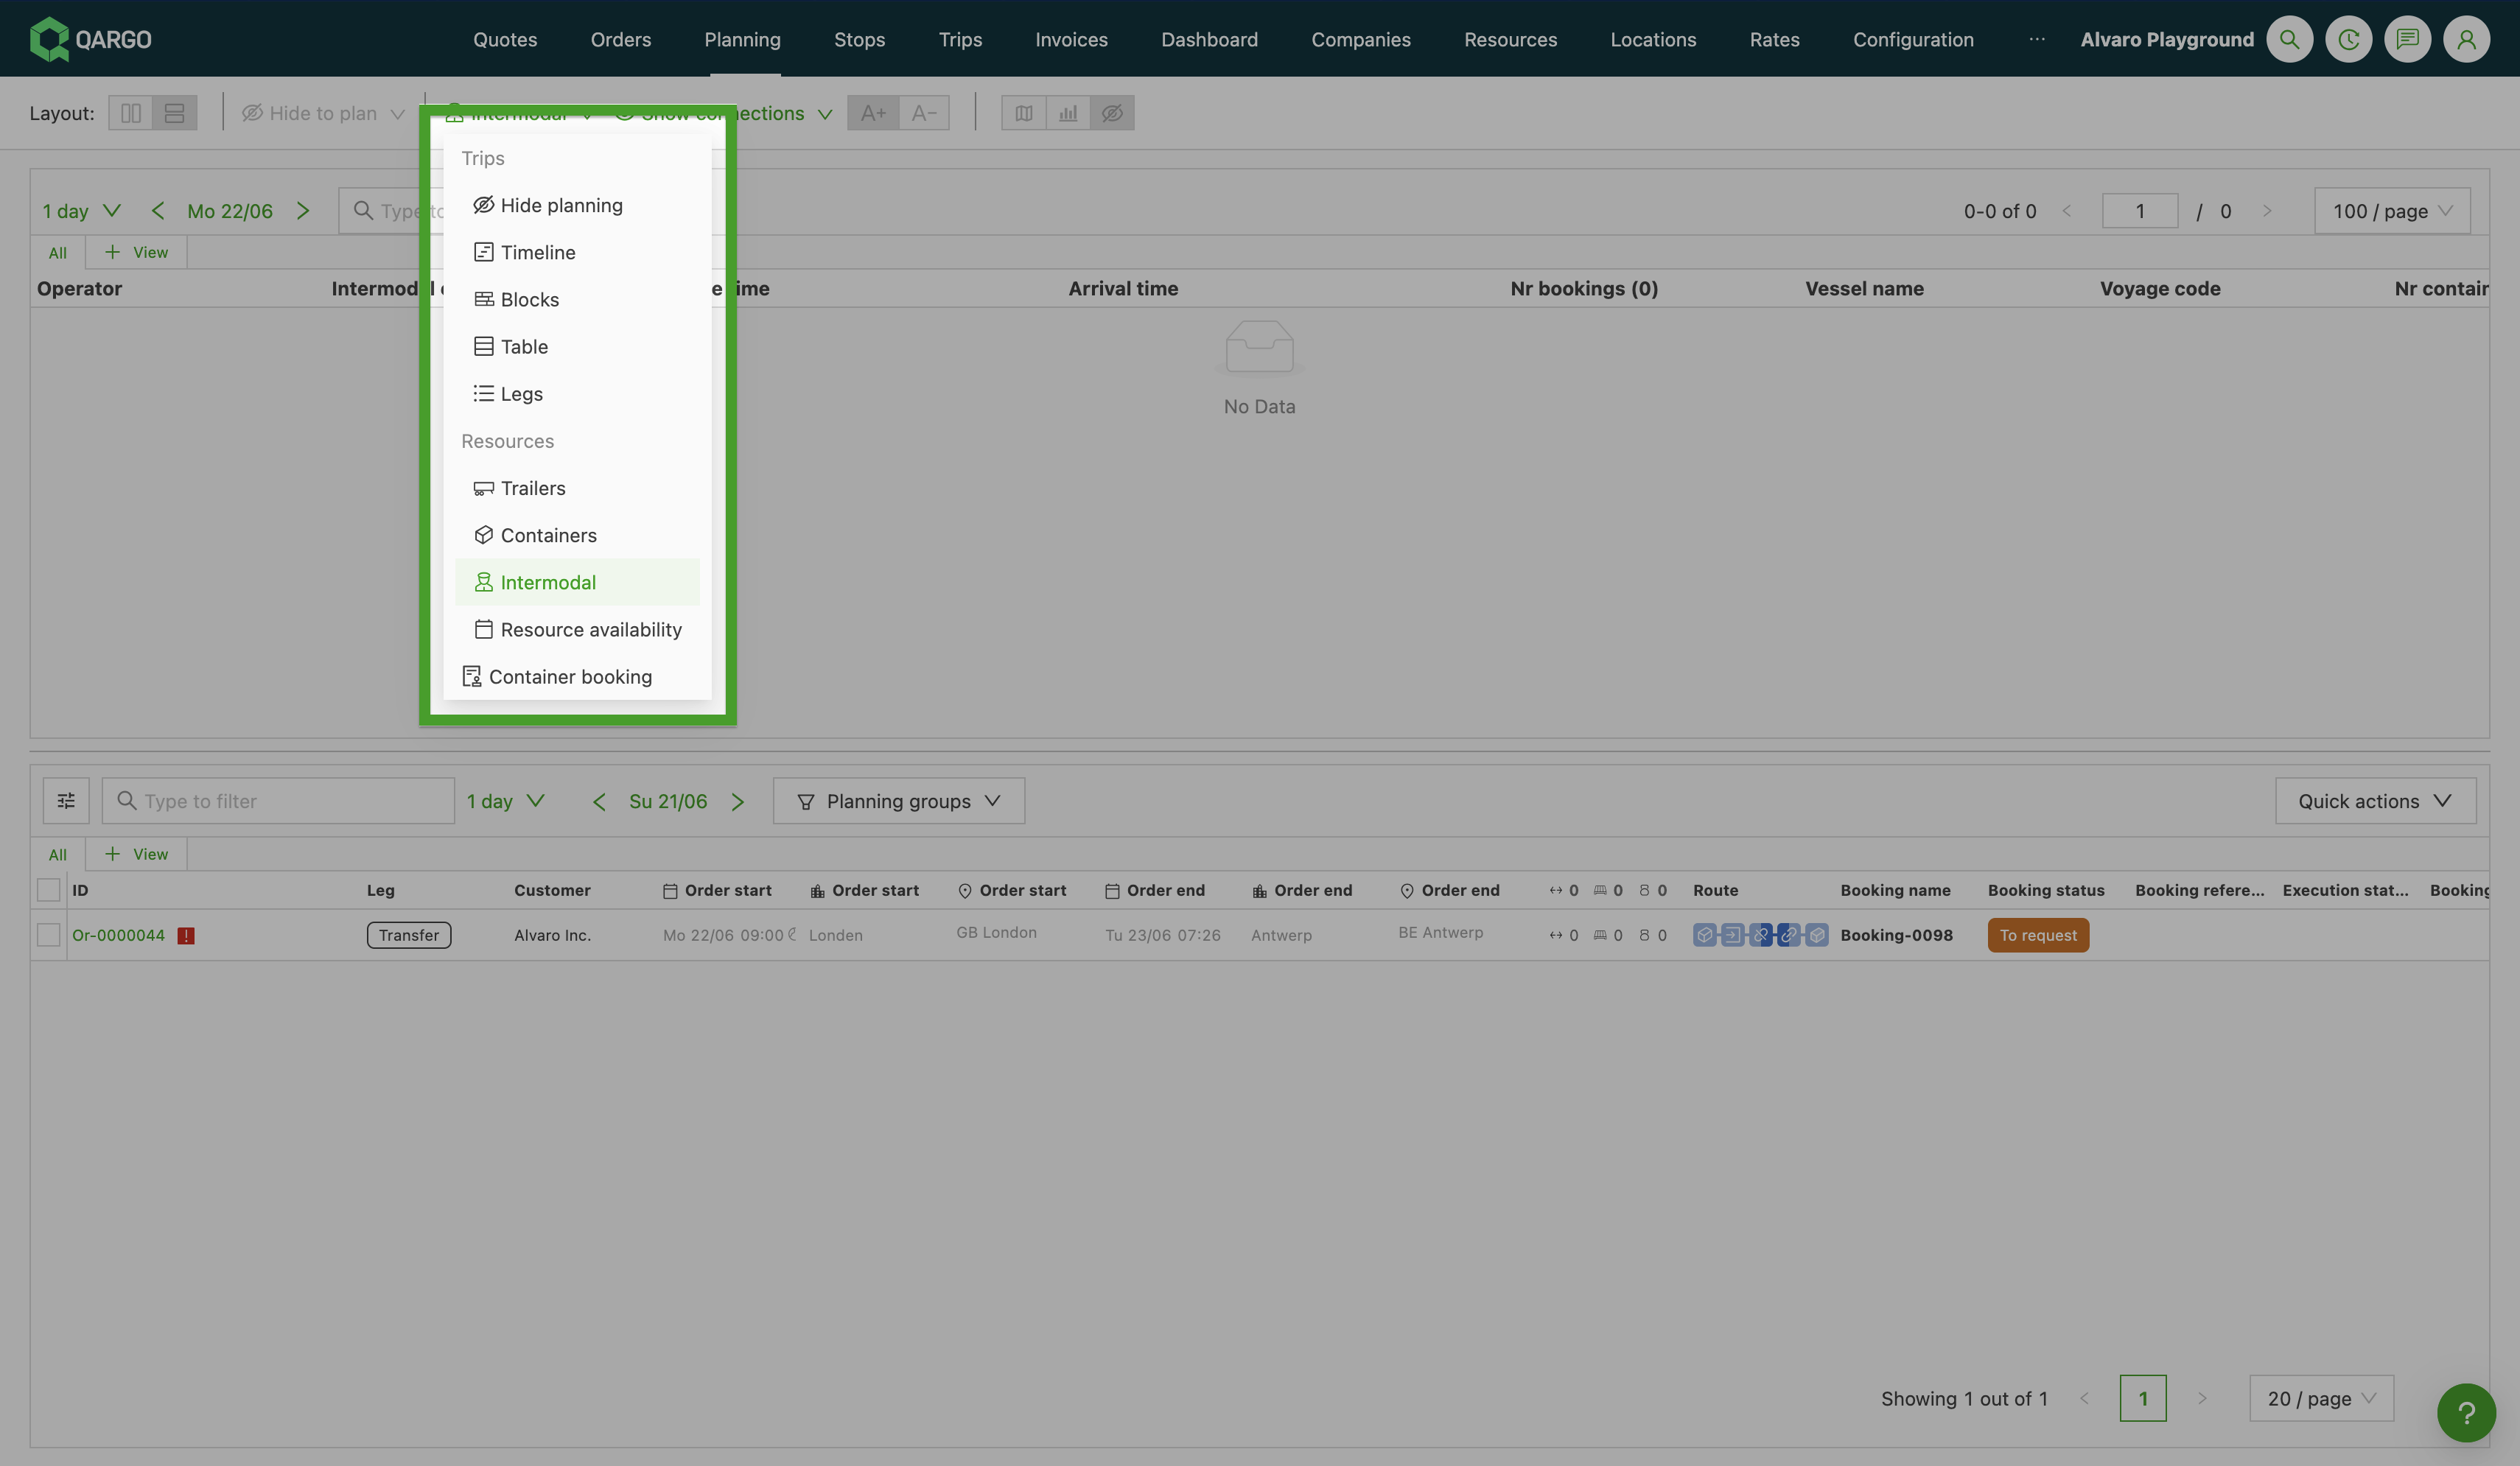
To read and resolve a violation:
- Open the intermodal table at
Planning > Resources > Intermodal. - Find any row marked with the red violation indicator.
- Hover over the indicator to read the violation details: the leg in conflict and the relevant timestamps (for example, a pickup carried out after the intermodal departure).
- Adjust the connected legs so that the pickup finishes before the intermodal departure and the delivery starts after the intermodal arrival.
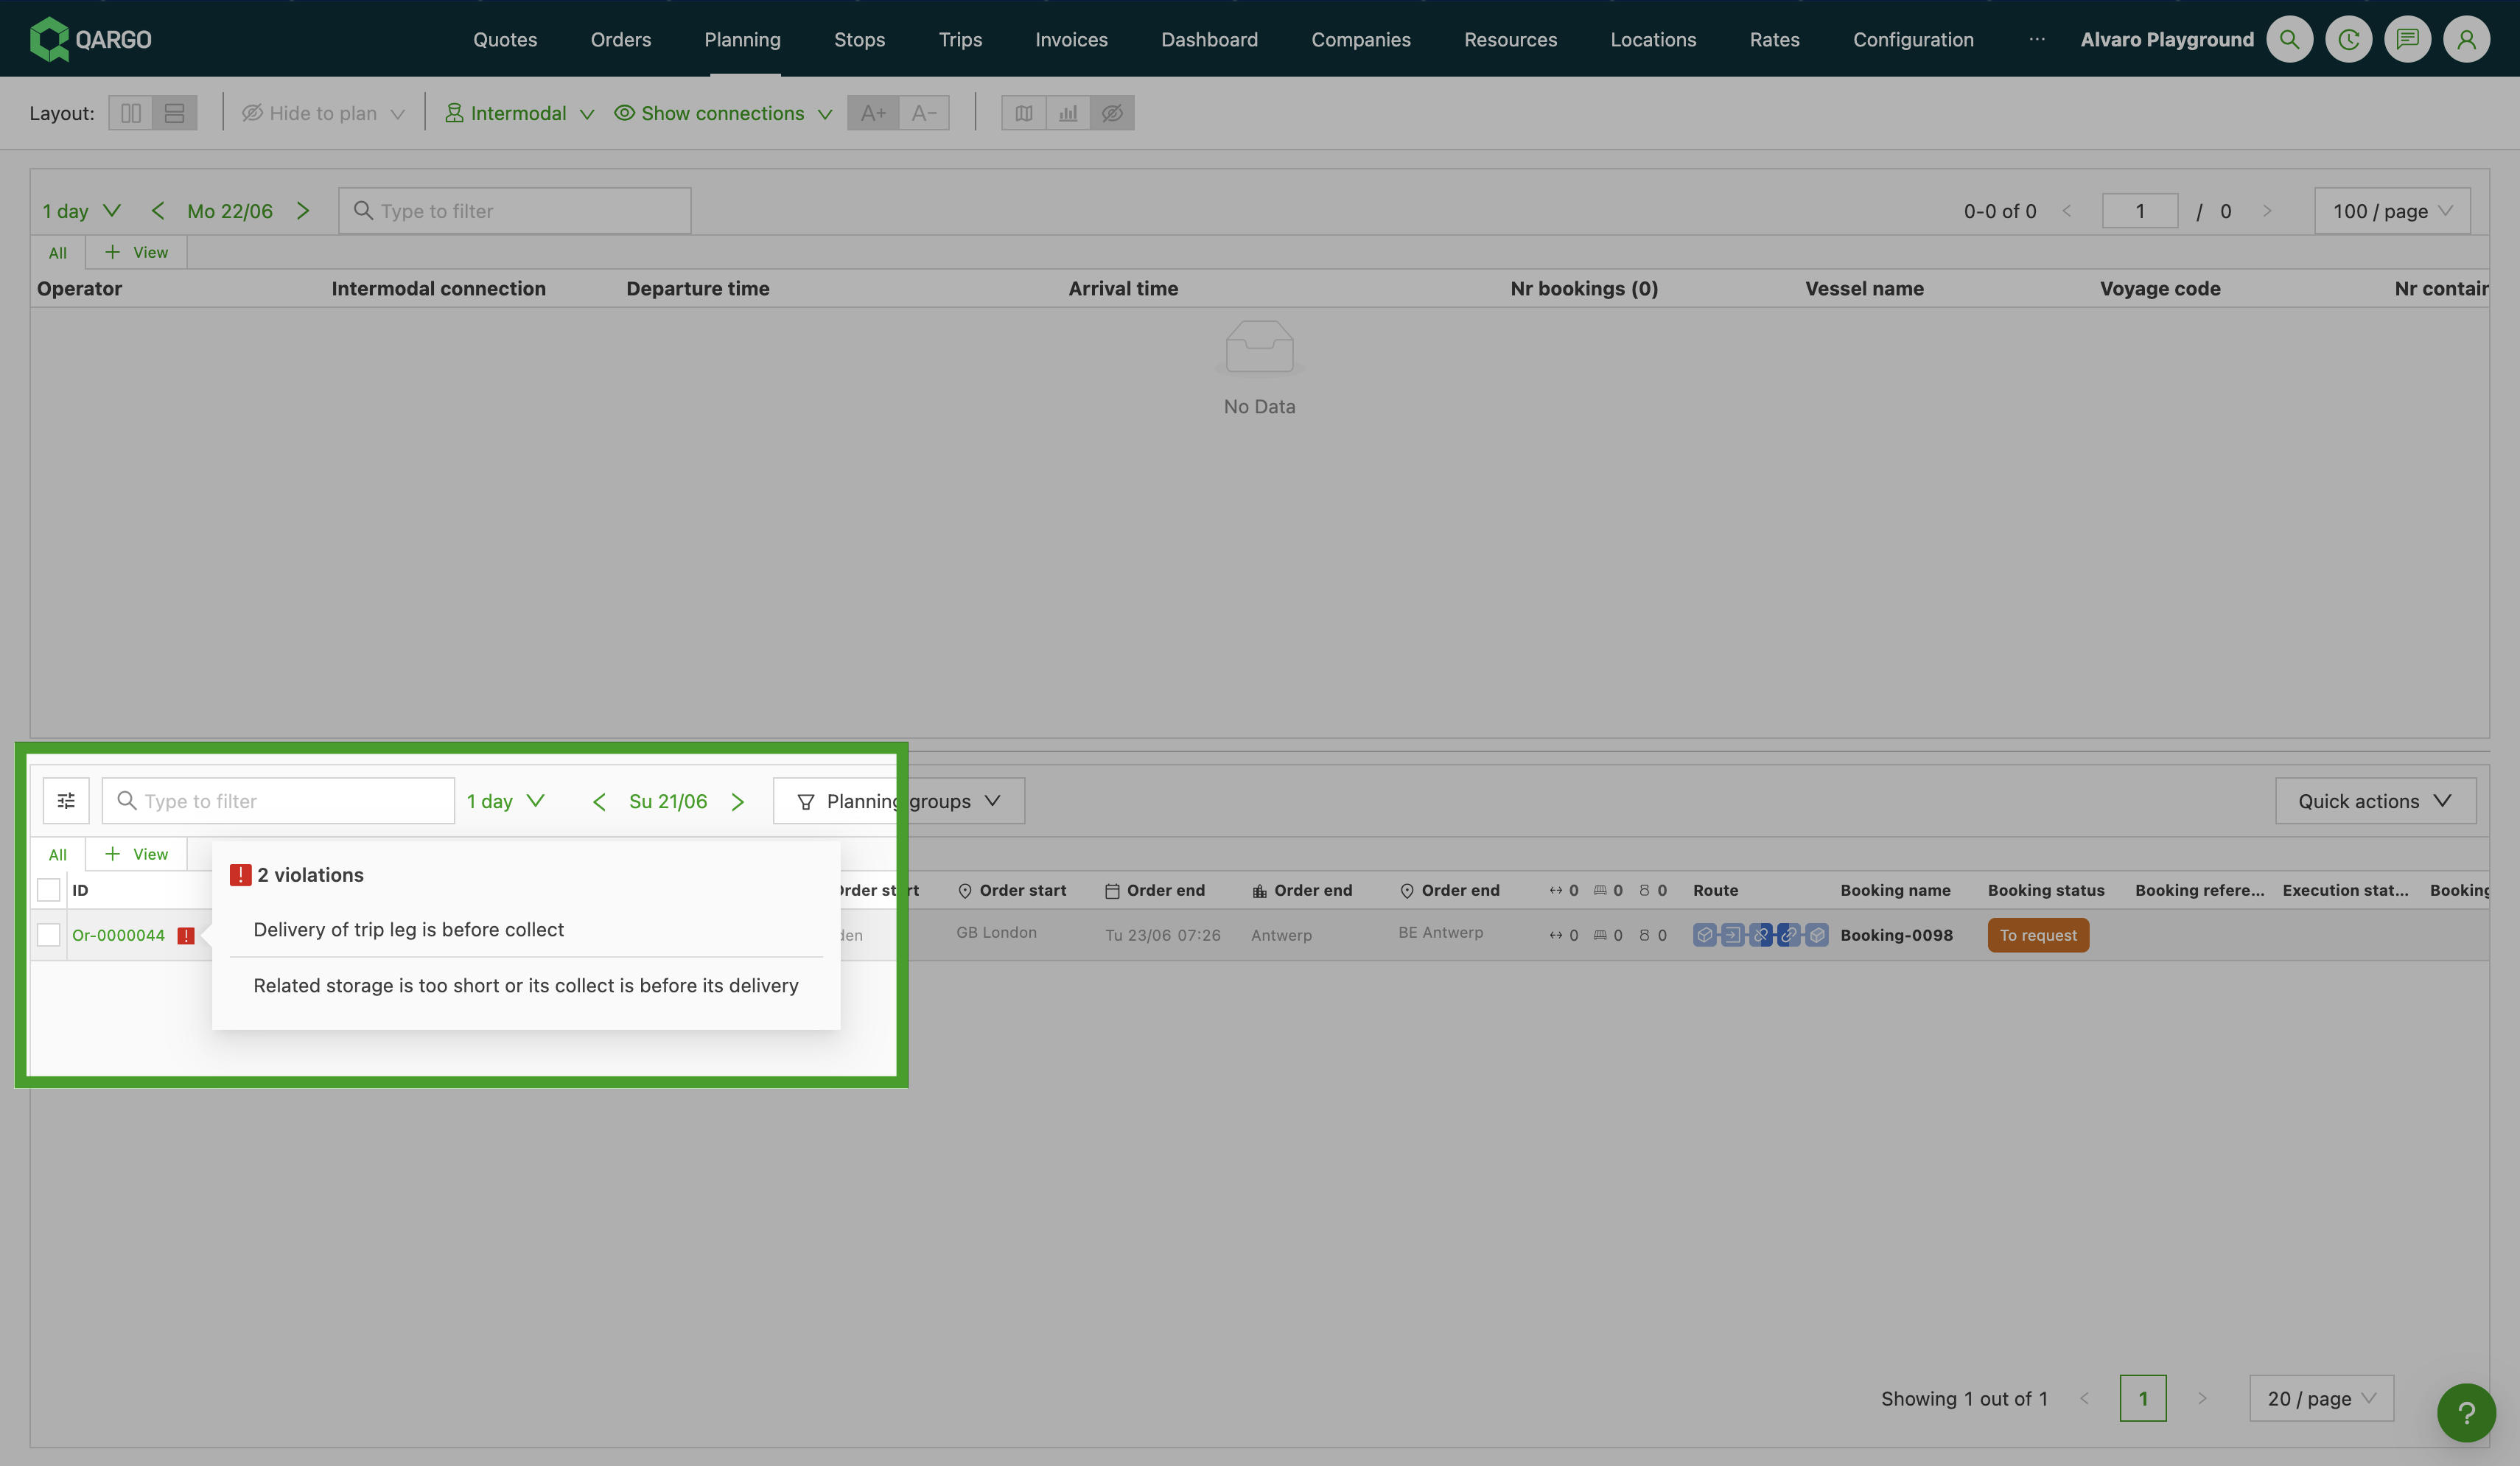
Violations shown on the table (the same rules as the planning timeline):
- The pickup leg is carried out after the intermodal departure.
- The delivery leg starts before the pickup leg finishes.
Do not plan load status for unused intermodal legs
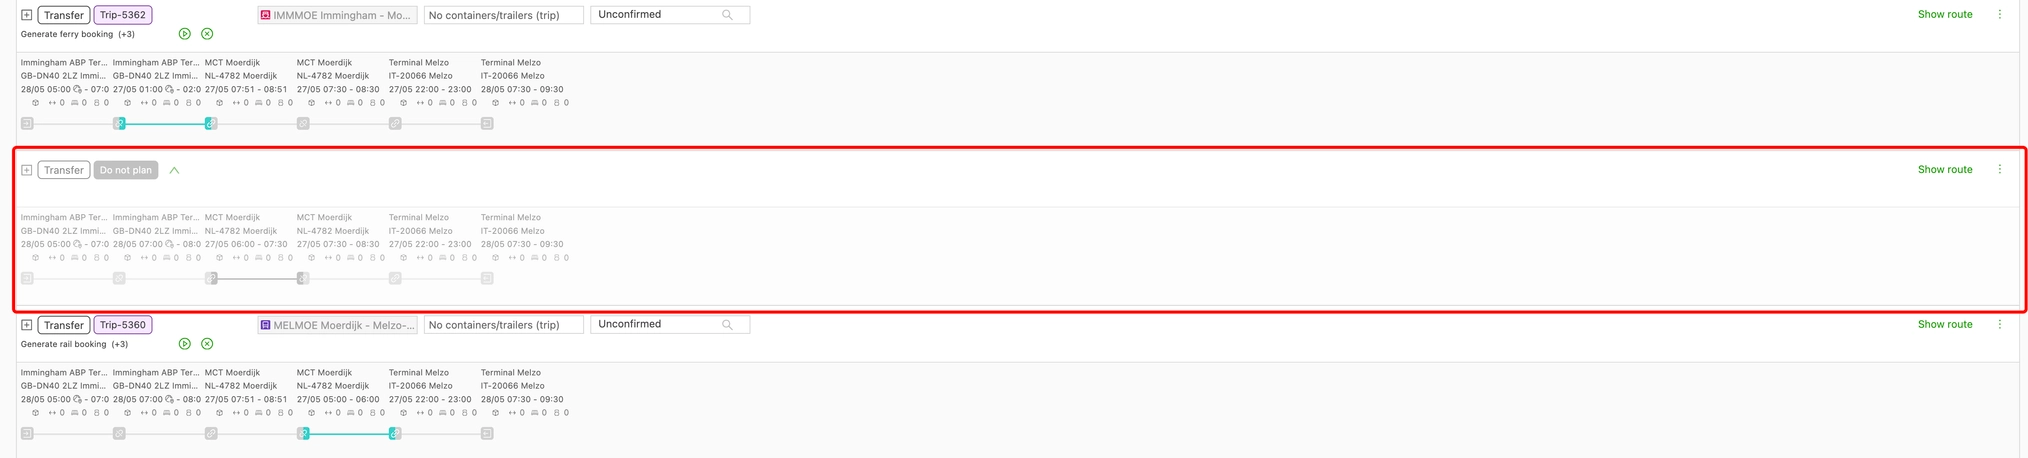
When an intermodal split is created (pickup, ferry, delivery legs), some legs may not be required for a given order. The Do not plan load status allows planners to mark a load as not in use for a given intermodal structure, while keeping the load itself intact for reference or future activation. These “unplanned loads” are excluded from active planning views, distance and revenue calculations, and operational dashboards.
When to use
Common scenarios for marking a load as Do not plan include:
- Unaccompanied intermodal moves where only the ferry leg is operationally planned, and the pickup or delivery leg is handled outside Qargo by the customer or a third party.
- Load groups where the intermodal split generated a placeholder leg that is not required for operations.
- Multimodal flows where one or more legs are temporarily skipped while alternative arrangements are made.
Steps to mark a load as ignored
- Open the load from the Planning board or from the Load group detail view.
- Open the load status menu.
- Select Do not plan.
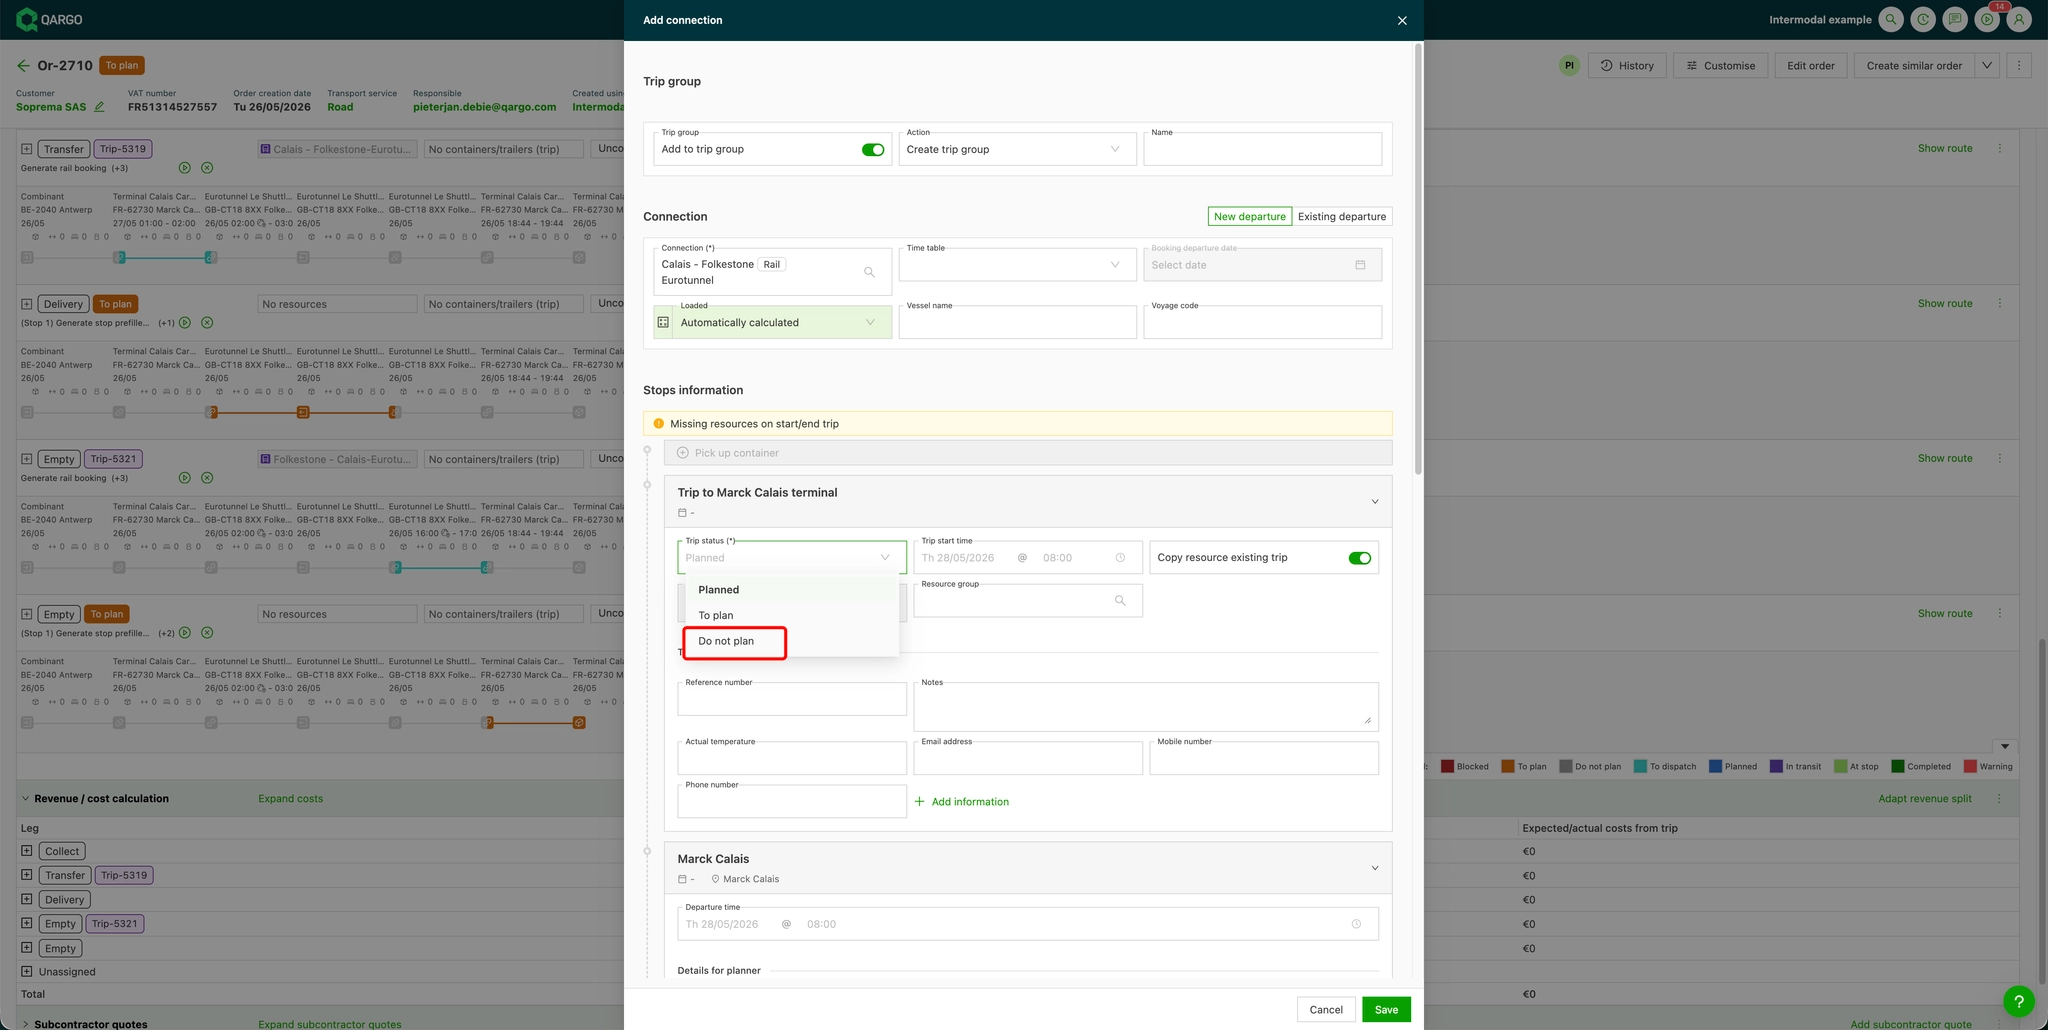
The load is removed from the active planning view but remains visible inside the load group. Resource allocations on the ignored load are preserved.
Reverting an ignored load
- Open the ignored load from the load group detail view.
- Open the load status menu.
- Select the required active status (for example, To plan or Planned).
The load returns to active planning views and is included in calculations again.
Impact on related views
- Planning board: ignored loads are hidden by default.
- Load group detail: ignored loads remain visible for context.
- Revenue and distance calculations: ignored loads are excluded.
- Operational dashboards: ignored loads are excluded from counts.
Syncing PBN and GMR codes
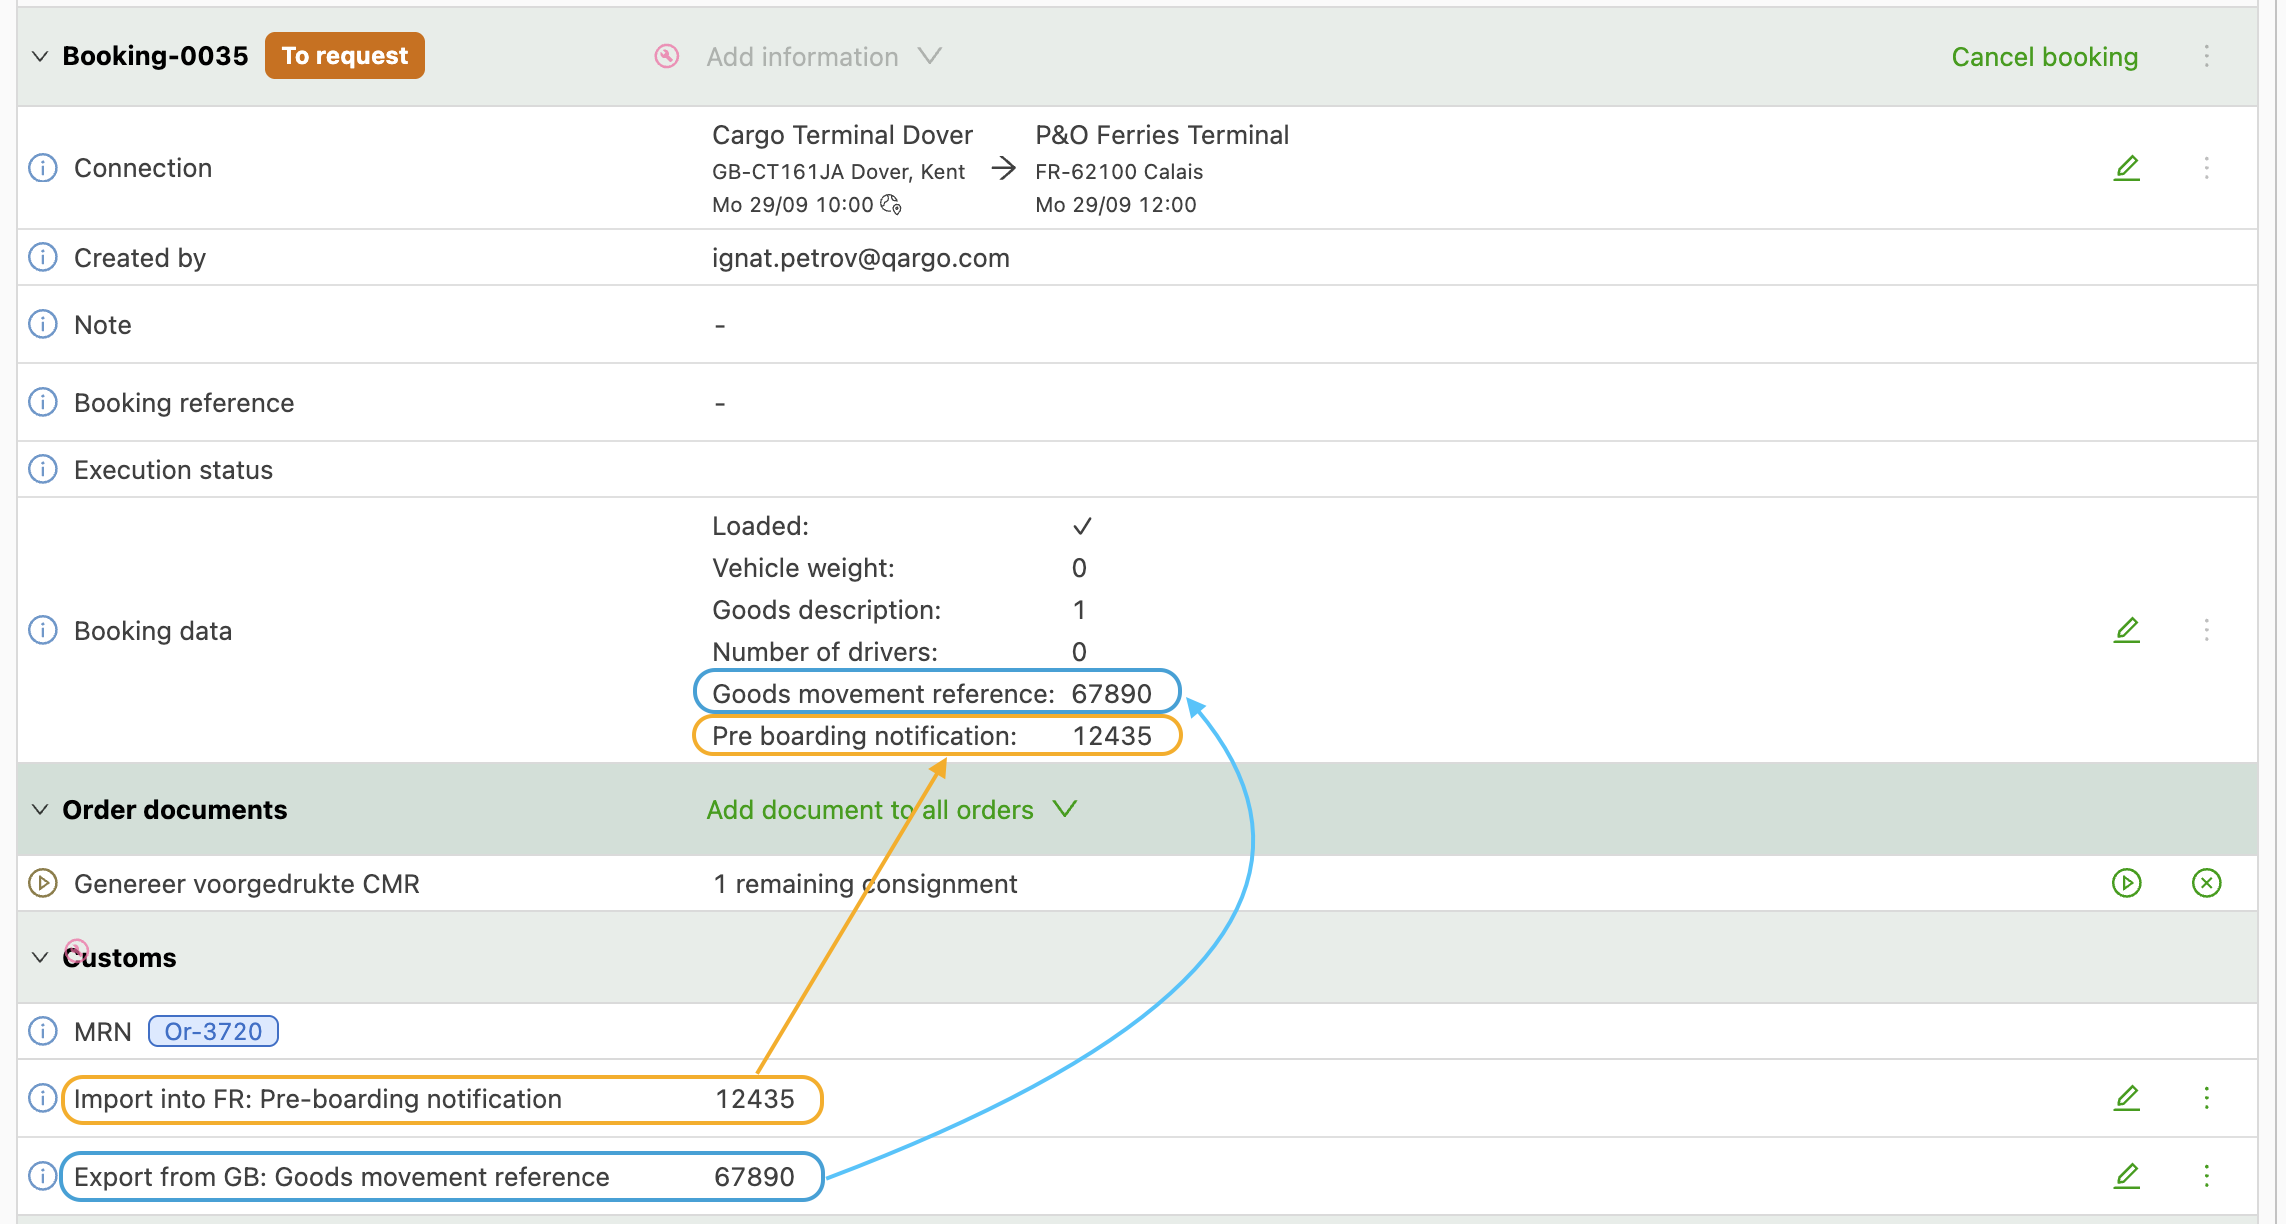
Qargo automatically synchronizes PBN and GMR codes between intermodal and customs bookings. This eliminates manual entry and ensures data accuracy across linked records.
When a new intermodal booking is created, the system automatically checks for existing customs bookings with the same source and target countries. If a match is found, it populates the PBN and GMR codes.
Whenever a customs booking is created, updated, or deleted, the system automatically looks for the matching intermodal bookings and updates their PBN and GMR codes accordingly.
Loads between mainland UK and Northern Ireland are included in this workflow
- The system detects the crossing using the NI ZIP code prefix ‘BT’
- When the load includes either a pickup or a delivery, specific UK-NI / NI-UK customs bookings are created as part of the generated ‘border crossing’.
Limitations
- Detection relies on the pickup and delivery ZIP codes and currently assumes that NI can be identified by the BT prefix.
Cancel a booking
Canceling an intermodal booking in Qargo without canceling it with the intermodal operator means the booking slot is retained and can be manually reused for another shipment later, while resources inside Qargo are still freed up.
- Secure valuable intermodal slots in advance, but keep flexibility when plans change.
How it works
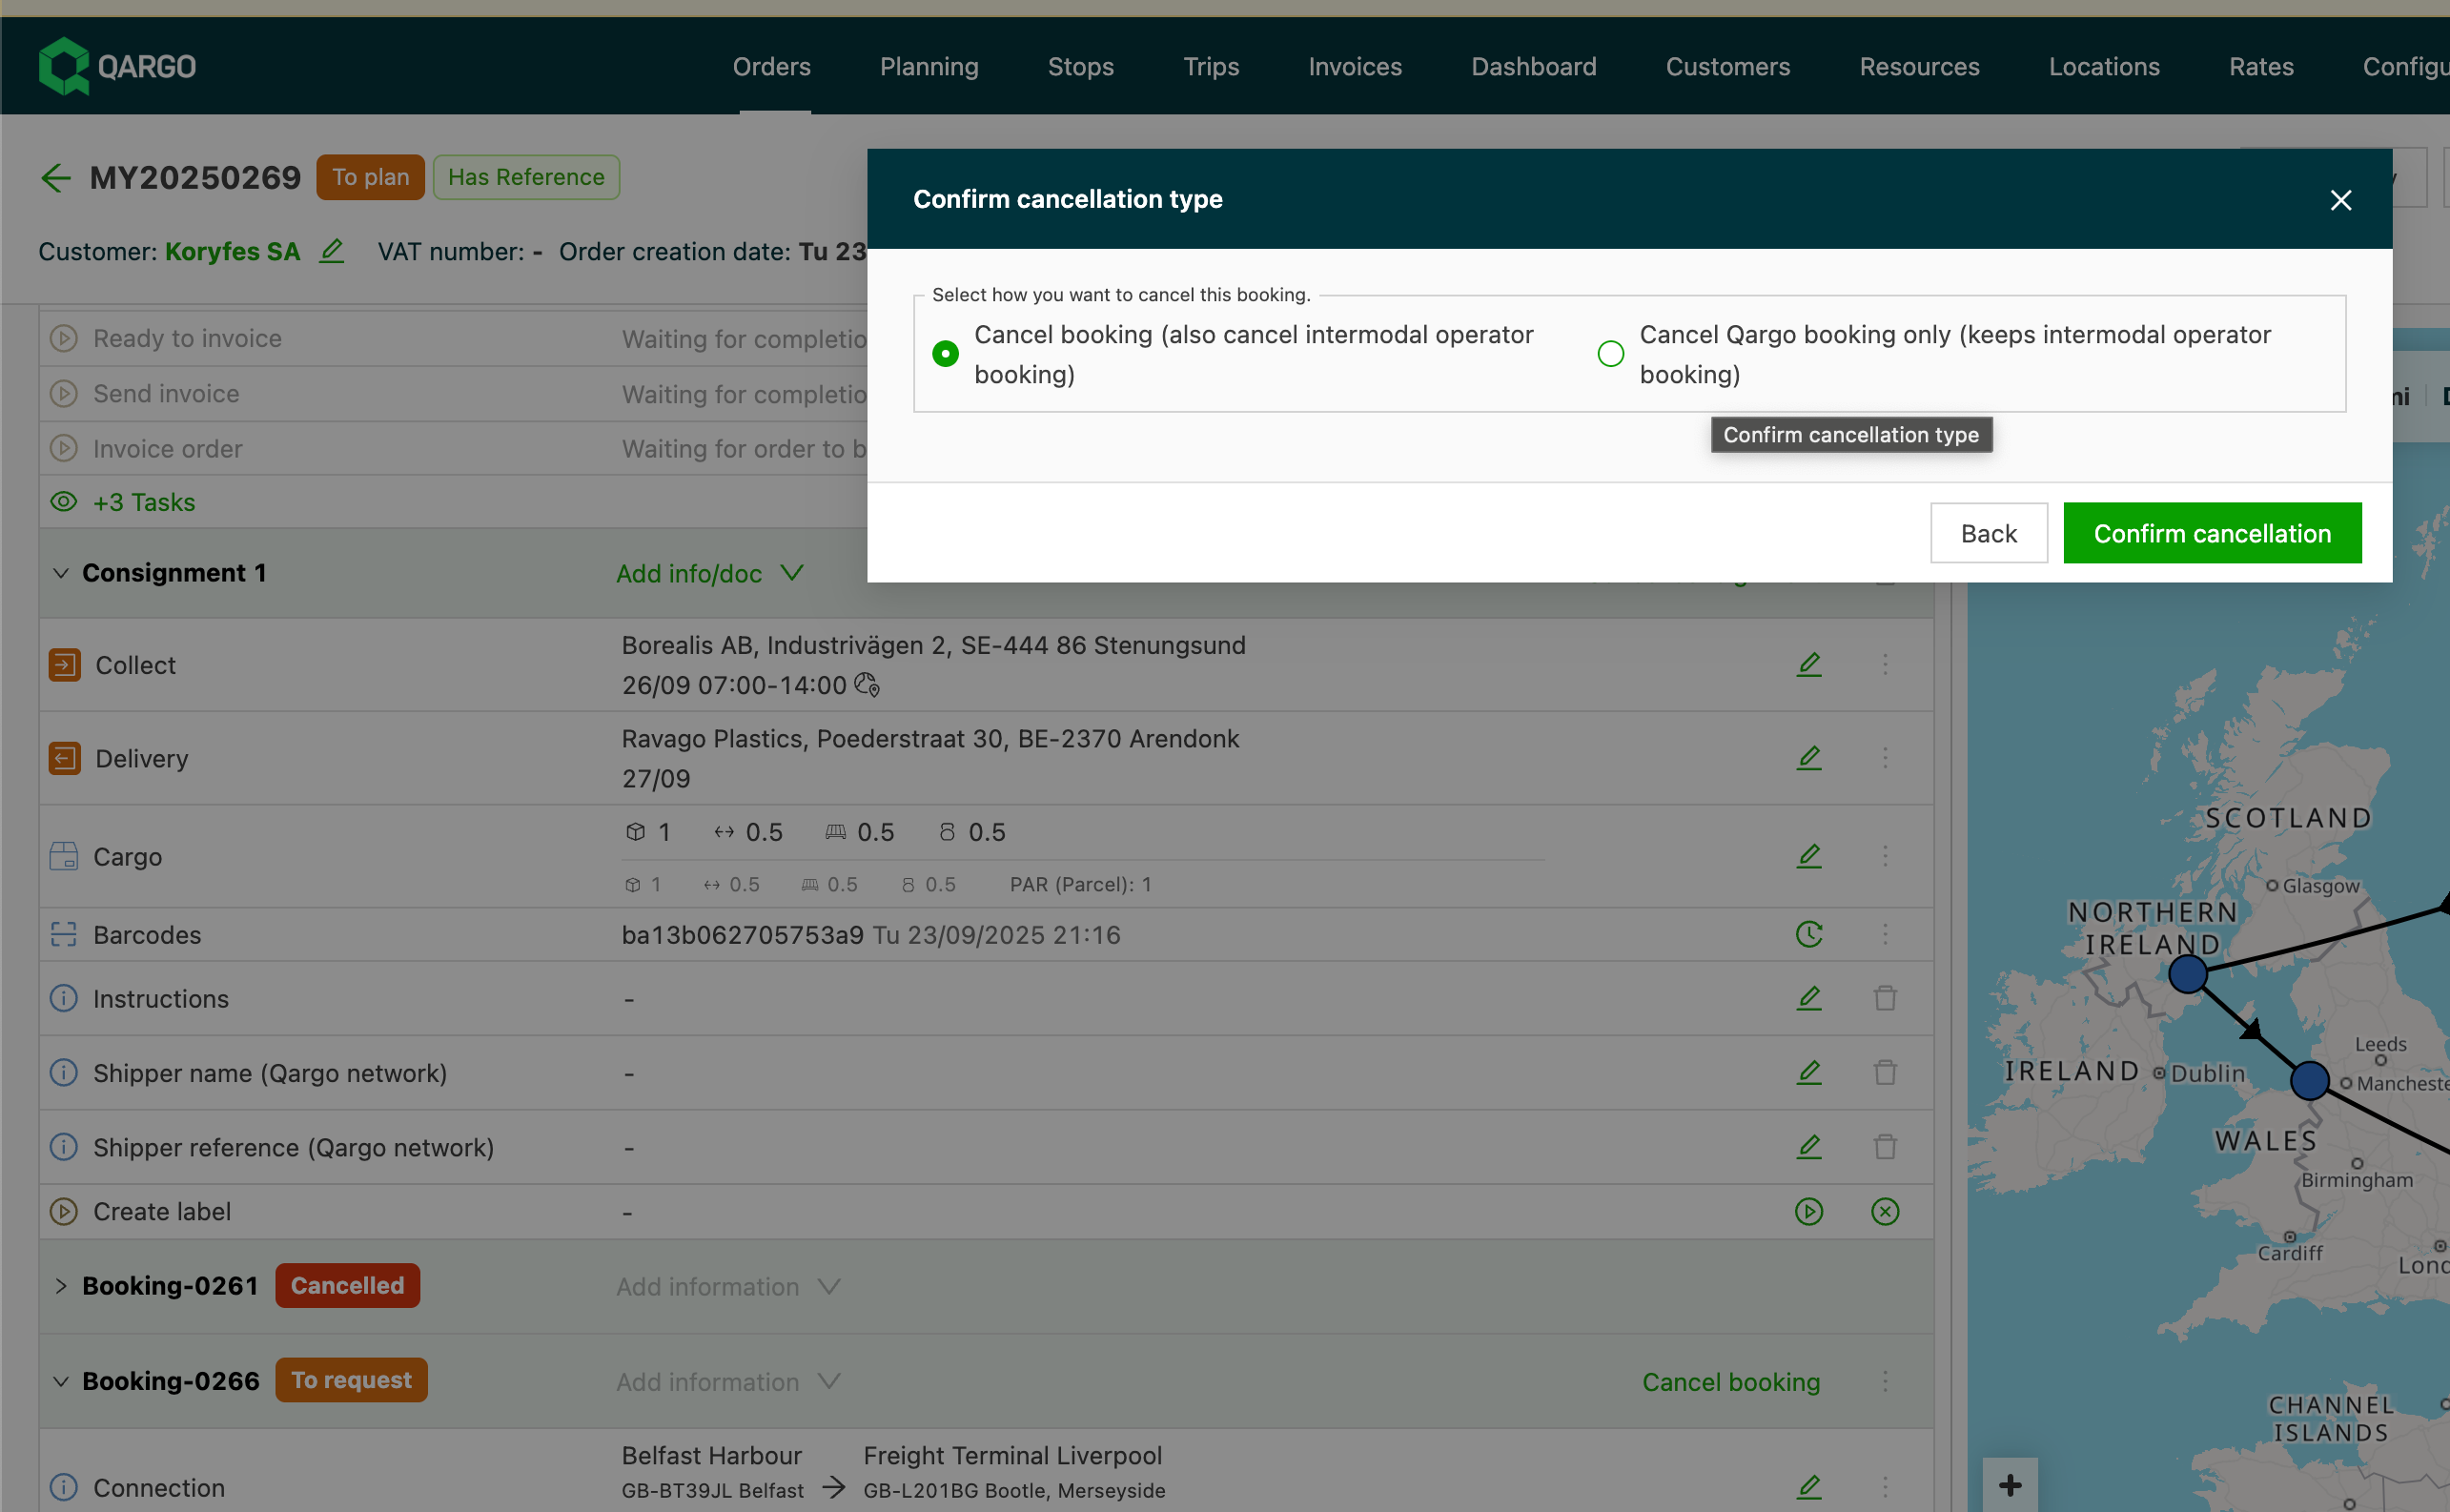
When canceling an intermodal booking, there are two options:
- Cancel in Qargo + with the intermodal operator: removes the booking in both systems.
- Cancel in Qargo only: keeps the slot reserved externally while canceling internally.
- Prevents unnecessary loss of intermodal slots.
- Improves operational flexibility for planners.
- Reduces manual work and errors when reusing existing bookings.
Moving an intermodal leg between shipping lanes
On the Intermodal view of the planning board, confirmation is required before an intermodal leg is moved to a different shipping lane. Planners can then verify or cancel the change before it is applied. A lane change can move a leg to different departure times, a different operator, or different routing, so a confirmation step prevents unintended reassignments.
🎥 Watch this video or follow the steps below:
Moving an intermodal leg between shipping lanes
- Open the Intermodal view of the planning board under Planning
- Drag an intermodal leg from its current shipping lane.
- Drop the leg onto a different shipping lane. Qargo opens a confirmation modal titled Move intermodal leg to a different shipping lane? that names both the current and the target shipping lane.
- Review the current and target shipping lane shown in the modal.
- Select Move leg to confirm the reassignment, or Cancel to return the leg to its original shipping lane.
Bulk reassign orders to another departure
When an intermodal departure is canceled, rescheduled, or overbooked, all orders booked on that departure can be reassigned to a different intermodal connection in a single action. This removes the need to drag and drop each order individually and allows moves across different operators and connections when needed.
How it works
- Open the Intermodal list view from the Planning toolbar.
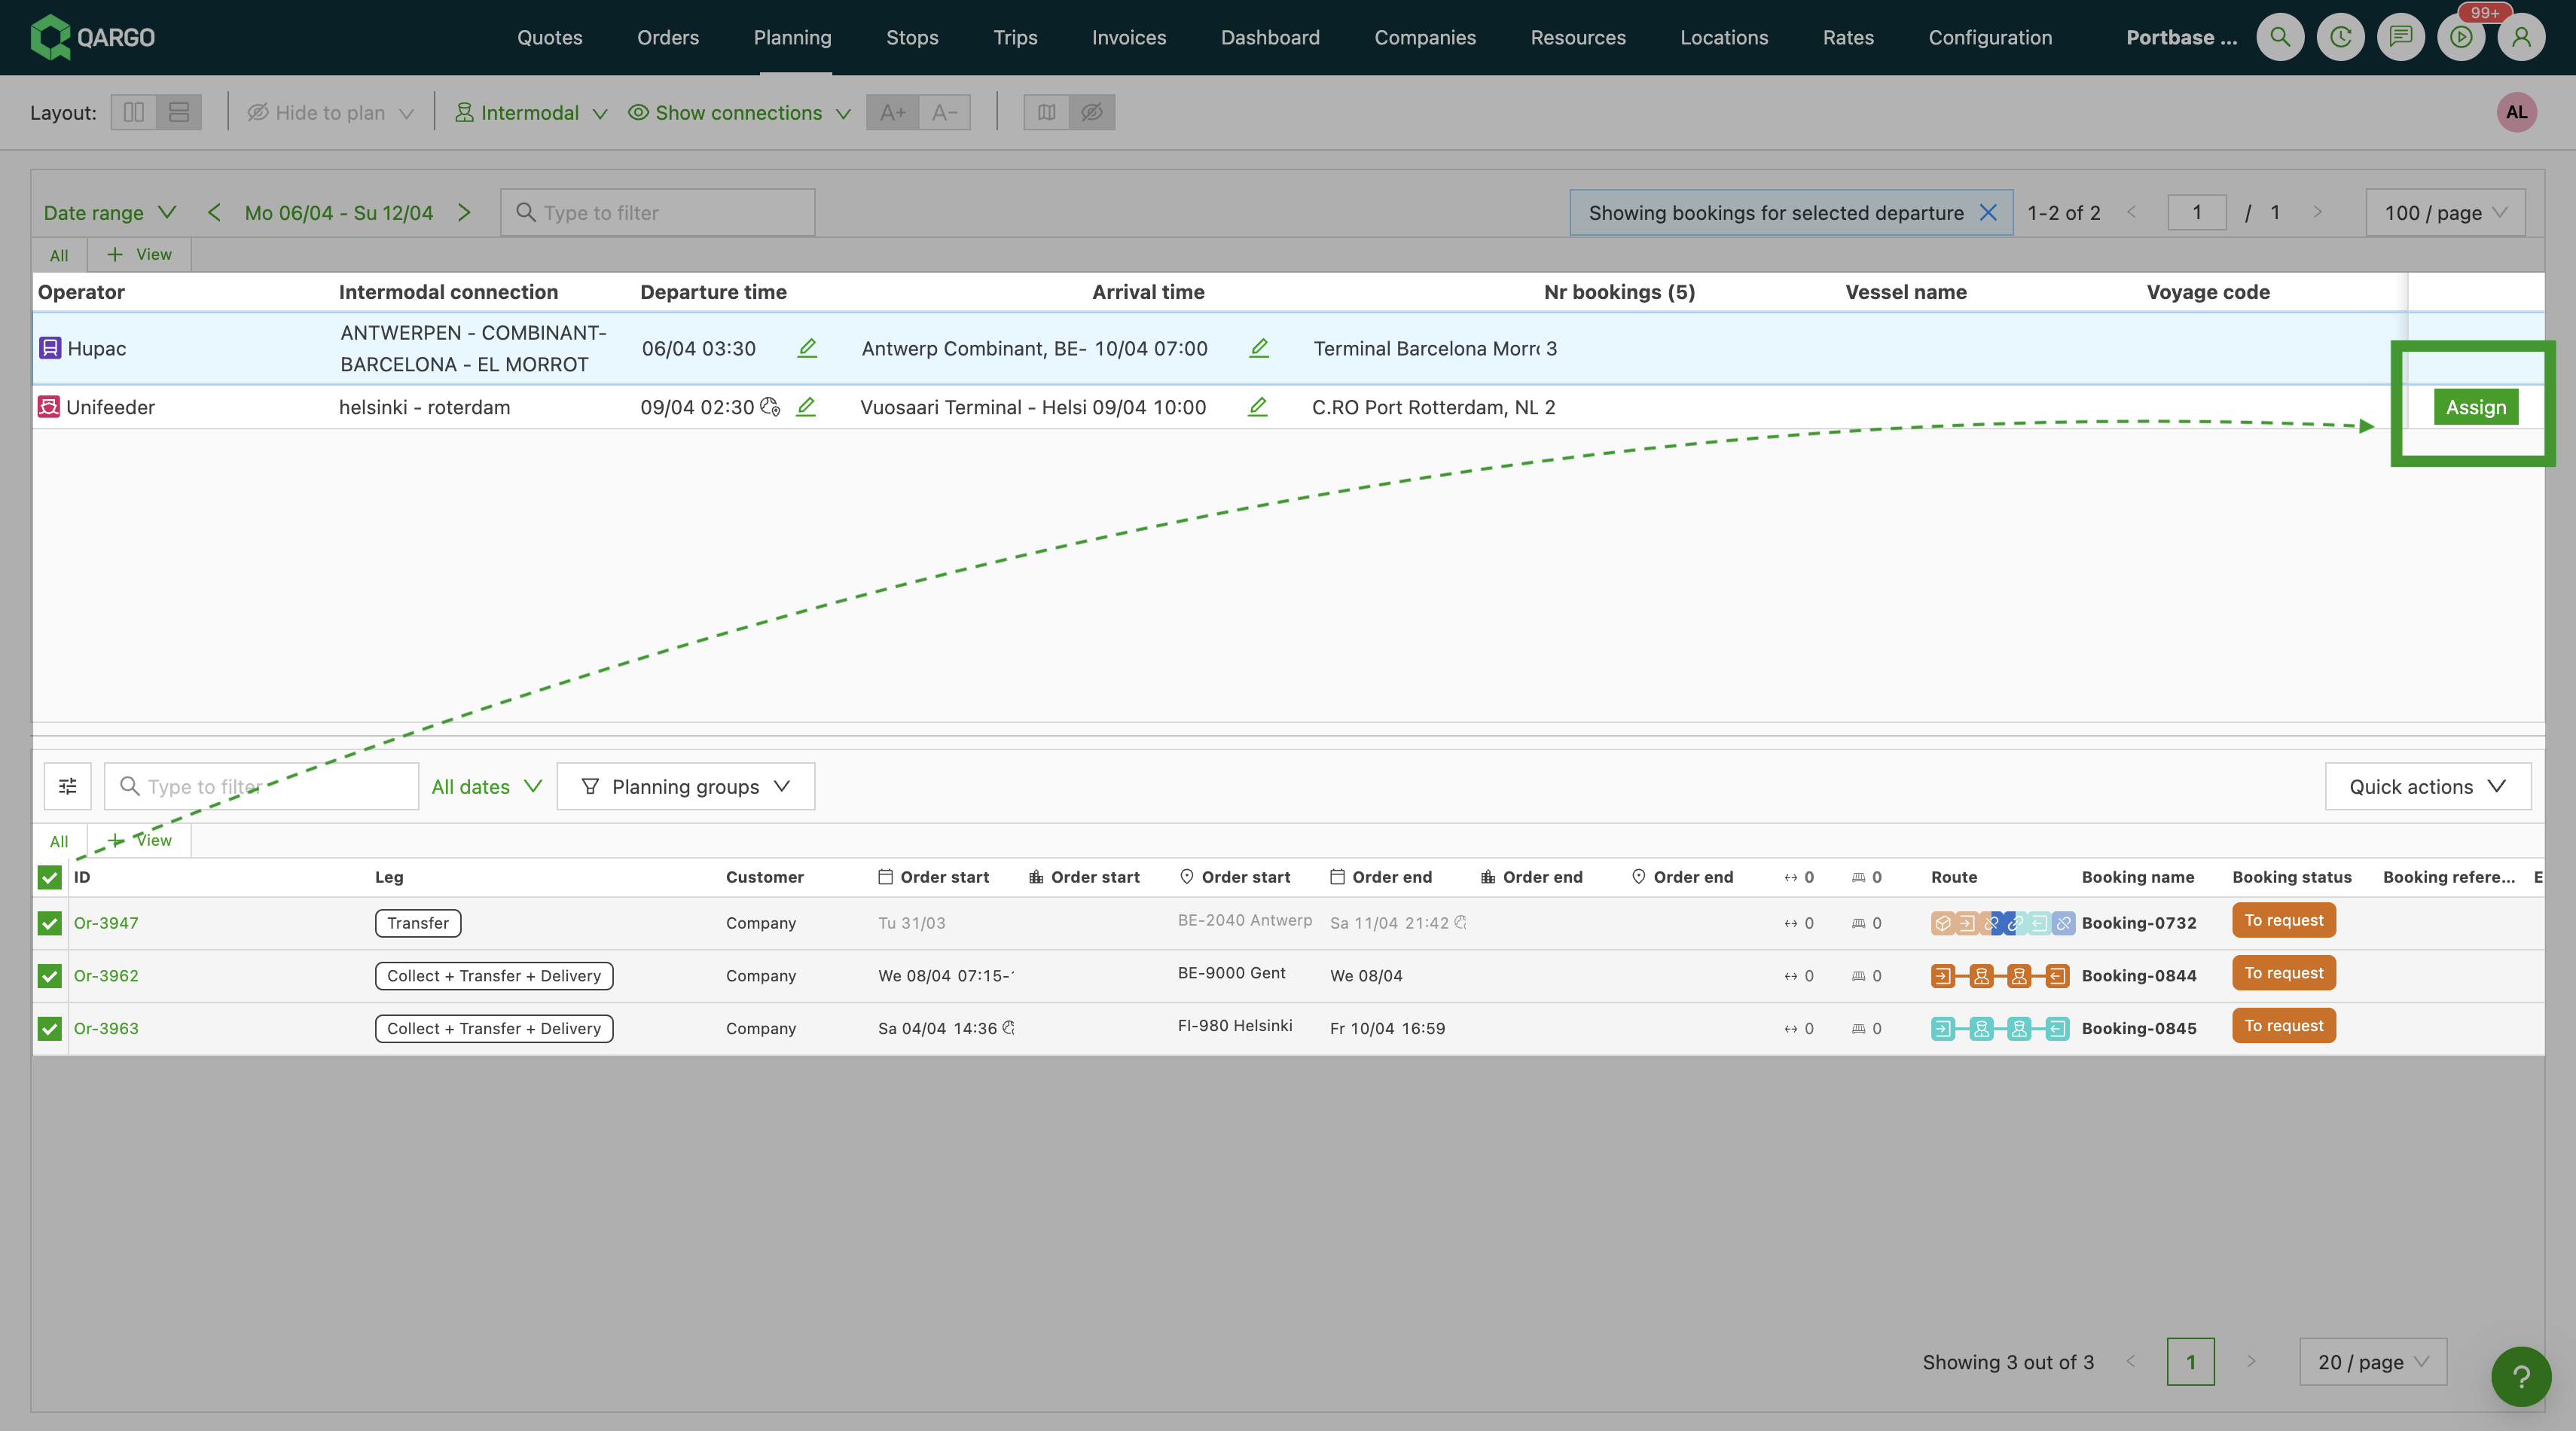
- In the departures table, click the departure whose orders need to be moved. The row is highlighted in blue, the bookings table below is filtered to that departure’s bookings, and a “Showing bookings for selected departure” indicator appears above the bookings table.
- Check the box next to each order to reassign. Orders from the same source departure can be selected together; orders from different source departures must be reassigned in separate actions.
- In the departures table, an Assign button appears on every other departure row, one for each possible target.
- Click Assign on the target departure row to start the reassignment. A confirmation dialog summarizes how many orders will be moved and to which intermodal connection.
- Confirm to complete the reassignment, or cancel to keep the current selection without applying changes.
Key benefits
- Significantly reduces the time needed to replan after a canceled or rescheduled departure.
- Works across operators and connections in one step. For example, a Unifeeder sailing can be reassigned to a Hupac rail connection.
- Prevents orders from being overlooked when the same corrective action has to be applied to many bookings.
Quick actions added
For customers with a high volume of intermodal orders, mass updates across multiple loads were cumbersome. For example, when sailings needed to be verified, there was a heavy manual effort to verify and update loads individually. A ‘Quick actions’ function on the Intermodal planning page now allows loads and tasks to be completed efficiently without processing each one individually.
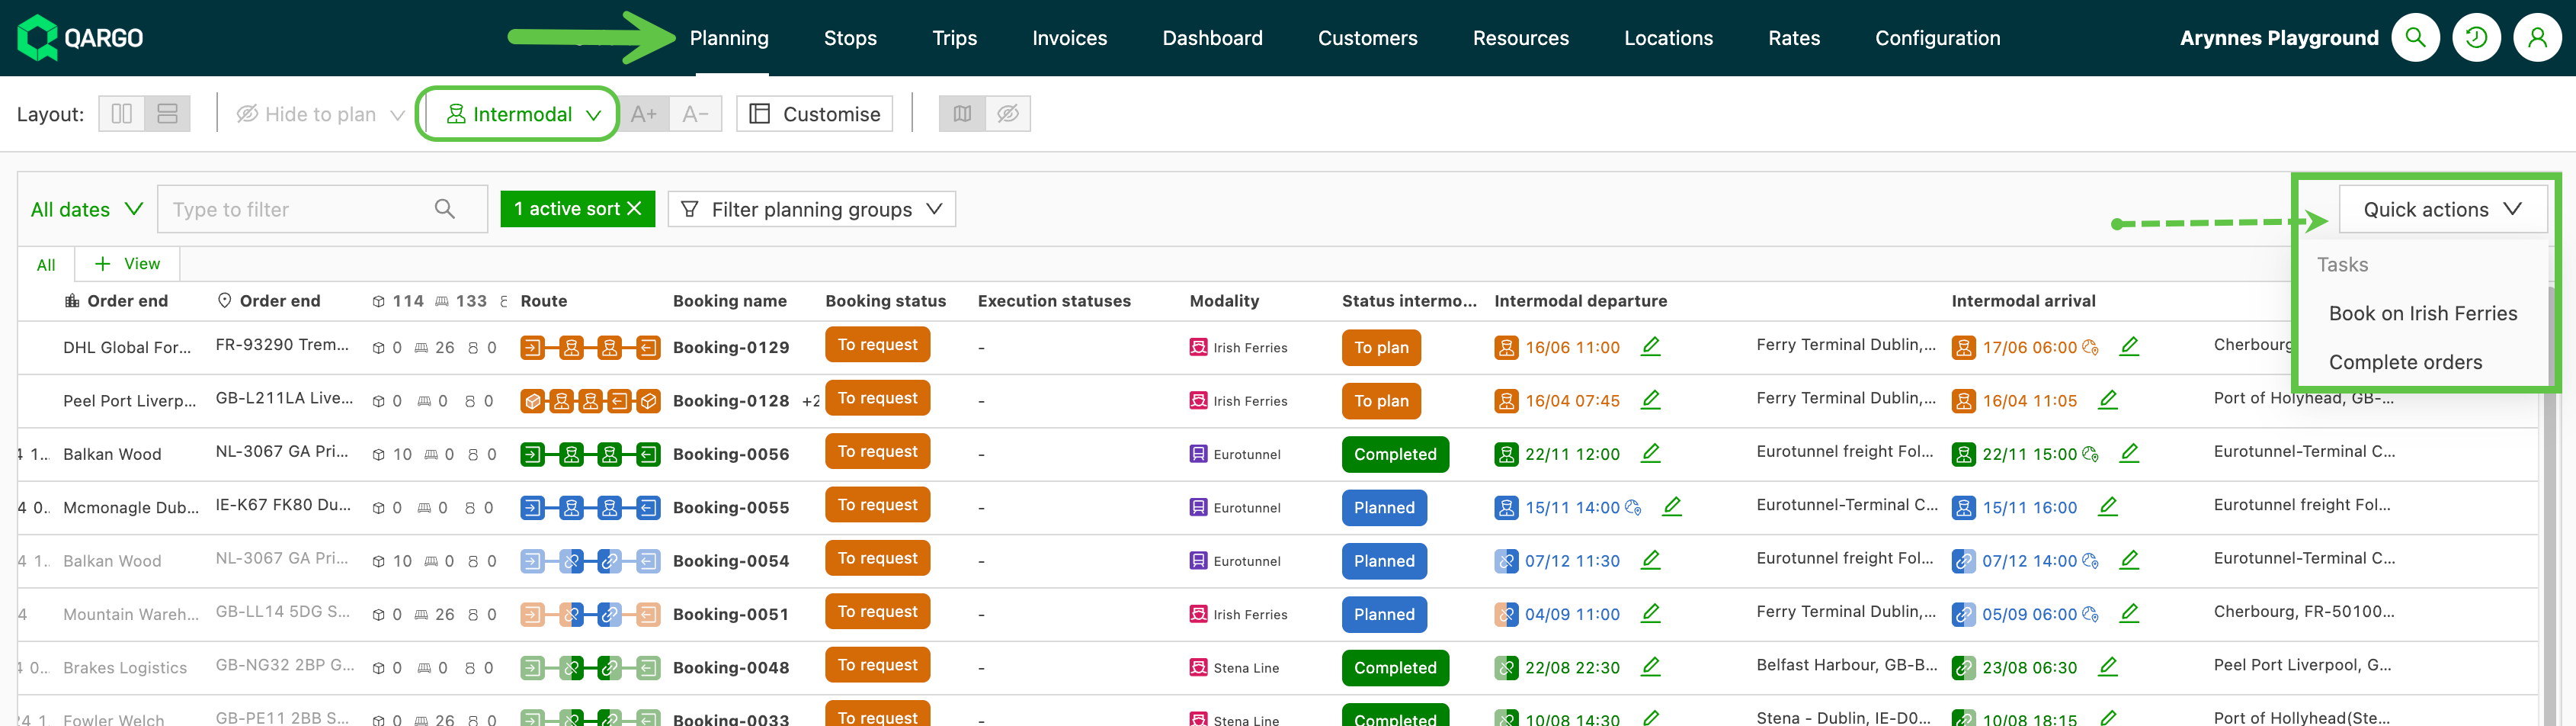
Key benefits:
- Save time by completing multiple loads at once
- Reduce the risk of human error in repetitive tasks
- Maintain a clear overview of pending actions