
Invoices: process sales invoice via Peppol
Configure and send Peppol sales invoices in Qargo: module setup, profile configuration, document attachment selection, invoice workflow, and troubleshooting.
Table of contents
- Introduction
- Module configuration (Qargo Admin only)
- Configure task
- Configure document attachments for Peppol
- Steps to verify CMR attachment inclusion
- Configure a company profile to send invoices
- Recommendations for recipients
- Troubleshooting
- Issues with viewing Peppol invoice attachments
- Error: The recipient does not accept Peppol invoices
Introduction
This article explains how to configure and use the Peppol integration in Qargo. It covers initial module setup and profile configuration, processing and sending invoices, and troubleshooting e-invoices. It is intended for Qargo Admin and Super Admin users and provides step-by-step guidance to ensure invoices are correctly processed and sent.
Module configuration (Qargo Admin only)
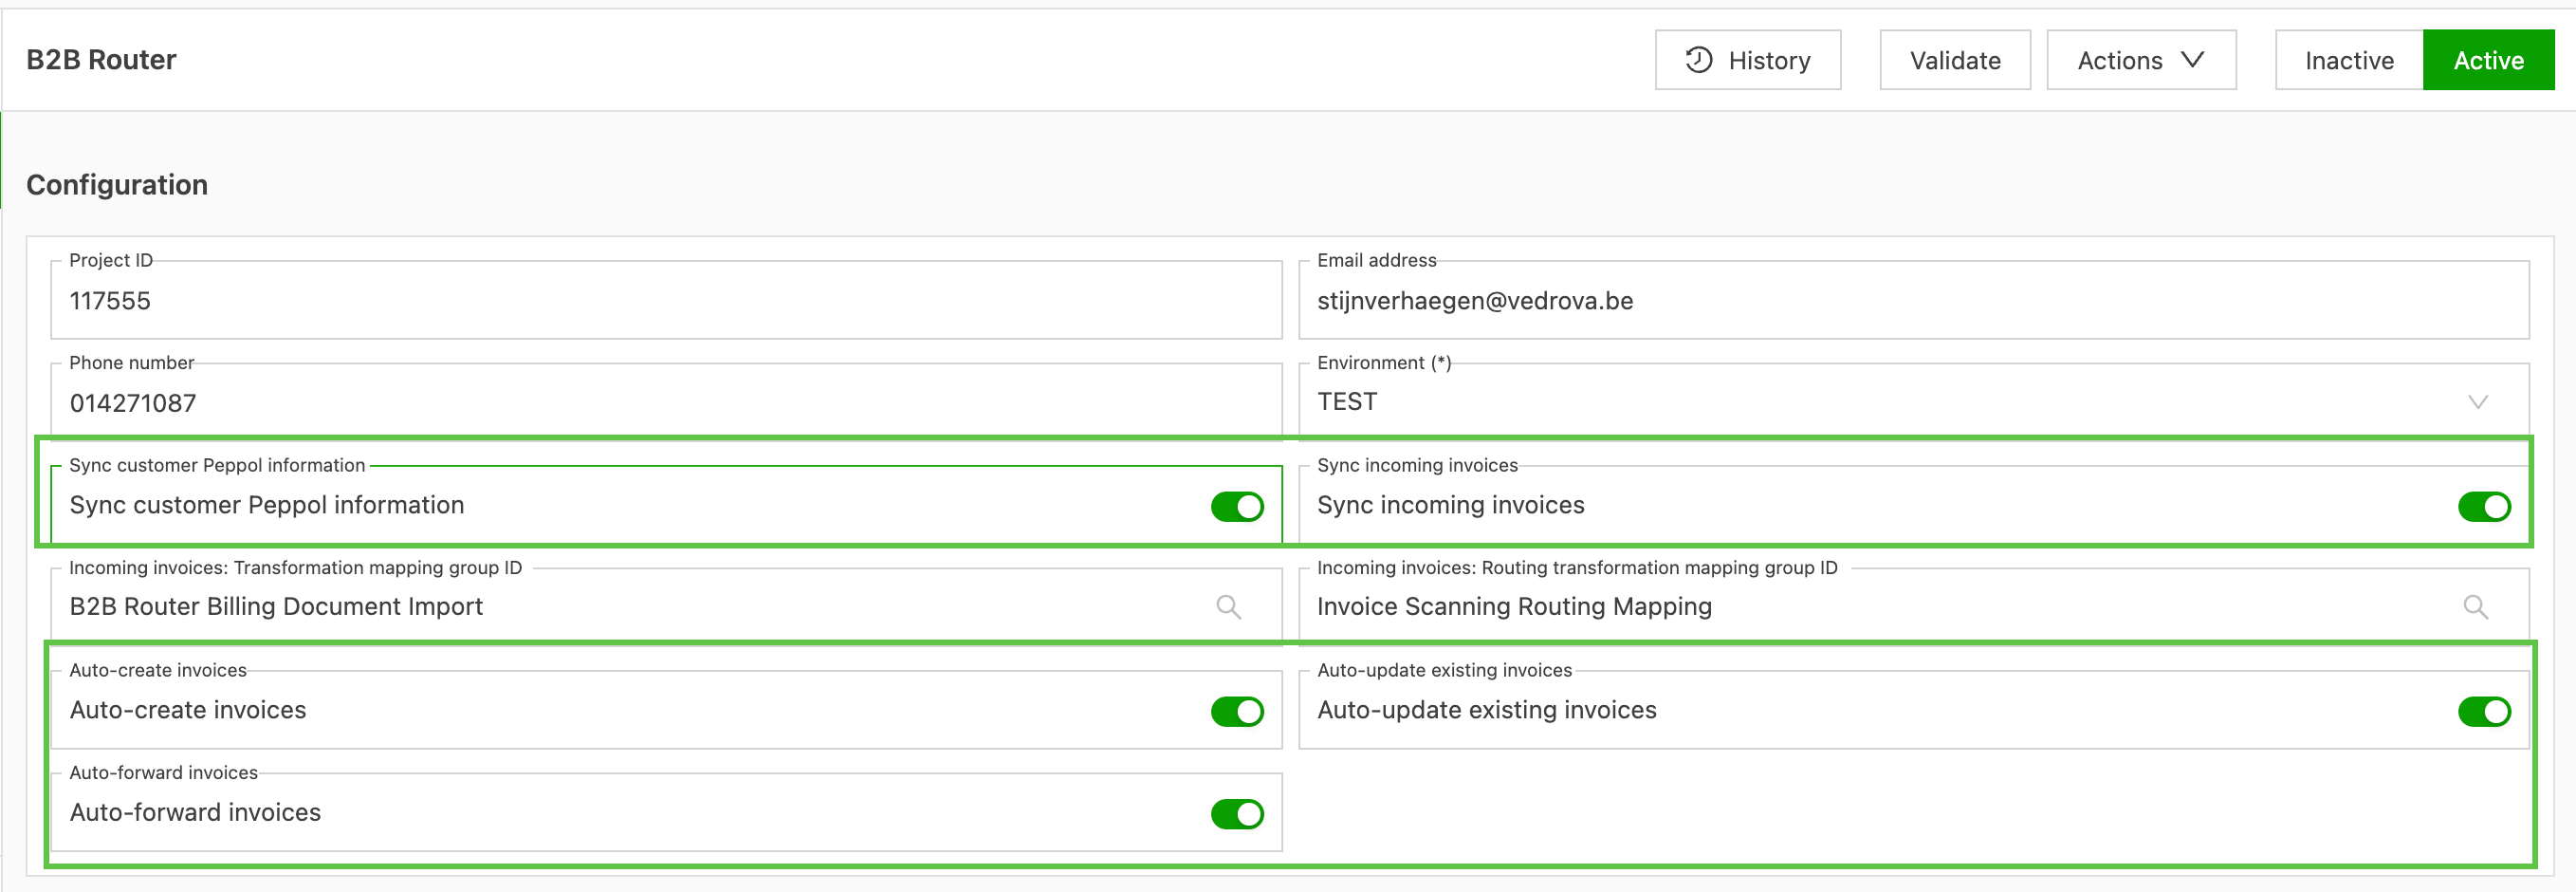
Enable the integration under Configuration > Integrations.
- Toggle on the ‘Sync incoming invoices’ option.
- Toggle on the ‘Sync customer Peppol information’ option. Qargo will then automatically scan the Peppol database and update the fields in the profile.
- B2BRouter: enable or disable the automatic creation and updating of invoices, and automatic forwarding. If disabled, the user still has to approve the invoice, even if the routing mapping gave an outcome other than ‘manual review’.
-
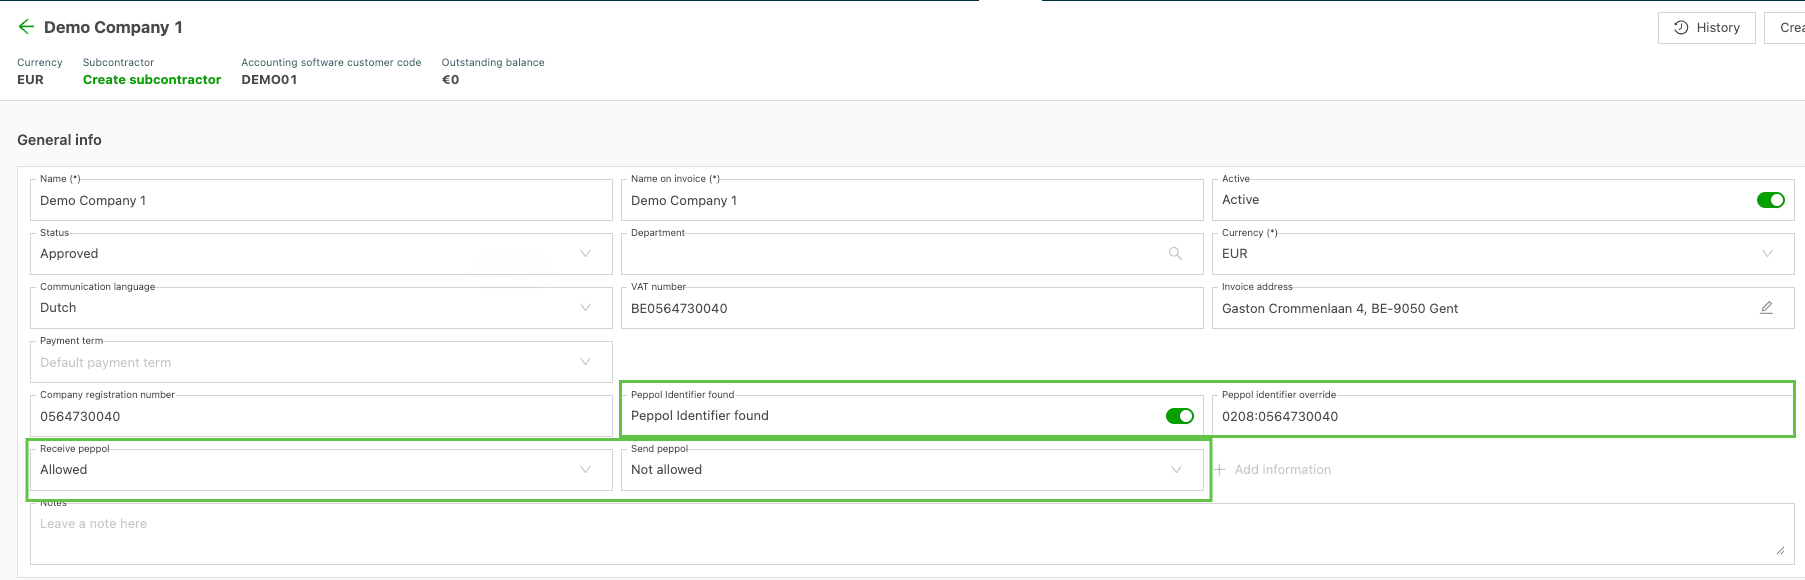
Once enabled, new fields are displayed in the company and contract carrier profiles:
- Peppol identifier override (number)
- Peppol identifier found (toggle)
- Receive Peppol (dropdown)
- Send Peppol (dropdown)
-
If the new fields do not show immediately, navigate to Configuration > Additional fields and enable the Peppol settings from the Customer/contract carrier options.
Configure task
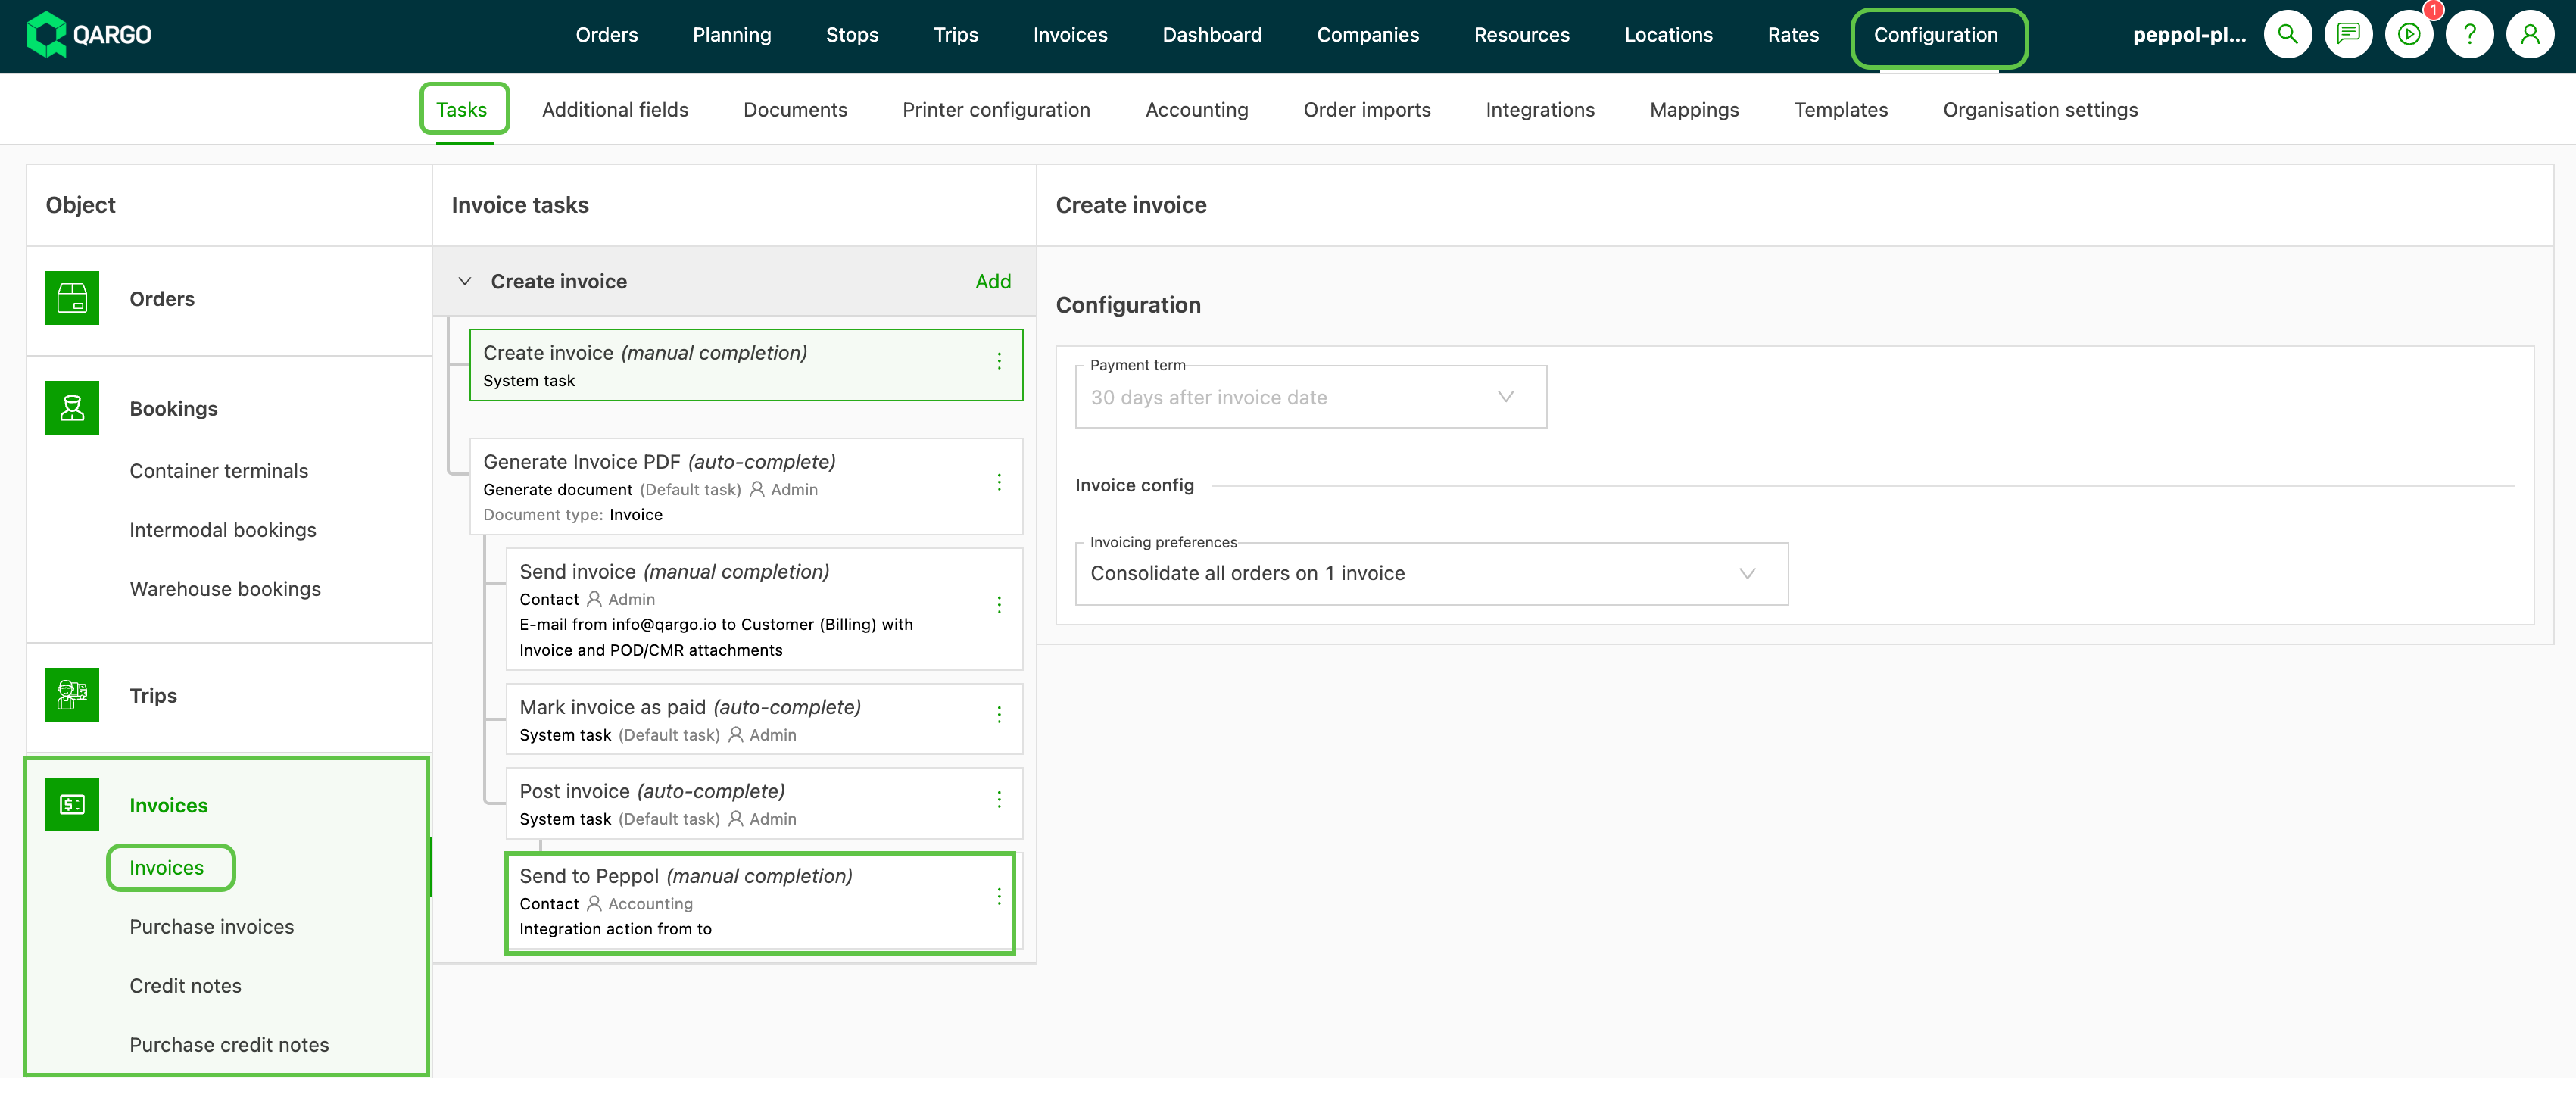
Once the Peppol integration is enabled, the ‘Send to Peppol’ task should be included automatically.
Configure document attachments for Peppol
Configure which document types are attached automatically when invoices are sent via Peppol. This is done directly in the task configuration interface, with no manual parameter editing.
Supported attachment types include:
- proof of delivery
- invoice
- credit memo
- other order documents. For Peppol billing, CMR documents must be in PDF format to be included. Documents stored in the invoice’s Communication section are not included as Peppol attachments, even if labeled “CMR.”
Configure document attachments at task level (Super Admin)
- Navigate to Configuration > Tasks.
- Select Send to Peppol from the Invoices task list.
- Open the Contact panel within the task configuration.
- Select the document types to attach from the attachment configuration fields. Qargo suggests relevant document types based on the types already configured for the task.
- Save the configuration.
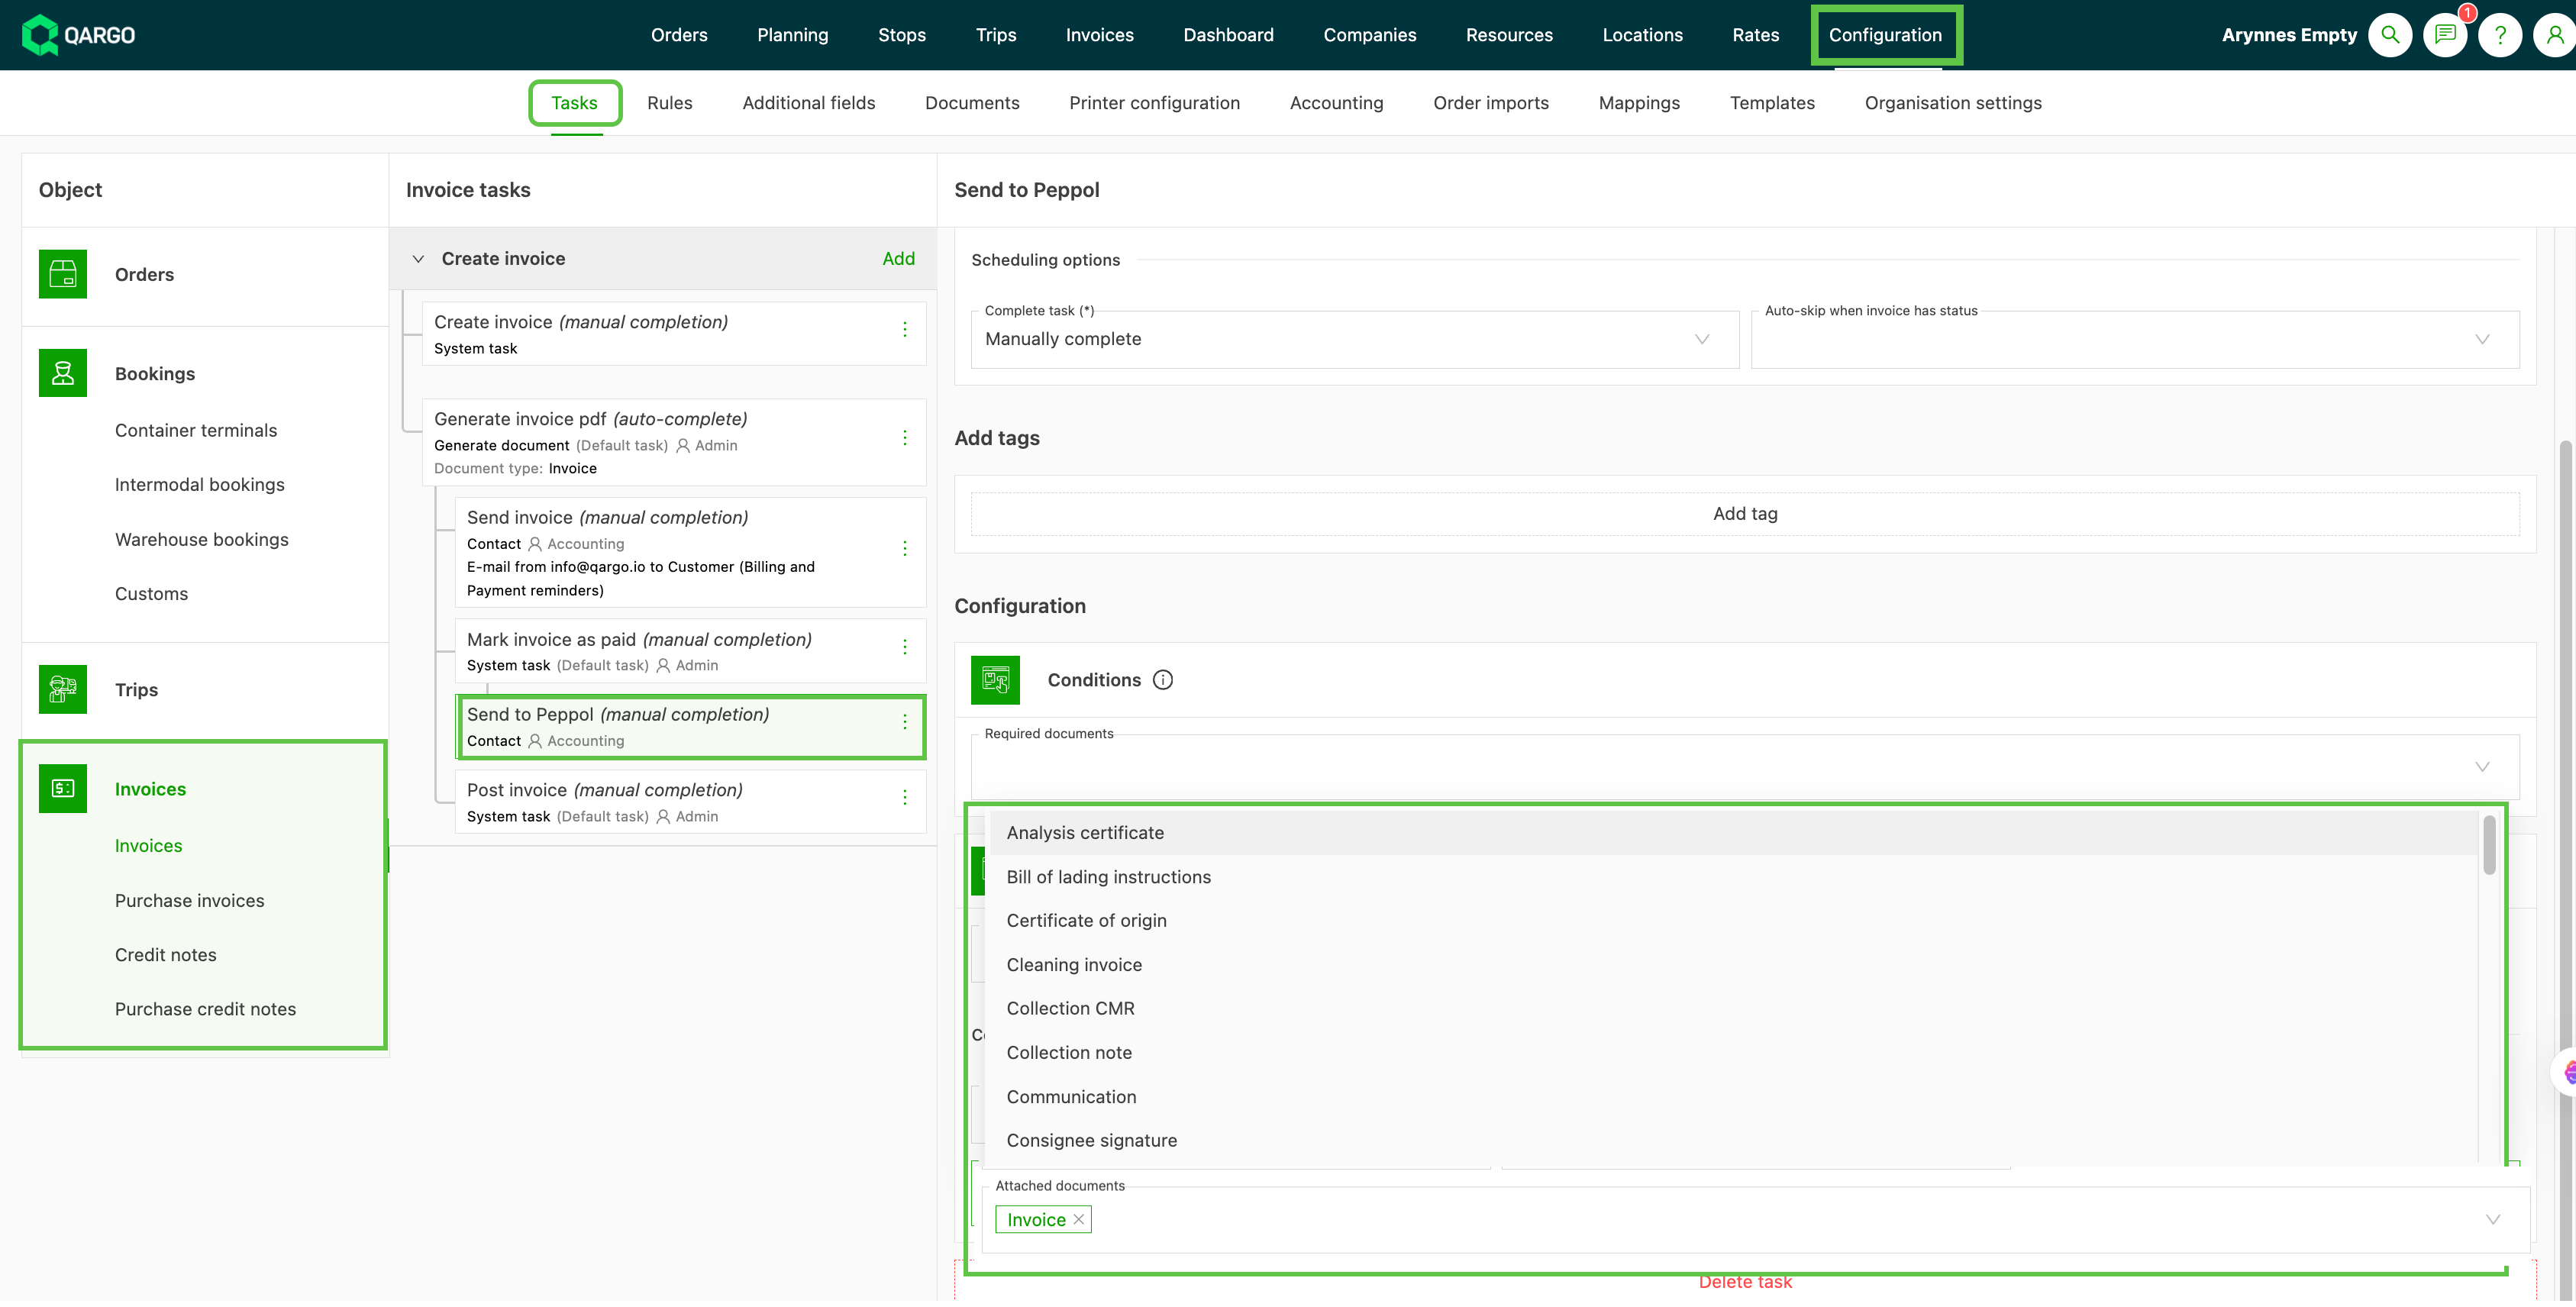
Once configured, the selected document types are included automatically each time the task runs. No manual parameter entry is required.
Override document attachments per company
When a customer does not need certain document types (for example, a customer who does not require proof of delivery), the attachment configuration can be overridden at company level.
Configure a company-level attachment override
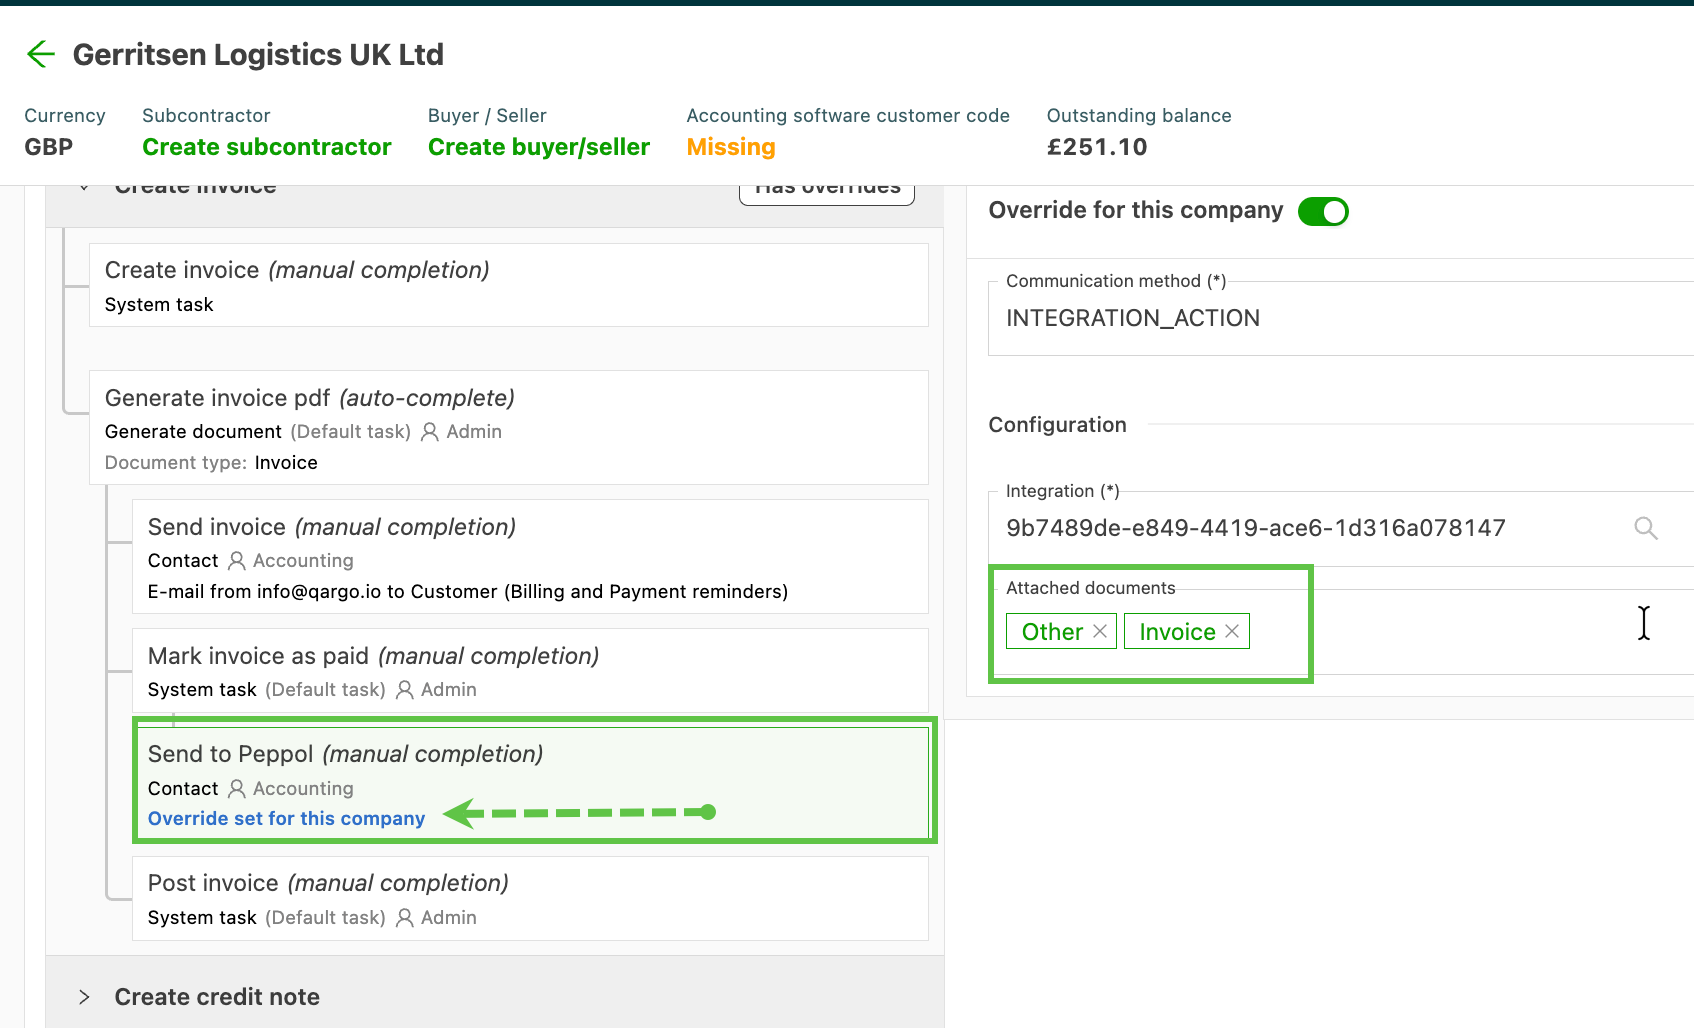
- Navigate to the company profile.
- Scroll to the Tasks section and expand the Create invoice tasks.
- Select the Send to Peppol task.
- Toggle on Override for this company.
- Select the document types to include or exclude for this company in the attachment configuration fields.
- Save the override.
Select attachments manually when triggering from the interface
When a Peppol integration action is triggered directly from the interface (rather than through an automated task run), an attachment selection window is displayed. This works like the existing email contact task flow.
Select attachments manually
- Trigger the integration action from the relevant invoice or document.
- Review the attachment window that appears. It shows the document types suggested by the task configuration.
- Select or deselect document types as needed for this transmission.
- Confirm to send.
Limitations
| Limitation | Details |
|---|---|
| PDF only | Qargo’s Peppol access point supports PDF attachments only. Non-PDF files, such as images, are not transmitted even if selected. |
| File size | The total file size (invoice + all attachments) should not exceed 100 MB. Oversized transmissions will fail. |
| Recipient opt-in required | Recipients must have opted in to receive the specific document types being attached. If the recipient does not support a document type, the invoice will fail. Contact the recipient’s Peppol provider to review their document opt-in settings. |
!!️ When a ‘Required document’ (CMR/POD) is included with the ‘Send to Peppol’ task, at least one document (CMR/POD or other order document) per order is required. Invoices with multiple orders will fail if any order is missing a required document.
Steps to verify CMR attachment inclusion
To confirm whether a CMR document was sent with a Peppol invoice:
- Open the invoice’s UBL XML file.
- Navigate to the
Invoice/cac:AdditionalDocumentReferencesection. - Check the
cbc:IDelement for the CMR file name (document name). If the CMR file name appears in theAdditionalDocumentReferencesection, the attachment was included. If no attachments are listed, the CMR document was not sent.
Configure a company profile to send invoices
To send invoices via the Peppol network, the company profiles linked to the sales invoice or sales credit memo must have certain fields configured.
-
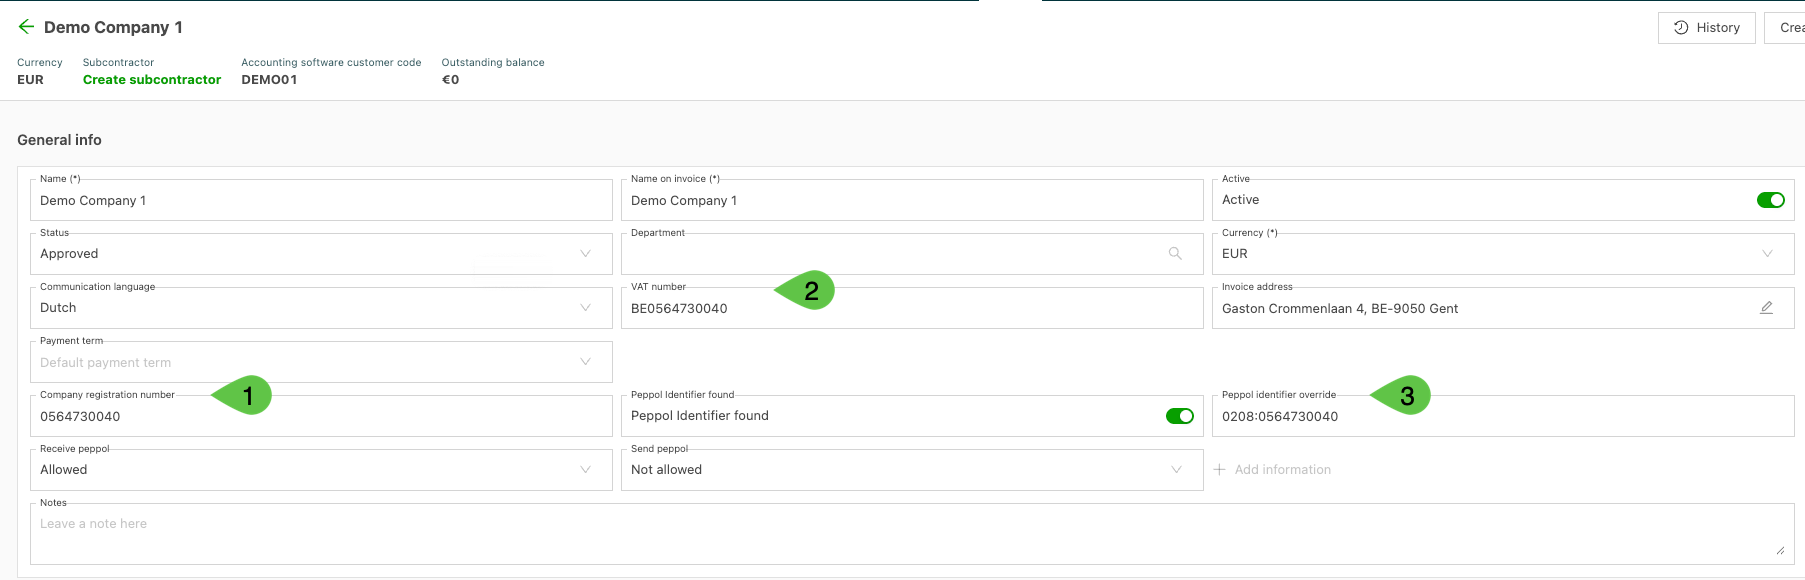
Make sure the company linked to the sales invoice or sales credit memo has one of the relevant fields filled in.
-
Company registration number (also known as ondernemingsnummer), if the company is registered on the Peppol network with this identifier
-
Tax number, if the company is registered on the Peppol network with this identifier
-
Peppol identifier override can be used if the Peppol identifier is not based on the tax number or company ID, or if it is a non-Belgian identifier.
- The identifier uses the following format:
<scheme>:<identifier. It must be a valid Peppol scheme and identifier.
See this link for more information
- The identifier uses the following format:
-
-
Once the integration is active, Qargo automatically scans the Peppol database and updates these fields:
-
Peppol identifier found (toggle)
-
Peppol settings = Allowed/Not_Allowed
- Allowed - The company can send and receive documents over the Peppol integration. The system uses the Peppol ID and routes invoices and credit memos via the Peppol network. A valid Peppol receiver ID is required.
- Not_Allowed - The company is not considered ‘Peppol-enabled’. The system blocks Peppol delivery and reverts to the standard method (email, portal or another e-billing format). This prevents sending via Peppol even if an ID is present.
-
-
Once the main sync is complete, any new companies are updated during the next daily sync with the Peppol database.
-
To process invoices immediately, users can update the fields manually:
- Peppol identifier found: set the toggle to on.
- ‘Receive Peppol’ settings = Allowed
- Peppol identifier (number): this is an override field. Leave it blank unless the company uses an alternative identifier, for example a DUNS number. Qargo automatically scans the Peppol database for the associated identifier.
- Peppol identifier found (toggle): toggle on to ensure invoices are received. Qargo sets this automatically on sync, confirming that the company’s Peppol registration is valid and active.
- Send Peppol settings (dropdown): set to Allowed. This authorizes the company to send invoices into Qargo. Qargo sets this automatically on sync.
- Receive Peppol (dropdown): set to Allowed. This authorizes the company to receive invoices sent via Qargo. Qargo sets this automatically on sync.
Custom options
-
Customization options include adding:
- Customer reference numbers (additional field, activation required)
- Purchase order numbers (additional field, activation required)
- Document attachments (proof of delivery, CMR, credit memo and other document types)
Recommendations for recipients
To ensure smooth handling of Peppol invoices and avoid common issues:
- Activate Peppol reception: confirm that the Peppol provider has invoice reception enabled.
- Configure appropriately: regularly review the Peppol settings in both the recipient’s tool and Qargo to ensure compatibility.
- Validate tools: use an up-to-date, fully functional Peppol solution so invoices and attachments are displayed correctly. Following these best practices significantly reduces errors and disruptions in invoice exchange.
Sales invoice workflow
The sales invoice workflow sends invoices through the Peppol network in the following steps:
-
Create invoice: create the Qargo sales invoice following the existing business process.
- Generate a PDF of the invoice.
-
Post invoice: run the Post invoice task as part of the invoice workflow.
- Note: the ‘Send to accounting’ task must be complete before the invoice or credit memo can be sent to Peppol.
- The invoice must have a posted status in the accounting software before it is sent to Peppol.
- A hard-coded check verifies this.
-
Submit to Peppol: submit the invoice to Peppol with the ‘Send to Peppol’ task.
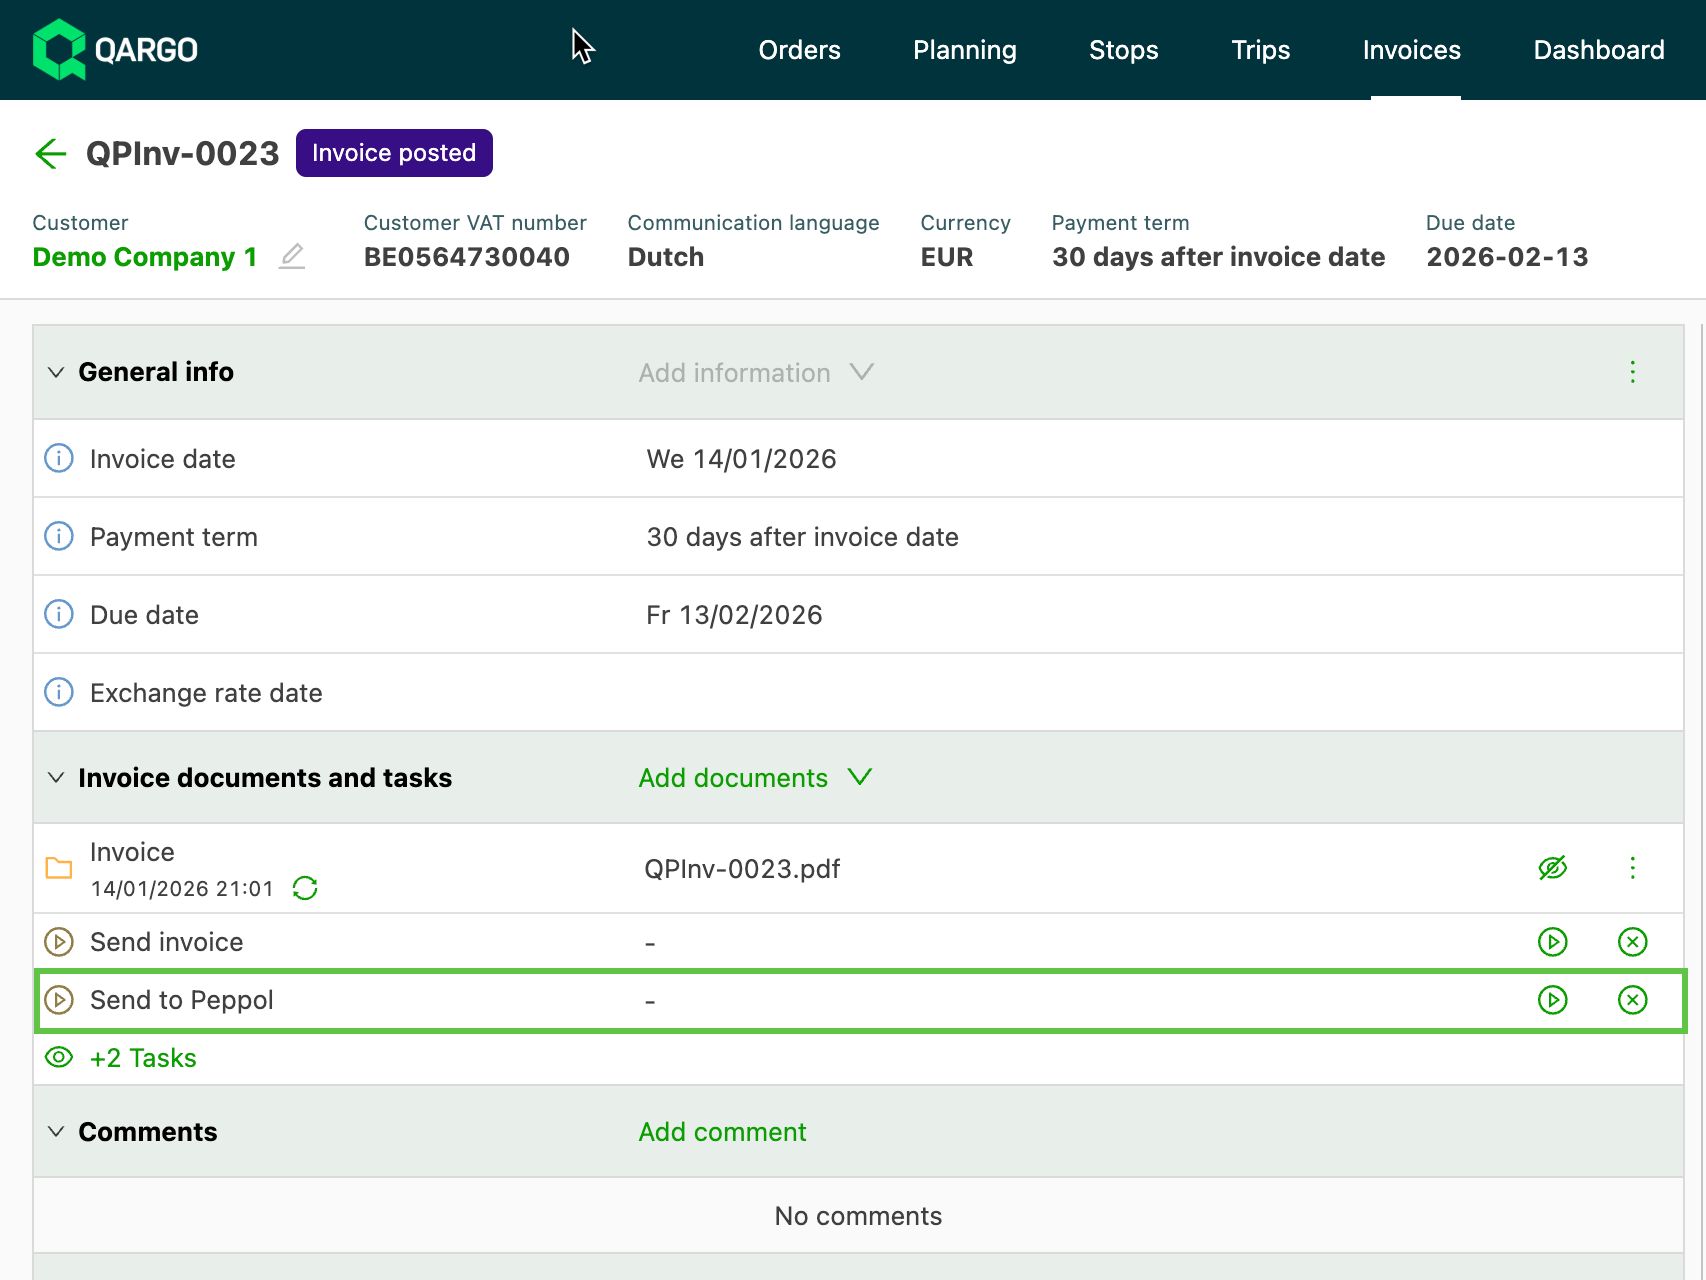
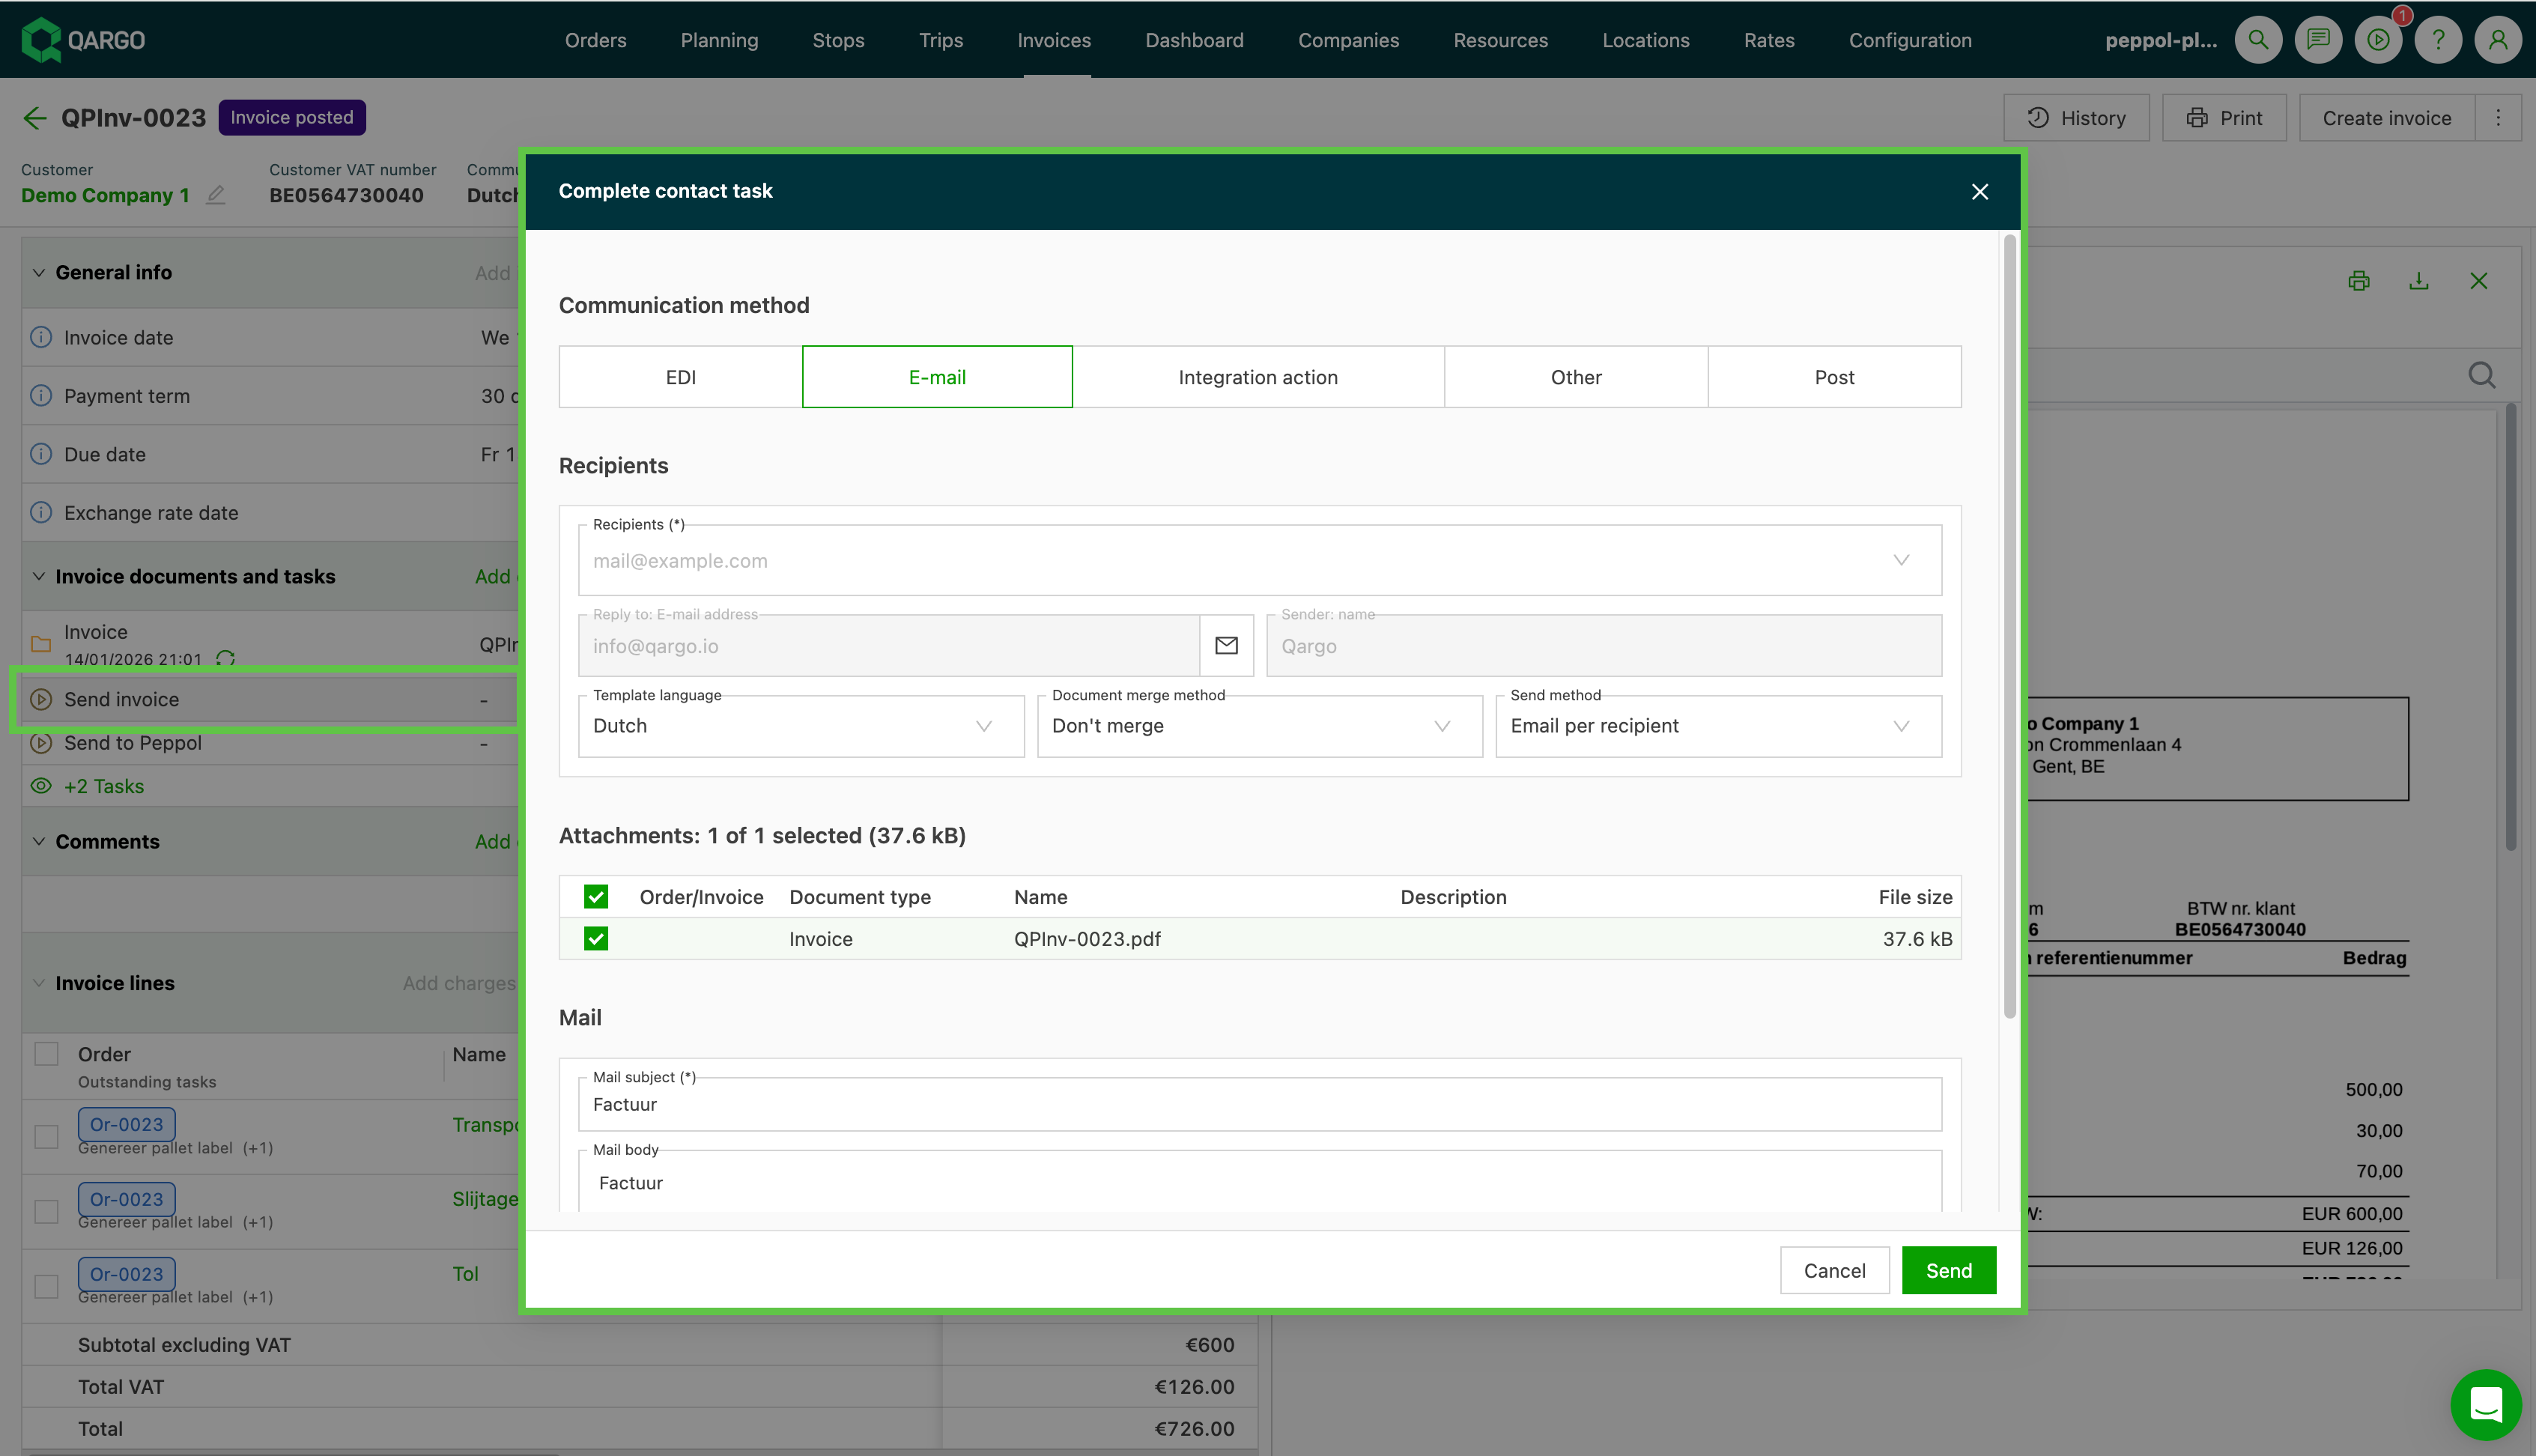
• Use the regular ‘Send invoice’ task to generate and send a proforma invoice for approval before completing the ‘Send to Peppol’ task.
Troubleshooting
Qargo uses the same error message handling for Peppol invoices.
-
Open the Errors view by clicking the icon in the top-right corner.
-
Use the filter on the Name column to filter for a specific task type.
- Tip: type ‘peppol’ in the search field to see the associated tasks.
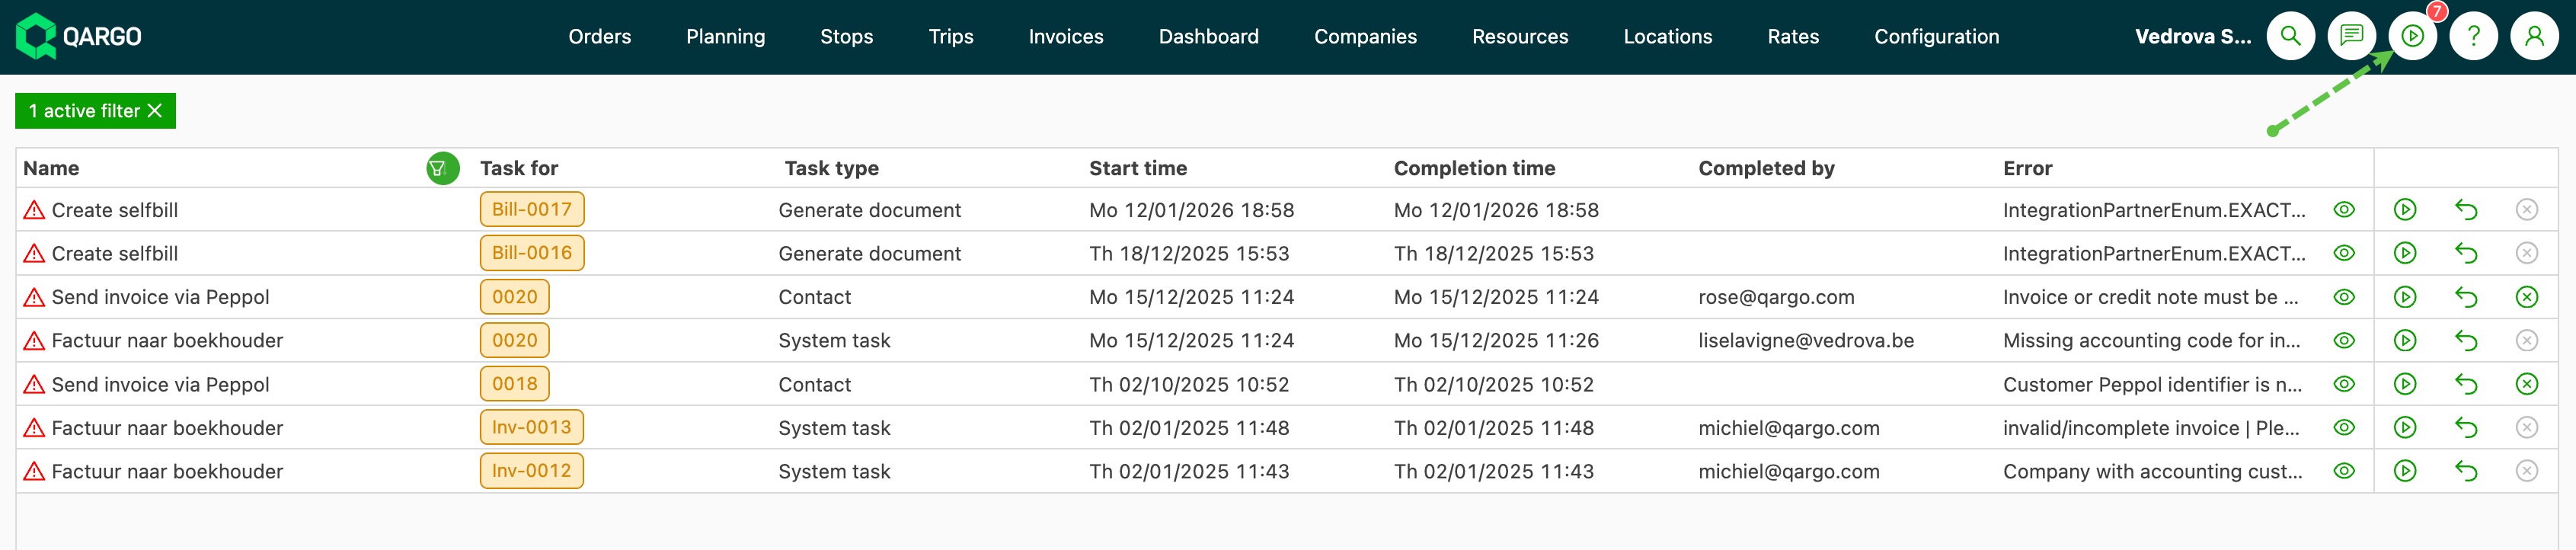
- Correct the error based on the message and trigger the task again.
General first step for all troubleshooting:
Check that all the correct Peppol fields are enabled on the company profile:
- Peppol identifier found: toggle is on
- Send/Receive Peppol settings: set to Allowed
Peppol failed for a company outside Belgium. When Quick Actions are used to update invoices in bulk, companies outside Belgium are skipped, as they do not have the same Peppol requirements.
Resolution: Review the batch of records being updated in bulk and check for companies or contract carriers outside Belgium. Send the invoice manually with the ‘Send invoice’ task.
Invoice not posted. The invoice does not yet have a posted status in the accounting software, so the ‘Send to Peppol’ task did not complete.
Resolution: Update the invoice status to Posted and trigger the task again.
Company doesn’t accept invoices. The company or contract carrier profile is not enabled for Peppol, the Peppol settings have not been updated, or they are set to Not_Allowed.
Resolution: Check the company or contract carrier profile. Under the general information, make sure the Peppol settings are set to Allowed and Peppol identifier found is toggled on. Error: Invoices set to ‘Peppol receiving – not allowed’ This error means the recipient has been configured to block Peppol invoice reception. To resolve it:
- Adjust the Peppol settings in the recipient’s profile: set ‘Peppol receiving’ to ‘Allowed.’
- Resend the invoices with the ‘Send to Peppol’ feature in Qargo.
Invoice with attachments fails. As part of the Peppol registration, companies opt in to receive specific document types, such as CMR or POD. If an unsupported document is included with the invoice, the invoice fails. There is also a file size limit: a maximum of 100 MB is recommended. If a CMR document was not delivered with a Peppol invoice, the cause may be the file type. Peppol supports PDF attachments only. Image files, such as JPEGs, are not included or converted automatically. To ensure delivery:
- Save or export the CMR document as a PDF.
- Attach the PDF version to the invoice before sending.
Resolution:
- Check that the total file size of the invoice and embedded attachments is less than 100 MB.
- Contact the company and request a Peppol review. Ask them to review the Peppol ‘document opt-in’ and enable the specific document type. Trigger the ‘Send to Peppol’ task again once it is enabled.
If the task previously used the include_cmr JSON parameter and now fails unexpectedly, check that the attachment configuration was migrated correctly in Configuration > Tasks > Send to Peppol. Contact Qargo support if the configuration is blank or incorrect after migration.
Issues with viewing Peppol invoice attachments
Peppol invoices are XML files that may include attachments. If a recipient reports that they cannot see attachments, the issue is most likely on the recipient’s side. Attachments in Peppol invoices must be opened and displayed with the recipient’s Peppol provider tool or interface. To resolve visibility issues:
- Recipients should use their Peppol solution’s features to locate and view attachments embedded in the XML files.
- If the attachments still cannot be viewed, the recipient should consult the Peppol provider’s documentation or support resources for further guidance.
Error: The recipient does not accept Peppol invoices
This error means the recipient’s Peppol participant configuration is not set up to receive invoices, or reception is not activated. This setting is managed by the recipient’s Peppol provider or access point. What needs to be done:
- The recipient must enable Peppol invoice reception in the Peppol provider’s interface. Without activation, the recipient cannot accept the invoice, even if it is sent correctly from Qargo.