
Data import: Importing contact data
A comprehensive guide to importing contact data, which links individuals to companies already in the system, ensuring an accurate database for communication.
Table of contents
- 📖 Key terminology
- ✅ Critical import requirements for contacts
- 🛠️ Step-by-step data import process
- Step 1: Download the template
- Step 2: Fill in the Excel template
- Step 3: Submit for upload
- 📝 Details of the contact import template
- 🔎 Troubleshooting common contact import errors
- ✨ Best practices for importing contacts
- ➡️ What to do next
- 📈 Use cases for contact import
Importing contact data is the logical next step after companies have been added to a Qargo tenant. This process allows bulk creation of individuals linked to specific companies. It keeps the database complete and accurate for order management and communication. This article outlines the specific requirements, best practices and common issues related to importing contact data.
📖 Key terminology
The following terms are defined for clarity throughout this guide.
- Contact: An individual associated with a company record, typically used for communication about orders, billing or operations.
- Company name: The name of the company a contact is linked to. This must exactly match a company already in the Qargo system.
- Company accounting code: A unique identifier from an external system, used to link an individual to the correct company.
- Role: A field that specifies the purpose or job function of a contact (e.g., ‘Dispatcher’).
✅ Critical import requirements for contacts
Before importing contact data, consider the following requirements and warnings to ensure data integrity.
- Company prerequisite: A company record must already exist in the Qargo system before a contact can be imported and linked to it. The contact import will fail if the specified company record cannot be found.
- Unique company identification: To link a contact successfully, the Company name and Accounting code in the contact template must exactly match the corresponding company record already in Qargo. If the Accounting code is empty, the system uses the Company name as a fallback.
🛠️ Step-by-step data import process
Step 1: Download the template
A specific spreadsheet template is available for uploading contact data. To edit and upload the data, a copy of the template must be downloaded:
- Click the link: Contact data import template
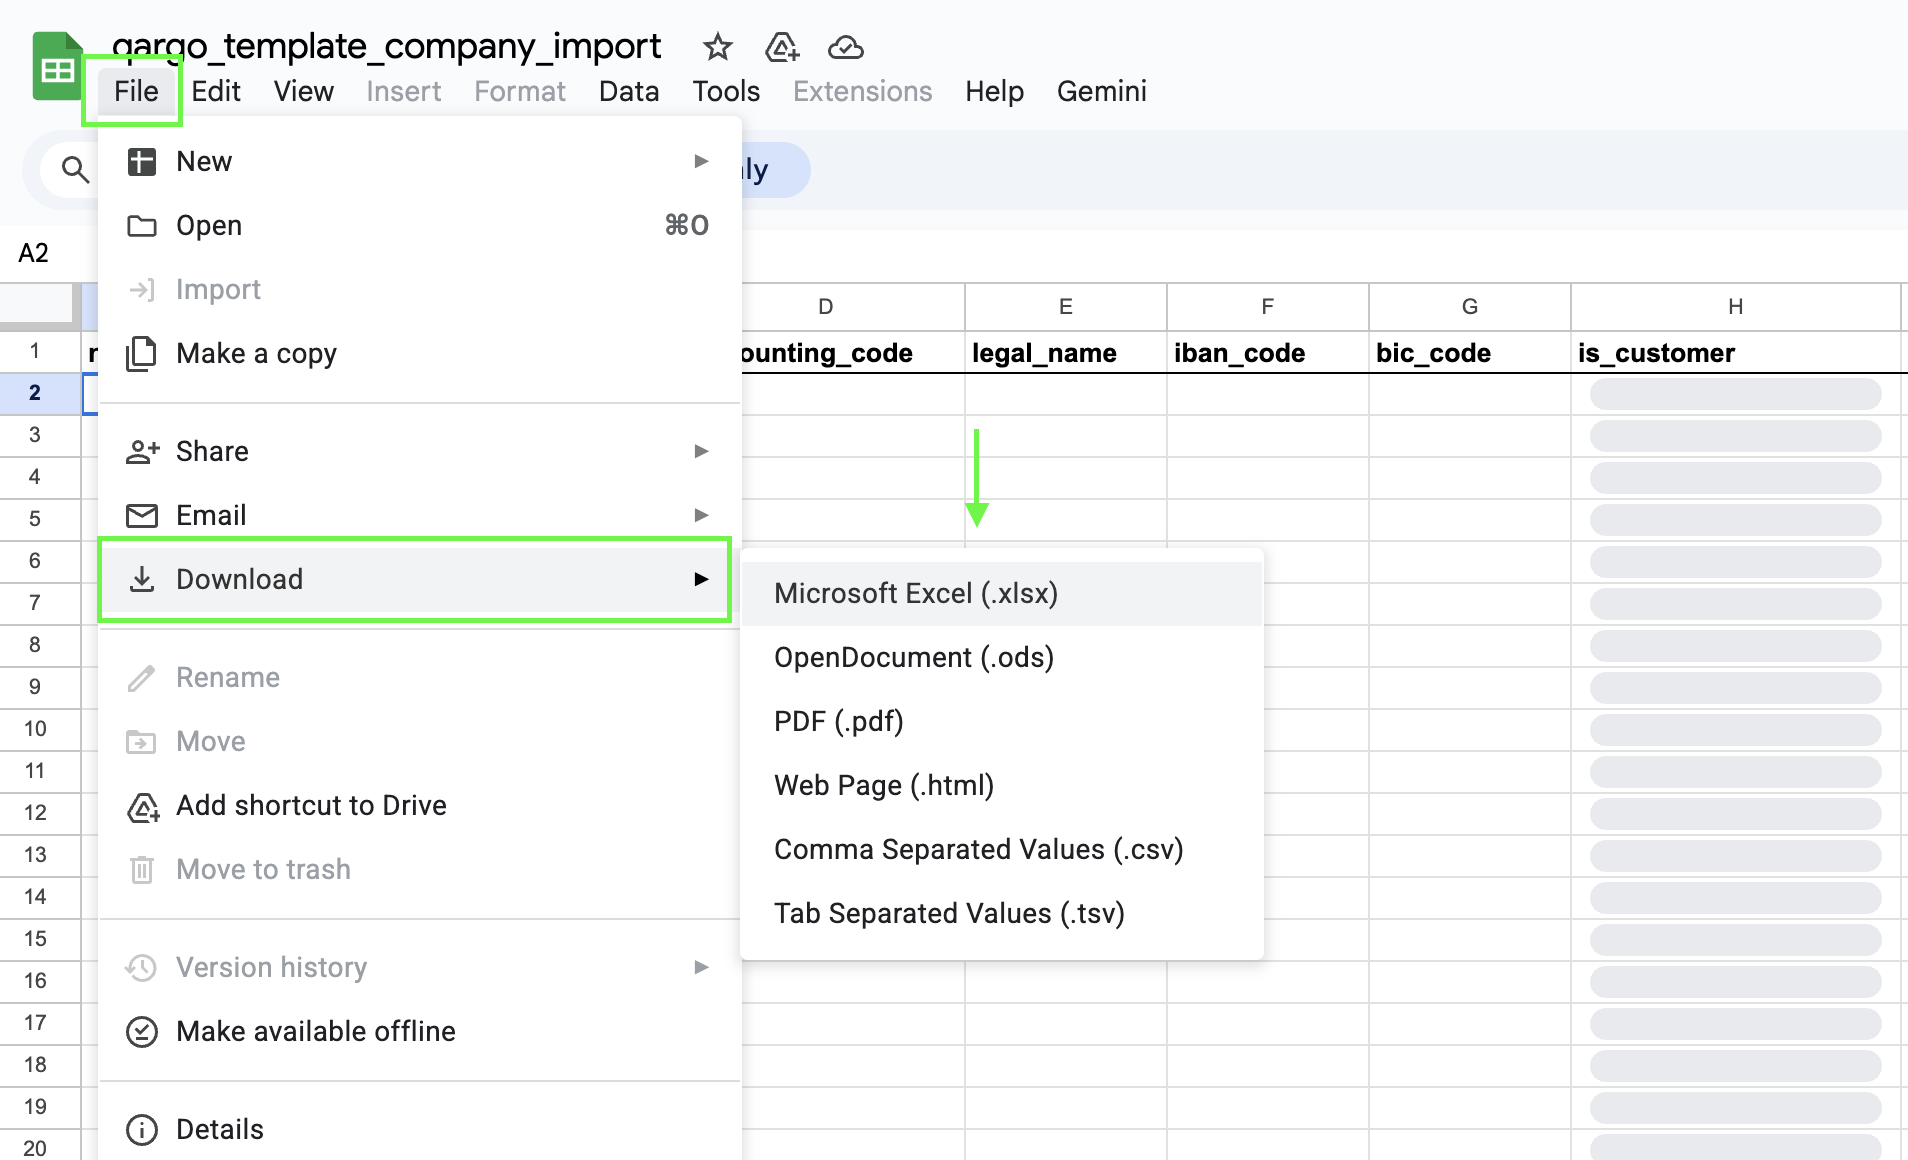
- Once the template opens, go to File and select Download
- Save the template (in .xlsx or .csv format) to a computer and begin entering the company data.
Step 2: Fill in the Excel template
Open the template and fill it in with the required data. The template contains column headers that correspond to the fields in Qargo.
- Required fields: Fill out all the required fields (a complete list of required fields is in the next section of this article). An import will fail if these fields are left blank.
- Formatting: Pay close attention to the specified data format (e.g., dates, numbers, text).
Step 3: Submit for upload
- During onboarding: Work directly with the onboarding manager to upload the initial business data. The onboarding manager guides the process and ensures a successful import.
- After onboarding: For all future data updates and imports, contact the account manager. The account manager assists with the upload process and provides ongoing support.
📝 Details of the contact import template
The following table gives a detailed, field-by-field explanation of the Excel template for contact import. It includes data formats, required fields and best practices for filling in each column.
| Column name | Required/optional | Remarks | Example |
|---|---|---|---|
| company_name | Required | Customer name used in the application | Qargo |
| company_accounting_customer_code | Required | Unique ID. It’s ‘accounting_code’ in the customer_import | 134 |
| company_is_customer | Optional | TRUE or null | |
| company_is_subcontractor | Optional | TRUE or null | |
| name | Required | Name of the contact | Thomas Smith |
| Required | Email address of the contact | thomas.smith@qargo.io | |
| job_title | Optional | ||
| has_portal_access | Optional | Gives a contact access to their company portal. | TRUE or null |
| note | Optional | Extra text information about the contact. This usually contains useful information that does not fit into one of the other categories described here. | |
| phone | Optional | +324723372 | |
| has_role_billing | Optional | To send invoices to this contact | TRUE or null |
| has_role_operations | Optional | To send operational documents such as transport orders or CMRs. | TRUE or null |
| has_role_cmr_processing | Optional | TRUE or null | |
| has_role_other | Optional | To use in individually created tasks. | TRUE or null |
| custom_fields__example | Optional | To import custom field values. Note: the format uses a double underscore (__) to connect the prefix custom_fields to the unique field ID |
🔎 Troubleshooting common contact import errors
This section covers specific errors that may come up when importing contact data.
- Company record not found: This is the most common error. It occurs when a contact’s Company name or Accounting code does not exactly match an existing company in Qargo. All company details must be identical to an existing record.
- Missing mandatory fields: The import will fail for any row where a mandatory field is left blank.
- Sheet name: The sheet in the Excel template file must be named exactly ‘Import’. Any other name will cause an error when uploading the file.
- Phone number format: The phone number should contain the country code followed by the number, without any spaces (e.g., +3212345678). In Excel/Google Sheets, set the column format to Text and add a ’ before the country code and phone number in the formula cell (i.e., ‘+3212345678) so the phone number displays correctly**.** See the example below:

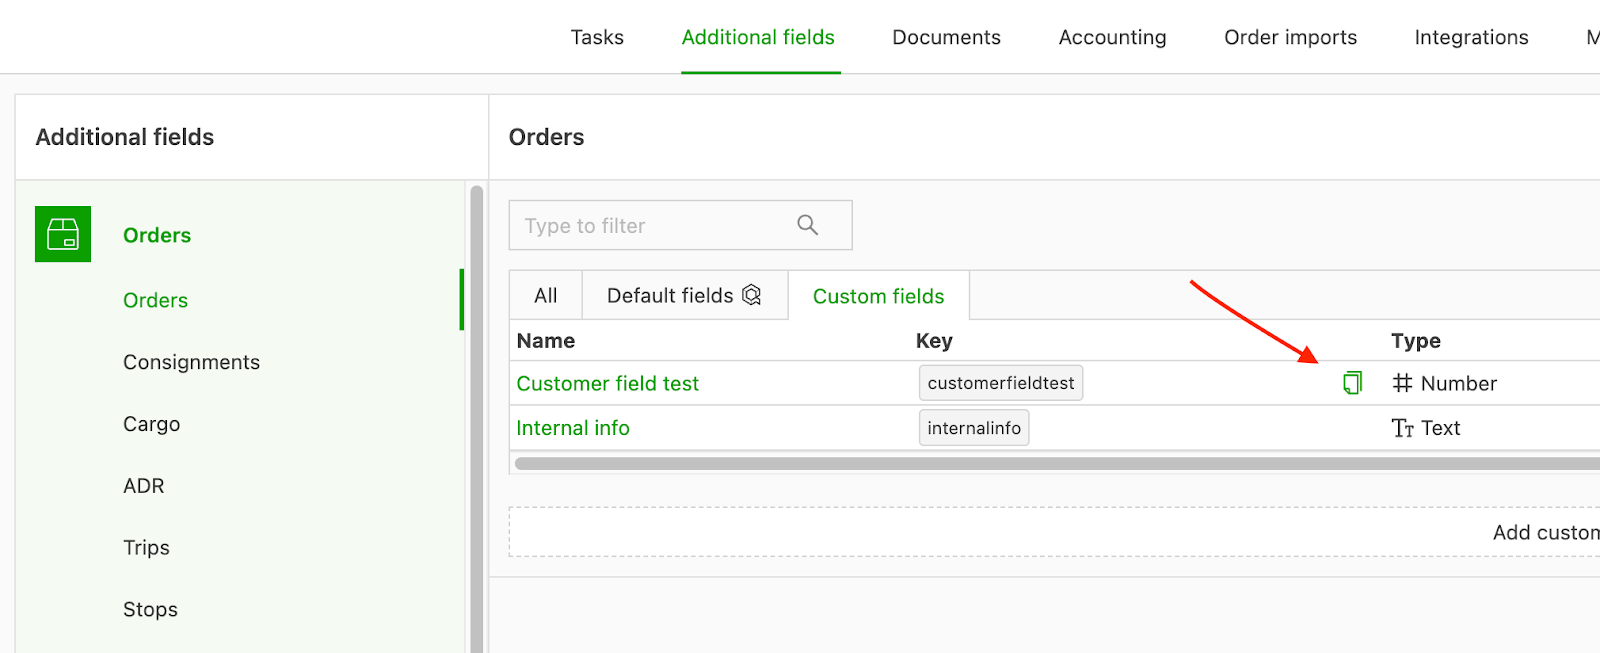
- Custom fields: The column name must follow the convention custom_field__[ID] (keep the double underscore that connects the prefix custom_field to the unique field ID). Retrieve the specific ID from the Qargo organization settings. Click the copy button next to the custom field to copy its ID:
- Case-sensitive column headers: Column headers must be entered with the correct casing (e.g.,
vat_number, notVAT_number). With incorrect casing, the system does not recognize the header, so the data in that column is silently ignored and not imported. - Leading apostrophe errors: Data in a cell cannot begin with an apostrophe (’). If an apostrophe is used, the system will not recognize the value, and an error may occur. This rule does not apply only if the article explicitly states that an apostrophe should be used for a specific field.
✨ Best practices for importing contacts
Consider the following best practices for a smooth and accurate import.
- Make sure company data is complete: Before importing contacts, verify that all associated companies have already been imported into the system.
- Keep data consistent: Pay close attention to the Company name and Accounting code fields in the contact template. Any spelling mistakes, extra spaces or different capitalization will cause the link to fail.
➡️ What to do next
Once contacts have been imported, the system is ready for order creation and communication. The next logical steps include:
- Importing drivers: If required, internal or contract carrier drivers can now be imported.
- Importing vehicles: The vehicle fleet can be populated by importing vehicles owned by the company or its contract carriers.
📈 Use cases for contact import
Importing contact data is a valuable tool for several key business processes.
- Initial tenant setup: After companies are imported, contacts can be added in bulk to populate the system and make it ready for operational use.
- Adding contacts to existing companies: For companies already in the system, this is a quick and efficient way to add multiple new contacts at once.