
Data import – importing company data
A comprehensive guide to importing company data, which is the foundational step for populating a Qargo tenant with customers, suppliers, and contract carriers.
Table of contents
- 📖 Key terminology
- ✅ Critical import requirements for companies
- 🛠️ Step-by-step data import process
- Step 1: Download the template
- Step 2: Fill in the Excel template
- Step 3: Submit for upload
- 📝 Details of the company import template
- 🔎 Troubleshooting common company import errors
- 📈 Use cases for company import
The import of company data is a foundational step in populating a Qargo tenant. This process supports the bulk creation of customers, suppliers, and contract carriers. It is also a prerequisite for importing contacts and contract carrier resources. This article outlines the specific requirements and best practices for a successful company data import.
📖 Key terminology
The following terms are defined for clarity throughout this guide.
- Company: An overarching term for any business entity managed in Qargo, including customers, suppliers, and contract carriers.
- Customer: A company that receives services and is invoiced for them.
- Contract carrier: A company that provides transportation services to a Qargo user.
- Accounting code: A unique identifier from an external accounting system. It links a company in Qargo to its corresponding entry in the other system. This is a critical field for data synchronization.
- Active/inactive: The status of a company in Qargo. An “inactive” company remains in the database but cannot be used in new orders or assignments.
✅ Critical import requirements for companies
Before importing company data, consider the following requirements and warnings to ensure data integrity.
- Accounting code for updates: Qargo uses the Accounting code as the unique identifier to recognize and update an existing company. If a company is re-imported without an accounting code, or with a different one, a duplicate entry is created. Accounting codes must be consistent across all imports for a given company.
- Prerequisite for contacts: A company record must exist in Qargo before a contact can be linked to it. The contact import template requires a valid company name and accounting code.
- Contract carriers: A contract carrier must first be created as a company in Qargo before resources such as drivers or vehicles can be imported for it.
🛠️ Step-by-step data import process
Follow these steps to successfully import company data.
Step 1: Download the template
A specific spreadsheet template is available for uploading company data. To edit and upload the data, a copy of the template must be downloaded:
- Click the link: Company data import template
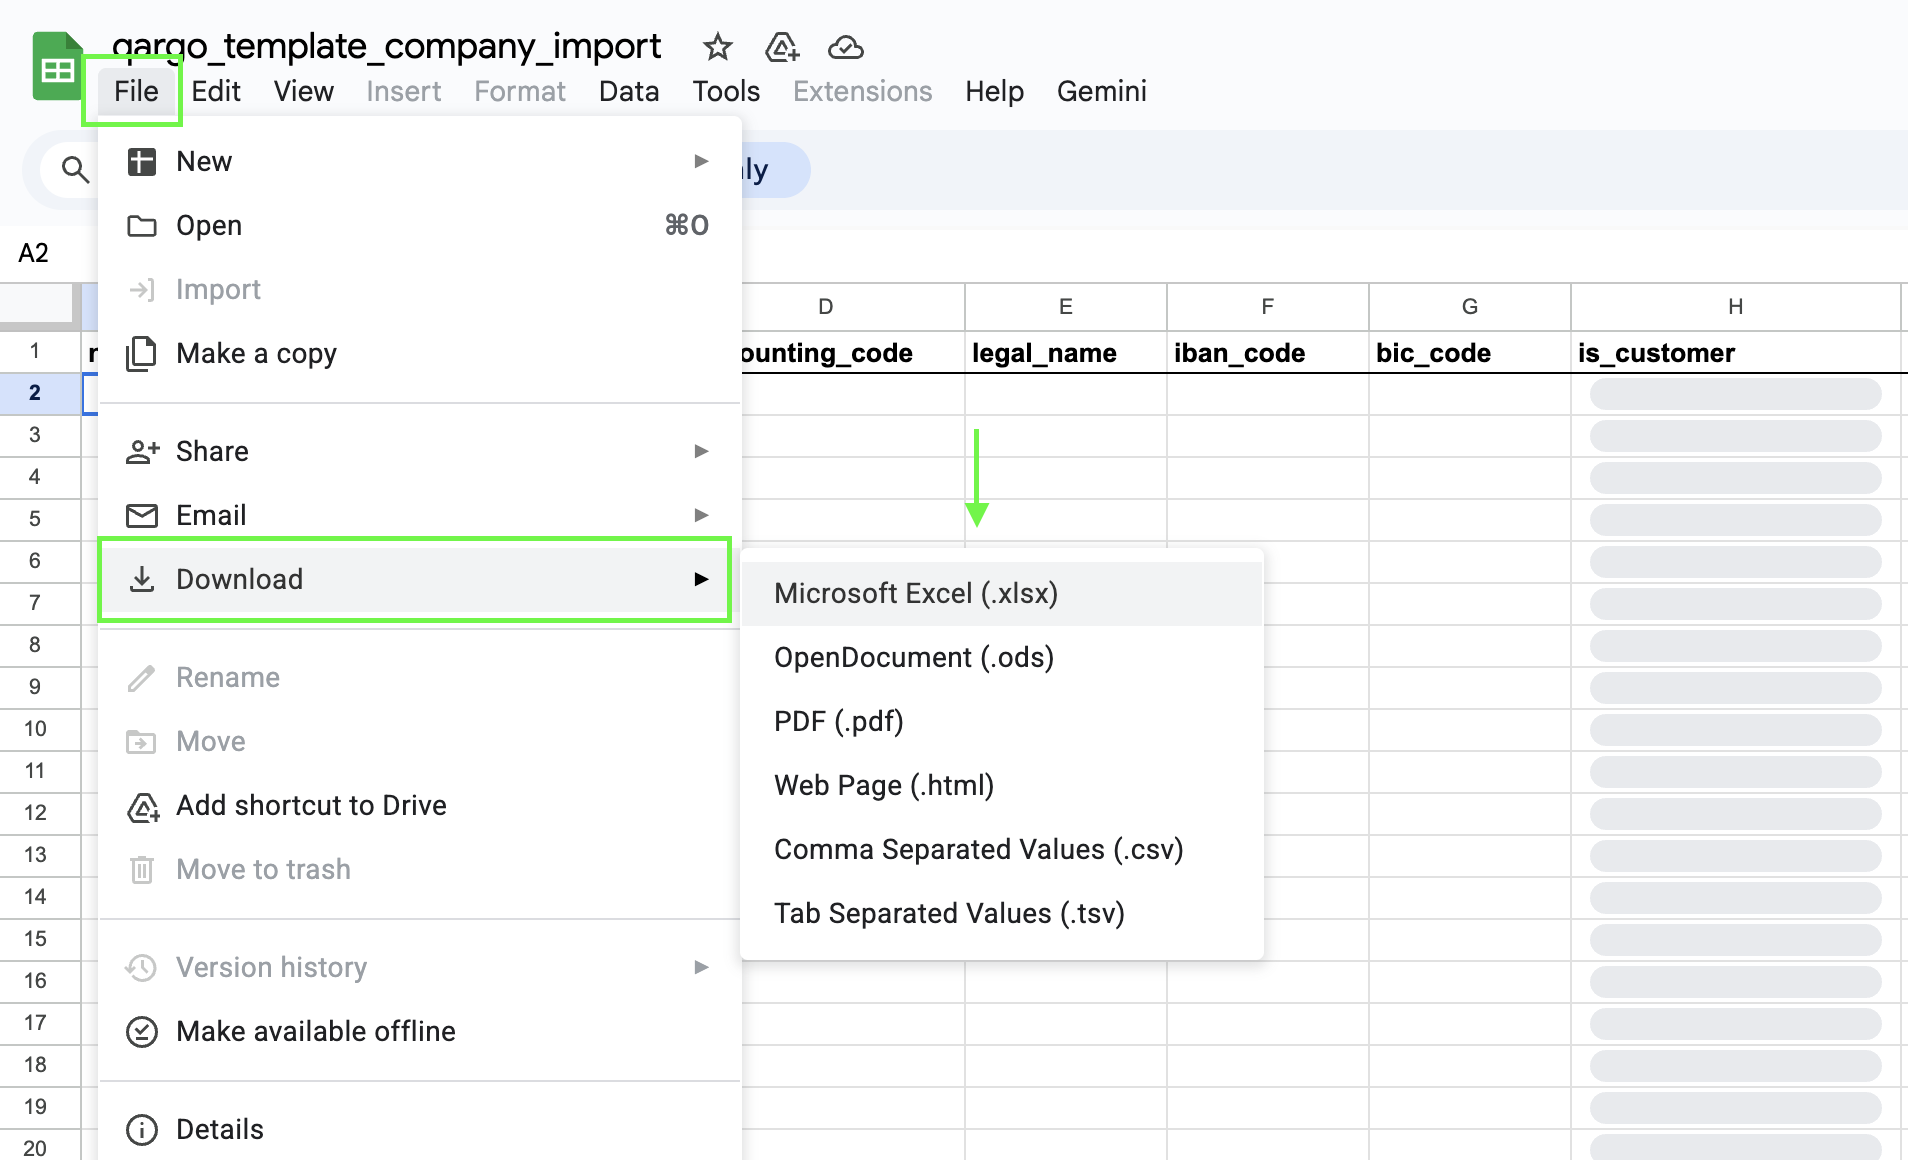
- Once the template opens, go to File and select Download
- Save the template (in .xlsx or .csv format) to a computer and begin entering the company data.
Step 2: Fill in the Excel template
Open the template and fill it in with the required data. The template contains column headers that correspond to the fields in Qargo.
- Required fields: Fill out all required fields (a complete list of required fields is in the next section of this article). An import fails if these fields are left blank.
- Formatting: Pay close attention to the specified data format (e.g., dates, numbers, text).
Step 3: Submit for upload
- During onboarding: Work directly with the onboarding manager to upload the initial business data. The onboarding manager provides guidance through the process and ensures a successful import.
- After onboarding: For all future data updates and imports, contact the account manager. The account manager assists with the upload process and provides ongoing support.
📝 Details of the company import template
The following table explains the Excel template for company import field by field. It includes data formats, required fields, and best practices for filling in each column.
| Column name | Required/optional | Remarks | Example |
|---|---|---|---|
| name | Required | Customer name to be used in the application | Qargo |
| vat_number | Optional | Customer’s tax number (no specific format is enforced) | BE1234567890 |
| accounting_code | Required | Unique ID | 134 |
| legal_name | Required | Legal customer name to put on official documents | Qargo Tech NV |
| iban_code | Optional | ||
| bic_code | Optional | ||
| is_customer | Required | If TRUE, will be created as a customer | TRUE or null |
| is_subcontractor | Required | If TRUE, will be created as a contract carrier | TRUE or null |
| archived | Optional | To import archived (no longer in use) customers | TRUE or null |
| customer_status | Optional | ||
| subcontractor_status | Optional | ||
| note | Optional | Extra text information about the customer. This usually contains useful information that does not belong to any of the other categories described here. | |
| website | Optional | Website of the customer | www.qargo.io |
| payment_term | Optional | To derive from the default customer payment_term | |
| subcontractor_payment_term | Optional | To derive from the default contract carrier payment_term | |
| currency | Optional | EUR | |
| tax_type | Optional | To derive from the default tax_type. By default, tax_type is selected automatically based on vat_number. | |
| locale | Optional | ||
| address | Required | Street + number + suite/box number, if any | Gaston Crommenlaan 4 |
| address_second_line | Optional | ||
| city | Required | Gent | |
| postal_code | Required | 9050 | |
| country | Required | The Country field requires a two-letter code (e.g., GB, not “UK”). See this list for Alpha-2 codes. | BE |
| state | Optional | ||
| factoring_code | Optional | ||
| contacts__name | Use contacts import instead | Use contacts import instead | Use contacts import instead |
| contacts__email | Use contacts import instead | Use contacts import instead | Use contacts import instead |
| contacts__phone | Use contacts import instead | Use contacts import instead | Use contacts import instead |
| extra_fields_billing_frequency | Optional | ||
| custom_fields__example | Optional | To import custom field values. Note: the format uses a double underscore (__) to connect the prefix custom_fields to the unique field ID |
|
| has_customer_portal_access | Optional | ||
| has_subcontractor_portal_access | Optional | ||
| extra_fields__credit_limit_invoiced | Optional |
🔎 Troubleshooting common company import errors
This section covers specific errors that may occur when importing company data.
- Missing or incorrect accounting codes: This is the most common cause of duplicate companies. The system relies only on the accounting code for updates. A missing or changed code results in a new record being created.
- Invalid data format: Make sure all fields follow the required format. For example, country codes must be valid and entered accurately. A descriptive list of the errors and their locations is added to the first column of the Excel sheet.
- Unusual characters: Unrecognized special characters in a company name or address can cause an import to fail. Review the data for any such characters.
- Customer/contract carrier classification: Each company must be classified as either a customer or a contract carrier by setting the corresponding column to “True”. A company can be both only if the Enforce separate subco/customer organization setting is disabled.
- Currency: Leave this field empty for tenants with a single currency. For multi-currency tenants, the field must contain a specific code (e.g., GBP, EUR) that matches the organization’s currency settings.
- Address fields: The Country field requires a two-letter code (e.g., GB, not “UK”). See this list for Alpha-2 codes.
- Sheet name: The sheet in the Excel template file must be named exactly ‘Import’. Any other name causes an error when the file is uploaded.
- Case-sensitive column headers: Column headers must be entered with the correct casing (e.g.,
vat_number, notVAT_number). Incorrect casing causes the data in that column to be silently ignored and not imported, because the system does not recognize the header. - Leading apostrophe errors: Data in a cell cannot begin with an apostrophe (’). If an apostrophe is used, the system does not recognize the value, and an error may occur. This rule is waived only if the article explicitly states that an apostrophe should be used for a specific field.
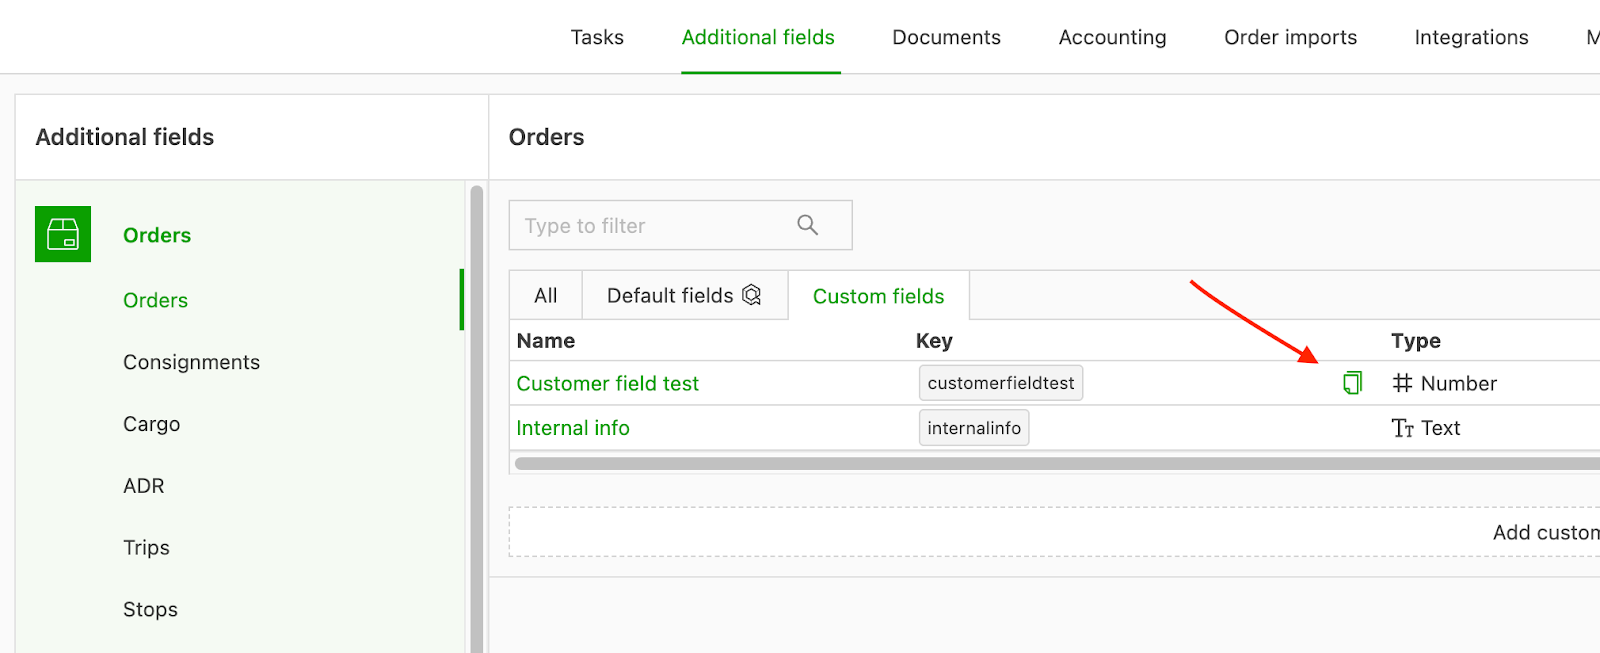
- Custom fields: The column name must follow the convention custom_field__[ID] (keep the double underscore that connects the prefix custom_field to the unique field ID). Retrieve the specific ID from the Qargo organization settings. Click the copy button next to the custom field to copy its ID:
✨ Best practices for importing companies
Consider the following best practices to ensure a smooth and accurate import.
- Clean the data: Before starting the import process, review the source data for accuracy and consistency. This includes checking for duplicate records or inconsistencies in company names.
- Start with a small batch: Test the import process with a small sample of 5–10 companies first. This makes it possible to verify that the data is formatted correctly before uploading a full database.
- Always use a new template: For each import, always use a blank template downloaded directly from the Qargo platform. Reusing an old template may lead to import errors.
➡️ What to do next
Once companies have been imported successfully, the foundation for further data population is in place. The next logical steps include:
- Importing contacts: Contacts can now be imported and correctly linked to the corresponding companies.
- Importing contract carrier resources: If required, the drivers and vehicles for contract carriers can now be imported and associated with the company records that have been created.
📈 Use cases for company import
Company import is a valuable tool for several key business processes:
- Initial tenant setup: The primary use case is importing an organization’s entire customer and contract carrier database during the initial setup of a Qargo tenant. This ensures a swift transition.
- Accounting system migration: When migrating from one accounting system to another, a clean, complete database of companies can be imported to ensure consistency and prevent data duplication.
- Adding a new division: When a new business unit or division is introduced, its associated customers and suppliers can be imported in a single action to populate the Qargo system with the new data.